AWS Security Blog
How to scale your authorization needs by using attribute-based access control with S3
August 31, 2021: AWS KMS is replacing the term customer master key (CMK) with AWS KMS key and KMS key. The concept has not changed. To prevent breaking changes, AWS KMS is keeping some variations of this term. More info.
May 26, 2021: In the section “Secure your tags using an AWS Organizations service control policy,” we’ve fixed an error in the policy.
In this blog post, we show you how to scale your Amazon Simple Storage Service (Amazon S3) authorization strategy as an alternative to using path based authorization. You are going to combine attribute-based access control (ABAC) using AWS Identity and Access Management (IAM) with a standard Active Directory Federation Services (AD FS) connected to Microsoft Active Directory. You should understand the concept of IAM roles and that you can use tags to add additional properties to your IAM roles and to your objects on Amazon S3. By the end of this blog post you will understand how to use tags to extend authorization into the domain of ABAC.
With ABAC in conjunction with Amazon S3 policies, you can authorize users to read objects based on one or more tags that are applied to S3 objects and to the IAM role session of your users based on attributes in Active Directory. This allows for fine-grained access control beyond regular role-based access control (RBAC) in scenarios such as a data lake, where ingestion and writing of the data is separated from users accessing the data. The benefits of ABAC in this solution are that you need to provision fewer IAM roles and that your S3 objects can have different prefixes without the need to explicitly add all those prefixes to your IAM permissions policies like you would with RBAC. The solution in this blog post can be combined with RBAC if you already have roles defined that require access based on the prefix of your S3 objects.
You will learn how to write reusable authorization policies in IAM, how to configure your AD FS and Active Directory setup to apply tags to your IAM role sessions, and how to secure tags on IAM roles and S3 objects. The solution in this post consists of Active Directory and AD FS hosted on Amazon Elastic Compute Cloud (Amazon EC2) instances, but the same steps apply if you host them in any other environment. If you use another Security Assertion Markup Language 2.0 (SAML) compatible identity provider (IdP) for access to Amazon Web Services (AWS), ask the vendor of your IdP if they support using custom SAML claims and how to configure them. The solution in this blog post supports server-side encryption with either Amazon S3-managed keys (SSE-S3) or a customer master key (CMK) stored in AWS Key Management Service (AWS KMS). AWS KMS doesn’t support the use of tags for authorization so when you use CMKs, the IAM role must have permissions to use the specified CMK in the key policy.
Architecture overview
This blog post shows you the steps to establish the workflow to securely access your data based on tags. It doesn’t show you the extract, transform, load (ETL) framework, as this is often customer and solution specific.
To establish the solution—excluding the ETL framework—you attach tags to both the IAM principal—the role session—and the S3 objects in a single S3 bucket. You use IAM policy language to match the tags between the IAM principal and the S3 objects to determine if a user is authorized to access the S3 object that is part of that particular request. We also show you how to secure your tags to help prevent unauthorized changes to your data and the tags.
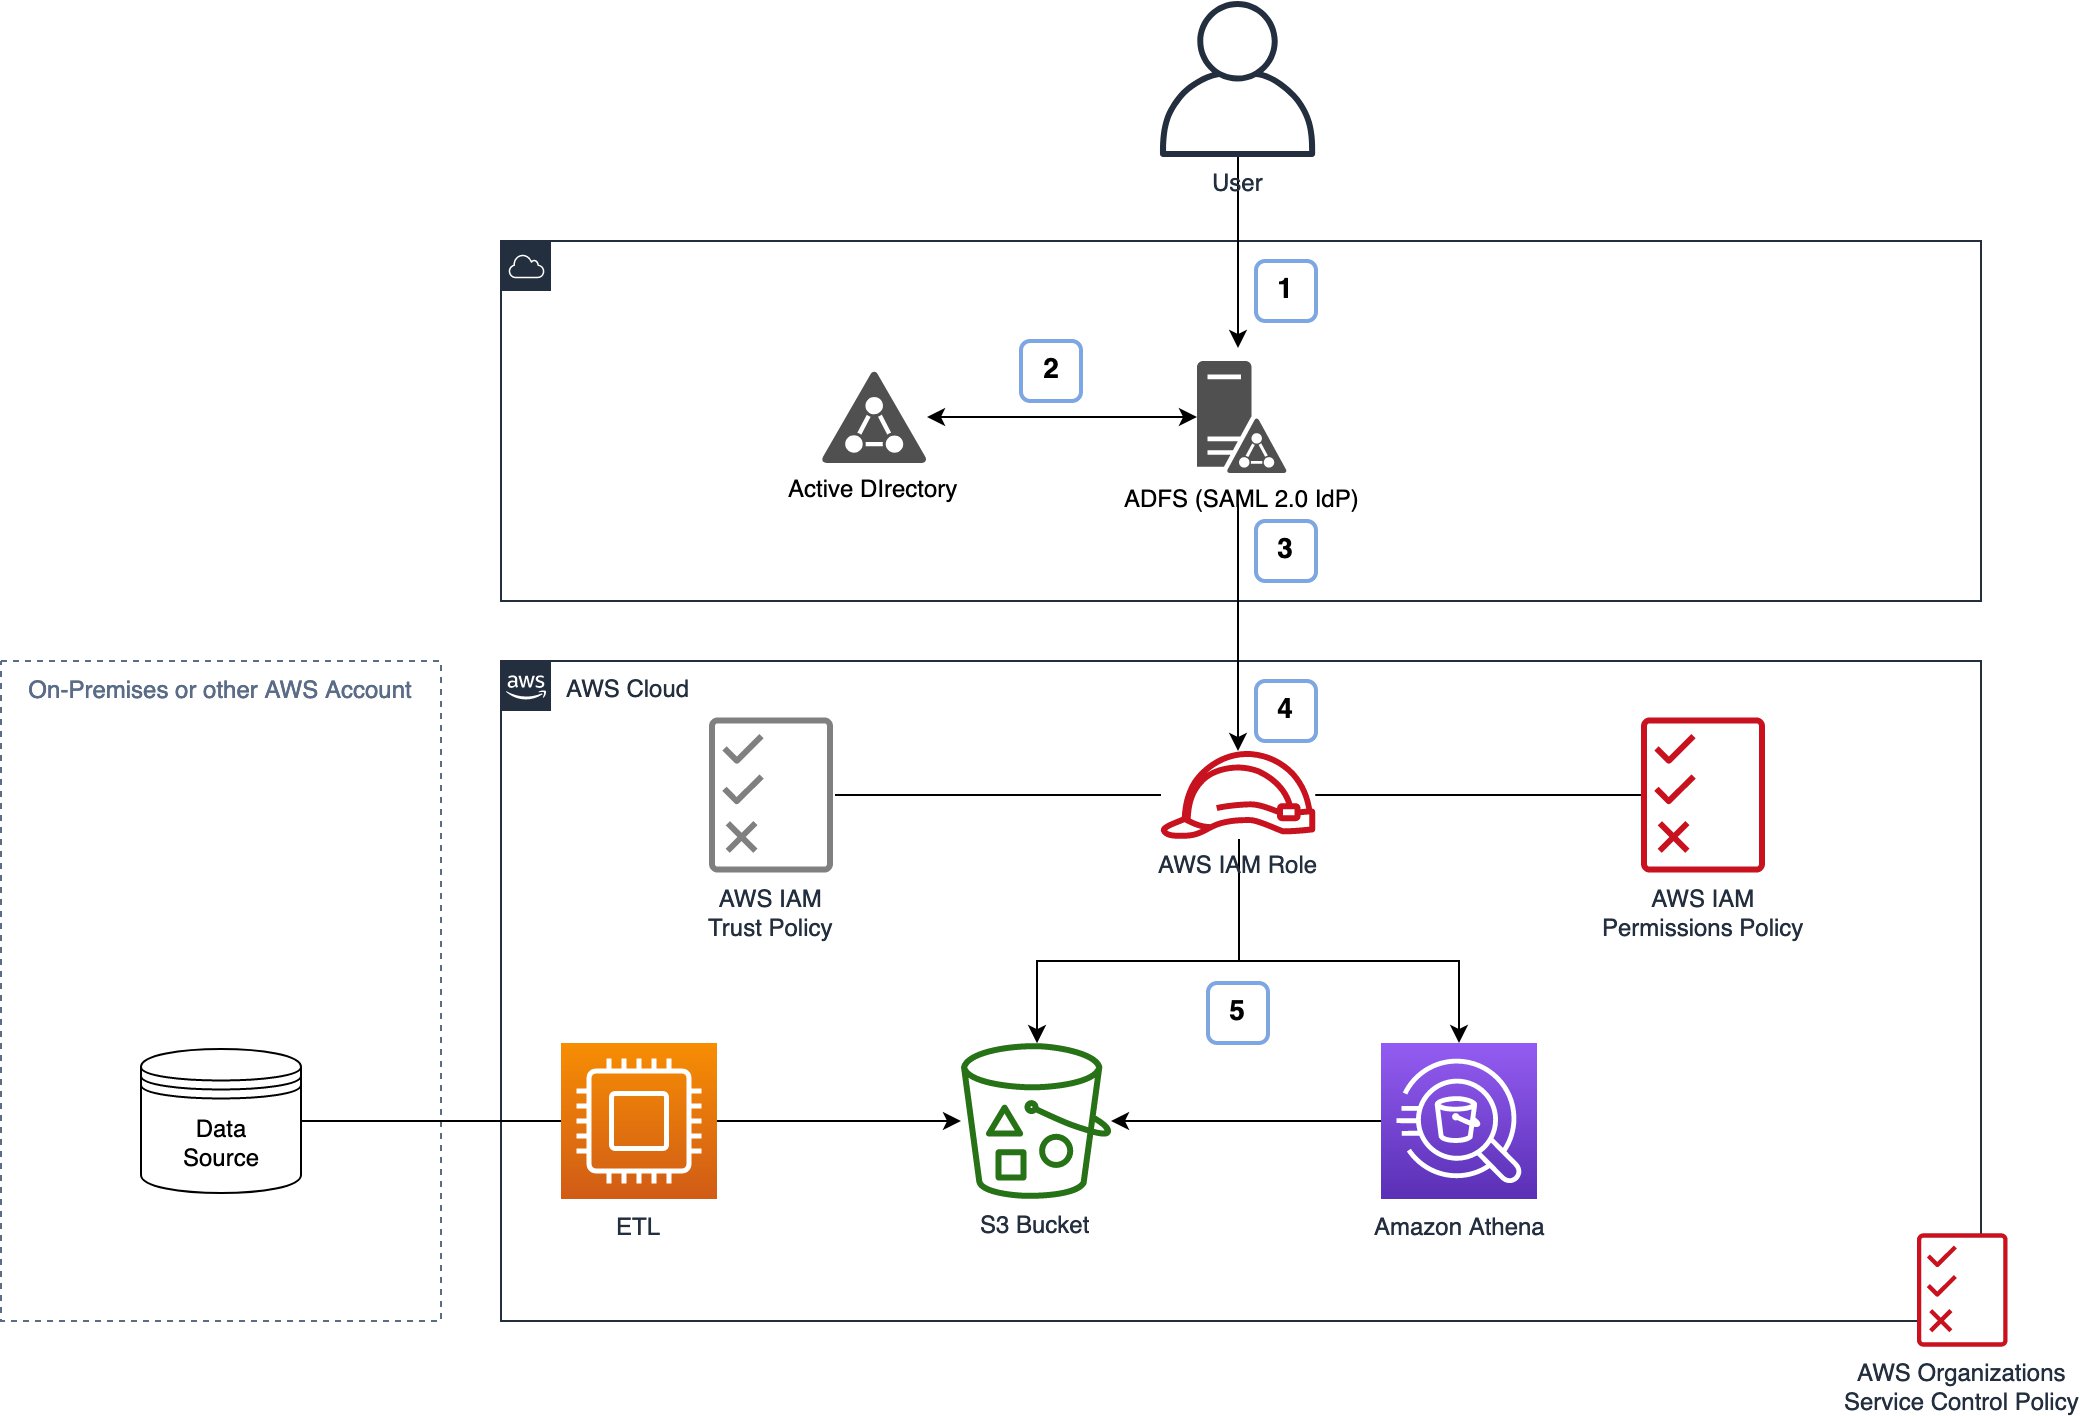
Figure 1: Architecture overview
In Figure 1 there are two major workflows defined:
- In the first workflow the users are querying data on Amazon S3, and here we show the authentication workflow they will follow.
- In the second workflow, your data ingest workflow processes data via ETL jobs into Amazon S3.
After you have configured everything, the user authentication will follow the first workflow illustrated in Figure 1:
- User authenticates to your IdP—AD FS in this case.
- The IdP queries the identity store—Active Directory in this case—to retrieve the tag values for the authenticated user.
- The identity store supplies the tag values to AWS—together with other information—in a SAML token.
- IAM checks the trust policy to determine if the IdP is allowed to federate the user into the specified role.
- Users can access the data directly or through another supported service using the credentials and in accordance with the permissions granted.
Prerequisites
Before you get started, you must have the following components available:
- An AWS account for your workload.
- Microsoft Active Directory and AD FS. The AWS Federated Authentication with Active Directory Federation Services (AD FS) blog post describes how to set this up.
- Administrative access to the accounts being used and your AWS Organizations management account to be able to apply a service control policy.
- Administrative access to your Active Directory and AD FS.
- An empty Amazon S3 bucket in the account of your workload. The solution presented here uses a bucket called aws-blogpost-datalake-tbac.
- A data source that you can ingest into Amazon S3 or some sample data already in Amazon S3. To follow along with the example in Query your data with Athena, create a data set in .CSV format. Your table should at least have two fields, of which one should be named dept. The other fields are for you to decide. Name your table hr_dept.csv, upload it so your S3 bucket, and apply a tag with the key department and value HR.
Tags and LDAP attributes
Start by defining the tags you want to base your authorization on. Most customers ask for guidance from AWS, but the right tags for your use case depend on your business requirements. You should define tags for your use case by working backwards from the consumers of your data lake to determine what tags and other technical capabilities you need. After you’ve defined the tags, you can apply them and define the policies. This blog post uses two tags: EmployeeType and Department.
For the tags in this blog post, you use the Active Directory LDAP attributes Department and Employee-Type. These attributes are already present in the default schema for Active Directory. If your needs aren’t covered by LDAP attributes that are available by default, you can extend your schema to add your own attributes. You attach these LDAP attributes as session tags to the role you set up. This way, one role can have different tag values applied to the role session depending on who assumes the role. The attributes are read from Active Directory and attached to the session of the user when they assume that role.
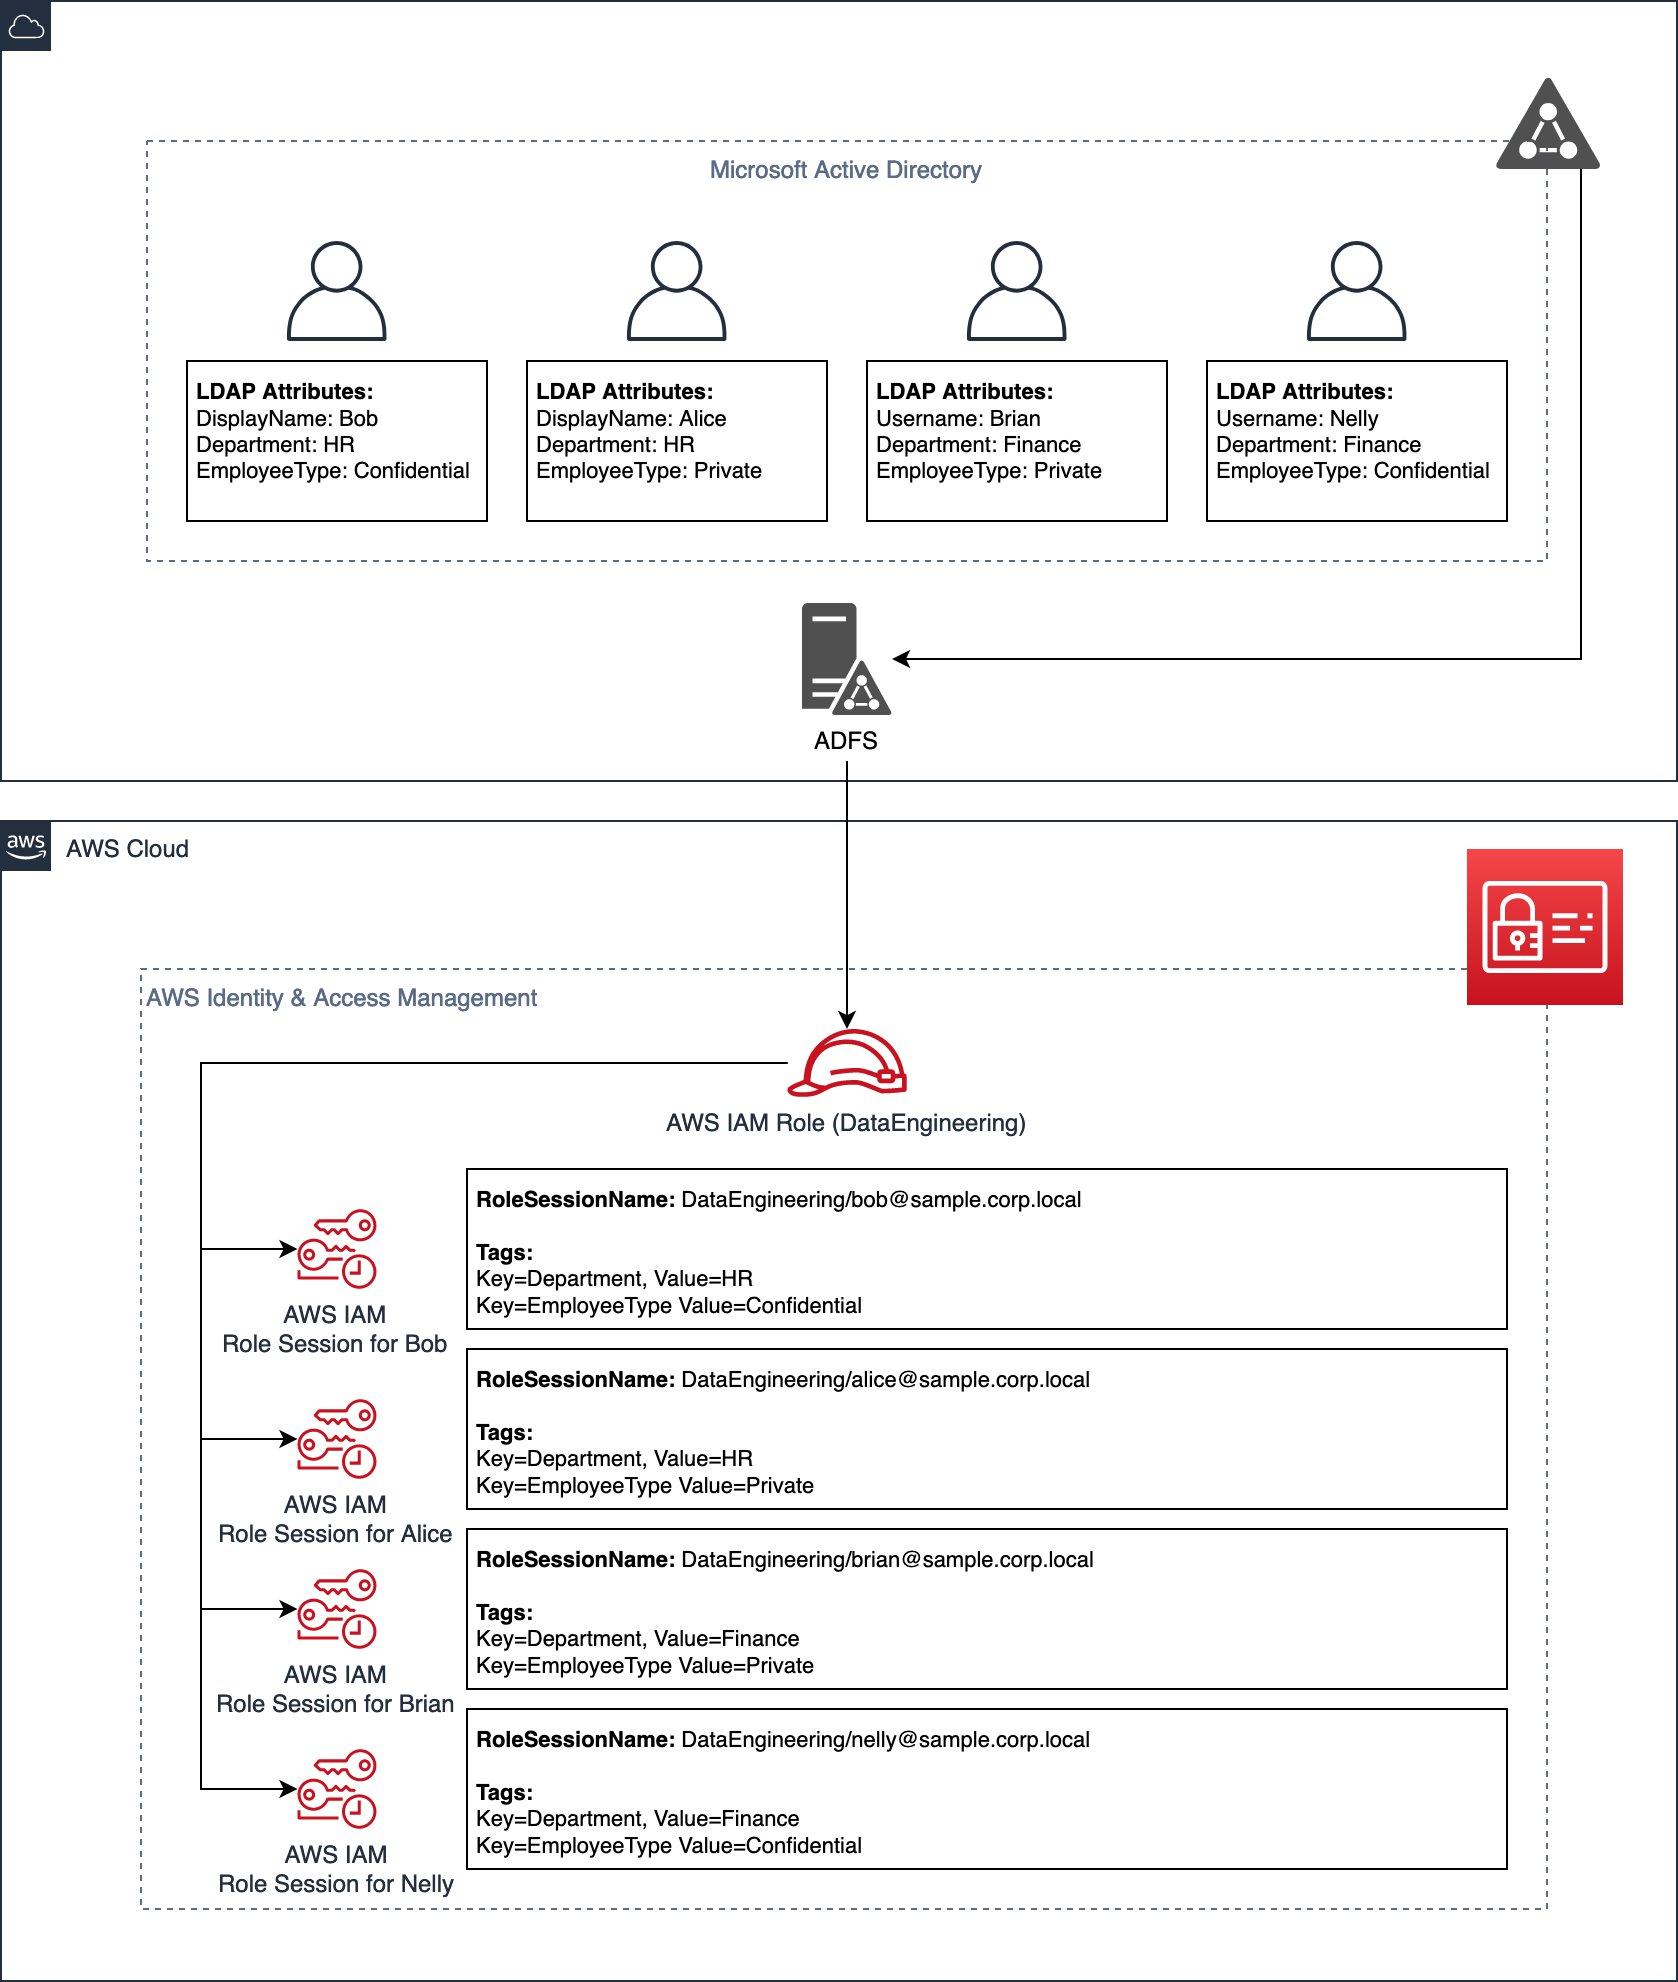
Figure 2: LDAP attributes and tags
For this blog post, you are going to configure four different users, each with their own Active Directory user account as outlined in Figure 2. Feel free to use existing users if you do not want to create new users. Two of them are from the HR department, and the other two from Finance. Within each department, there is one user of the employee type confidential and the other of the type private. That corresponds to the data classification scheme of the example organization, which uses public, private, and confidential. The diagram in Figure 2 shows how these user attributes are mapped to AWS.
As you can see in Figure 2, there is only a single IAM role deployed in AWS (DataEngineering), but the assigned session tags are unique to each user assuming the role. This works the same as RoleSessionName in a regular federated setup. To achieve this, you must determine what LDAP attributes you need to map to which tags in IAM. To add LDAP attributes to your AD FS configuration, you take the following steps:
Define SAML claims in AD FS
As mentioned in the prerequisites section, you should have AD FS already set up with the minimum set of claims and claim rules necessary to establish federation to your AWS account. In this step you will add an extra claim rule to include the session tags in the SAML token when assuming the AWS IAM role.
To open the AD FS new claim rule window
- Open the AD FS administration tool on the EC2 instance that AD FS is installed on.
- Choose the Relying Party for AWS in the AD FS administration tool.
- To open the current claim issuance policy, choose Edit Claim Issuance Policy.
- To add a new claim rule, choose Add Rule.
- Select Send LDAP Attributes as Claims in the claim rule template list.
Now that you’ve opened the AD FS administration tool and have arrived at the screen to define a new claim rule, it’s time to enter the settings as shown in Figure 3.
To define the new claim rule in AD FS
- For Claim rule name, enter SessionTags.
- For Attribute store, select Active Directory.
- Add two rows to the Mapping of LDAP attributes to outgoing claim types table.
Values for row one of your new claim rule
- For LDAP Attribute, enter Employee-Type.
- For Outgoing Claim Type, enter the following:
https://aws.amazon.com/SAML/Attributes/PrincipalTag:EmployeeType
Values for row two of your new claim rule
- For LDAP Attribute, enter Department.
- For Outgoing Claim Type, enter the following:
https://aws.amazon.com/SAML/Attributes/PrincipalTag:Department
To save your new claim rule
- Choose OK and Apply.
- Close the AD FS administration tool. Your new claim rule is effective immediately. You don’t need to restart AD FS.
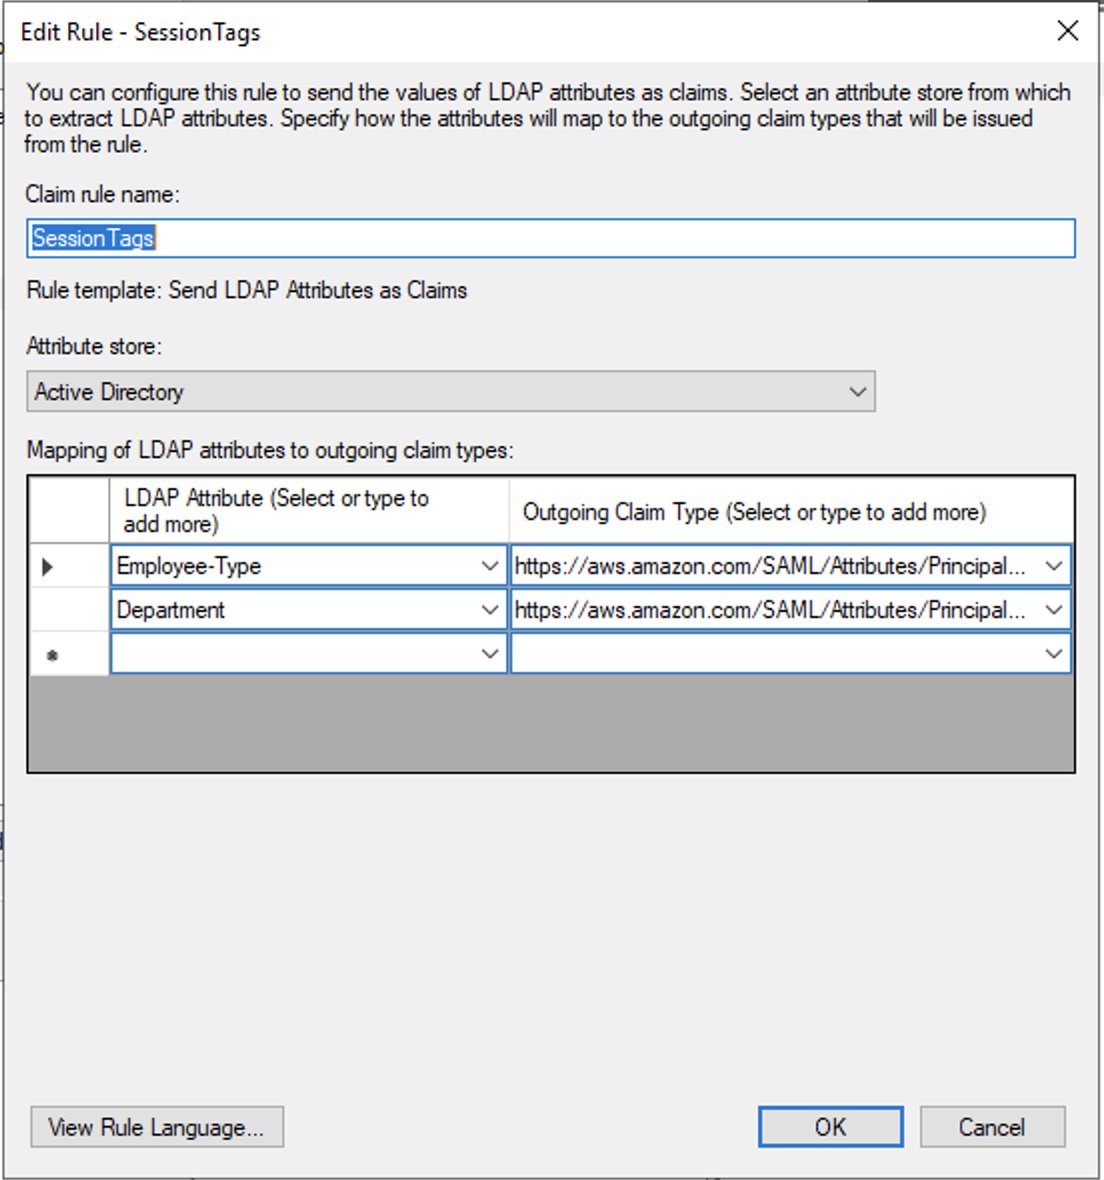
Figure 3: Add new claim rule
Combine tags for authorization decisions
Before you move on to the next steps, it’s important to understand how these tags work together. In the example, users that have the tag EmployeeType:Confidential are allowed to access objects with all three classifications—public, private, and confidential. Users with the tag EmployeeType:Private can only access data that is classified and tagged as public and private, but not confidential. You build this logic in the permissions policy in the next step.
Data ingestion and object tagging
It’s important to understand that for tag-based ABAC to be effective, your objects must be tagged accordingly. What we have seen work for customers is to ensure that their ETL framework that is responsible for ingesting data into Amazon S3 tags the objects on ingestion.
This solution describes fine-grained control that relies on S3 object tags. These tags are different than tags applied to S3 buckets. The benefit is that within a bucket—or a collection of buckets—you don’t have to specify the prefix of objects to authorize users, which greatly increases your potential scale. Instead of having to add hundreds of prefixes to a permissions policy, you can achieve the same result with a few lines of policy language.
Because the solution described requires tags on every object, you must apply these tags to each object individually. If you don’t need fine-grained access within your buckets but still want to use tags, you can use an AWS Lambda function triggered by an Amazon S3 data event when new objects are created to automatically apply your bucket tags to the object.
IAM permissions
The next step is to set up the IAM role with the correct permissions for accessing your objects on Amazon S3. To authorize users to Amazon S3, you can use either an IAM policy or an S3 bucket policy, as long as the IAM role and the S3 bucket are in the same AWS account.
Note: In this blog post, you use a single AWS account, but a cross-account configuration allows you to increase your scale even further in some scenarios. You don’t need to explicitly deny actions in the bucket policy because a user must be authorized in both the IAM policy and the S3 bucket policy in a cross-account scenario. However, this will increase the complexity of your environment.
You use the IAM policy to set up the basic allow statements, and the S3 bucket policy with three deny statements to set boundaries. This avoids duplication of policy language and helps enforce security centrally. Putting the deny statements in the S3 bucket policy prevents anyone from creating an IAM role with permissions that don’t respect these deny statements—an explicit deny cannot be overruled by an allow statement.
Note: For a complete overview of authorization to Amazon S3 see IAM Policies and Bucket Policies and ACLs! Oh, My! (Controlling Access to S3 Resources).
Create the IAM role
The first step is to create the IAM role. See Creating a role for SAML 2.0 federation (console) for a detailed description for creating a role for use with your SAML provider. When creating an IAM role, there are two policies attached to a role—an IAM permissions policy and a trust policy. The trust policy determines who can assume this role—in this case your SAML 2.0 IdP—and what can be done with the role—such as add session tags and federate a user into this role. The IAM permissions policy describes the permissions users that have assumed this role receive.
To create an IAM role with a custom IAM policy
- Follow the procedure for Creating a role for SAML through step 8.
- After Step 8, choose Create policy to create a policy.
- Select JSON and replace the empty policy with the following IAM policy:
- Choose Review policy.
- Enter DataEngineeringABACPolicy as the Name for your policy.
- Choose Create policy to finish the creation of your new policy.
- Return to the procedure Creating a role for SAML and continue with Step 9. Choose the Refresh button in the top right corner and then select your new policy—named DataEngineeringABACPolicy.
- When asked for a name for your new role, enter DataEngineering.
The permissions policy allows access only to data that has the same tag value for Department as that of the user assuming the role. The conditions map the tags applied to the role session of the individual users to the tags applied to objects in your S3 bucket.
Apply the trust policy to the IAM role
The next step is to change the trust policy associated with your newly created IAM role. This is important to ensure the IdP is able to apply the necessary tags to your IAM role sessions.
To apply the trust policy
- Sign in to the AWS Management Console and open the IAM console.
- In the navigation pane of the IAM console, choose Roles and select your newly created role named DataEngineering.
- Choose Trust relationship and then choose Edit trust relationship.
- Replace the current trust policy under Policy Document with the following policy:
- Choose Update Trust Policy to complete changing the trust policy of your IAM role.
If you have experience creating roles for a SAML IdP, the first statement in the preceding IAM role trust policy should look familiar. It allows the IdP that is set up in your AWS account to federate users into this role with the action sts:AssumeRoleWithSAML. There’s an added condition to make sure your IdP is only able to federate users into this role when the Department and EmployeeType tags are set. The second statement allows the IdP to add session tags to role sessions with the action sts:TagSession. Also, you’ve defined two conditions: The first condition does the same as the condition specified on your first statement—it prevents federating users in if those two tags aren’t applied. The second condition adds another restriction that makes sure that the tag values for EmployeeType can only be one of those three—public, private, or confidential. This is especially useful for tags where you have a predefined list of tag values.
Define the S3 bucket policy
As you might have noticed, there aren’t any conditions for the data classification that should be applied using the LDAP attribute and tag named EmployeeType. The authorization logic for the S3 bucket using the EmployeeType tag is a bit more complicated—see the earlier statement about how authorization is based on data classification— so you use the S3 bucket policy with deny statements so that access is explicitly denied if a user doesn’t have the appropriate tag applied.
To apply a bucket policy to your S3 bucket
- Sign in to the console and open the Amazon S3 console.
- From the list of S3 buckets shown in the console, select the S3 bucket that you are using for this blog post.
- On the navigation bar, select Permissions.
- Choose Edit next to Bucket Policy.
- Replace the current S3 bucket policy under Policy with the following policy:
- Choose Save Changes to apply your new bucket policy.
The S3 bucket policy you applied includes a statement that denies tagging of S3 objects for your two tags by any principal other than your ETL framework. The statement also denies access for the different data classifications based on the values of the object tag and the principal tags—which are your role session tags. The bucket policy also includes a statement that will deny access to data if the object doesn’t have the tag EmployeeType attached to it. Feel free to change this according to your needs. The benefit of having these explicit deny statements in the S3 bucket policy is that no IAM policy can overwrite these deny statements with an allow statement. You also need these deny statements to support the data classification feature, as the policy language required for the data classification feature isn’t enforced in your IAM permissions policy.
Secure your tags using an AWS Organizations service control policy
Because you are relying on tags for authorization to data, you want to limit who is able to tag data on Amazon S3 and your IAM principals. You already used an S3 bucket policy to prevent any principal other than your ETL framework from applying tags. The following service control policy (SCP) prevents the modification of the bucket policy. The SCP also prevents setting tags on AWS IAM principals as these will be applied on a per-session basis. To achieve this, you apply an SCP to the AWS account that contains your ETL framework and the S3 bucket with your data. If your ETL framework runs in a separate AWS account, you must also apply the policy to that account. This needs to be done in the management account of your organization.
To create and attach an SCP
- Follow the procedure for Creating an SCP through step 4.
- Replace the current service control policy as shown under Policy with the following policy:
- Finish creating the policy by choosing Create policy.
- To attach the SCP to your AWS account, follow the procedure for Attaching an SCP.
Looking at the preceding SCP, you can see that you are denying tagging of IAM users and roles except for an IAM role called admin-role. You haven’t used any IAM users in the example solution, but still want to prevent anybody from creating a user and gaining access to your data. The last statement is to prevent principals from modifying the S3 bucket policy that contains statements to protect your tags. Only the role admin-role is allowed to delete or update S3 bucket policies in the account this SCP is attached to.
Note: If you use your ETL framework to create your S3 buckets automatically, you must replace the role ARN in the above policy with the role ARN of your ETL framework role.
Query your data with Athena
Amazon Athena is an AWS managed service that allows you to query your data on Amazon S3 using standard SQL language. To demonstrate that Athena also works in combination with tags, let’s look at how to query your tagged data. What is important to note, is that Athena can only run a query if all the data objects belonging to the same dataset or data table are available. This is why it is important that when querying data stored on Amazon S3, the same tags are applied to all the objects belonging to a common dataset. Before continuing, you must have already uploaded a data set into Amazon S3 as mentioned in the prerequisites, and used AWS Glue to populate an AWS Glue Data Catalog. Athena and AWS Glue support multiple file formats, including CSV, JSON, Parquet and ORC. In order to use this example, the data set you have uploaded must have a field named department to use to query the table.
To query the data on Amazon S3 using Athena
- Sign in to the console using AD FS as one of the HR employees defined previously in Tags and LDAP attributes and open the Athena console.
- Query the hr_dept table on Amazon S3 as described in Running SQL Queries Using Amazon Athena. The query should return results similar to those shown in Figure 4.
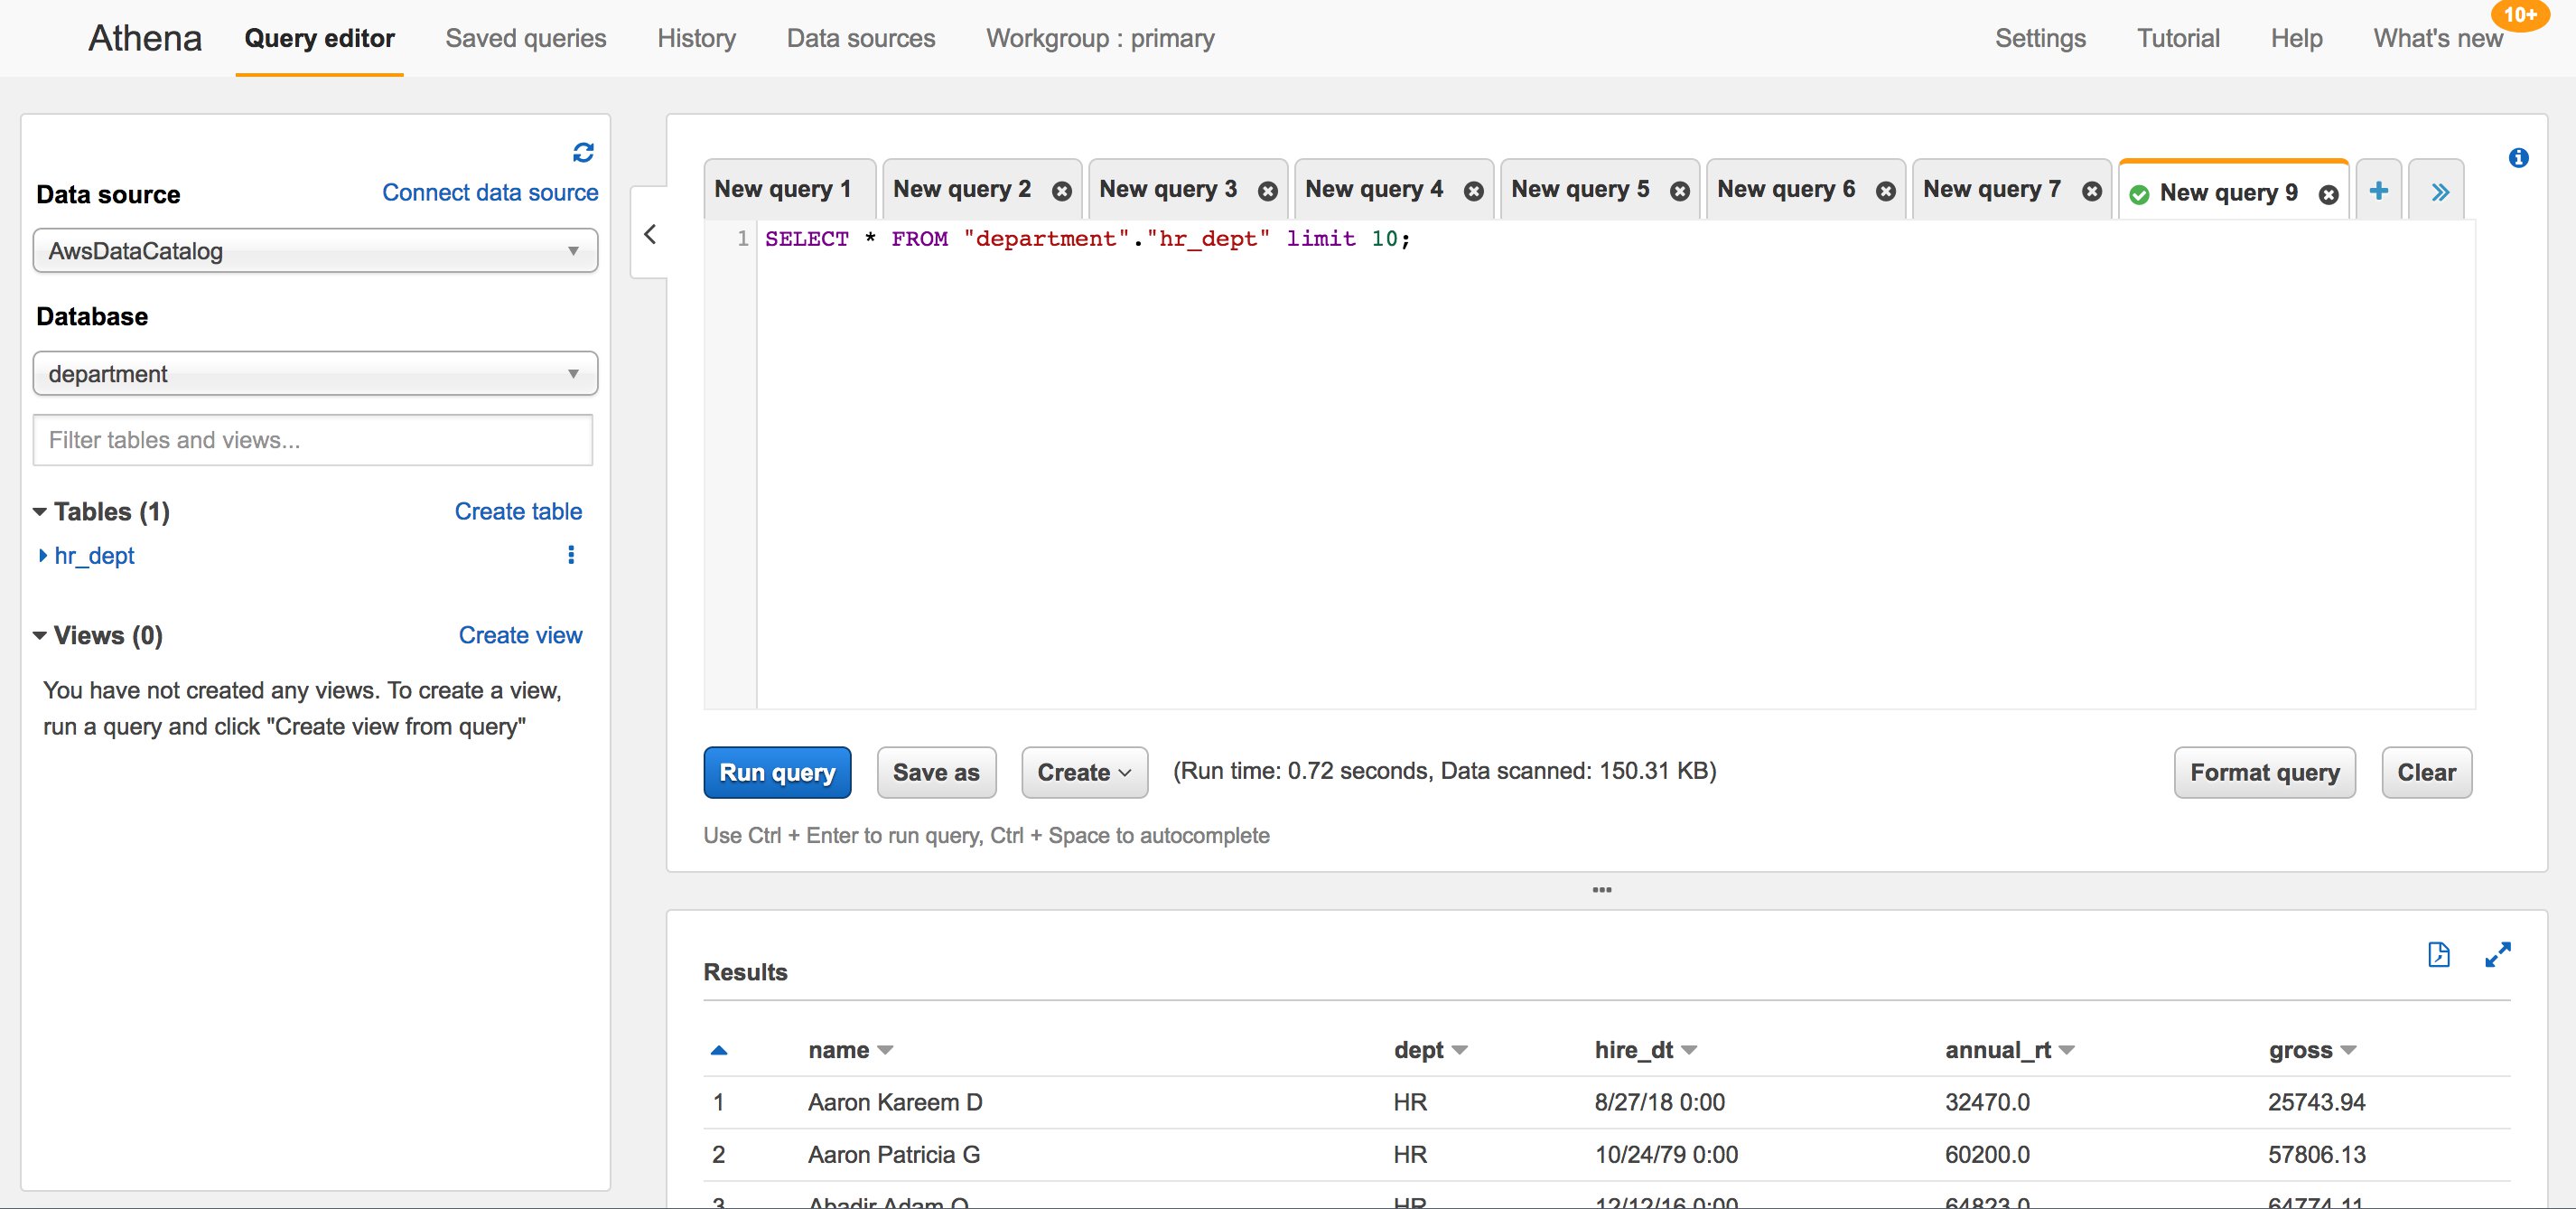
Figure 4: Successful Amazon Athena query
If you are querying a table with an object tag that you don’t have permissions to, then the query returns an access denied message as shown in Figure 5. In this example, the failure is because the role used has the tag Department:Finance instead of Department:HR.
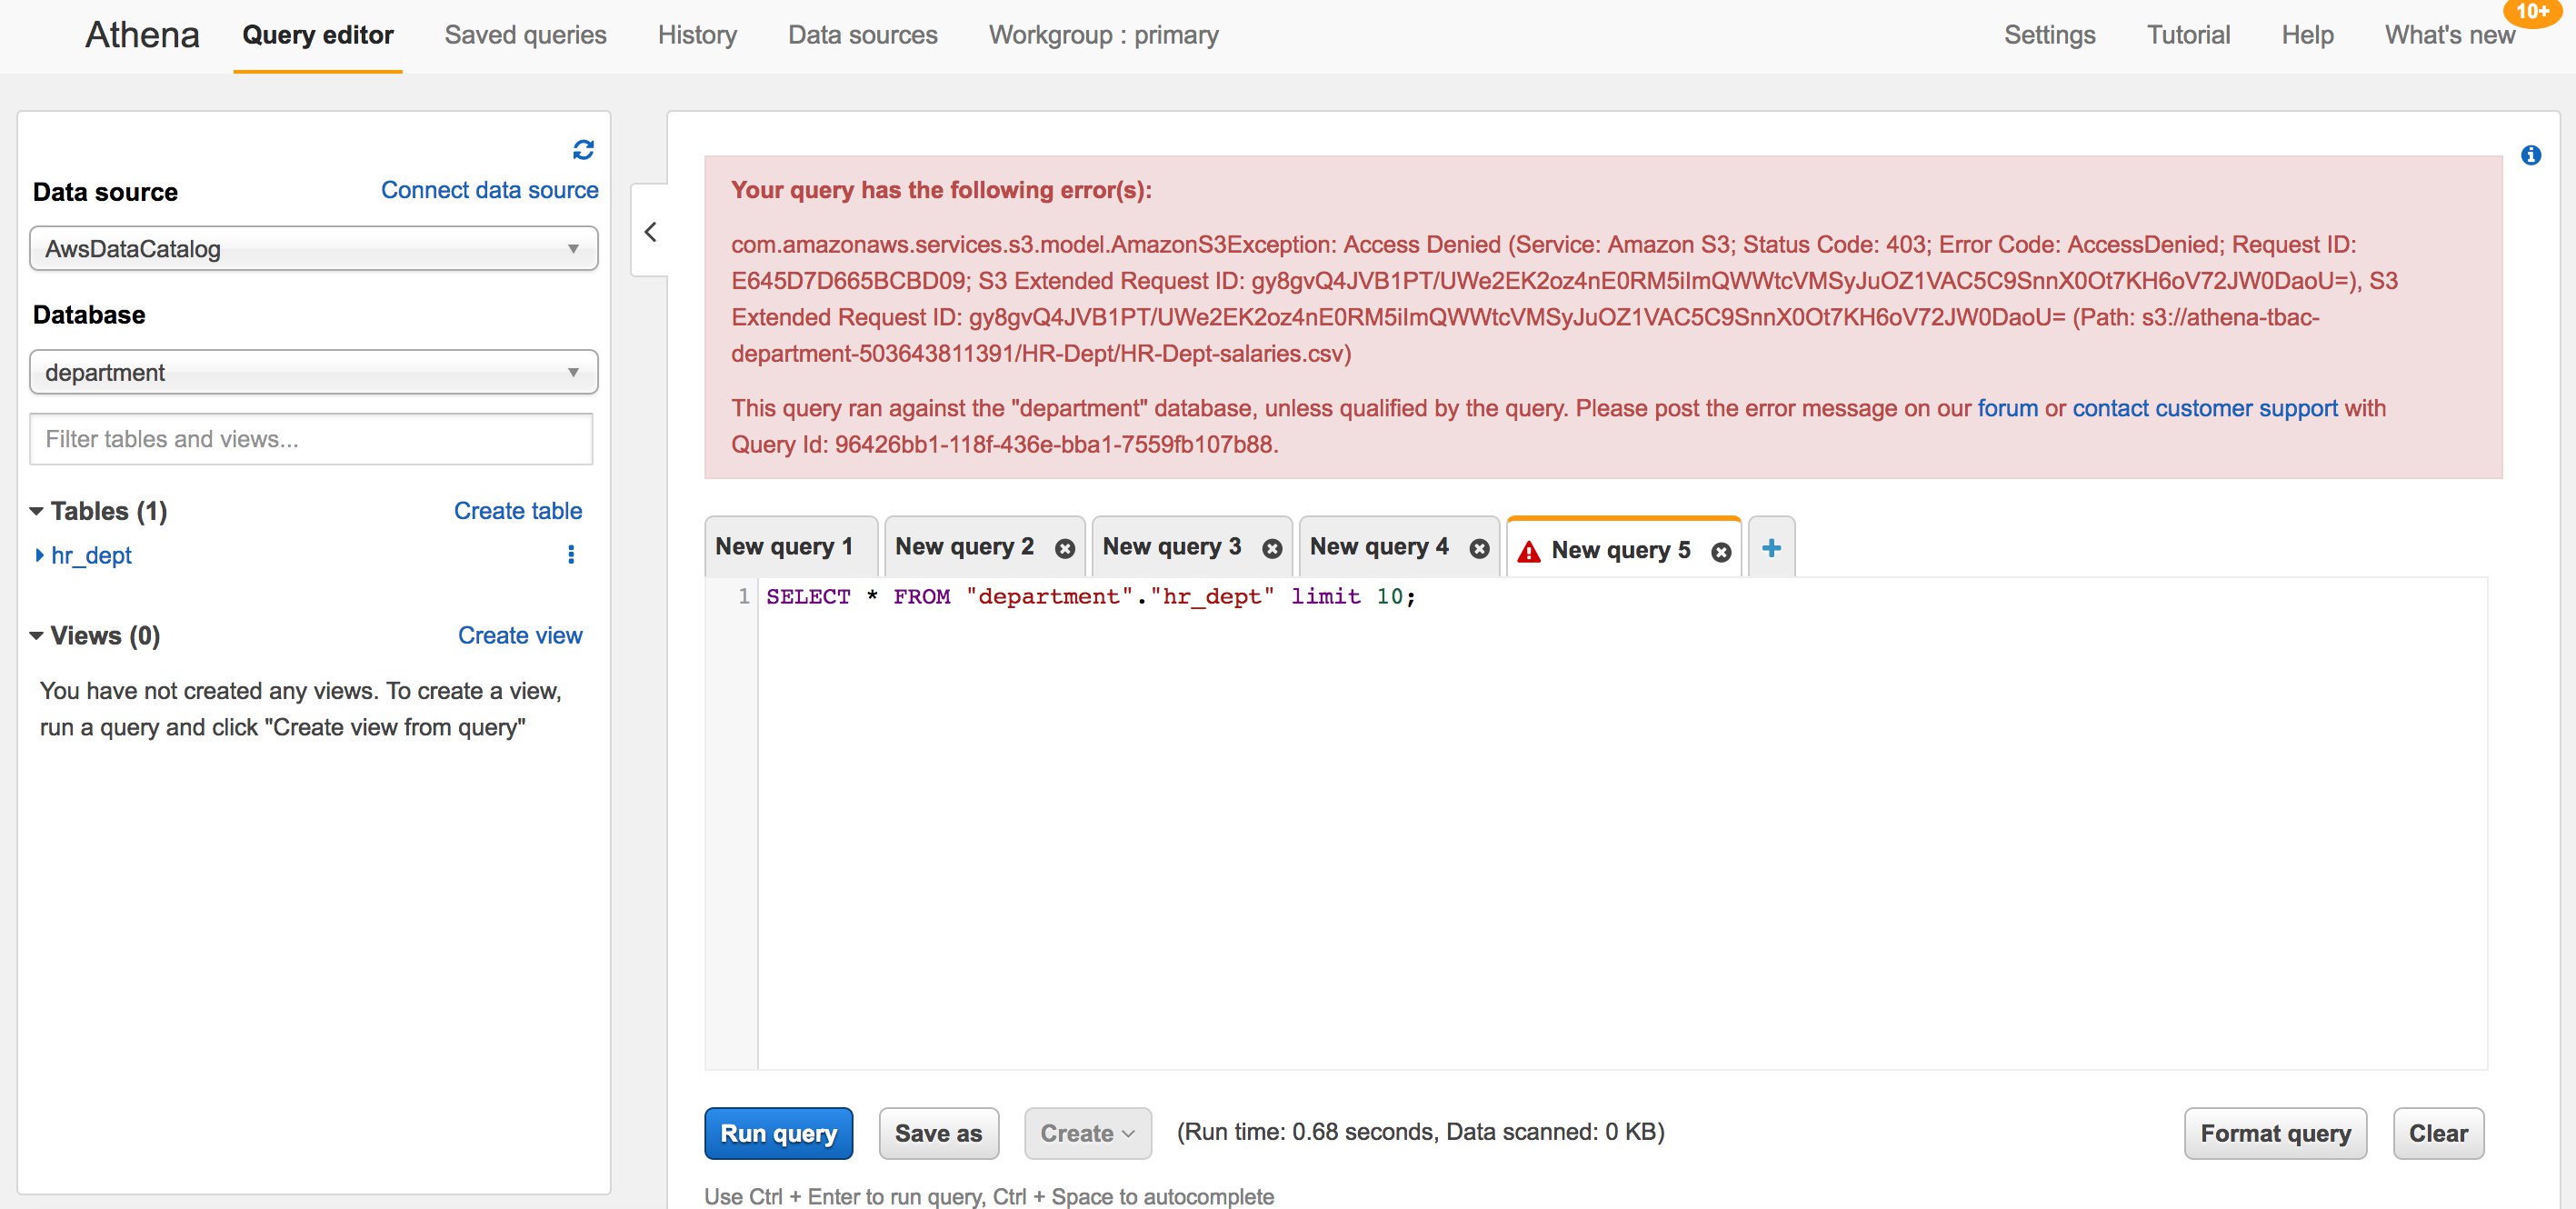
Figure 5: Failed Amazon Athena query
Wrap-up and troubleshooting
If you run into any issues, you can use AWS CloudTrail to troubleshoot. To verify if the tags are applied correctly to your role sessions, CloudTrail can show you which tags are applied to the role session.
In this blog post, you’ve seen how to use session tags in combination with your Active Directory to scale your authorization needs beyond RBAC. You’ve also learned the steps you can take to protect tags and tagging permissions to prevent escalation of permissions within your AWS account. It is important to understand how tags work together and to engage your business stakeholders to understand what tags are important for authorization purposes in your environment. Tags should always reflect your data access requirements, so make sure you edit the policies in this post to reflect your tags and roles.
If you have feedback about this post, submit comments in the Comments section below.
Want more AWS Security how-to content, news, and feature announcements? Follow us on Twitter.