AWS Security Blog
How to use KMS and IAM to enable independent security controls for encrypted data in S3
August 31, 2021:AWS KMS is replacing the term customer master key (CMK) with AWS KMS key and KMS key. The concept has not changed. To prevent breaking changes, AWS KMS is keeping some variations of this term. More info.
Typically, when you protect data in Amazon Simple Storage Service (Amazon S3), you use a combination of Identity and Access Management (IAM) policies and S3 bucket policies to control access, and you use the AWS Key Management Service (AWS KMS) to encrypt the data. This approach is well-understood, documented, and widely implemented. However, many customers want to extend the value of encryption beyond basic protection against unauthorized access to the storage layer where the data resides. They want to enforce a separation of duties between which team manages access to the storage layer and which team manages access to the encryption keys. This model ensures that configuration errors made by only one of these teams won’t compromise the data in ways that grant unauthorized access to plaintext data. For example, if the team that owns permissions to the S3 bucket mistakenly grants access to unauthorized users, when those users attempt to access objects in S3 they will fail. Why? Because the separate team who manages access to the keys didn’t grant those users access to use the keys for decryption.
You can create this kind of independent access control by combining KMS encryption with IAM policies and S3 bucket policies. When data is encrypted with a customer-managed KMS key, the key’s policy acts as an independent access control. Users can be prevented from accessing the data, even though the IAM permissions and the S3 bucket policy would permit the access. Figure 1 shows a Venn diagram of the access that is required. The bucket policy, the IAM policy, and the KMS key policy all play a role. Users have permission for the data only when they are granted permissions in all three policies.
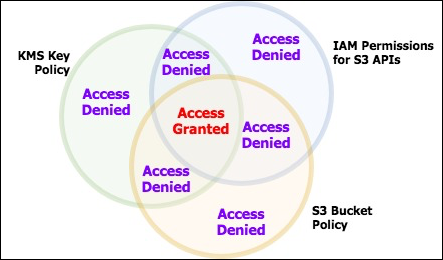
Figure 1: Venn diagram showing the required permissions for access
This exercise builds the resources shown in Figure 2:
- Three AWS IAM roles
- A role (1) with permission to create and manage permissions on an S3 bucket (secure-bucket-admin)
- A role (2) with permission to create and manage permissions on a KMS key (secure-key-admin)
- A role (3) with permissions to access (but not manage) a specific S3 bucket and to use (but not manage) a specific AWS KMS key (authorized-users).
- An S3 bucket (4) with a custom bucket policy (5) that only allows data to be stored if that data is encrypted with a specific KMS key. The ability to write to or read from this bucket will be restricted to the IAM role authorized-users.
- A KMS key (6) with a specific key policy (7) that can only be used by the IAM role authorized-users and only managed by the IAM user secure-key-admin.
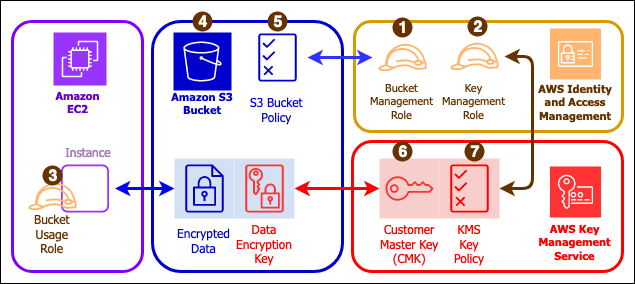
Figure 2: Architecture diagram
When you have completed this exercise, you will have:
- Created an S3 bucket protected by IAM policies, and a bucket policy that enforces encryption.
- Attached the IAM role authorized-users to an EC2 instance so your applications in that instance can assume that role and access encrypted data in the S3 bucket.
- Uploaded and downloaded data from the bucket that is protected by the KMS key.
- Demonstrated that when the KMS key policy is modified, removing access for the IAM role authorized-users, the applications on the EC2 instance no longer have access to the data in the S3 bucket.
Set things up
For simplicity, I create the S3 bucket, KMS keys, and EC2 instances all in the same region and in the same AWS account. It’s possible to use KMS keys that are owned by a different AWS account, to assume roles across accounts, and to have instances in different regions from the buckets and the keys. I discuss those variations at the end.
I assume you have at least one administrator identity available to you already: one that has broad rights for creating users, creating roles, managing KMS keys, and launching EC2 instances. I will refer to this as your “Admin identity” throughout these instructions. This can be a federated identity (for example, from your corporate identity provider or from a social identity), or it can be an AWS IAM user.
Assuming Roles
Throughout this exercise I will use IAM roles to acquire and release privileges. If you’re working from the AWS command line, you’ll need to configure your command line environment to use profiles. If you’re working from the AWS Management Console, then you’ll follow these instructions to switch role. If you haven’t worked with roles before, take a minute to follow those instructions and become familiar with it before continuing.
Step 1: Create IAM policies
First, I will create 3 policies that grant very specific sets of rights. Then, I will attach those policies to roles: two roles for administrators, and one for software running on EC2 instances. You’re going to create an S3 bucket in Step 3. That bucket, like all S3 buckets, needs a globally unique name. You will reference that bucket’s name in these policies, even though you will create the bucket later. Decide the name of your bucket now. When you reach steps that require you to type or paste a JSON policy document for your bucket policy, remember to use the name of your bucket where I have written secure-demo-bucket.
Step 1a: Create the S3 bucket management policy
While logged in to the console as your Admin user, create an IAM policy in the web console using the JSON tab. Name the policy secure-bucket-admin. When you reach the step to type or paste a JSON policy document, paste the JSON from Listing 1 below. This policy allows broad S3 administration rights (creating, deleting, and modifying policies), so it is a high privilege policy. In an effort to be concise, it grants all permissions to S3 and then takes a few away by explicitly denying them. The intention is to permit managing all aspects of the bucket’s operation, while denying all access to the contents of the bucket. The explicit deny mechanism is important because, due to IAM’s policy evaluation logic, an explicit deny cannot be overridden by subsequent “allow” statements or by attaching additional policies. As the S3 service evolves over time and new features are added, the policy will permit using those new features, without any change to this policy. If you prefer to enable features explicitly, you’ll need to rewrite this policy to explicitly allow only the features you want, and then come back and revise the policy every so often, as S3 features are added that your role needs to use.
Listing 1: secure-bucket-admin IAM policy
Your policy will have an ARN (it will look something like arn:aws:iam::111122223333:policy/secure-bucket-admin). Make a note of this ARN. You will use it later to attach to the secure-bucket-admin role you’ll create in step 2.
Step 1b: Create the KMS administrator policy
While logged in to the console as your Admin user, create an IAM policy in the web console using the JSON tab. Name the policy secure-key-admin. When you reach the step to type or paste a JSON policy document, paste the JSON from Listing 2 below. Be sure to add your own 12-digit AWS account number where I have written 111122223333. This policy allows broad KMS administration rights (creating keys, granting access to keys, and modifying key policies), so it is a high privilege policy. In an effort to be concise, this policy grants all permissions to the KMS service and then denies certain rights through an explicit deny statement. The intention is to permit managing all aspects of KMS keys, while denying all access to perform encryption and decryption using KMS keys. As the KMS service evolves over time and new features are added, the policy will permit using those new features, without any change to this policy. If you prefer to enable features explicitly, you’ll need to rewrite this policy to explicitly allow only the features you want, and then come back and revise the policy every so often, as KMS features are added that your role needs to use.
Listing 2: secure-key-admin IAM policy
Your policy will have an ARN (it will look something like arn:aws:iam::111122223333:policy/secure-key-admin). Make a note of this ARN. You will use it later to attach to the secure-key-admin role you’ll create in step 2.
Step 1c: Create the S3 bucket usage policy
This final policy grants access to read and write encrypted data in the target S3 bucket. This is a narrowly-scoped policy that only grants rights to a single bucket. While logged in to the console as your Admin user, create an IAM policy in the web console using the JSON tab. Name the policy secure-bucket-access.
When you reach the step to type or paste a JSON policy document for your bucket policy, paste the JSON from Listing 3 below, substituting the name of your bucket on the two lines where I have secure-demo-bucket.
Listing 3: secure-bucket-access IAM policy
Note: In an effort to grant a minimal, but realistic, set of permissions, this IAM policy only grants access to basic get, put, and delete operations. You might have a use for other features, like tagging objects. If so, you will need to change the policy to enable the features you want to use.
Your policy will have an ARN (it will look something like arn:aws:iam::111122223333:policy/secure-bucket-access). Make a note of this ARN. You will use it later to attach to the authorized-users role you’ll create in step 2.
You might ask why this policy designed to control access to encrypted objects has no KMS permissions in it. Wouldn’t that prevent the users that assume this IAM role from using the encryption keys? It would normally prevent them, except you have the ability to list the authorized-users IAM role within the resource policy attached to the KMS key you’re about to create. By placing the authorized-users role in the KMS key resource policy, it further enforces the separation of duties so administrators in the account with an ability to modify IAM policies don’t inadvertently escalate privilege to other IAM users/roles and give them permissions to use KMS keys for decryption.
Step 2: Create IAM roles
An AWS IAM role is an identity that you can create in an AWS account that has specific permissions. An IAM role is similar to an IAM user, because it has permission policies that determine what the identity can and cannot do in AWS. It’s different from an IAM user because it’s not associated with a single person. A role can be used by users, by EC2 instances, by AWS services, or by other entities like AWS Lambda functions that you allow to use it. The IAM policies we created in step 1 do not grant permissions until we assign them to roles and assign the roles to users or entities.
Step 2a: Create the S3 bucket management role
This role will be used by administrators who need to manage the properties of the bucket.
- Follow the online instructions for creating an IAM role.
- Choose Another AWS account under the section labeled Select type of trusted entity.
- For the authorized AWS account ID, enter the 12-digit account number for the account that you’re working in. If you intend to authorize AWS IAM users that are defined in a different AWS IAM account to access the S3 bucket and decrypt objects, then you would include that AWS account’s ID number, instead.
- Name the IAM role secure-bucket-admin and import the customer managed policy named secure-bucket-admin that you created in step 1a to the role that you have created.
Your AWS IAM role will have an ARN (it will look something like arn:aws:iam::111122223333:role/secure-bucket-admin). Make a note of this ARN. You will use it in the step 3 when you create your S3 bucket.
Step 2b: Create the KMS key management role
This role will be used by administrators who need to manage the KMS keys that protect the data. The actions you take to manage the keys will be authorized by this role. Importantly, this role has no ability to modify the bucket, grant access to the bucket, or access any of the data in the bucket.
- Follow the online instructions for creating an IAM role.
- In the Select type of trusted entity section, select Another AWS account.
- For the authorized AWS account ID, enter the 12-digit account number for the account that you’re working in. If you intend to authorize AWS IAM users that are defined in a different AWS IAM account, then you would include that AWS account’s ID number, instead.
- Name the IAM role secure-key-admin and import the customer-managed policy named secure-key-admin that you created in step 1b to the role that you have created.
Your AWS IAM role will have an ARN (it will look something like arn:aws:iam::111122223333:role/secure-key-admin). Make a note of this ARN. You will use it in step 4 when you create your KMS key.
Step 2c. Create the bucket usage role
This role will grant permissions to EC2 instances. An EC2 instance running with this role will be able to create and read encrypted data in the protected S3 bucket.
- Follow the online instructions for creating an IAM role.
- In the Select type of trusted entity section, select AWS service.
- Choose EC2 as the service that you will authorize. This authorizes all applications running on that EC2 instance to use credentials with permissions attached to the role.
- Name the IAM role authorized-users and import the customer-managed secure-bucket-access policy that you created in step 1c to the role that you have created.
This role is not for users trying to access the S3 bucket from any arbitrary application that happens to have the role’s credentials. It will only be used by users operating within applications running in AWS EC2 instances.
Step 3: Create an S3 bucket for the encrypted data
Log in to the console using your secure-bucket-admin role. (Either log in with the correct federated identity, or with the AWS IAM user you created in step 1d). Follow the instructions to create a bucket that will hold the encrypted data. In my example, I call my bucket secure-demo-bucket. You chose your own unique bucket name back in step 1. Type that bucket name throughout these steps where I use secure-demo-bucket. You will set a bucket policy and properties on that bucket later.
Step 4: Create a KMS key to encrypt and decrypt the data in the S3 bucket
Log out of the console and log back in using your secure-key-admin role. Create a customer-managed KMS key to encrypt and decrypt the data in the S3 bucket you just created. If you already have a customer-managed KMS key created that you want to use for this purpose, you can do that. To use your own KMS key, skip steps 1-5 below about creating a key and, instead, select your existing key in the KMS console and then follow steps 6-8 to change the key policy to allow the authorized-users role permissions to use the key.
- In the AWS console, go to Key Management Service.
- Select the Create Key button.
- On the Step 1 screen, set a display name (called an “Alias”) for the key and a description. I recommend a meaningful description that tells others what the key is for.
- On the Step 2 screen, set tags if you need them to track usage of keys for billing purposes. Tags won’t have a functional impact in this exercise so you can skip this step if you want by selecting Next.
- On the Step 3 screen, select key administrators. Pick only the secure-key-admin IAM role. You must not pick the secure-bucket-admin role or the authorized-users role as key administrators to ensure separation of duties. For example, if you were to pick the authorized-users IAM role, then any user that assumed that role could escalate their own (or others’) privileges to use this key to decrypt any other data encrypted under this key in your account. If you were to pick the secure-bucket-admin user, then that user could modify permissions both on the S3 bucket and the KMS key in ways that allowed unauthorized users access to decrypt data.
- On the Step 4 screen, select key users. Pick only the authorized-users IAM role you created in step 2c.
- On the Step 5 screen, select Finish.
After you have created the key, make note of the key’s ARN. It will look something like this:
arn:aws:kms::11112222333:key/1234abcd-12ab-34cd-56ef-1234567890ab
You will need it for the next step where you enforce all objects uploaded into the S3 bucket to be encrypted under this key.
Step 5: Modify the bucket policy
Log out of the console and log back with the secure-bucket-admin role. You’re going to attach a bucket policy to the bucket that does two things: it requires objects to be encrypted and it requires them to be encrypted with a specific KMS key. You will accomplish this by explicitly denying any attempt to call PutObject unless the correct conditions are true. This helps you increase your confidence that you will not store unencrypted data in this bucket.
Find the secure-demo-bucket bucket in the S3 web console, and then modify its bucket policy. Use the code from Listing 4 below as the entire bucket policy. Be sure to change secure-demo-bucket to the actual name of the bucket that you’re using in both places where it appears in the policy. You recorded the key’s ARN in step 4, make sure you insert that ARN for your KMS key where I use an example key ARN below.
Listing 4: Bucket policy requiring encryption
Note: This bucket policy is not retroactive: If you apply this policy to a bucket that already exists and already has unencrypted objects, nothing happens to the objects that are already in the bucket. They remain unencrypted. They can be fetched or deleted. Once the policy is applied, however, new objects cannot be put in the bucket unless they are correctly encrypted.
Instead of applying a bucket policy, you could consider turning on S3 default encryption. This feature forces all new objects uploaded to an S3 bucket to be encrypted using the KMS key you created in step 4 unless the user specifies a different key. This feature doesn’t prohibit callers from encrypting objects under other KMS keys, but it ensures that the data is protected even if the user does not specify KMS encryption when putting the object. The bucket policy in Listing 4 is a bit stricter than S3 default encryption because it ensures that no object is ever encrypted by any key other than the KMS key created in step 4. That strictness means the attempt to put an object fails, unless the caller explicitly names the KMS keyId in every S3 PUT request. With S3 default encryption, attempts to put an object without specifying encryption will succeed, and the data will be protected by the named KMS key.
Step 7: Launch an EC2 instance to demonstrate the solution
The final step to showing how this solution works is to launch an EC2 instance and show that applications running in that instance can write and read data in the S3 bucket you created. If you launch an EC2 instance that has your authorized-users role attached and log in on that instance, you will be able to upload and download objects from the bucket, encrypting and decrypting transparently as you do it. No other identity (for example, other IAM users, other IAM roles, other EC2 instances, and Lambda functions) will be able to upload and download data to this S3 bucket because these other identities don’t have the permissions to use the KMS key that protects the data.
Start by logging out of the console and log back in as your Admin user. Following instructions to launch an EC2 instance:
- Choose an Amazon Linux AMI.
- Choose an instance type. Any instance type will work. If you launch an Amazon Linux t2.micro instance, it might qualify for free tier pricing.
- For IAM Role, select the authorized-users role from the drop-down menu.
- Make sure you specify an SSH key that you have access to, and make sure that you have a way to reach the EC2 instance over the network.
Satisfy yourself that it works as expected
At this point, the solution is complete and is running. I want to demonstrate that the KMS key is providing the independent access controls the way I said it would. I will modify the key policy to remove the instance’s rights to use the KMS key. Then, I will confirm that the commands that had succeeded before now fail after the key policy change. This shows how the KMS key and its policy are completely independent of the S3 bucket policies and the IAM policies.
Test 1: Uploading encrypted objects
Using SSH, log in on the EC2 instance you launched that has the authorized-users role attached.
You will need to download a file onto the EC2 instance that you can then upload, encrypted, to the S3 bucket. If you don’t have a file that you want to use, you can use the AWS Cryptographic Details whitepaper as a reasonable test file.
On the instance, run the following command to download a local copy of the AWS Cryptographic Details whitepaper that you can use as test data:
Side note: You should also read this whitepaper. It’s very informative on how AWS KMS is built and operated to secure your encryption keys.
On the EC2 instance, use the AWS command line to upload the file to the S3 bucket. Note all the options that tell S3 to use KMS encryption and to use the correct key ID. Remember to insert the bucket name for the bucket that you’re using and the ARN of your KMS key from step 4 above.
If all went well, you should see a message like the following, showing that the object was uploaded successfully:
Test 2: Upload an Unencrypted Object
You can now prove the fact that a user on this instance attempting to upload unencrypted objects will fail. Run this command to upload a second copy of the PDF file to be called test2.pdf. Be sure to substitute your bucket’s name into the command.
You’ll notice this command doesn’t include the options instructing S3 to use KMS to encrypt the file. You should see this error message:
If you see no error, then double-check that your bucket policy in Step 5 above is correct.
Test 3: Downloading Encrypted Objects
You’ve now proven that the EC2 instance can upload encrypted objects and that unencrypted objects are refused. Now, you can prove that the EC2 instance has access to cause S3 to decrypt the encrypted object in the bucket using the KMS keys. Here’s how: While still on your EC2 instance, run this command, substituting your bucket name, to download a copy of the PDF file:
If this command succeeds, then you will have a file in your current directory on your EC2 instance named test3.pdf. That shows that you have successfully decrypted and downloaded the PDF file.
Test 4: Demonstrate that the key policy regulates access
Now, I will demonstrate the independence of access control provided by the KMS key policy. Leaving the bucket policy and IAM role/policy as they are, you will disable the EC2 instance’s access to the objects using the KMS key policy. The IAM policy for S3 and the bucket policy on the bucket would still normally permit the EC2 instance to access the data. But, because the KMS key policy will prevent use of the key by the authorized-users IAM role, S3 will fail to encrypt or decrypt the object. This means that any commands that execute on the EC2 instance will no longer be able to upload or download data from the S3 bucket.
First, modify the key policy.
- Log out of the console and log back in under the secure-key-admin user. Go to the Key Management Service console.
- In the left-hand navigation, select Customer managed keys and look for the key with the alias or Key ID that you’re using. The Key ID is the last 32 characters of the full key ARN.
- Select the Key ID for the key that you’re using to get to the screen where you can edit the key policy.
- In the list of Key users, you will see your authorized-users role listed. Select that role, and then select the Remove button to remove its access to use the KMS key.
At this point, the EC2 instance no longer has the permissions to use the KMS key because its role no longer grants it permission to use the key.
Repeat the command that you did in Test 1 that uploaded a PDF file to the bucket. In this case, try to make a second copy of the PDF file into an object named test4.pdf. Run this command, substituting your bucket name and your KMS key ID as required:
You should see an error like this:
Now, try to download the copy of the KMS-Cryptographic-Details.pdf file from the bucket, again using the command that worked before, substituting the bucket name as required:
You should see an error message like this:
These two commands are denied because when S3 tried to invoke KMS to encrypt or decrypt data, the EC2 instance role did not have permission to use the KMS key and thus the request failed. Note that there is no situation where the API call returns the KMS-encrypted data from S3. Either the API call succeeds, and you receive the decrypted data, or the API call fails, and you receive an error. All AWS services that use KMS to encrypt data behave this way—you either get the decrypted data, or you get an error message.
Restoring access to the key
To restore the EC2 instance’s access to the data, you authorize its role again in the KMS key policy:
- Go to Key Management Service in the AWS Console.
- Select Customer managed keys.
- Find the key that you’re using and select it.
- Find your authorized-users role in the list of roles, or type “authorized-users” in the search box to find it.
- Select the checkbox next to the authorized-users role, and then select Add to add that role as a key user.
The role will now have permission to use the key as it did before.
Useful variations on this solution
Variation 1: Using KMS keys in different AWS accounts
You can use a KMS key that is in a different AWS account for encrypting and decrypting. This allows administrators in a central AWS account to manage KMS keys, while the data itself resides in other AWS accounts. This can offer further separation of roles from the example above because even a highly privileged user (for example, root) in the account in which the authorized-users role exists won’t be able to modify the key policy. The account ID in which authorized-users role exists must be listed in the key policy. For more information, follow the instructions on sharing KMS keys across accounts.
Note that the KMS key and the S3 bucket must always be in the same region. The EC2 instance does not need to be in the same region as the S3 bucket. You will experience higher latency when your EC2 instance is not in the same region as the S3 bucket.
Variation 2: Granting KMS key usage permissions to other AWS services
EC2 is not the only service that can be granted a role this way. Lambda functions can be granted AWS IAM roles that allow them to use KMS keys. That would permit the Lambda functions with the correct roles to manipulate the S3 data, while other entities (users, EC2 instances) could not. Likewise, AWS services such as Amazon Athena might require access to a KMS key if you want to use it to search data stored in S3 that has been encrypted using KMS. If Athena is given permission to assume a role with permissions to use the KMS key, then Athena can successfully execute its search queries because S3 will be allowed to decrypt objects on behalf of Athena, which is acting on your behalf when assuming the authorized-users role.
Variation 3: Creating isolated authorization to encrypt vs decrypt
You can use the KMS key policy to isolate authorization to encrypt versus decrypt data between two identities. For example, if a role has the kms:Encrypt or kms:GenerateDataKey permissions for a key, that means that role can write encrypted data directly or ask an AWS service to do it on their behalf (for example, during an upload to an S3 bucket). If the role does not also have kms:Decrypt permission, it can’t read encrypted data. This write-only permission might be appropriate for data acquisition, security log delivery, or other functions that should not be allowed to read the data they have written. Likewise, if a role has the kms:Decrypt permission, then the role has the ability to read data. But if it lacks the kms:Encrypt permission, it cannot write or modify encrypted data. This kind of isolation authorization is suitable for audit functions and log aggregation functions that need to read data but typically are prohibited from modifying the data/logs that they read. The complete set of permissions for KMS key policies can be found in the KMS developers guide.
Cost of this solution
Three services with charges are used in this solution: EC2, S3, and KMS. The EC2 instance hours are charged according to standard EC2 pricing. Likewise, storing data in S3 will incur costs according to standard S3 pricing. There is no difference in S3 pricing for storing encrypted versus unencrypted data. Finally, KMS has a fixed price per month for each customer-managed KMS key you create, which is described in the KMS pricing page. Each encryption and decryption of an object is a KMS API call and a certain number of KMS API calls are free each month. The number of free KMS API calls, and the price for API calls beyond the free tier, are described on the KMS pricing page.
Summary
The combination of IAM policies, S3 bucket policies, and KMS key policies gives you a powerful way to apply independent access control mechanisms on data. This mechanism means that one set of users can be granted rights to do maintenance operations on the buckets themselves, while not having rights to access or manipulate the data itself. Even a user or function with full privileges in S3 would be denied access to this encrypted data unless it also had the rights to use the KMS keys. It gives you an approach to access control that allows key policies to serve as an additional control when IAM policies or S3 bucket policies alone are not sufficient.
If you have feedback about this blog post, submit comments in the Comments section below. If you have questions about this blog post, start a new thread on the AWS Key Management Service forum or contact AWS Support.
Want more AWS Security how-to content, news, and feature announcements? Follow us on Twitter.