AWS Storage Blog
Automating copying encrypted Amazon EBS snapshots across AWS accounts
UPDATE: The screenshots of the Amazon DLM interface in this post were updated on 7/14/2021.

Many customers have disaster recovery (DR) best practices that require them to copy their Amazon EBS snapshots to an isolated account in a different Region and encrypt those snapshots with a different key. In doing so, customers are able to protect themselves from data loss if any number of disasters compromise their accounts. With Amazon Data Lifecycle Manager (Amazon DLM), customers can now automate this process by copying and protecting their EBS snapshots immediately upon creation.
In a previous post, an AWS colleague walked through steps required to share custom encryption keys between accounts using AWS Key Management Service (AWS KMS). In another post, others covered how to use Amazon DLM to create policies that automate EBS snapshot management. In this post, we bring these concepts together to show how you can use Amazon DLM, AWS KMS, and AWS Identity and Access Management (IAM) to automate copying of encrypted Amazon EBS snapshots to different accounts. We also cover encrypting those snapshots with a different key, in addition to copying them to different Regions.
Note that you can only copy unencrypted snapshots or snapshots encrypted with customer managed CMKs across accounts. You cannot share a snapshot that is encrypted using the default AWS KMS encryption key. Visit the documentation on AWS KMS best practices to learn more.
Solution overview

Steps 1–3 are in the source account, and steps 4-6 are in the target account:
- Source account: Create and share snapshots
- Source account: Share the customer managed CMK (in AWS KMS console)
- Source account: Complete snapshot sharing setup
- Target account: Encrypt and copy shared snapshots
- Target account: Allow IAM role to use the shared CMK (in AWS IAM console)
- Target account: Complete snapshot encrypt and copy setup
The source account can also share snapshots directly, rather than automating the create and share process through Amazon DLM. In this case, steps 1 and 3 can be skipped.
If you would like to learn how to complete steps 1-6 using API or CLI, refer to Amazon DLM in the EC2 user guide.
Prerequisites
You need access to two AWS accounts:
- A source account in which you will create a snapshot from an EBS volume and then share it with the target account.
- If you would like to share an encrypted snapshot, then you must first create a customer managed CMK at the source account.
- A target account in which you will copy the snapshot from the source account, encrypt the snapshot and then copy it to other Regions.
- If you would like to encrypt the copied snapshots with customer managed CMKs, then you must first create the CMKs in the target account.
In this post, we create snapshots daily and then copy those snapshots from our source account (account ID: 123456789012) to our target account (account ID: 987654321098). We store one copy of the snapshot in the AWS South America (Sao Paulo) Region, and the other copy in the AWS Europe (London) Region. Both copies are encrypted with the target account’s AWS managed CMK for Amazon EBS.
Step 1: Create and share snapshots
In this step, we automate the process of creating and sharing Amazon EBS snapshots in the source account.
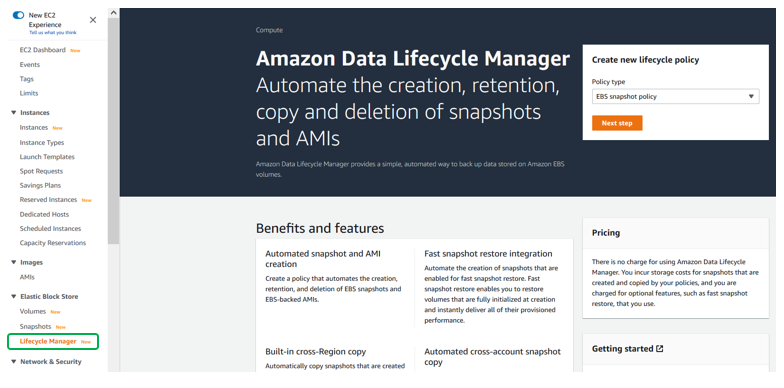
1. On the Amazon EC2 console, choose Lifecycle Manager located in the left side panel under Elastic Block Store. Under Create new lifecycle policy, choose EBS snapshot policy from the drop-down menu, and then select Next step.
2. Select the resource type as Volume. Enter a brief Description for the policy. Then next to Target with these tags, enter the tags of the Amazon EBS volumes that you want to create EBS snapshots from. Amazon DLM uses resource tags to identify the volumes.

3. For the IAM role, you may choose to use the Default role (created as part of this policy if one does not exist), or you may choose another role. If you do not use the Default role, make sure that the role has the necessary permissions for Amazon DLM.

4. Next, define the Policy Schedule to create and share the Amazon EBS snapshots. For each policy, you may create up to four separate schedules. For the purpose of this example, we create a single schedule that creates snapshots every 24 hours, starting at 15:30 UTC. We also Retain only the two most recent snapshots.

5. Scroll down or move on to selecting Enable cross-account sharing by checking the box next to it.

Note: If you are sharing an unencrypted snapshot (of an unencrypted volume), or if you have already configured your customer managed CMK, skip to step 3.
Step 2: Share the customer managed CMK (in the AWS KMS console)
If you are sharing a snapshot encrypted with a customer managed CMK, you must also share the CMK with the target accounts.
1. Select AWS KMS Console to open it in a new window.
2. Select Customer managed keys on the left side panel, and then the CMK that is encrypting the volume. Make a note of the ARN of the key, this is used later by the target account in step 6.

3. Scroll down to Key users and choose Add.

4. In the Add key users screen, select the IAM role from step 1 (in our example, we are using AWSDataLifecycleManagerDefaultRole). Then proceed to choose Add.

5. Go back to the AWS KMS console page and scroll down to Other AWS Accounts, then choose Add other AWS accounts.

6. Enter all Account IDs that you want to share the CMK with. Choose Save changes when done.

7. Verify that all accounts appear correctly, then close this window and return to the Amazon DLM policy page.

Step 3: Complete snapshot sharing setup
We now complete the steps required to share snapshots in the source account.
1. Back at the Amazon DLM policy page, use the text box to Add all AWS account IDs that you want to share the snapshots with. All accounts here must have access to the CMK as per step 2. The policy is not able to share the snapshots with accounts that do not have access to the CMK. You may also choose here to Unshare the snapshot automatically after a specific duration.

2. Scroll to bottom of the page, verify that the Policy status after creation is enabled (if you want the policy to be in effect immediately). Then select Create Policy.

Note: You can also choose to setup 3 more schedules for the volumes targeted by this policy, but for our example, we skip them.
3. You should now see a Success message with a policy-id confirming that your policy was successfully created. Click on Close to return to the Amazon DLM main page.

Back at the Amazon DLM main page, you can select the policy and see more details at the bottom of the screen. You can also take other Actions on the policy, including Modify Policy and Delete Policy.

You have now successfully created a policy to automate creating and sharing of snapshots. Let’s move on to the target account to copy the shared snapshots.
Step 4: Encrypt and copy shared snapshots
In this step, we automate the process of copying Amazon EBS snapshots that are shared with the target account. The target account does not need snapshots to already be shared with it for the policies to be in effect. It automatically copies snapshots shared with it from the specified source accounts.
Note: If this is the first time you are creating an Amazon DLM policy in this account, you have to set up the AWSDataLifecycleManagerDefaultRole manually. We recommend that you follow the instructions to create a snapshot policy first in the account, which automatically creates the AWSDataLifecycleManagerDefaultRole in IAM. You can then delete the policy and proceed with the following steps:
1. On the Amazon EC2 console, choose Lifecycle Manager located in the left side panel under Elastic Block Store, followed by Create Lifecycle Policy.

2. Select Cross Account Copy event policy and then Next.

3. Enter a brief Description of the policy.

Note: For Cross Account Copy event policies, we do not need to indicate target tags, the policy copies all snapshots from source accounts that are shared with the target account. Similarly, the policy is not schedule-based, it triggers as soon as it detects that a snapshot has been shared with the account.
4. Next to Copy snapshots shared by, enter the AWS account IDs of all source accounts that you want to copy snapshots from. Select Add after entering each account.

5. You must add a Snapshot description filter to copy snapshots. Enter .* to copy all snapshots that are shared by the specified source accounts with the target account. Alternatively, Created for policy: policy-0123456789abcdef0.* where policy-0123456789abcdef0 is the Amazon DLM policy sharing the snapshots from the source account. For more examples, visit Amazon DLM in the EC2 user guide.
6. Select the IAM role you would like to perform the copy action. If you are copying encrypted snapshots for the first time with this CMK, then you must also update your IAM role in step 5. Otherwise, if the snapshots are unencrypted or if you have already updated your IAM role, skip to step 6.

Note: Select Default role or Choose another role before clicking on the link to AWS IAM console. If you choose to use another role, make sure you have setup the right permissions. Visit Amazon DLM in the EC2 user guide for more information.
Step 5: Allow IAM role to use the shared CMK (in AWS IAM console)
In this part, we give the IAM role in the target account access to the shared CMK by embedding inline policies. This is necessary for the target account to be able to copy the shared snapshots.
1. In the AWS IAM console page of the IAM role you have selected (from Step 4), click on Add inline policy.

2. Select the JSON tab and delete all existing text.

3. Visit the user guide and copy the contents of the corresponding JSON and paste it into the JSON editor. Replace the ARN under Resources with that of the source account from step 2 – make sure you paste it twice in the same document. When done, click on Review policy.

Note: If you are copying from multiple source accounts, then the corresponding ARN from each source account must be listed here. For more examples, visit Amazon DLM in the EC2 user guide.
4. Enter a Name for the policy, and then select Create policy.

5. Once you have verified that the IAM policy appears correctly under Permission policies, you may close this window and return to the Amazon DLM policy page.

Step 6: Complete snapshot encrypt and copy setup
We now complete the steps required to encrypt and copy snapshots in the target account.
1. Back at the Amazon DLM policy page, under Copy settings, you can select up to three Regions to as the destinations for your snapshots.

In our example, we are copying the snapshots to two Regions. Given that the source snapshots are encrypted, the copied snapshots will be encrypted with the target account’s default Amazon EBS master key even if we don’t enable encryption. We will copy one set of snapshots to AWS South America (Sao Paulo) Region, where we will retain it for 3 days. We will copy another set of snapshots to the AWS Europe (London) Region, where we are explicitly encrypting it with the default EBS master key and retaining it for one month.

Note: if you choose to encrypt with another customer managed CMK, ensure the CMK for the target account in that Region is included in the IAM role in step 5.
2. Scroll to the bottom of the page, verify that the Policy status after creation is enabled (if you want the policy to be effective immediately). Then select Create Policy.

3. You should now see a message with a policy-id confirming that your policy was successfully created. Click on Close to return to the Amazon DLM console.

Back at the Amazon DLM console page, you can select the policy and see more details, including which Regions the snapshot is copied to and the corresponding retention period.

Congratulations! You have now successfully automated sharing, encrypting, and copying snapshots across different accounts and different Regions. If you would like to complete steps 1–6 using API or CLI, refer to Amazon DLM in the EC2 user guide.
Cleaning up
Any snapshots created in the source and target accounts as part of this example will incur future charges. To avoid those costs, delete the snapshots and also the associated Amazon DLM policies. Be sure to clean up snapshots and policies in all associated Regions.
Conclusion
In this blog post, we covered automating copying of Amazon EBS snapshots to different accounts and different Regions by setting up policies using Amazon DLM. We also covered an additional layer of security by choosing to encrypt the copied snapshots with a different CMK. With the solution provided, you can copy your EBS snapshots in multiple regions to ensure proper fulfillment of compliance or DR requirements.
By automating the creation and copy process of Amazon EBS snapshots through DLM, you no longer have to worry about completing these actions manually. You can dedicate the time and resources for other tasks, knowing that your EBS snapshots are protected even if your source account is compromised.
Thank you for reading this blog post! For more information on Amazon Data Lifecycle Manager and its other features, visit Amazon DLM in the EC2 user guide. If you have any comments or questions, please don’t hesitate to leave them in the comments section.