Containers
Expose Amazon EKS pods through cross-account load balancer
Introduction
Amazon Elastic Kubernetes Service (Amazon EKS) is a managed container service to run and scale Kubernetes applications in the cloud or on-premises. Kubernetes Ingress is an API resource that allows you manage external or internal HTTP(S) access to Kubernetes services running in a cluster. The AWS Load Balancer Controller in Amazon EKS creates Application Load Balancer (ALB), a fully managed layer 7 load balancing service and the necessary supporting AWS resources whenever a Kubernetes ingress resource is created on the cluster with the kubernetes.io/ingress.class: alb annotation. An ingress resource configures the ALB to route HTTP or HTTPS traffic to different pods within the cluster.
While these can run in same account but when you are looking for traffic filtration, resource isolation, separate logging, and monitoring for enhanced security, you have to consider segregation of accounts for ALB and Amazon EKS cluster at the same time linking them with help of (Virtual Private Cloud (VPC) sharing. VPC sharing allows customers to share subnets with other AWS accounts within the same AWS Organization. This is a very powerful concept that allows for a number of benefits:
- Separation of duties: Centrally controlled VPC structure, routing, and IP address allocation.
- Application ownership: Application owners continue to own resources, accounts, and security groups.
- VPC sharing participants can reference security group IDs of each other.
- Efficiencies: Higher density in subnets, efficient use of VPNs and AWS Direct Connect.
- Hard limits can be avoided, for example, 50 virtual interfaces (VIFs) per AWS Direct Connect connection through simplified network architecture.
- Optimized Cost through reuse of NAT gateways, VPC interface endpoints, and intra-Availability Zone (AZ) traffic.
In this post, we’ll cover the following topics:
- Configuring VPC sharing.
- Deploying an Amazon EKS cluster, with a managed node group running in shared subnet.
- Deploying and configuring AWS Load Balancer Controller.
- Deploying a sample application.
- Testing the ALB deployment and traffic flow.
Solution overview
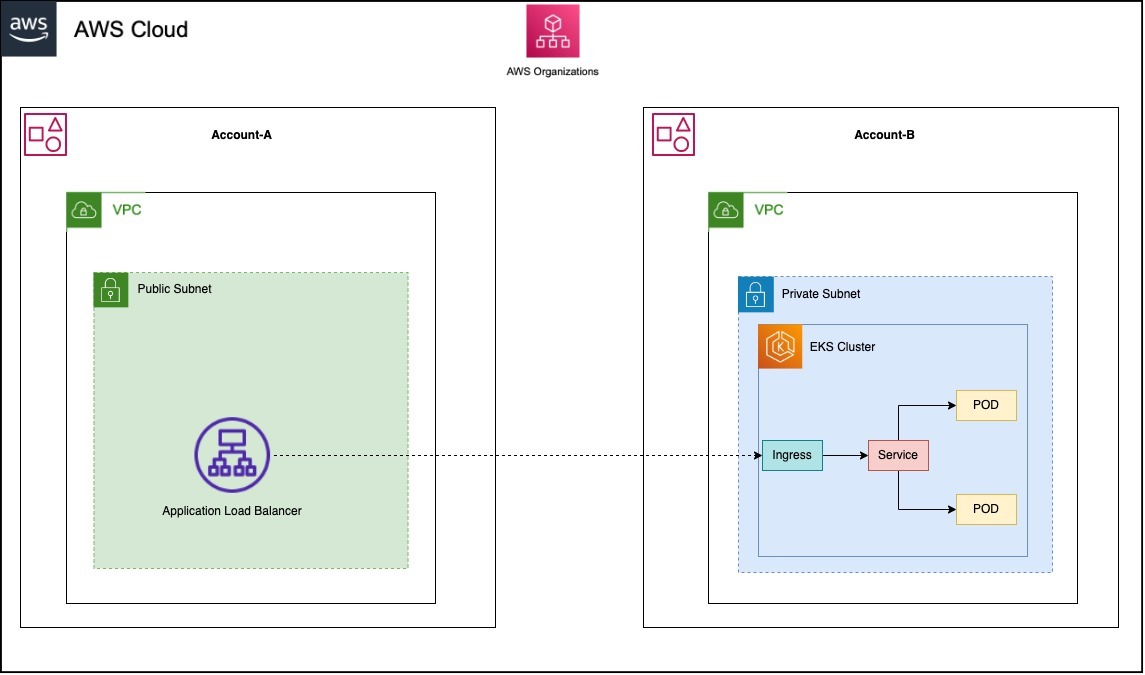
We’ll set up AWS Load Balancer Controller add-on to create Application Load Balancer between different AWS accounts that share VPC and subnets. We’ll leverage VPC sharing functionality which uses AWS Resource Access Manager (AWS RAM) to share the subnet across accounts within the same AWS organization. After that, we’ll deploy a sample application on our Amazon EKS cluster present in one account. With the help of AWS Load Balancer Controller add-on, we’ll expose the application through the ALB, which resides in another account.
The following diagram shows a high-level architecture for kubernetes pods running in an Amazon EKS cluster exposed through cross-account ALB.
Architecture
Walkthrough
Prerequisites
- Two AWS accounts which are part AWS Organizations, referred as Account-A and Account-B.
Implementation steps:
In the first account (Account-A) a VPC has to be created and the subnet of same VPC has to be shared to second Account (Account-B) with help of AWS Resource Access Manager (AWS RAM). In Account-B, the Amazon EKS cluster should be created and a sample application is deployed. This Amazon EKS cluster uses the AWS Load Balancer Controller to provision ALB in first account (Account-A).
Step 1 – Create VPC in Account-A
The first thing we’ll need to provision for this architecture is a VPC, which contains private and public subnets for the Amazon EKS cluster and ALB, respectively. We have created VPC with two public and two private subnets in the AZs. You can create public and private subnet as per your requirements.
Step 2 – Setting up VPC sharing
You can share your VPCs to leverage the implicit routing within a VPC for applications that require a high degree of interconnectivity and are within the same trust boundaries. To achieve this, it’s required to enable resource sharing from the management account for your organization. For information about enabling resource sharing, see Enable sharing with AWS Organizations in the AWS RAM User Guide.
To share a subnet using the Console:
- Open the Amazon VPC Console at https://console.aws.amazon.com/vpc/.
- In the navigation pane, choose Subnets.
- Select the private subnets and choose Actions, Share subnet.
- Select your resource share and choose Share subnet.
For more detailed explanation you can also go through blog.
Step 3 – Create an Amazon EKS cluster in Account-B
We’ll use eksctl to create an Amazon EKS cluster. Replace the VPC and subnets with the shared VPC and private subnet from Account-A in below config file.
Save the above configuration file and run below command to create the Amazon EKS cluster using above config file.
After creating the Amazon EKS cluster, eksctl creates a kubectl config file in ~/.kube or adds the new cluster’s configuration within an existing config file in ~/.kube. Once the Amazon EKS cluster transitions to ACTIVE state, we can connect to the Amazon EKS cluster using kubectl. Execute the following kubectl command to verify the Amazon EKS cluster connectivity. The following is the expected output:
Step 4 – AWS IAM configuration
Create an identity provider in Account-A
Your cluster has an OpenID Connect (OIDC) issuer URL associated with it. To use AWS Identity and Access Management (AWS IAM) roles for service accounts, an AWQS IAM OIDC provider must exist for your cluster.
To create an AWS IAM OIDC identity provider for your cluster:
- Go to AWS IAM Console in Account-A.
- In the left navigation pane, choose Identity Providers under Access management.
- To create a provider, choose Add provider.
- For Provider type, select OpenID Connect.
- For Provider URL, enter the OIDC provider URL of the Amazon EKS cluster created in Account-B, and then choose Get thumbprint. To get the OIDC provider run:
- For Audience, enter sts.amazonaws.com and choose Add provider.
Create an IAM policy in Account-A
The IAM policy is used by role, which we’ll also use while creating service account.
- Download an AWS IAM policy for the AWS Load Balancer Controller that allows it to make calls to AWS APIs on your behalf.
For, AWS GovCloud (US-East) or AWS GovCloud (US-West) AWS Regions
All other AWS Regions
- Create an AWS IAM policy using the policy downloaded in the previous step. If you downloaded iam_policy_us-gov.json, then change json to iam_policy_us-gov.json before running the command.
Create an AWS IAM role in Account-A
- View your cluster’s OIDC provider URL.
The example output is as follows:
- Create the trust relationship policy document that grants an entity permission to assume the role. Copy the following contents to your device. Replace 111122223333 with your Account-A account ID. Replace region-code with the AWS Region that your cluster is in. Replace EXAMPLED539D4633E53DE1B71EXAMPLE with the output returned in the previous step.
- Create the AWS IAM role.
- Attach the required Amazon EKS managed AWS IAM policy to the IAM role. Replace 111122223333 with your Account-A account ID.
Step 5 – Create a Kubernetes service account for Amazon EKS cluster deployed in Account-B
- Copy the following contents to your device. Replace 111122223333 with your Account-A account ID. After replacing the text, run the modified command to create the aws-load-balancer-controller-service-account.yaml file.
- Create the Kubernetes service account on your cluster. The Kubernetes service account named aws-load-balancer-controller is annotated with the AWS IAM role that you created named AmazonEKSLoadBalancerControllerRole.
Step 6 – Deploy and configure AWS Load Balancer Controller add-on
- Add the eks-charts repository.
- Update your local repo to make sure that you have the most recent charts.
- Install the AWS Load Balancer Controller add-on in the Amazon EKS cluster deployed in Account-B. Replace my-cluster with EKS cluster name and VPC Id with shared VPC Id from Account-A.
- Verify that the controller is installed.
The example output is as follows.
Step 7 – Deploy the sample application.
- Create the security group for load balancer in Account-A.
- Edit the ingress rule of security group associated with Amazon EKS worker to allow traffic from the Classless Inter-Domain Routing (CIDR) of the shred VPC shared from Account-A.
- Deploy the game 2048 as a sample application to verify that the AWS Load Balancer Controller creates an AWS ALB as a result of the ingress object.
- Download the manifest.
- Edit the file and find the line that says kind: Ingress.
- Add the below annotations in Ingress manifest. Replace the subnet with shared public subnet from Account-A and security group with load balancer security group created in step 1.
- Apply the manifest to your cluster.
- After a few minutes, verify that the ingress resource was created with the following command.
The example output is as follows:
Step 8 – Test
- Verify the Application load balancer created in Account-A.
- If you deployed the ingress using public subnet, open a browser, and navigate to the ADDRESS URL from the previous command output to see the sample application. In case you don’t see anything, refresh your browser and try again. If you deployed the ingress using private subnet, then you’ll need to view the page from a device within your VPC, such as a bastion host.

Cleaning up
When you finish experimenting with your sample application, delete it by running the following commands.
Then delete the Amazon EKS cluster by running the following commands.
Conclusion
In this post, we showed you how to expose Amazon EKS pods through cross-account load balancing. We created a load balancer in one AWS account(i.e. an infra account) that connected to the kubernetes pod in another AWS account(i.e. an application account) using VPC sharing for complete isolation of infra and application. Started with creating VPC with public and private subnets and shared the private subnets using VPC sharing functionality. Then created the Amazon EKS cluster in a shared private subnet and configured the required AWS IAM set-up in both accounts. Configured the AWS Load Balancer Controller add-on and deployed the sample application using kubernetes ingress which created the Application load balancer in another account.
We hope we’ve given you some guidance on how to expose your application running on Amazon EKS cluster using cross-account application load balancer. You can get started with Amazon EKS today. We would love hear from you, feel free to put your thoughts in comment section.