The Internet of Things on AWS – Official Blog
How to Bridge Mosquitto MQTT Broker to AWS IoT
UPDATE: The original blog post written on August 18th 2016 has been updated to this current version with the help of the author Michael Garcia (Principal Solutions Architect at AWS) and Anish Yadav (Cloud Support Associate at AWS).
Whether it is in the context of industrial IoT or in connected homes, gateways are present in most architectural discussions. Today, we will show you how to implement the Mosquitto broker ‘Bridge’ capability to setup bi-directional exchange of data with AWS IoT Core through MQTT messages. This will enable your devices to communicate locally with the Mosquitto broker and with AWS IoT Core to benefit from the power of the AWS Cloud.
Why Bridge your MQTT Broker to AWS IoT
If you have legacy IoT deployments, you might already have devices connected to an MQTT broker such as Mosquitto. In that scenario, your MQTT broker can be very close to where your sensors are deployed (local MQTT broker) or in a remote location like the Cloud.
If you plan to migrate to AWS IoT Core or wish to test it in order to benefit from the scalability, agility, security and high availability of the AWS Cloud, bridging your legacy MQTT broker to AWS IoT core could represent an easy transient solution that you can deploy quickly. In this article, we will implement a bridge using the Mosquitto broker such as illustrated in the diagram below.

How to Install Mosquitto MQTT Broker
Typically, you should install this on what you view as your local gateway which is the device that will be the link between your local devices and other local devices or to the AWS Cloud. Mosquitto supports a wide range of platforms including many distributions of Linux. Therefore, you can run it on devices as well as on a full-fledged server/virtual machine. You can go to Mosquitto download page for instructions.
For the sake of convenience and reproducibility, in this blog we will install the Mosquitto broker on an Amazon EC2 Linux instance which is the equivalent to having a local gateway running a Linux distribution.
If you are not planning on using an Amazon EC2 Instance you can skip to the section “How to configure the bridge to AWS IoT Core”
Launching and Configuring the EC2 Instance
Before launching an Amazon EC2 Ubuntu instance to host the Mosquitto broker, we are going to create an IAM Role so we’ll be able to use the CLI from the Amazon EC2 instance to generate AWS IoT credentials for the bridge.
- Go to the AWS Web Console and access the IAM service (Fig. 1)

- Click on Roles. Then, click on Create role (Fig. 2)

- Select EC2 and click on Next: Permissions (Fig. 3)

- Filter with the value AWSIoTConfigAccess (Fig. 4). Then select the policy AWSIoTConfigAccess and click on Next: Tags. Skip the next screen by clicking on Next: Review.

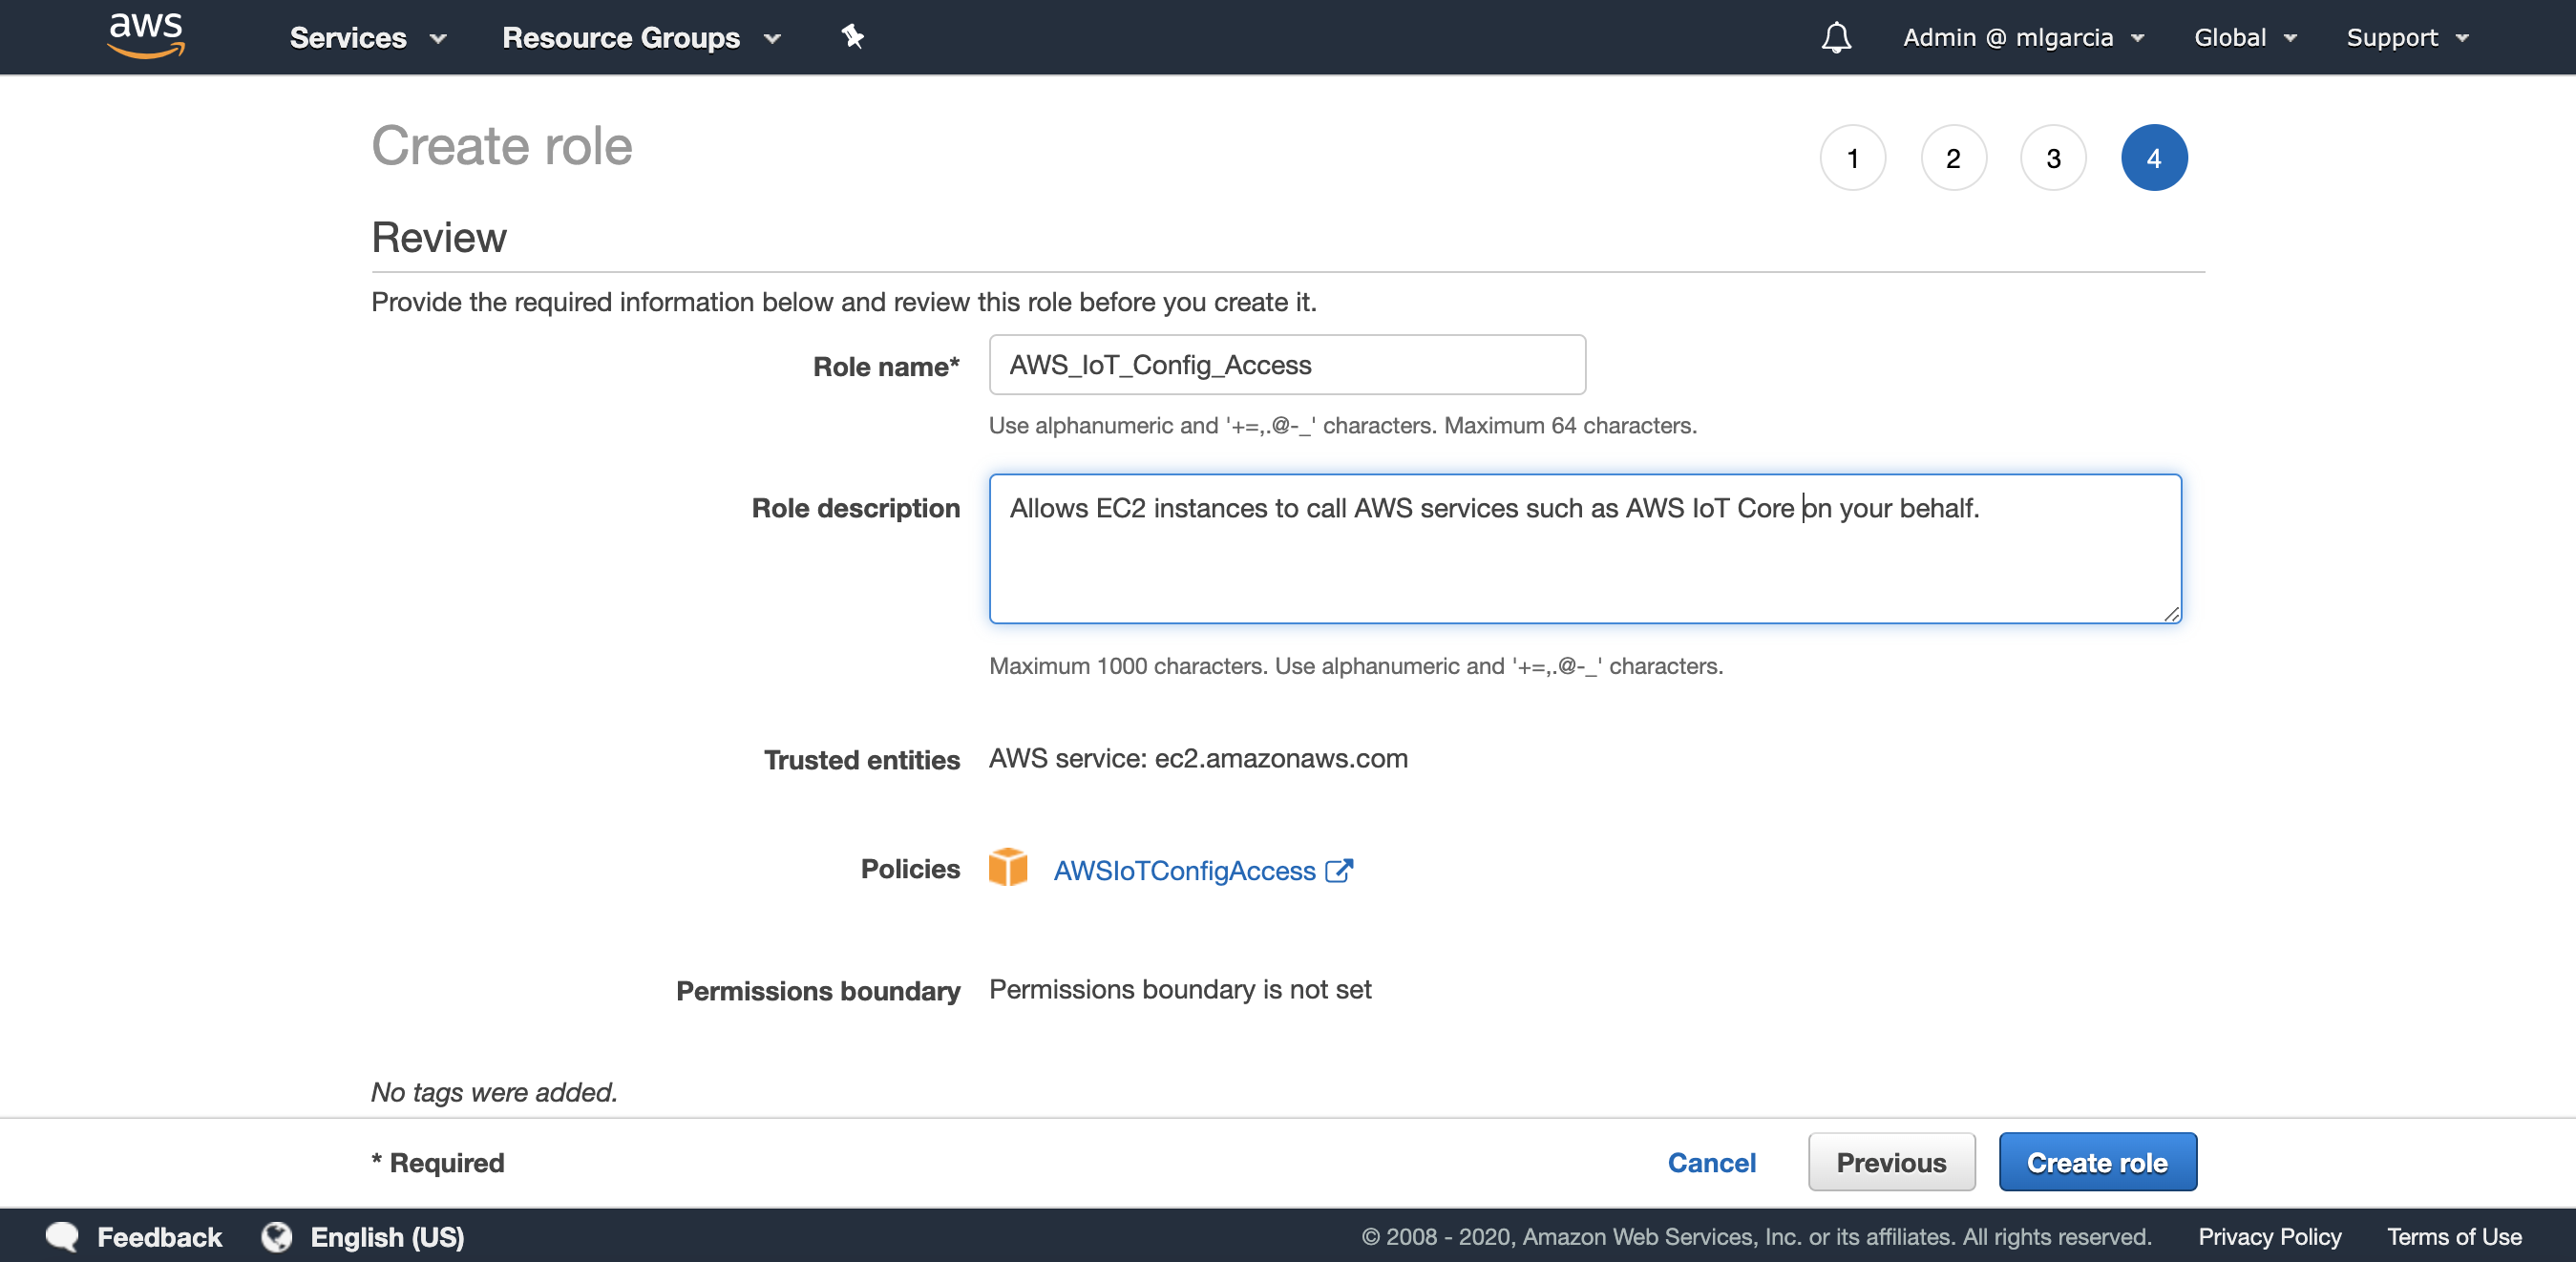
- Enter AWS_IoT_Config_Access as the Role name and enter a Role description. Review the role and click on Create role (Fig. 5)
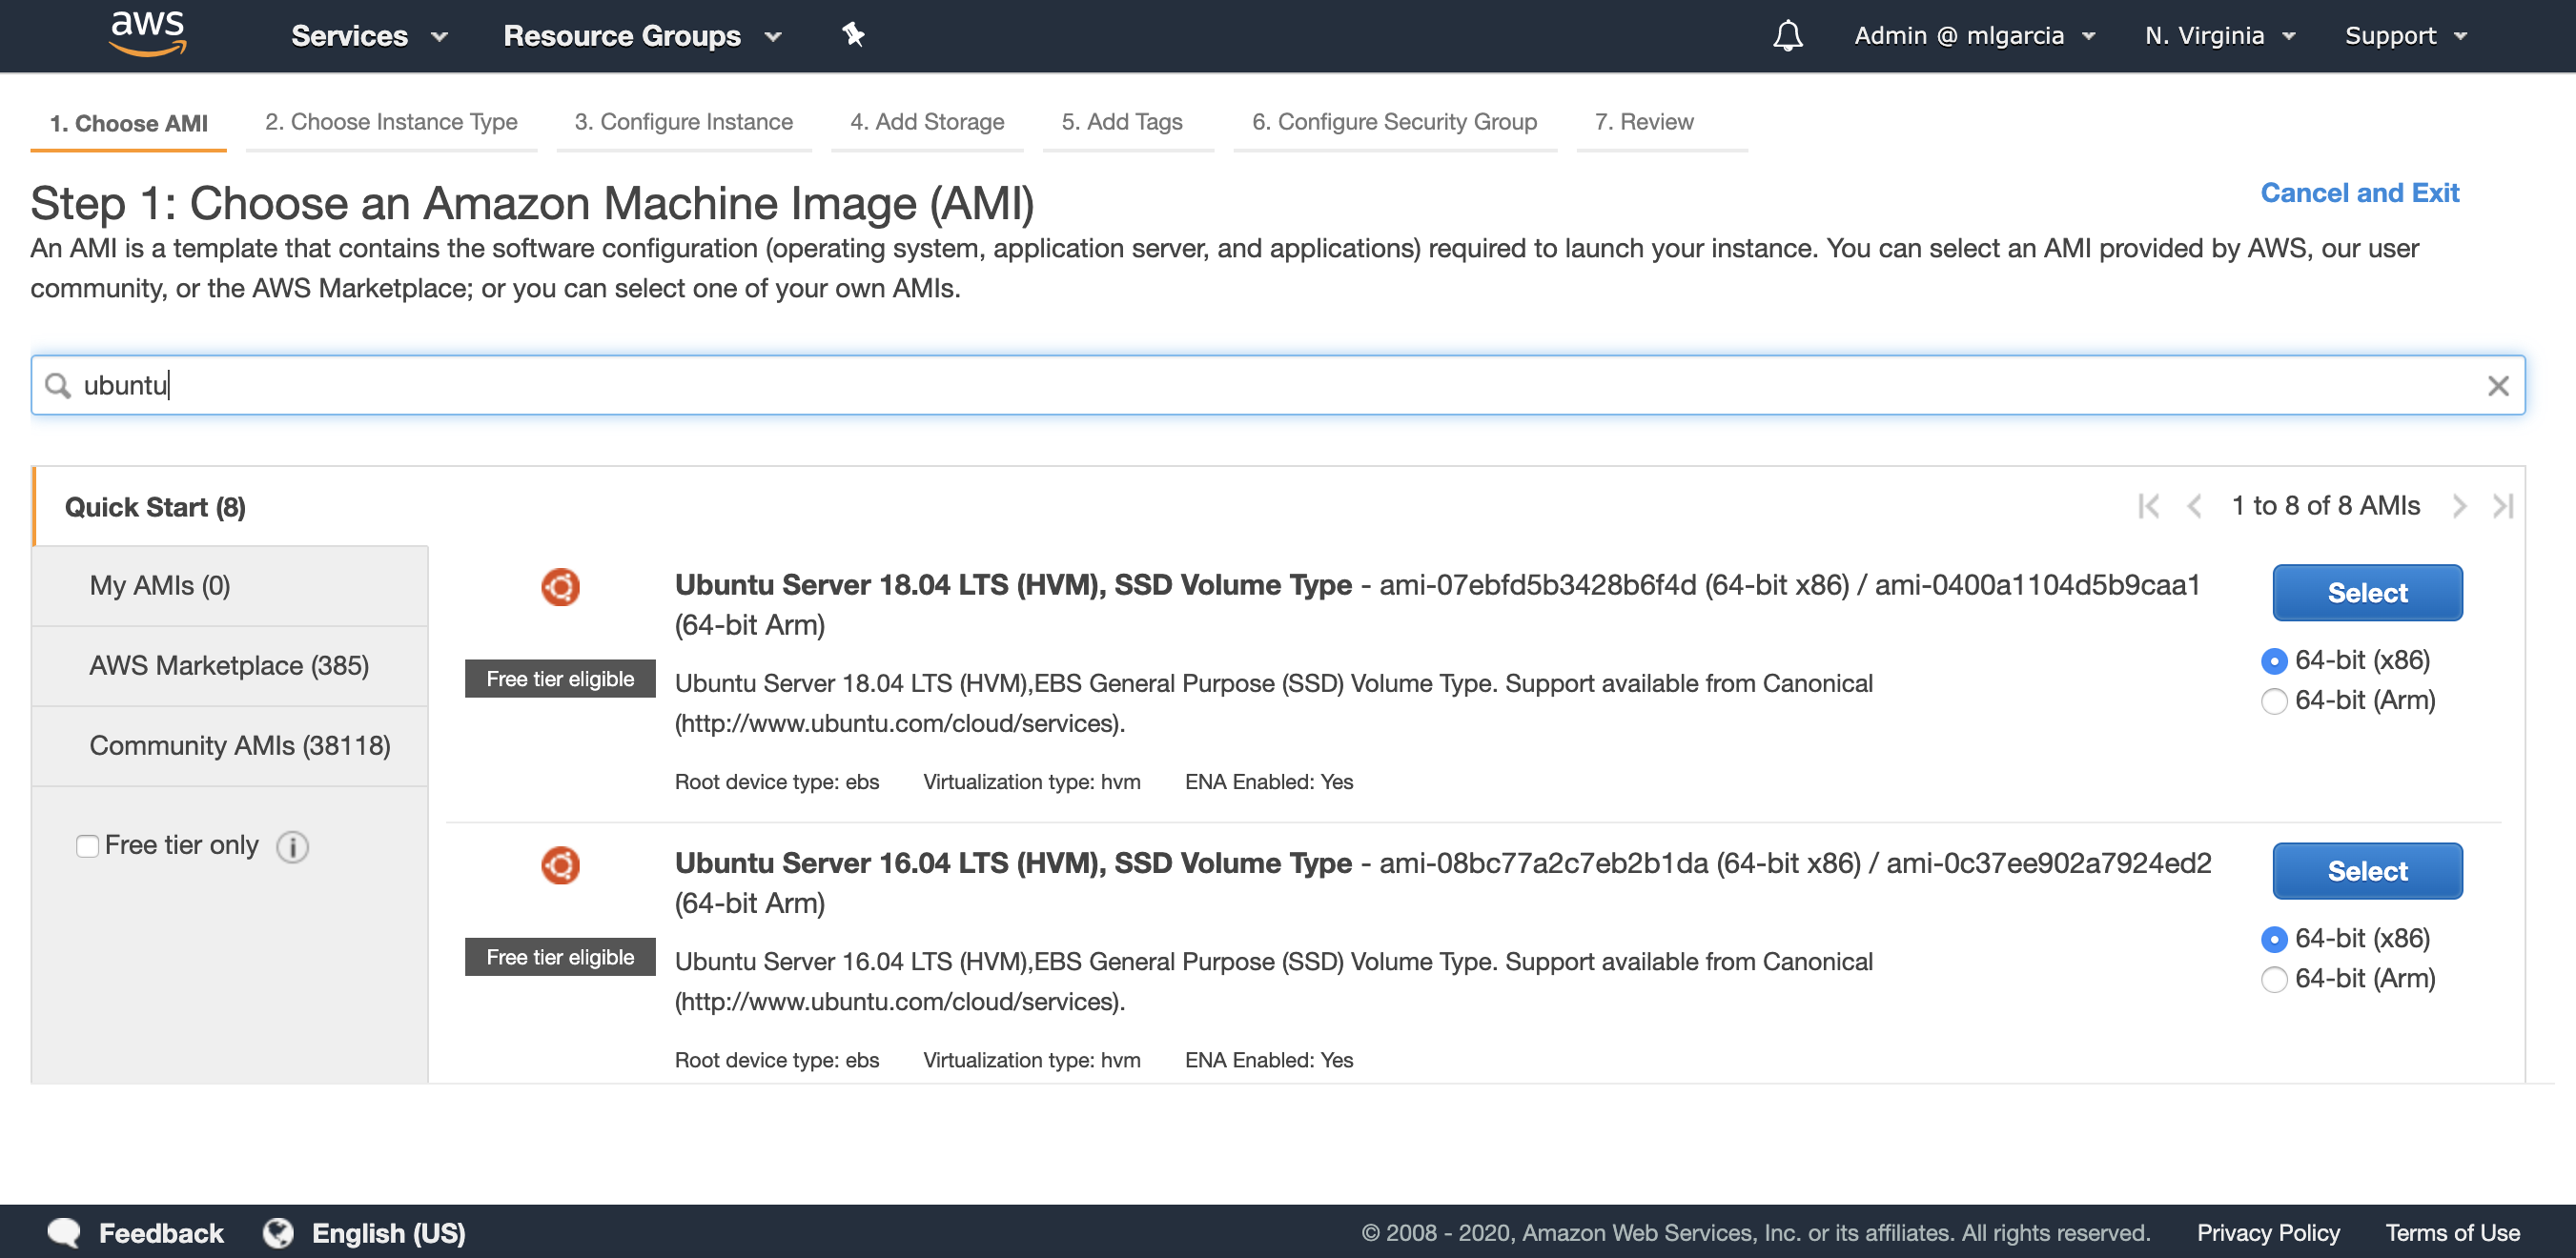
- Now that the Role has been created you can go to Amazon EC2. Choose a region, in this article I am using N. Virginia (us-east-1). Then click on Launch Instance and use the filter with the value “ubuntu”. Select the Ubuntu Server 18.04 LTS x86 (Fig. 6)
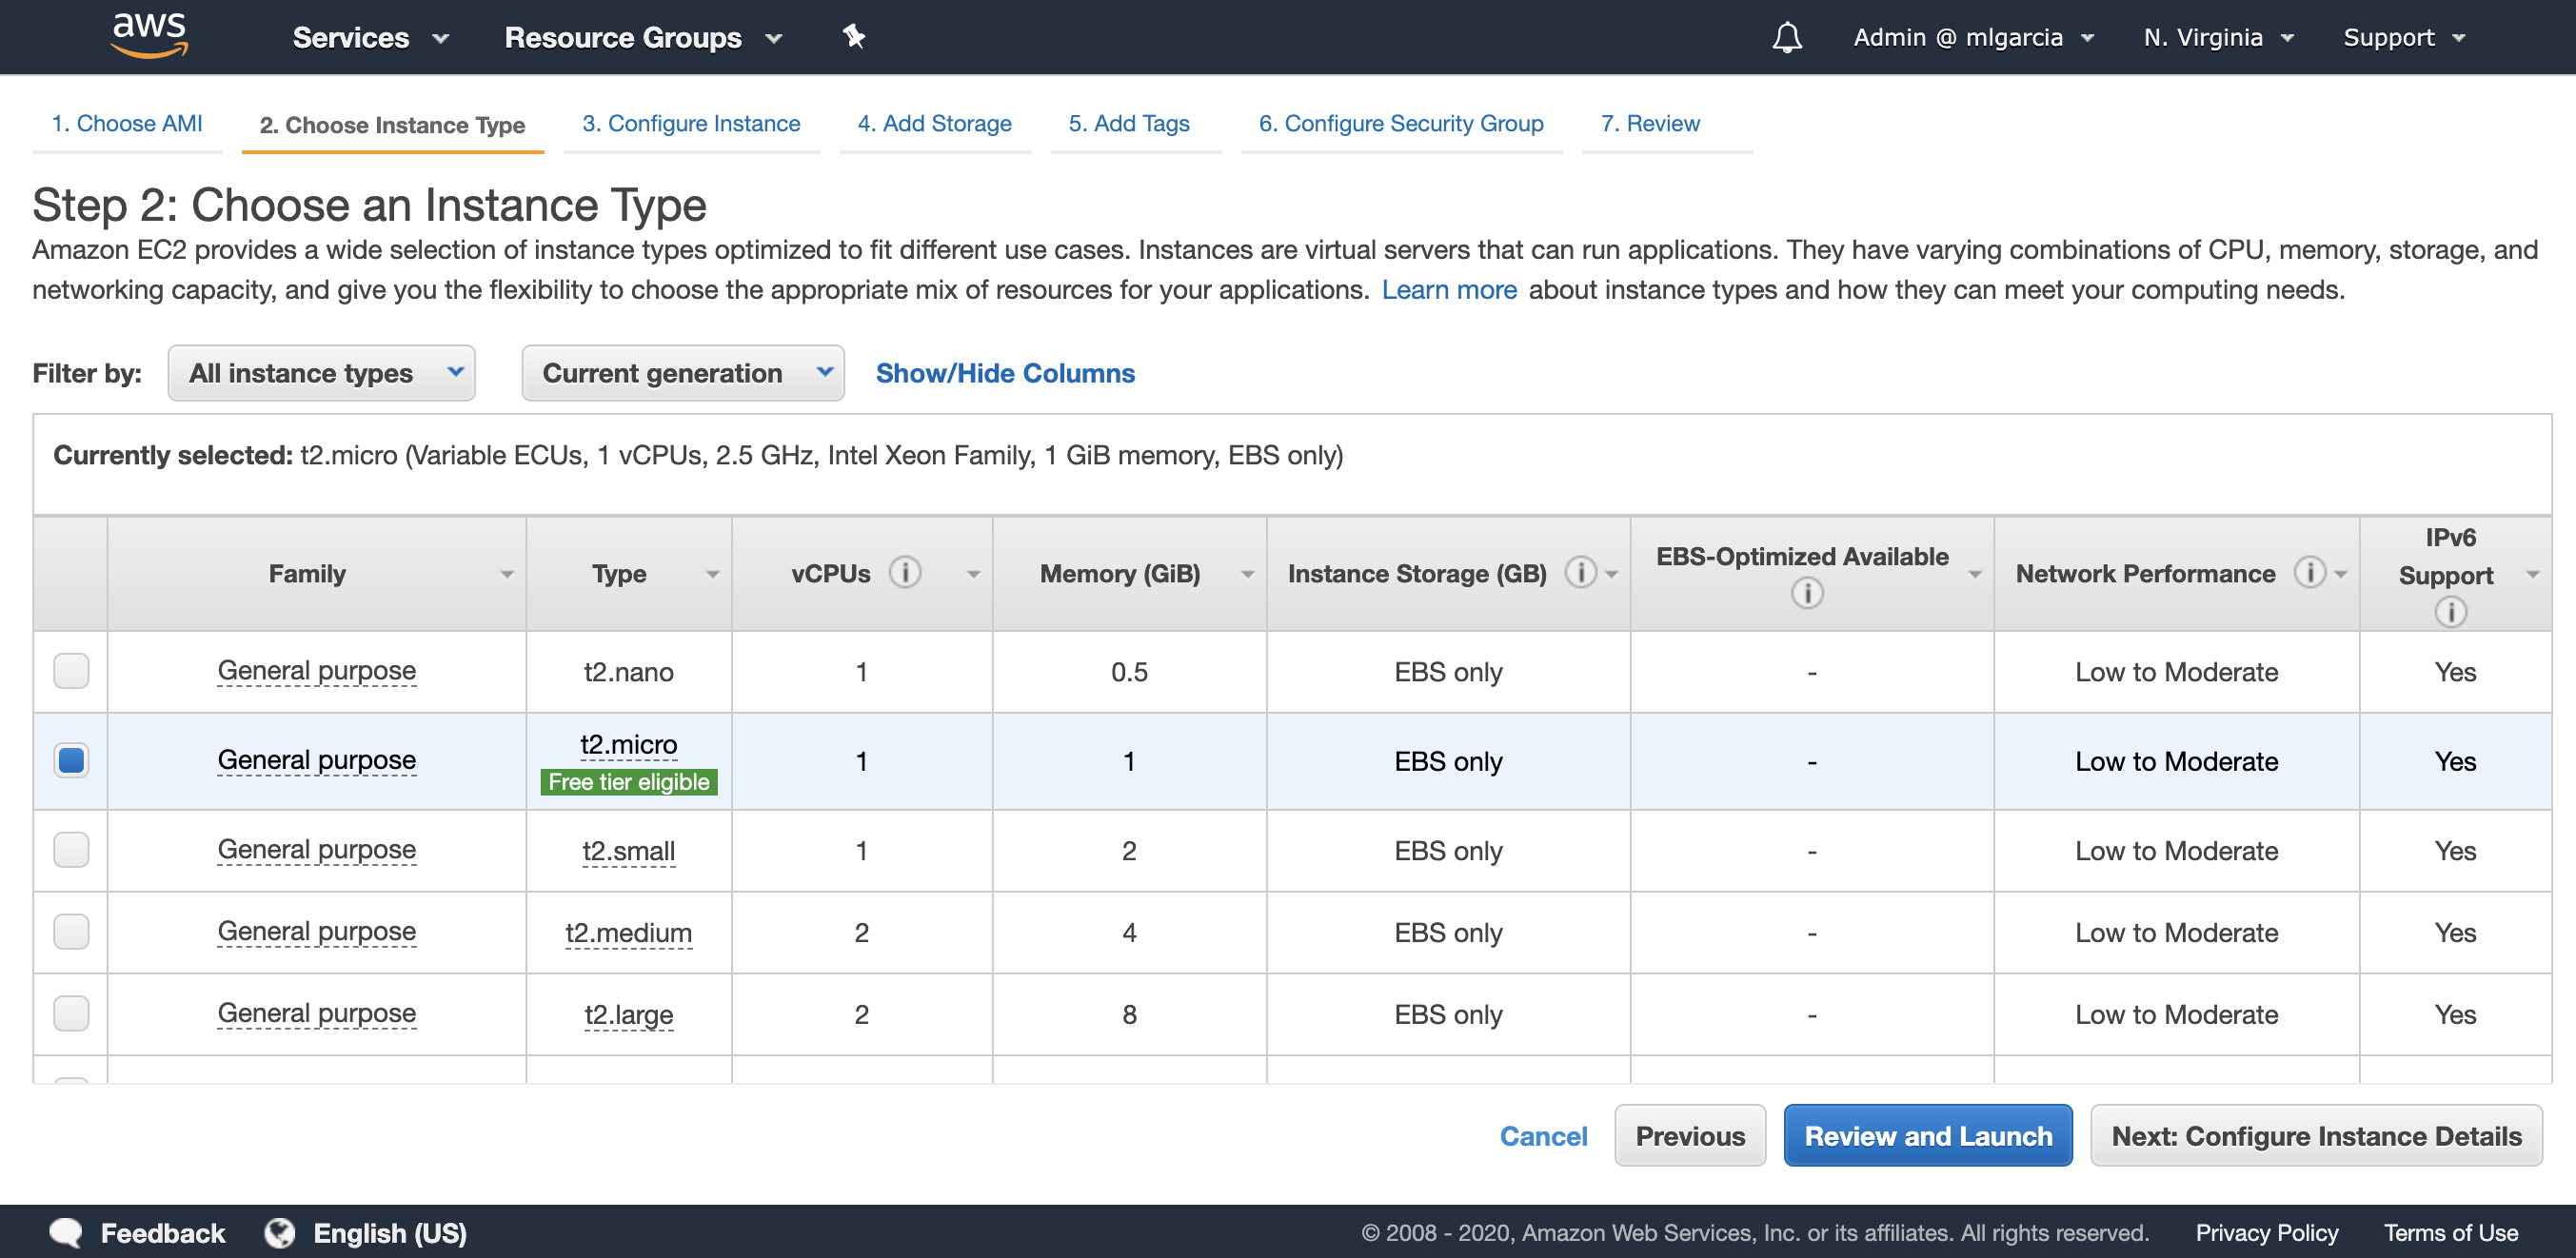
- Select the t2.micro instance type (Fig. 7).
- Click on Next: Configure Instance Details. In the IAM Role dropdown, select AWS_IoT_Config_Access (Fig. 8).
Make sure you use the default VPC and that the Auto-assign Public IP is Enable to get a public IP automatically. If you wish to use another VPC, make sure the subnet you choose will enable you to remotely connect to your Amazon EC2 instance. Then, click on Next: Add Storage.

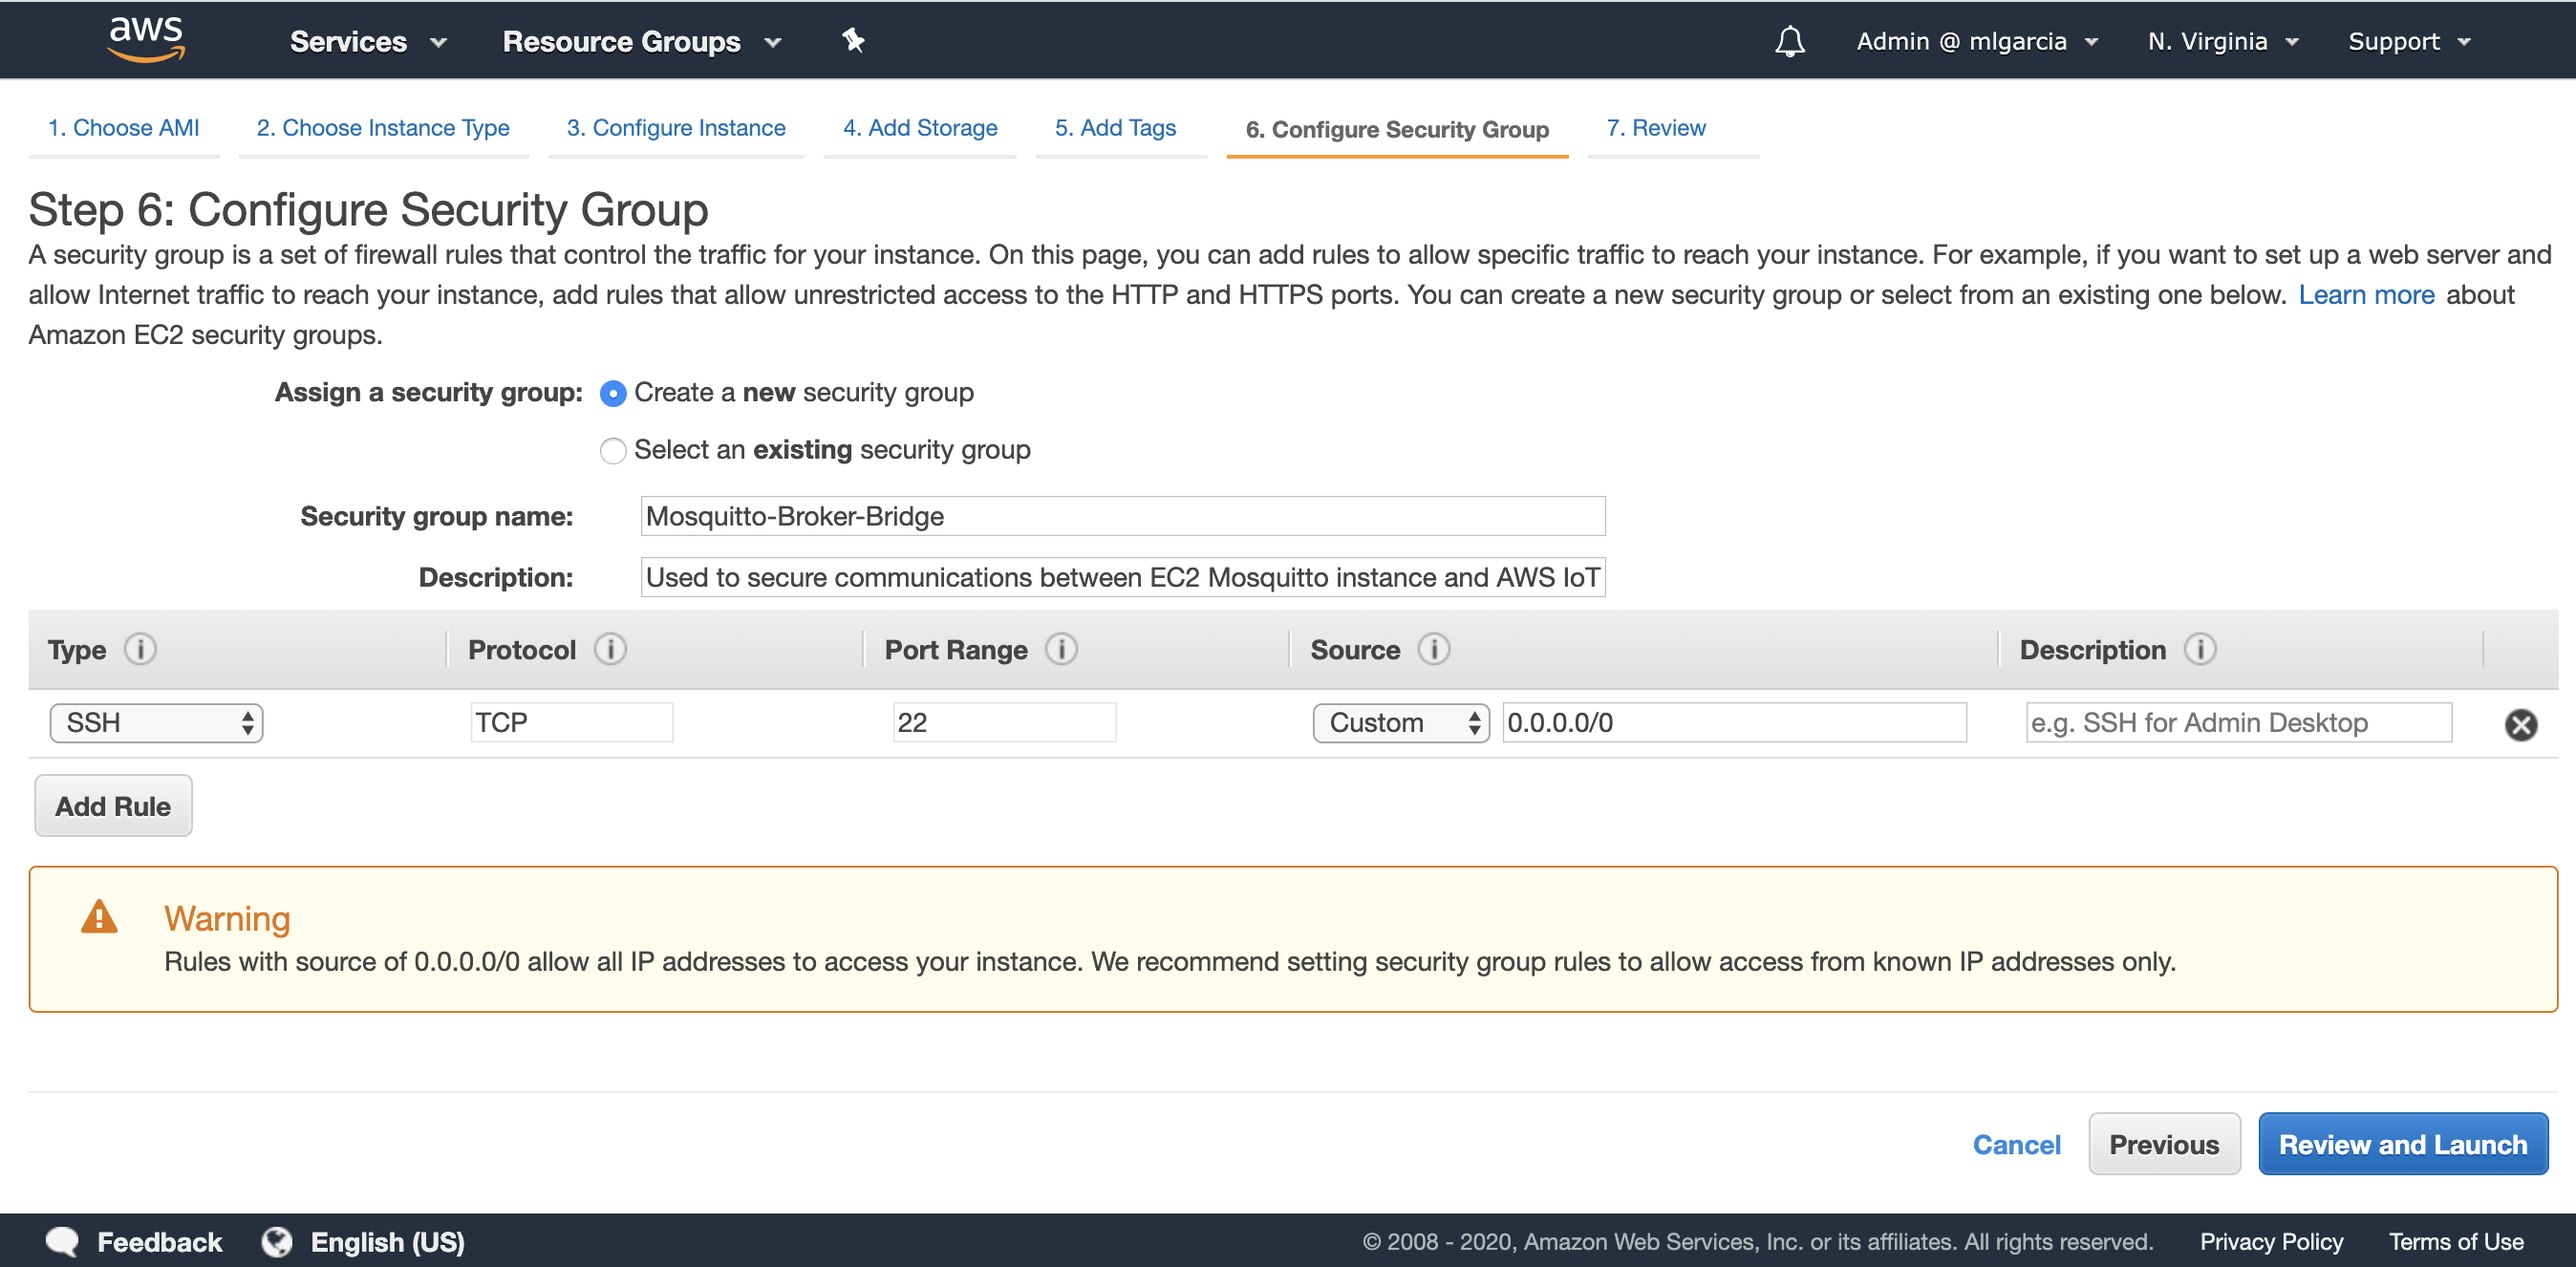
- Leave everything as is and click on Next: Tag Instance. You may assign a tag to your instance. Click on Next: Configure Security Groups. Create a new security group as described in the screenshot (Fig. 9).
- Review and launch the EC2 instance. Make sure to select an existing Key Pair or to create a new one in order to connect to the Amazon EC2 instance later on. Once the Amazon EC2 instance is running, click on “Connect” and follow instructions to establish a connection through a terminal. Once logged into the Amazon EC2 instance type the following commands:
#Update the list of repositories with one containing the latest version of #Mosquitto and update the package lists
sudo apt-add-repository ppa:mosquitto-dev/mosquitto-ppa
sudo apt-get update

#Install the Mosquitto broker, Mosquitto clients and the aws cli
sudo apt-get install mosquitto
sudo apt-get install mosquitto-clients
sudo apt install awscli
How to Configure the Bridge to AWS IoT Core
Now that we have installed the Mosquitto broker onto our Amazon EC2 instance (or local gateway), we will need to configure the bridge so that the Mosquitto broker can create a bi-directional connection to AWS IoT Core. We will first use the AWS CLI to create the necessary resources on AWS IoT side.
Enter the following commands in your terminal:
#Configure the AWS CLI with your AWS region, leave access/private keys blank
aws configure

#Create an IAM policy for the bridge
aws iot create-policy --policy-name bridgeMQTT --policy-document '{"Version": "2012-10-17","Statement": [{"Effect": "Allow","Action": "iot:*","Resource": "*"}]}'

#Place yourself in Mosquitto directory and download the Amazon Root CA #certificate
cd /etc/mosquitto/certs/
sudo wget https://www.amazontrust.com/repository/AmazonRootCA1.pem -O rootCA.pem

#Create certificates and keys. Make a note of the certificate ARN as it will be #needed to configure the IoT Policy.
sudo aws iot create-keys-and-certificate --set-as-active --certificate-pem-outfile cert.crt --private-key-outfile private.key --public-key-outfile public.key --region us-east-1

#Copy the ARN of the certificate returned by the command line in the form of #arn:aws:iot:us-east-1:0123456789:cert/xyzxyz and replace it in the following #command line in order to attach the IoT policy to your certificate
aws iot attach-principal-policy --policy-name bridgeMQTT --principal <certificate ARN>

#Add read permissions to the private key and the public certificate
sudo chmod 644 private.key
sudo chmod 644 cert.crt
We now have a client certificate for our bridge, this certificate is associated with an IoT policy. This IoT policy will give permissions to the bridge to connect to AWS IoT Core and publish/subscribe to any topic (this policy must be further restricted to match your usage appropriately). The last step is to create the configuration file with our specific configuration for the Mosquitto Broker bridge.
#Retrieve the value of the AWS IoT Core ATS endpoint for your AWS Region using #the cli and make a note of it.
aws iot describe-endpoint --endpoint-type iot:Data-ATS

#Create the configuration file
sudo nano /etc/mosquitto/conf.d/bridge.conf
First, edit the following by replacing the value of the ‘address’ with the value of your AWS IoT Core ATS endpoint. Second, copy the content and paste it in the nano editor. Finally, save the file on the Amazon EC2 instance by using the following key combinations ‘ctrl + o’, ‘enter’, then ‘ctrl + x’.
# ============================================================
# Bridge to AWS IOT
# ============================================================

connection awsiot

#<Paste your AWS IoT Core ATS endpoint retrieved from the AWS CLI in the form of xxxxxxxxxxxxxxx-ats.iot.<region>.amazonaws.com:8883

address xxxxxxxxxxxxxxx-ats.iot.<region>.amazonaws.com:8883

# Specifying which topics are bridged and in what fashion
topic awsiot_to_localgateway in 1
topic localgateway_to_awsiot out 1
topic both_directions both 1

# Setting protocol version explicitly
bridge_protocol_version mqttv311
bridge_insecure false

# Bridge connection name and MQTT client Id, enabling the connection automatically when the broker starts.
cleansession true
clientid bridgeawsiot
start_type automatic
notifications false
log_type all

# ============================================================
# Certificate based SSL/TLS support
# ============================================================

#Path to the rootCA
bridge_cafile /etc/mosquitto/certs/rootCA.pem

# Path to the PEM encoded client certificate
bridge_certfile /etc/mosquitto/certs/cert.crt

# Path to the PEM encoded client private key
bridge_keyfile /etc/mosquitto/certs/private.key

#END of bridge.conf
Now we can restart the Mosquitto broker to load this new configuration:
#Restart the Mosquitto Mosquitto broker
sudo service mosquitto restart
Making Sure Everything is Working
The Mosquitto broker has now restarted and has already connected to AWS IoT Core in the background. In our configuration we have bridged 3 topics:
- awsiot_to_localgateway: any message received by AWS IoT Core from this topic will be forwarded to the local gateway.
- localgateway_to_awsiot: any message received by the local gateway will be forwarded to AWS IoT Core.
- both_directions: any message received on this topic by one MQTT broker will be forwarded to the other MQTT broker.
We will check that the topic localgateway_to_awsiot is functioning properly, meaning that messages will be forwarded from the local Mosquitto broker to AWS IoT Core.
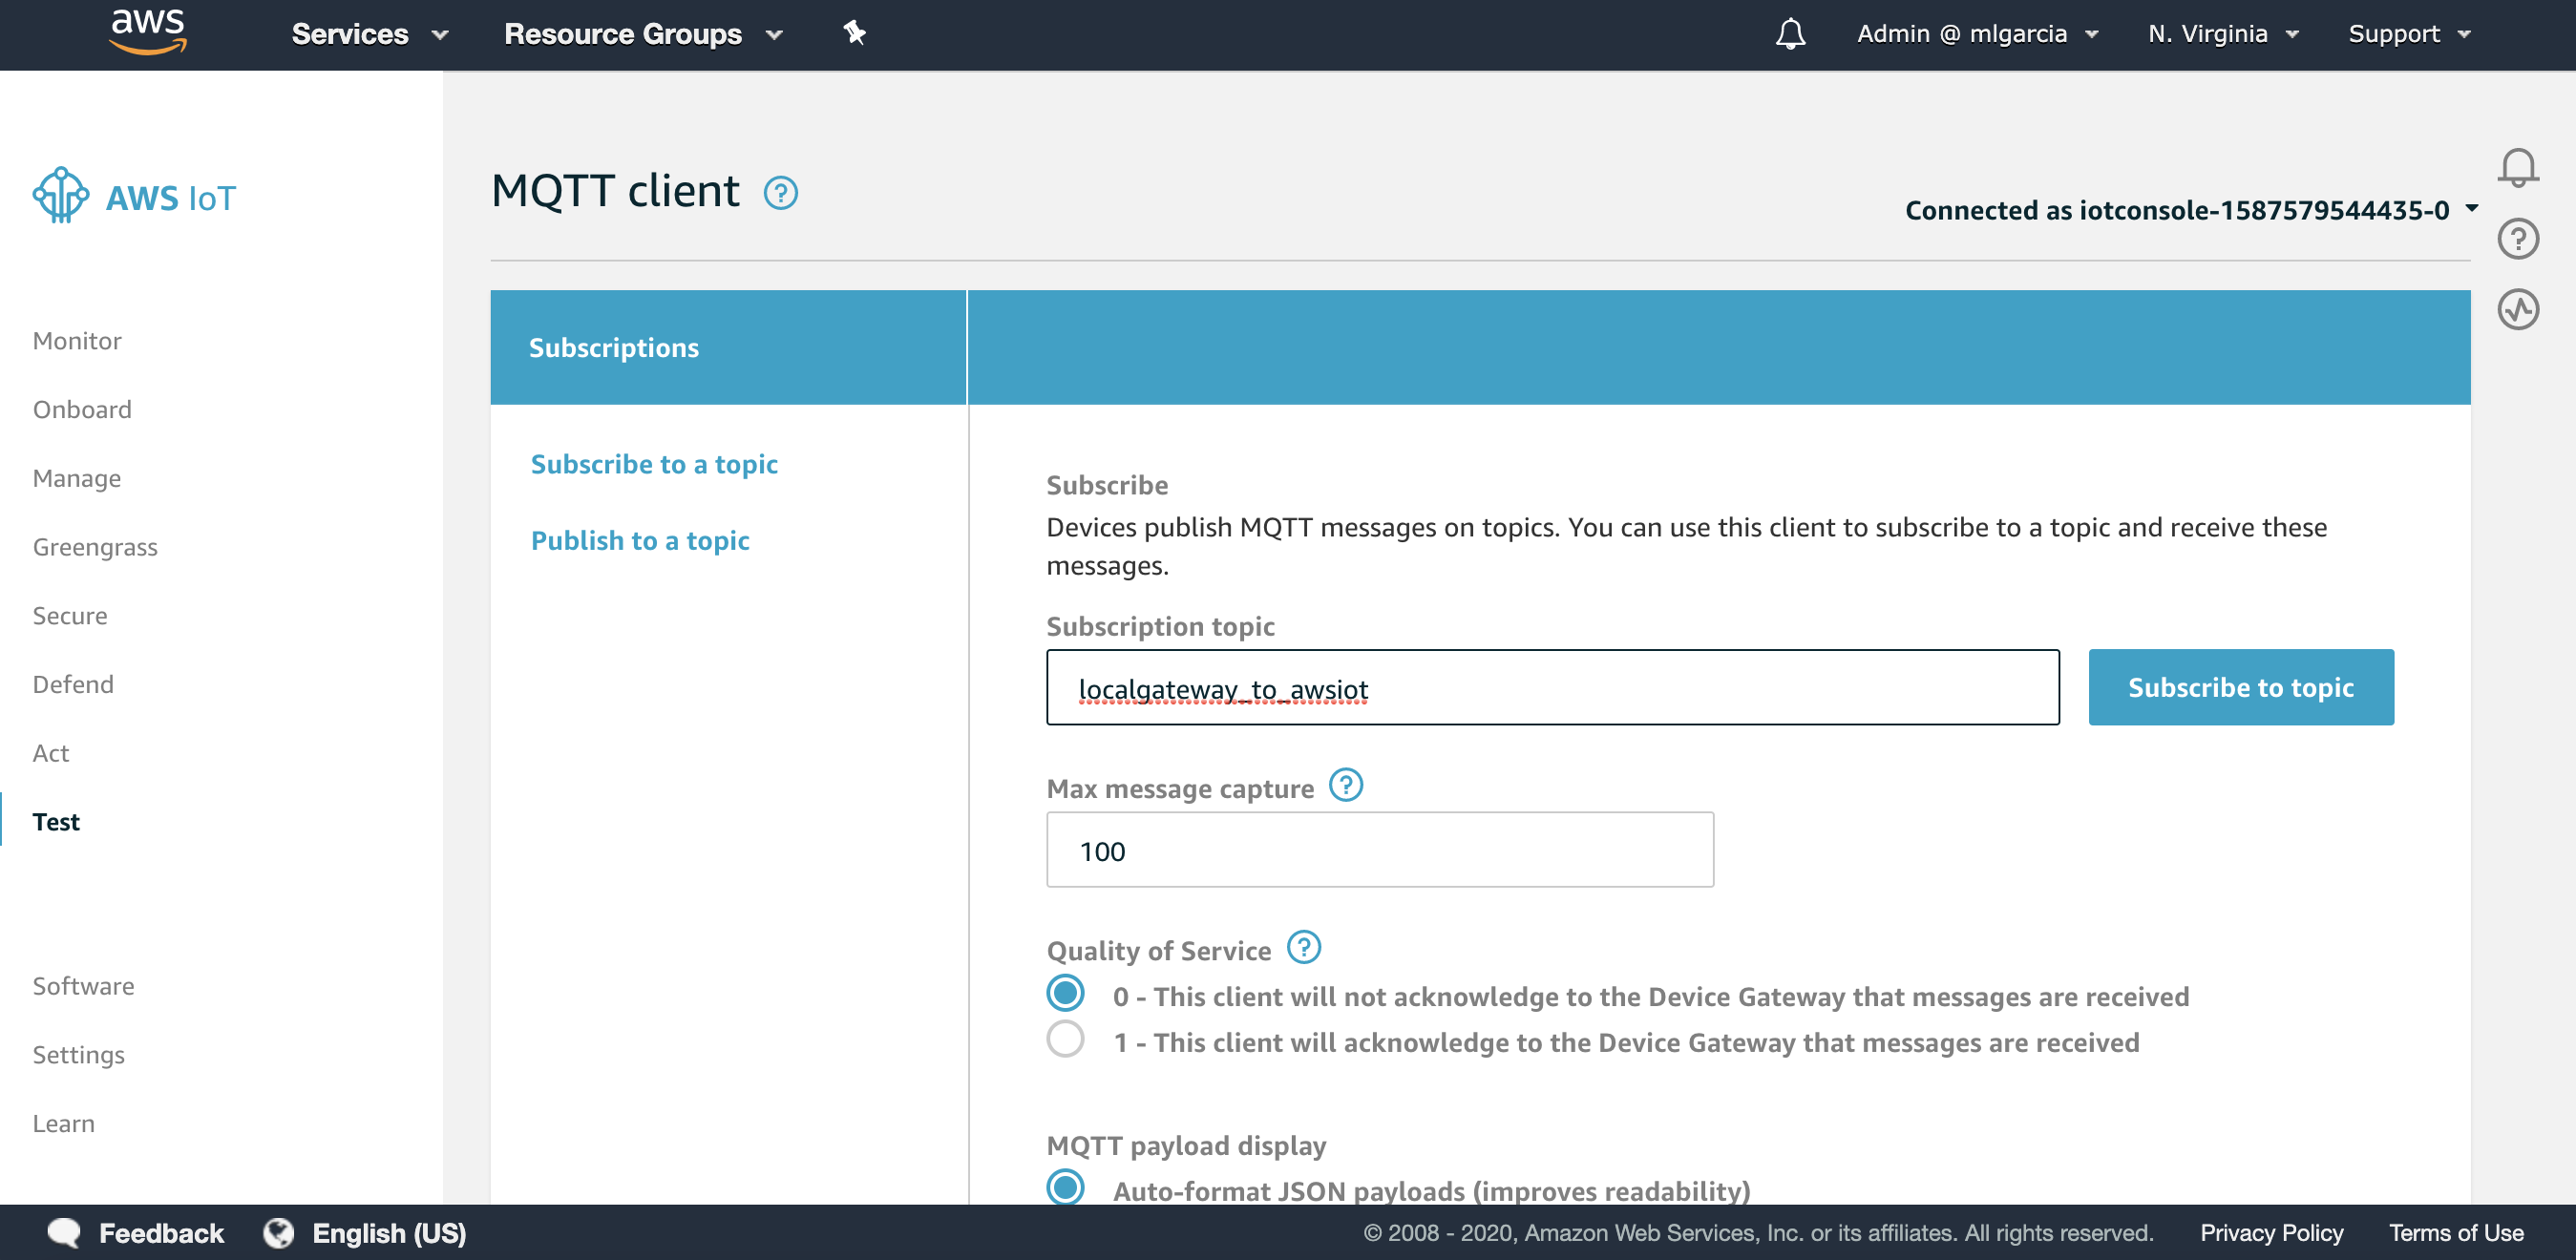
- Go to the Test section of the AWS IoT Console.
- Enter localgateway_to_awsiot as the Subscription topic and click on Subscribe to topic (Fig. 10)
Now that we are listening for incoming messages on the AWS IoT Core side, we will publish an MQTT message from a local client inside the Amazon EC2 instance to the Mosquitto broker inside the Amazon EC2 instance to test if the bridge is running properly. If everything runs properly, the message will be emitted from the local client to the Amazon EC2 instance Mosquitto broker and forwarded to AWS IoT Core.
#Publish a local message to the Mosquitto broker running on the Amazon EC2 #instance from the terminal
mosquitto_pub -h localhost -p 1883 -q 1 -d -t localgateway_to_awsiot  -i localClientID -m "{\"message\": \"helloFromLocalGateway\"}"
You should now get this message on your screen, delivered to AWS IoT Core thanks to the configured bridge running on your Amazon EC2 instance (Fig. 11).

As an exercice, you can use the following commands to test the other configured bridged topics to test sending messages both ways!
# Publish a message locally on the topic both_directions and receive the message on AWS IoT Core
mosquitto_pub -h localhost -p 1883 -q 1 -d -t both_directions -i yourClientID -m "{\"message\": \"helloFromLocalGateway\"}"

# Subscribe to the both_directions topic to receive message sent by AWS IoT #Core on that topic
mosquitto_sub -h localhost -p 1883 -t both_directions
If you are done testing with an Amazon EC2 Instance you can replicate this setup with the device you are planning to use as a gateway which is hosting the Mosquitto broker!
Next Steps
Now that your bridge between your local Mosquitto broker and AWS IoT Core is up and running you might want to fine tune some parameters of the bridge connection. Please consult the Bridge section of the official Mosquitto documentation if you need additional details.
Also, bear in mind the limitations of this approach if you are considering production use. The bridge connection is using only one connection to exchange messages to AWS IoT Core which is subject to the AWS IoT Core Broker limits. Furthermore, the Mosquitto broker represents a single point of failure in this architecture. Due to those shortcomings in terms of scalability and high availability, we recommend you reach out to the AWS team in order to evaluate other solutions if your use case requires it. Alternatively, you could connect your devices directly to AWS IoT Core using FreeRTOS, our IoT Device SDKs, or use AWS IoT Greengrass.
Don’t forget you can use Machine Learning, Data lakes and Analytics and other AWS IoT Services to create your IoT application. To learn more do not hesitate to read our IoT blog, to browse our library of patterns, or to register for free online training.