Build and Train a Machine Learning Model Locally
TUTORIAL
Overview
In this tutorial, you learn how to build and train a machine learning (ML) model locally within your Amazon SageMaker Studio notebook.
Amazon SageMaker Studio is an integrated development environment (IDE) for ML that provides a fully managed Jupyter notebook interface in which you can perform end-to-end ML lifecycle tasks. Using SageMaker Studio, you can create and explore datasets, prepare training data, build and train models, and deploy trained models for inference—all in one place.
Exploring a sample of the dataset and iterating over multiple model and parameter configurations before training with the full dataset is a common practice in ML development. For this exploration stage, Amazon SageMaker provides the local mode, which allows you to test your training logic, try different modeling approaches, and gauge model performance before running full-scale training jobs.
For this tutorial, you use a synthetically generated auto insurance claims dataset. The inputs are the training and test datasets, each containing details and extracted features about claims and customers along with a fraud column indicating whether a claim was fraudulent or otherwise. You will use the open source XGBoost framework to prototype a binary classification model on this synthetic dataset to predict the likelihood of a claim being fraudulent.
What you will accomplish
In this guide, you will:
- Ingest training data from Amazon S3 into Amazon SageMaker
- Build and train an XGBoost model locally
- Save the trained model and artifacts to Amazon S3
- Clean up resources you created
Prerequisites
Before starting this guide, you will need:
- An AWS account: If you don't already have an account, follow the Setting Up Your AWS Environment getting started guide for a quick overview.
AWS experience
Beginner
Time to complete
15 minutes
Cost to complete
See SageMaker pricing to estimate cost for this tutorial.
Requires
You must be logged into an AWS account.
Services used
Amazon SageMaker Studio
Last updated
July 7, 2022
Implementation
Step 1: Set up your Amazon SageMaker Studio domain
With Amazon SageMaker, you can deploy a model visually using the console or programmatically using either SageMaker Studio or SageMaker notebooks. In this tutorial, you deploy the model programmatically using a SageMaker Studio notebook, which requires a SageMaker Studio domain.
Amazon SageMaker supports the creation of multiple Amazon SageMaker Domains in a single AWS Region for each account. If you already have a SageMaker Studio domain in the US East (N. Virginia) Region, follow the SageMaker Studio setup guide to attach the required AWS IAM policies to your SageMaker Studio account, then skip Step 1, and proceed directly to Step 2.
If you don't have an existing SageMaker Studio domain, continue with Step 1 to run an AWS CloudFormation template that creates a SageMaker Studio domain and adds the permissions required for the rest of this tutorial.
Choose the AWS CloudFormation stack link. This link opens the AWS CloudFormation console and creates your SageMaker Studio domain and a user named studio-user. It also adds the required permissions to your SageMaker Studio account. In the CloudFormation console, confirm that US East (N. Virginia) is the Region displayed in the upper right corner. Stack name should be CFN-SM-IM-Lambda-catalog, and should not be changed. This stack takes about 10 minutes to create all the resources.
This stack assumes that you already have a public VPC set up in your account. If you do not have a public VPC, see VPC with a single public subnet to learn how to create a public VPC.

Select I acknowledge that AWS CloudFormation might create IAM resources, and then choose Create stack.

On the CloudFormation pane, choose Stacks. It takes about 10 minutes for the stack to be created. When the stack is created, the status of the stack changes from CREATE_IN_PROGRESS to CREATE_COMPLETE.

Step 2: Set up a SageMaker Studio notebook
In this step, you'll launch a new SageMaker Studio notebook, install the necessary open source libraries, and set up the SageMaker variables required to interact with other services, including Amazon Simple Storage Service (Amazon S3).
Enter SageMaker Studio into the console search bar, and then choose SageMaker Studio.

Choose US East (N. Virginia) from the Region dropdown list on the upper right corner of the SageMaker console. For Launch app, select Studio to open SageMaker Studio using the studio-user profile.

Open the SageMaker Studio interface. On the navigation bar, choose File, New, Notebook.

In the Set up notebook environment dialog box, under Image, select Data Science. The Python 3 kernel is selected automatically. Choose Select.

The kernel on the top right corner of the notebook should now display Python 3 (Data Science).

Copy and paste the following code snippet into a cell in the notebook, and press Shift+Enter to run the current cell to update the aiobotocore library, which is an API to interact with many of the AWS services, and install the XGBoost library. Ignore any warnings to restart the kernel or any dependency conflict errors.
Note: If you face any issues related to botocore, please downgrade the boto3 version in your notebook.
%pip install --upgrade -q aiobotocore
%pip install -q xgboost==1.3.1You also need to instantiate the S3 client object and the locations inside your default S3 bucket where content such as metrics and model artifacts are uploaded. To do this, copy and paste the following code block and run the cell. Notice that the write bucket name is derived from the SageMaker session object. Your default bucket has the name sagemaker-<your-Region>-<your-account-id>. This bucket is where all training artifacts are uploaded. The datasets that you use for training exist in a public S3 bucket named sagemaker-sample-files, which has been specified as the read bucket. The location in the bucket is specified through the read prefix.
import pandas as pd
import boto3
import sagemaker
import json
import joblib
import xgboost as xgb
from sklearn.metrics import roc_auc_score

# Set SageMaker and S3 client variables
sess = sagemaker.Session()

region = sess.boto_region_name
s3_client = boto3.client("s3", region_name=region)

sagemaker_role = sagemaker.get_execution_role()

# Set read and write S3 buckets and locations
write_bucket = sess.default_bucket()
write_prefix = "fraud-detect-demo"

read_bucket = "sagemaker-sample-files"
read_prefix = "datasets/tabular/synthetic_automobile_claims"

train_data_key = f"{read_prefix}/train.csv"
test_data_key = f"{read_prefix}/test.csv"
model_key = f"{write_prefix}/model"
output_key = f"{write_prefix}/output"

train_data_uri = f"s3://{read_bucket}/{train_data_key}"
test_data_uri = f"s3://{read_bucket}/{test_data_key}"Step 3: Train an XGBoost model
In this step, you set up and train an XGBoost binary classification model on the synthetic auto-insurance claim dataset and evaluate the model's performance. You use the column named fraud as the target column. The goal is to train an XGBoost binary classifier that can differentiate fraudulent claims from legitimate ones and gauge baseline model performance.
The open source XGBoost framework exposes multiple hyperparameters that can be used to control model performance. For the purposes of this tutorial, a few of the important hyperparameters are set and the area under the Receiver Operating Characteristic Area Under the Curve (ROC-AUC) is chosen as the evaluation metric. Copy and paste the following code block in a cell and run it to cross-validate and train an XGBoost model.
hyperparams = {
                "max_depth": 3,
                "eta": 0.2,
                "objective": "binary:logistic",
                "subsample" : 0.8,
                "colsample_bytree" : 0.8,
                "min_child_weight" : 3
              }

num_boost_round = 100
nfold = 3
early_stopping_rounds = 10


# Set up data input
label_col = "fraud"
data = pd.read_csv(train_data_uri)

# Read training data and target
train_features = data.drop(label_col, axis=1)
train_label = pd.DataFrame(data[label_col])
dtrain = xgb.DMatrix(train_features, label=train_label)

# Cross-validate on training data
cv_results = xgb.cv(
    params=hyperparams,
    dtrain=dtrain,
    num_boost_round=num_boost_round,
    nfold=nfold,
    early_stopping_rounds=early_stopping_rounds,
    metrics=["auc"],
    seed=10,
)


metrics_data = {
    "binary_classification_metrics": {
        "validation:auc": {
            "value": cv_results.iloc[-1]["test-auc-mean"],
            "standard_deviation": cv_results.iloc[-1]["test-auc-std"]
        },
        "train:auc": {
            "value": cv_results.iloc[-1]["train-auc-mean"],
            "standard_deviation": cv_results.iloc[-1]["train-auc-std"]
        },
    }
}


print(f"Cross-validated train-auc:{cv_results.iloc[-1]['train-auc-mean']:.2f}")
print(f"Cross-validated validation-auc:{cv_results.iloc[-1]['test-auc-mean']:.2f}")
The cross-validated training and validation AUC scores are displayed after you run the cell. Your scores might be slightly different due to the stochastic nature of the model-building process. However, the difference in training and test performance indicates that the model is most likely overfitting the training dataset given the chosen hyperparameter combinations. As a data scientist, you can use this insight to refine the model before full-scale training.

Once you have measured the cross-validated performance, instead of splitting the training dataset across a number of folds, you can retrain the model on the full training dataset while using the test set for early stopping. Early stopping helps to control model complexity and reduces overfitting. Copy and paste the following code block to retrain and evaluate on the training and test datasets. Note that retraining in local mode means the dataset is pulled from Amazon S3 to the local SageMaker Studio instance environment. The SageMaker Studio instance should have sufficient space to store data locally.
data = pd.read_csv(test_data_uri)
test_features = data.drop(label_col, axis=1)
test_label = pd.DataFrame(data[label_col])
dtest = xgb.DMatrix(test_features, label=test_label)

model = (xgb.train(params=hyperparams, dtrain=dtrain, evals = [(dtrain,'train'), (dtest,'eval')], num_boost_round=num_boost_round,
                  early_stopping_rounds=early_stopping_rounds, verbose_eval = 0)
        )

# Test model performance on train and test sets
test_pred = model.predict(dtest)
train_pred = model.predict(dtrain)

test_auc = roc_auc_score(test_label, test_pred)
train_auc = roc_auc_score(train_label, train_pred)

print(f"Train-auc:{train_auc:.2f}, Test-auc:{test_auc:.2f}")
This completes the training and evaluation of a binary classification model on the auto-insurance claims dataset. Copy and paste the following code block to save the evaluation metrics as a JSON file and the trained model as a pickle file. The code saves both to the local directory within SageMaker Studio as well as to your default S3 bucket.
# Save model and performance metrics locally

with open("./metrics.json", "w") as f:
    json.dump(metrics_data, f)

with open("./xgboost-model", "wb") as f:
    joblib.dump(model, f)

# Upload model and performance metrics to S3

metrics_location = output_key + "/metrics.json"
model_location = model_key + "/xgboost-model"

s3_client.upload_file(Filename="./metrics.json", Bucket=write_bucket, Key=metrics_location)
s3_client.upload_file(Filename="./xgboost-model", Bucket=write_bucket, Key=model_location)
Step 4: Clean up the resources
It is a best practice to delete resources that you are no longer using so that you don't incur unintended charges.
To delete the S3 bucket, do the following:
- Open the Amazon S3 console. On the navigation bar, choose Buckets, sagemaker-<your-Region>-<your-account-id>, and then select the checkbox next to fraud-detect-demo. Then, choose Delete.
- On the Delete objects dialog box, verify that you have selected the proper object to delete and enter permanently delete into the Permanently delete objects confirmation box.
- Once this is complete and the bucket is empty, you can delete the sagemaker-<your-Region>-<your-account-id> bucket by following the same procedure again.

The Data Science kernel used for running the notebook image in this tutorial will accumulate charges until you either stop the kernel or perform the following steps to delete the apps. For more information, see Shut Down Resources in the Amazon SageMaker Developer Guide.
To delete the SageMaker Studio apps, do the following: On the SageMaker Studio console, choose studio-user, and then delete all the apps listed under Apps by choosing Delete app. Wait until the Status changes to Deleted.

If you used an existing SageMaker Studio domain in Step 1, skip the rest of Step 4 and proceed directly to the conclusion section.
If you ran the CloudFormation template in Step 1 to create a new SageMaker Studio domain, continue with the following steps to delete the domain, user, and the resources created by the CloudFormation template.
To open the CloudFormation console, enter CloudFormation into the AWS console search bar, and choose CloudFormation from the search results.

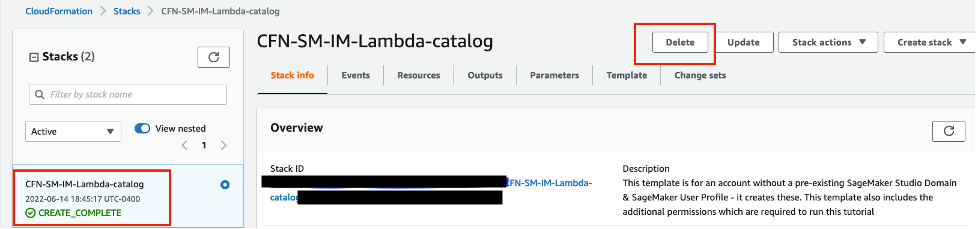
In the CloudFormation pane, choose Stacks. From the status dropdown list, select Active. Under Stack name, choose CFN-SM-IM-Lambda-catalog to open the stack details page.

On the CFN-SM-IM-Lambda-catalog stack details page, choose Delete to delete the stack along with the resources it created in Step 1.
Conclusion
Congratulations! You have finished the Build and Train a Machine Learning Model Locally tutorial.
In this tutorial, you used Amazon SageMaker Studio to locally build a binary classification model using the XGBoost open source library and saved the model artifacts and outputs to Amazon S3. As shown in this tutorial, with quick prototyping in SageMaker Studio, you can assess model performance and potential overfitting issues before production model training using the full dataset.
You can continue your data scientist journey with Amazon SageMaker by following the next steps section below.