Orchestrate Queue-based Microservices with AWS Step Functions and Amazon SQS
TUTORIAL
Overview
In this tutorial, you will learn how to use AWS Step Functions and Amazon Simple Queue Service (Amazon SQS) to design and run a serverless workflow that orchestrates a message queue-based microservice. Step Functions is a serverless orchestration service that lets you easily coordinate multiple AWS services into flexible workflows that are easy to debug and change. Amazon SQS is the AWS service that allows application components to communicate in the cloud.
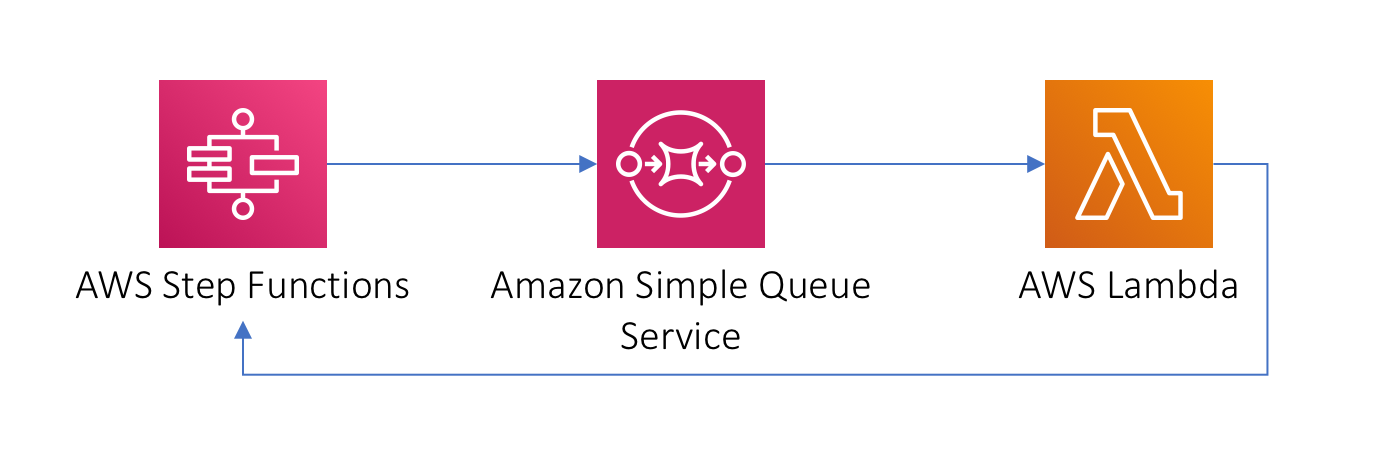
This tutorial will simulate inventory verification requests from incoming orders in an e-commerce application as part of an order-processing workflow. Step Functions will send inventory verification requests to a queue on Amazon SQS. An AWS Lambda function will act as your inventory microservice that uses a queue to buffer requests. When it retrieves a request, it will check inventory and then return the result to Step Functions. When a task in Step Functions is configured this way, it is called a callback pattern. Callback patterns allow you to integrate asynchronous tasks in your workflow, such as the inventory verification microservice of this tutorial.
What you will accomplish
In this tutorial, you will:
- Create and configure an Amazon SQS queue
- Design a workflow in Step Functions that describes how you want e-commerce orders to be processed
- Create an IAM role that allows Step Functions to access Amazon SQS
- Create a Lambda function that will mock an inventory microservice
- Execute a serverless workflow
Prerequisites
Before starting this tutorial, you will need:
- An AWS account: If you don't already have one, follow the Setting Up Your AWS Environment getting started guide for a quick overview.
AWS experience
Intermediate
Minimum time to complete
10 minutes
Cost to complete
Free Tier eligible
Requires
- AWS account with administrator-level access*
- Recommended browser: The latest version of Chrome or Firefox
*Accounts created within the past 24 hours might not yet have access to the services required for this tutorial.
Services used
Last updated
April 19, 2023
This tutorial
requires an AWS account
There are no additional charges for AWS Step Functions or Amazon SQS. The resources you create in this tutorial are Free Tier eligible.
Implementation
-
Enter the Amazon SQS console
a. Open the AWS Management Console in a separate tab so you can keep this step-by-step guide open. In the search bar, enter SQS and select Simple Queue Service to open the service console.

b. If the Amazon SQS console landing page appears, as shown in the screenshot, choose Create queue. If you don't see this page, skip to the next step.

-
Create an Amazon SQS queue
In this step, you will create and configure an Amazon SQS queue. A queue is a reliable, highly scalable buffer that stores messages as they travel between distributed applications or microservices. Queues help to decouple applications, connect microservices, batch tasks, and store notifications.
Our use case for Amazon SQS in this tutorial will simulate the storage of inventory verification requests from incoming orders in an e-commerce application.
a. First, we will create a simple queue that stores orders that are placed on the e-commerce store. For this tutorial, we do not require strict ordering, so we won’t make any changes to the queue type. Leave Standard selected under Type.
 b. Enter Orders in the Name field.

c. You can configure your queue to modify settings such as retention period, maximum message size, and delivery delays. For this tutorial, we will keep the default parameters. Choose Create queue.

d. Your new queue is created and shown on the Queues details page.

-
Create a workflow with a state machine
Your next step is to design a workflow that describes how you want e-commerce orders to be processed. Workflows describe a process as a series of discrete tasks that can be repeated again and again.
You will design your workflow in Step Functions. Your workflow will request verification of inventory from a microservice. Many microservices uses a queue to receive requests. In this tutorial, you will use an AWS Lambda function to represent the microservice.
a. Open the AWS Step Functions console. Select Write your workflow in code, then select Standard in the Type section.
.3876a5975989e21c0d80a9c2d2eeb6a1c997c205.png "Name your state machine InventoryStateMachine")
b. Replace the contents of the State machine definition window with the Amazon States Language (ASL) state machine definition below. Amazon States Language is a JSON-based, structured language used to define your state machine.
This state machine uses a task state to put a message on an Amazon SQS queue. This task state is configured for a callback pattern. When you append .waitForTaskToken to your resource, Step Functions will add a task token to the JSON payload and wait for a callback. The microservice can return a result to Step Functions by calling the Step Functions API.
{
  "Comment": "An example of the Amazon States Language for starting a callback task.",
  "StartAt": "Check Inventory",
  "States": {
    "Check Inventory": {
      "Type": "Task",
      "Resource": "arn:aws:states:::sqs:sendMessage.waitForTaskToken",
      "Parameters": {
        "QueueUrl": "<INSERT SQS QUEUE URL HERE>",
        "MessageBody": {
          "MessageTitle": "Callback Task started by Step Functions",
          "TaskToken.$": "$$.Task.Token"
        }
      },
      "Next": "Notify Success",
      "Catch": [
      {
        "ErrorEquals": [ "States.ALL" ],
        "Next": "Notify Failure"
      }
      ]
    },
    "Notify Success": {
      "Type": "Pass",
      "Result": "Callback Task started by Step Functions succeeded",
      "End": true
    },
    "Notify Failure": {
      "Type": "Pass",
      "Result": "Callback Task started by Step Functions failed",
      "End": true
    }
  }
}
c. Copy the URL of your Amazon SQS queue from the Amazon SQS console and paste it into your state machine definition.

d. Select the refresh button to have Step Functions translate the ASL state machine definition into a visual workflow. You are able to easily verify that the process is described correctly by reviewing the visual workflow. When the microservice returns a result, the state machine will progress down the success branch. If something goes wrong, you can catch the exception and go down the right branch to make corrections.
Choose Next.
 e. Next, you will enter the name of the state machine as InventoryStateMachine. Next, go to Permissions and under Execution role, select Create new role. Step Functions will analyze your workflow and generate an IAM policy that includes permissions required by your workflow. Keep all other parameters as default.
.9a6e2c58fb0c22389d69cc0b171d4d3bbef37591.png "Select Create an IAM role for me and name it inventory-state-machine-role")
f. Choose Create state machine. You should see a green banner indicating your state machine was successfully created.

-
Create an AWS Identity and Access Management (IAM) role
AWS IAM is a web service that helps you securely control access to AWS resources. In this step, you will create an IAM role that allows Step Functions to access Amazon SQS.
a. In another browser window, open the AWS Management Console. When the screen loads, enter IAM in the search bar, then select IAM to open the service console.

b. Click Roles and then click Create role.

c. On the Create role screen, leave AWS service selected. Select Lambda under Use case and then choose Next.

d. On the Create role screen, attach AmazonSQSFullAccess and AWSStepFunctionsFullAccess policies. Attach each policy by searching on the policy name and selecting the tick box next to each name, as shown in the screenshot for the AmazonSQSFullAccess policy. Choose Next.

e. Enter Role name as inventory-lambda-role and choose Create role.

-
Create your microservice with AWS Lambda functions
In this step, you will create a Lambda function that will mock an inventory microservice. The Lambda function retrieves messages from Amazon SQS and will return a message to Step Functions that represents the result of the request.
a. In another browser window, open the AWS Management Console. When the screen loads, enter Lambda in the search bar, then select Lambda to open the service console.

b. Choose Create function.
 c. Leave Author from scratch selected. Next, configure your first Lambda function as follows:
For Name, enter Inventory.
For Runtime, select Node.js 16.x
For Execution role, select Use an existing role.
Under Existing role, select inventory-lambda-role from the dropdown list.
Choose the Create function button. d. Replace the contents of the Function code window with the following code in the index.mjs file, and then choose Save.
console.log('Loading function'); const aws = require('aws-sdk'); exports.handler = (event, context, callback) => { const stepfunctions = new aws.StepFunctions(); for (const record of event.Records) { const messageBody = JSON.parse(record.body); const taskToken = messageBody.TaskToken; const params = { output: "\"Callback task completed successfully.\"", taskToken: taskToken }; console.log(`Calling Step Functions to complete callback task with params ${JSON.stringify(params)}`); stepfunctions.sendTaskSuccess(params, (err, data) => { if (err) { console.error(err.message); callback(err.message); return; } console.log(data); callback(null); }); } };.47be4d2e8cf027ee4a08d7436b0c2fa8e238f6a0.png "Replace the contents of the Function code window")
e. Go to the Configuration tab and go to Triggers. Choose Add trigger and select the SQS trigger. Turn on the Activate trigger toggle for the Orders queue. Choose Add.

-
Execute your workflow
Your serverless workflow is ready to be executed. A state machine execution is an instance of your workflow, and occurs each time a Step Functions state machine runs and performs its tasks. Each Step Functions state machine can have multiple simultaneous executions, which you can initiate from the Step Functions console (which is what you will do next), or using the AWS SDKs, the Step Functions API actions, or the AWS CLI. An execution receives JSON input and produces JSON output.
a. In another browser window, open the AWS Management Console. When the screen loads, enter Step Functions in the search bar, then select Step Functions to open the service console.

b. On the State machines screen, select your InventoryStateMachine.
.9adf9558dc99b68c64c4cbca3b22580c930beeb8.png "On the State machines screen, click on your InventoryStateMachine")
c. Choose Start execution.

d. A new execution dialog box appears, where you can enter input for your state machine. This state machine does not depend on the input. You can use the default input. Choose Start execution.

e. As your workflow executes, each step will change color in the Visual workflow pane. Wait a few seconds for execution to complete. Then, in the Execution input and output pane, choose Input and Output to view the inputs and results of your workflow.

f. Step Functions lets you inspect each step of your workflow execution, including the inputs and outputs of each state. Select each task in your workflow and expand the Input and Output fields under Step details. You can see that the input payload into your state machine is passed from each step to the next, and that the payload is updated as each step completes.

g. Scroll down to the Execution event history section. Click through each step of execution to see how Step Functions called SQS and passed payloads between steps.

h. Depending on the output of your InventoryStateMachine, your workflow may have ended in success or failure.
In a real world scenario, you might decide to retry the task or to take other actions, depending on the error message you received.
-
Clean up resources
In this step you will terminate your AWS Step Functions and AWS Lambda related resources.:
Important: Terminating resources that you are no longer using reduces costs and is a best practice. Not terminating your resources can result in a charge.a. At the top of the AWS Step Functions console window, choose State machines.

b. In the State machines window, select your InventoryStateMachine and then select Actions and then Delete. Confirm the action by selecting Delete state machine in the dialog box. Your state machine will be deleted in a minute or two once Step Functions has confirmed that any in-process executions have completed.

c. Next, you will delete your Lambda functions. In the AWS Management Console, enter lambda in the search bar and then select Lambda.

d. In the Functions screen, select the Inventory function you created for this tutorial and then select Actions and then Delete. Confirm the deletion by choosing Delete again.

e. Lastly, you will delete your IAM roles. In the AWS Management Console, enter iam in the search bar and then select IAM.

f. Select the IAM roles that you created for this tutorial, then choose Delete. Confirm the delete by choosing Yes, Delete in the dialog box.

g. In the queue list, select the Orders queue. Then, choose the Delete button.

h. The Delete queue dialog box is displayed. You can delete your queue, even though you may still have messages in it. Enter delete in the confirmation textbox and choose the Delete button.

Congratulations!
You have orchestrated a microservice in the cloud with a message queue using AWS Step Functions and Amazon SQS. Step Functions is a great fit when you need to coordinate your application resources where productivity and agility are key considerations.