Category: AWS Lambda
SAML for Your Serverless JavaScript Application: Part II
Contributors: Richard Threlkeld, Gene Ting, Stefano Buliani
The full code for both scenarios—including SAM templates—can be found at the samljs-serverless-sample GitHub repository. We highly recommend you use the SAM templates in the GitHub repository to create the resources, opitonally you can manually create them.
This is the second part of a two part series for using SAML providers in your application and receiving short-term credentials to access AWS Services. These credentials can be limited with IAM roles so the users of the applications can perform actions like fetching data from databases or uploading files based on their level of authorization. For example, you may want to build a JavaScript application that allows a user to authenticate against Active Directory Federation Services (ADFS). The user can be granted scoped AWS credentials to invoke an API to display information in the application or write to an Amazon DynamoDB table.
Part I of this series walked through a client-side flow of retrieving SAML claims and passing them to Amazon Cognito to retrieve credentials. This blog post will take you through a more advanced scenario where logic can be moved to the backend for a more comprehensive and flexible solution. (more…)
SAML for Your Serverless JavaScript Application: Part I
Contributors: Richard Threlkeld, Gene Ting, Stefano Buliani
The full code for this blog, including SAM templates—can be found at the samljs-serverless-sample GitHub repository. We highly recommend you use the SAM templates in the GitHub repository to create the resources, opitonally you can manually create them.
Want to enable SAML federated authentication? You can use the AWS platform to exchange SAML assertions for short-term, temporary AWS credentials.
When you build enterprise web applications, it is imperative to ensure that authentication and authorization (AuthN and AuthZ) is done consistently and follows industry best practices. At AWS, we have built a service called Amazon Cognito that allows you to create unique Identities for users and grants them short-term credentials for interacting with AWS services. These credentials are tied to roles based on IAM policies so that you can grant or deny access to different resources.
In this post, we walk you through different strategies for federating SAML providers with Amazon Cognito. Additionally, you can federate with different types of identity providers (IdP). These IdPs could be third-party social media services like Facebook, Twitter, and others. You can also federate with the User Pools service of Amazon Cognito and create your own managed user directory (including registration, sign-In, MFA, and other workflows). (more…)
Implementing Serverless Manual Approval Steps in AWS Step Functions and Amazon API Gateway

Ali Baghani, Software Development Engineer
A common use case for AWS Step Functions is a task that requires human intervention (for example, an approval process). Step Functions makes it easy to coordinate the components of distributed applications as a series of steps in a visual workflow called a state machine. You can quickly build and run state machines to execute the steps of your application in a reliable and scalable fashion.
In this post, I describe a serverless design pattern for implementing manual approval steps. You can use a Step Functions activity task to generate a unique token that can be returned later indicating either approval or rejection by the person making the decision.
Key steps to implementation
When the execution of a Step Functions state machine reaches an activity task state, Step Functions schedules the activity and waits for an activity worker. An activity worker is an application that polls for activity tasks by calling GetActivityTask. When the worker successfully calls the API action, the activity is vended to that worker as a JSON blob that includes a token for callback.
At this point, the activity task state and the branch of the execution that contains the state is paused. Unless a timeout is specified in the state machine definition, which can be up to one year, the activity task state waits until the activity worker calls either SendTaskSuccess or SendTaskFailure using the vended token. This pause is the first key to implementing a manual approval step.
The second key is the ability in a serverless environment to separate the code that fetches the work and acquires the token from the code that responds with the completion status and sends the token back, as long as the token can be shared, i.e., the activity worker in this example is a serverless application supervised by a single activity task state.
In this walkthrough, you use a short-lived AWS Lambda function invoked on a schedule to implement the activity worker, which acquires the token associated with the approval step, and prepares and sends an email to the approver using Amazon SES.
It is very convenient if the application that returns the token can directly call the SendTaskSuccess and SendTaskFailure API actions on Step Functions. This can be achieved more easily by exposing these two actions through Amazon API Gateway so that an email client or web browser can return the token to Step Functions. By combining a Lambda function that acquires the token with the application that returns the token through API Gateway, you can implement a serverless manual approval step, as shown below.
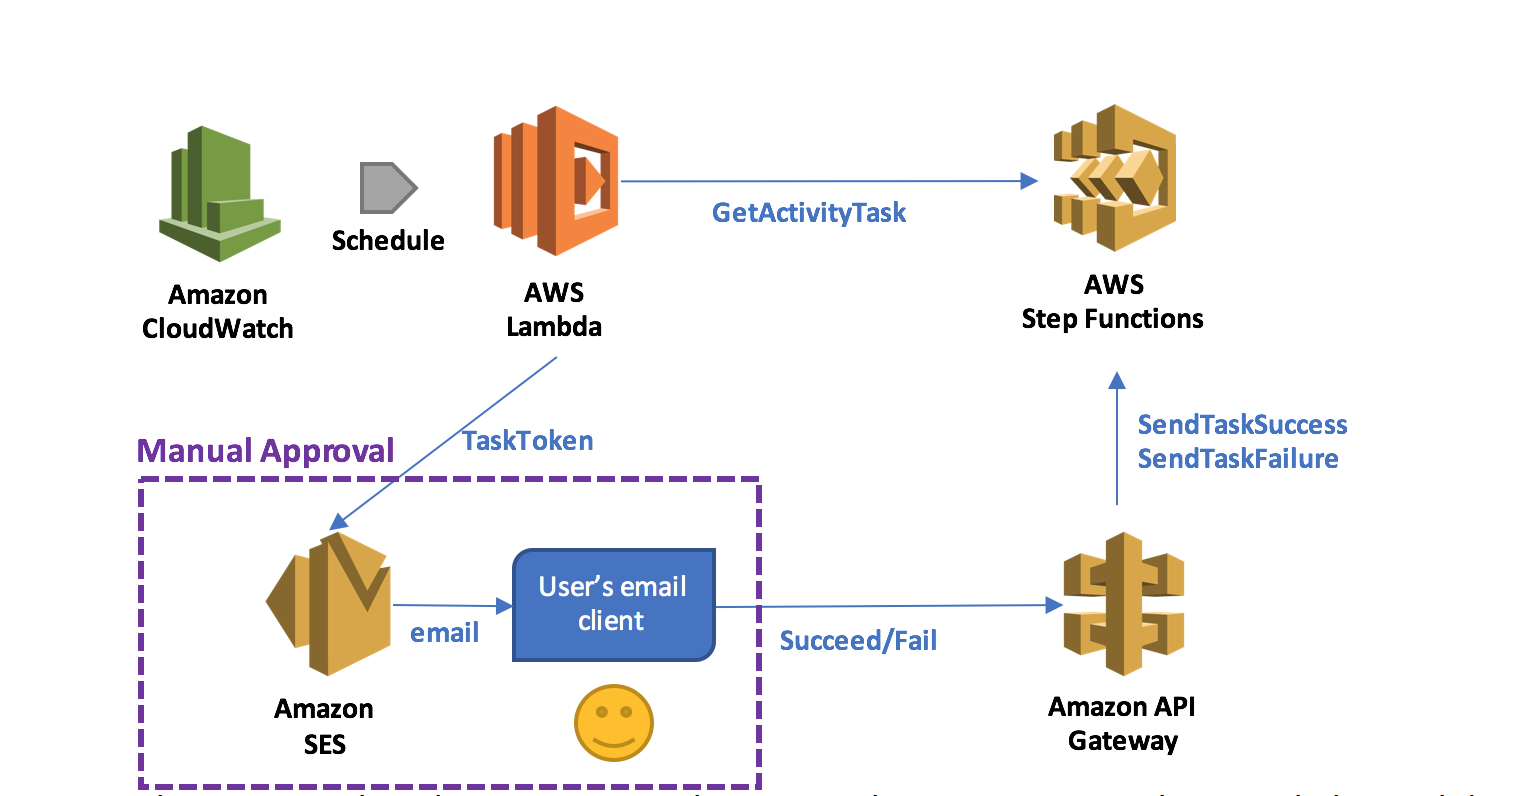
In this pattern, when the execution reaches a state that requires manual approval, the Lambda function prepares and sends an email to the user with two embedded hyperlinks for approval and rejection.
If the authorized user clicks on the approval hyperlink, the state succeeds. If the authorized user clicks on the rejection link, the state fails. You can also choose to set a timeout for approval and, upon timeout, take action, such as resending the email request using retry/catch conditions in the activity task state.
Employee promotion process
As an example pattern use case, you can design a simple employee promotion process which involves a single task: getting a manager’s approval through email. When an employee is nominated for promotion, a new execution starts. The name of the employee and the email address of the employee’s manager are provided to the execution.
You’ll use the design pattern to implement the manual approval step, and SES to send the email to the manager. After acquiring the task token, the Lambda function generates and sends an email to the manager with embedded hyperlinks to URIs hosted by API Gateway.
In this example, I have administrative access to my account, so that I can create IAM roles. Moreover, I have already registered my email address with SES, so that I can send emails with the address as the sender/recipient. For detailed instructions, see Send an Email with Amazon SES.
Here is a list of what you do:
- Create an activity
- Create a state machine
- Create and deploy an API
- Create an activity worker Lambda function
- Test that the process works
Create an activity
In the Step Functions console, choose Tasks and create an activity called ManualStep.

Remember to keep the ARN of this activity at hand.

Create a state machine
Next, create the state machine that models the promotion process on the Step Functions console. Use StatesExecutionRole-us-east-1, the default role created by the console. Name the state machine PromotionApproval, and use the following code. Remember to replace the value for Resource with your activity ARN.
{
  "Comment": "Employee promotion process!",
  "StartAt": "ManualApproval",
  "States": {
    "ManualApproval": {
      "Type": "Task",
      "Resource": "arn:aws:states:us-east-1:ACCOUNT_ID:activity:ManualStep",
      "TimeoutSeconds": 3600,
      "End": true
    }
  }
}
Create and deploy an API
Next, create and deploy public URIs for calling the SendTaskSuccess or SendTaskFailure API action using API Gateway.
First, navigate to the IAM console and create the role that API Gateway can use to call Step Functions. Name the role APIGatewayToStepFunctions, choose Amazon API Gateway as the role type, and create the role.
After the role has been created, attach the managed policy AWSStepFunctionsFullAccess to it.

In the API Gateway console, create a new API called StepFunctionsAPI. Create two new resources under the root (/) called succeed and fail, and for each resource, create a GET method.

You now need to configure each method. Start by the /fail GET method and configure it with the following values:
- For Integration type, choose AWS Service.
- For AWS Service, choose Step Functions.
- For HTTP method, choose POST.
- For Region, choose your region of interest instead of us-east-1. (For a list of regions where Step Functions is available, see AWS Region Table.)
- For Action Type, enter SendTaskFailure.
- For Execution, enter the APIGatewayToStepFunctions role ARN.

To be able to pass the taskToken through the URI, navigate to the Method Request section, and add a URL Query String parameter called taskToken.

Then, navigate to the Integration Request section and add a Body Mapping Template of type application/json to inject the query string parameter into the body of the request. Accept the change suggested by the security warning. This sets the body pass-through behavior to When there are no templates defined (Recommended). The following code does the mapping:
{
   "cause": "Reject link was clicked.",
   "error": "Rejected",
   "taskToken": "$input.params('taskToken')"
}
When you are finished, choose Save.
Next, configure the /succeed GET method. The configuration is very similar to the /fail GET method. The only difference is for Action: choose SendTaskSuccess, and set the mapping as follows:
{
   "output": "\"Approve link was clicked.\"",
   "taskToken": "$input.params('taskToken')"
}
The last step on the API Gateway console after configuring your API actions is to deploy them to a new stage called respond. You can test our API by choosing the Invoke URL links under either of the GET methods. Because no token is provided in the URI, a ValidationException message should be displayed.

Create an activity worker Lambda function
In the Lambda console, create a Lambda function with a CloudWatch Events Schedule trigger using a blank function blueprint for the Node.js 4.3 runtime. The rate entered for Schedule expression is the poll rate for the activity. This should be above the rate at which the activities are scheduled by a safety margin.
The safety margin accounts for the possibility of lost tokens, retried activities, and polls that happen while no activities are scheduled. For example, if you expect 3 promotions to happen, in a certain week, you can schedule the Lambda function to run 4 times a day during that week. Alternatively, a single Lambda function can poll for multiple activities, either in parallel or in series. For this example, use a rate of one time per minute but do not enable the trigger yet.

Next, create the Lambda function ManualStepActivityWorker using the following Node.js 4.3 code. The function receives the taskToken, employee name, and manager’s email from StepFunctions. It embeds the information into an email, and sends out the email to the manager.
'use strict';
console.log('Loading function');
const aws = require('aws-sdk');
const stepfunctions = new aws.StepFunctions();
const ses = new aws.SES();
exports.handler = (event, context, callback) => {

    var taskParams = {
        activityArn: 'arn:aws:states:us-east-1:ACCOUNT_ID:activity:ManualStep'
    };

    stepfunctions.getActivityTask(taskParams, function(err, data) {
        if (err) {
            console.log(err, err.stack);
            context.fail('An error occured while calling getActivityTask.');
        } else {
            if (data === null) {
                // No activities scheduled
                context.succeed('No activities received after 60 seconds.');
            } else {
                var input = JSON.parse(data.input);
                var emailParams = {
                    Destination: {
                        ToAddresses: [
                            input.managerEmailAddress
                            ]
                    },
                    Message: {
                        Subject: {
                            Data: 'Your Approval Needed for Promotion!',
                            Charset: 'UTF-8'
                        },
                        Body: {
                            Html: {
                                Data: 'Hi!<br />' +
                                    input.employeeName + ' has been nominated for promotion!<br />' +
                                    'Can you please approve:<br />' +
                                    'https://API_DEPLOYMENT_ID.execute-api.us-east-1.amazonaws.com/respond/succeed?taskToken=' + encodeURIComponent(data.taskToken) + '<br />' +
                                    'Or reject:<br />' +
                                    'https://API_DEPLOYMENT_ID.execute-api.us-east-1.amazonaws.com/respond/fail?taskToken=' + encodeURIComponent(data.taskToken),
                                Charset: 'UTF-8'
                            }
                        }
                    },
                    Source: input.managerEmailAddress,
                    ReplyToAddresses: [
                            input.managerEmailAddress
                        ]
                };

                ses.sendEmail(emailParams, function (err, data) {
                    if (err) {
                        console.log(err, err.stack);
                        context.fail('Internal Error: The email could not be sent.');
                    } else {
                        console.log(data);
                        context.succeed('The email was successfully sent.');
                    }
                });
            }
        }
    });
};
In the Lambda function handler and role section, for Role, choose Create a new role, LambdaManualStepActivityWorkerRole.

Add two policies to the role: one to allow the Lambda function to call the GetActivityTask API action by calling Step Functions, and one to send an email by calling SES. The result should look as follows:
{
  "Version": "2012-10-17",
  "Statement": [
    {
      "Effect": "Allow",
      "Action": [
        "logs:CreateLogGroup",
        "logs:CreateLogStream",
        "logs:PutLogEvents"
      ],
      "Resource": "arn:aws:logs:*:*:*"
    },
    {
      "Effect": "Allow",
      "Action": "states:GetActivityTask",
      "Resource": "arn:aws:states:*:*:activity:ManualStep"
    },
    {
      "Effect": "Allow",
      "Action": "ses:SendEmail",
      "Resource": "*"
    }
  ]
}
In addition, as the GetActivityTask API action performs long-polling with a timeout of 60 seconds, increase the timeout of the Lambda function to 1 minute 15 seconds. This allows the function to wait for an activity to become available, and gives it extra time to call SES to send the email. For all other settings, use the Lambda console defaults.

After this, you can create your activity worker Lambda function.
Test the process
You are now ready to test the employee promotion process.
In the Lambda console, enable the ManualStepPollSchedule trigger on the ManualStepActivityWorker Lambda function.
In the Step Functions console, start a new execution of the state machine with the following input:
{ "managerEmailAddress": "name@your-email-address.com", "employeeName" : "Jim" } Within a minute, you should receive an email with links to approve or reject Jim’s promotion. Choosing one of those links should succeed or fail the execution.

Summary
In this post, you created a state machine containing an activity task with Step Functions, an API with API Gateway, and a Lambda function to dispatch the approval/failure process. Your Step Functions activity task generated a unique token that was returned later indicating either approval or rejection by the person making the decision. Your Lambda function acquired the task token by polling the activity task, and then generated and sent an email to the manager for approval or rejection with embedded hyperlinks to URIs hosted by API Gateway.
If you have questions or suggestions, please comment below.
Authorizing Access Through a Proxy Resource to Amazon API Gateway and AWS Lambda Using Amazon Cognito User Pools

Ed Lima, Solutions Architect
Want to create your own user directory that can scale to hundreds of millions of users? Amazon Cognito user pools are fully managed so that you don’t have to worry about the heavy lifting associated with building, securing, and scaling authentication to your apps.
The AWS Mobile blog post Integrating Amazon Cognito User Pools with API Gateway back in May explained how to integrate user pools with Amazon API Gateway using an AWS Lambda custom authorizer. Since then, we’ve released a new feature where you can directly configure a Cognito user pool authorizer to authenticate your API calls; more recently, we released a new proxy resource feature. In this post, I show how to use these new great features together to secure access to an API backed by a Lambda proxy resource.
Walkthrough
In this post, I assume that you have some basic knowledge about the services involved. If not, feel free to review our documentation and tutorials on:
Start by creating a user pool called “myApiUsers”, and enable verifications with optional MFA access for extra security:

Be mindful that if you are using a similar solution for production workloads you will need to request a SMS spending threshold limit increase from Amazon SNS in order to send SMS messages to users for phone number verification or for MFA. For the purposes of this article, since we are only testing our API authentication with a single user the default limit will suffice.
Now, create an app in your user pool, making sure to clear Generate client secret:

Using the client ID of your newly created app, add a user, “jdoe”, with the AWS CLI. The user needs a valid email address and phone number to receive MFA codes:
aws cognito-idp sign-up \
--client-id 12ioh8c17q3stmndpXXXXXXXX \
--username jdoe \
--password P@ssw0rd \
--region us-east-1 \
--user-attributes '[{"Name":"given_name","Value":"John"},{"Name":"family_name","Value":"Doe"},{"Name":"email","Value":"jdoe@myemail.com"},{"Name":"gender","Value":"Male"},{"Name":"phone_number","Value":"+61XXXXXXXXXX"}]'
In the Cognito User Pools console, under Users, select the new user and choose Confirm User and Enable MFA:

Your Cognito user is now ready and available to connect.
Next, create a Node.js Lambda function called LambdaForSimpleProxy with a basic execution role. Here’s the code:
'use strict';
console.log('Loading CUP2APIGW2Lambda Function');

exports.handler = function(event, context) {
    var responseCode = 200;
    console.log("request: " + JSON.stringify(event));

    var responseBody = {
        message: "Hello, " + event.requestContext.authorizer.claims.given_name + " " + event.requestContext.authorizer.claims.family_name +"!" + " You are authenticated to your API using Cognito user pools!",
        method: "This is an authorized "+ event.httpMethod + " to Lambda from your API using a proxy resource.",
        body: event.body
    };

    //Response including CORS required header
    var response = {
        statusCode: responseCode,
        headers: {
            "Access-Control-Allow-Origin" : "*"
        },
        body: JSON.stringify(responseBody)
    };

    console.log("response: " + JSON.stringify(response))
    context.succeed(response);
};
For the last piece of the back-end puzzle, create a new API called CUP2Lambda from the Amazon API Gateway console. Under Authorizers, choose Create, Cognito User Pool Authorizer with the following settings:

Create an ANY method under the root of the API as follows:

After that, choose Save, OK to give API Gateway permissions to invoke the Lambda function. It’s time to configure the authorization settings for your ANY method. Under Method Request, enter the Cognito user pool as the authorization for your API:

Finally, choose Actions, Enable CORS. This creates an OPTIONS method in your API:

Now it’s time to deploy the API to a stage (such as prod) and generate a JavaScript SDK from the SDK Generation tab. You can use other methods to connect to your API however in this article I'll show how to use the API Gateway SDK. Since we are using an ANY method the SDK does not have calls for specific methods other than the OPTIONS method created by Enable CORS, you have to add a couple of extra functions to the apigClient.js file so that your SDK can perform GET and POST operations to your API:
    apigClient.rootGet = function (params, body, additionalParams) {
        if(additionalParams === undefined) { additionalParams = {}; }

        apiGateway.core.utils.assertParametersDefined(params, [], ['body']);

        var rootGetRequest = {
            verb: 'get'.toUpperCase(),
            path: pathComponent + uritemplate('/').expand(apiGateway.core.utils.parseParametersToObject(params, [])),
            headers: apiGateway.core.utils.parseParametersToObject(params, []),
            queryParams: apiGateway.core.utils.parseParametersToObject(params, []),
            body: body
        };


        return apiGatewayClient.makeRequest(rootGetRequest, authType, additionalParams, config.apiKey);
    };

    apigClient.rootPost = function (params, body, additionalParams) {
        if(additionalParams === undefined) { additionalParams = {}; }

        apiGateway.core.utils.assertParametersDefined(params, ['body'], ['body']);

        var rootPostRequest = {
            verb: 'post'.toUpperCase(),
            path: pathComponent + uritemplate('/').expand(apiGateway.core.utils.parseParametersToObject(params, [])),
            headers: apiGateway.core.utils.parseParametersToObject(params, []),
            queryParams: apiGateway.core.utils.parseParametersToObject(params, []),
            body: body
        };

        return apiGatewayClient.makeRequest(rootPostRequest, authType, additionalParams, config.apiKey);

    };
You can now use a little front end web page to authenticate users and test authorized calls to your API. In order for it to work, you need to add some external libraries and dependencies including the API Gateway SDK you just generated. You can find more details in our Cognito as well as API Gateway SDK documentation guides.
With the dependencies in place, you can use the following JavaScript code to authenticate your Cognito user pool user and connect to your API in order to perform authorized calls (replace your own user pool Id and client ID details accordingly):
<script type="text/javascript">
 //Configure the AWS client with the Cognito role and a blank identity pool to get initial credentials

  AWS.config.update({
    region: 'us-east-1',
    credentials: new AWS.CognitoIdentityCredentials({
      IdentityPoolId: ''
    })
  });

  AWSCognito.config.region = 'us-east-1';
  AWSCognito.config.update({accessKeyId: 'null', secretAccessKey: 'null'});
  var token = "";

  //Authenticate user with MFA

  document.getElementById("buttonAuth").addEventListener("click", function(){
    var authenticationData = {
      Username : document.getElementById('username').value,
      Password : document.getElementById('password').value,
      };

    var showGetPut = document.getElementById('afterLogin');
    var hideLogin = document.getElementById('login');

    var authenticationDetails = new AWSCognito.CognitoIdentityServiceProvider.AuthenticationDetails(authenticationData);

   // Replace with your user pool details

    var poolData = {
        UserPoolId : 'us-east-1_XXXXXXXXX',
        ClientId : '12ioh8c17q3stmndpXXXXXXXX',
        Paranoia : 7
    };

    var userPool = new AWSCognito.CognitoIdentityServiceProvider.CognitoUserPool(poolData);

    var userData = {
        Username : document.getElementById('user').value,
        Pool : userPool
    };

    var cognitoUser = new AWSCognito.CognitoIdentityServiceProvider.CognitoUser(userData);
    cognitoUser.authenticateUser(authenticationDetails, {
      onSuccess: function (result) {
        token = result.getIdToken().getJwtToken(); // CUP Authorizer = ID Token
        console.log('ID Token: ' + result.getIdToken().getJwtToken()); // Show ID Token in the console
        var cognitoGetUser = userPool.getCurrentUser();
        if (cognitoGetUser != null) {
          cognitoGetUser.getSession(function(err, result) {
            if (result) {
              console.log ("User Successfuly Authenticated!");
            }
          });
        }

        //Hide Login form after successful authentication
        showGetPut.style.display = 'block';
        hideLogin.style.display = 'none';
      },
    onFailure: function(err) {
        alert(err);
    },
    mfaRequired: function(codeDeliveryDetails) {
            var verificationCode = prompt('Please input a verification code.' ,'');
            cognitoUser.sendMFACode(verificationCode, this);
        }
    });
  });

//Send a GET request to the API

document.getElementById("buttonGet").addEventListener("click", function(){
  var apigClient = apigClientFactory.newClient();
  var additionalParams = {
      headers: {
        Authorization: token
      }
    };

  apigClient.rootGet({},{},additionalParams)
      .then(function(response) {
        console.log(JSON.stringify(response));
        document.getElementById("output").innerHTML = ('<pre align="left"><code>Response: '+JSON.stringify(response.data, null, 2)+'</code></pre>');
      }).catch(function (response) {
        document.getElementById('output').innerHTML = ('<pre align="left"><code>Error: '+JSON.stringify(response, null, 2)+'</code></pre>');
        console.log(response);
    });
//}
});

//Send a POST request to the API

document.getElementById("buttonPost").addEventListener("click", function(){
  var apigClient = apigClientFactory.newClient();
  var additionalParams = {
      headers: {
        Authorization: token
      }
    };

 var body = {
        "message": "Sample POST payload"
  };

  apigClient.rootPost({},body,additionalParams)
      .then(function(response) {
        console.log(JSON.stringify(response));
        document.getElementById("output").innerHTML = ('<pre align="left"><code>Response: '+JSON.stringify(response.data, null, 2)+'</code></pre>');
      }).catch(function (response) {
        document.getElementById('output').innerHTML = ('<pre align="left"><code>Error: '+JSON.stringify(response, null, 2)+'</code></pre>');
        console.log(response);
    });
});
</script>
As far as the front end is concerned you can use some simple HTML code to test, such as the following snippet:
<body>
<div id="container" class="container">
    <br/>
    <img src="http://awsmedia.s3.amazonaws.com/AWS_Logo_PoweredBy_127px.png">
    <h1>Cognito User Pools and API Gateway</h1>
    <form name="myform">
        <ul>
          <li class="fields">
            <div id="login">
            <label>User Name: </label>
            <input id="username" size="60" class="req" type="text"/>
            <label>Password: </label>
            <input id="password" size="60" class="req" type="password"/>
            <button class="btn" type="button" id='buttonAuth' title="Log in with your username and password">Log In</button>
            <br />
            </div>
            <div id="afterLogin" style="display:none;">
            <br />
            <button class="btn" type="button" id='buttonPost'>POST</button>
            <button class="btn" type="button" id='buttonGet' >GET</button>
            <br />
          </li>
        </ul>
      </form>
  <br/>
    <div id="output"></div>
  <br/>
  </div>
  <br/>
  </div>
</body>
After adding some extra CSS styling of your choice (for example adding "list-style: none" to remove list bullet points), the front end is ready. You can test it by using a local web server in your computer or a static website on Amazon S3.
Enter the user name and password details for John Doe and choose Log In:

A MFA code is then sent to the user and can be validated accordingly:

After authentication, you can see the ID token generated by Cognito for further access testing:

If you go back to the API Gateway console and test your Cognito user pool authorizer with the same token, you get the authenticated user claims accordingly:

In your front end, you can now perform authenticated GET calls to your API by choosing GET.

Or you can perform authenticated POST calls to your API by choosing POST.

The calls reach your Lambda proxy and return a valid response accordingly. You can also test from the command line using cURL, by sending the user pool ID token that you retrieved from the developer console earlier, in the “Authorization” header:

It’s possible to improve this solution by integrating an Amazon DynamoDB table, for instance. You could detect the method request on event.httpMethod in the Lambda function and issue a GetItem call to a table for a GET request or a PutItem call to a table for a POST request. There are lots of possibilities for this kind of proxy resource integration.
Summary
The Cognito user pools integration with API Gateway provides a new way to secure your API workloads, and the new proxy resource for Lambda allows you to perform any business logic or transformations to your API calls from Lambda itself instead of using body mapping templates. These new features provide very powerful options to secure and handle your API logic.
I hope this post helps with your API workloads. If you have questions or suggestions, please comment below.
Managing Your AWS Resources Through a Serverless Policy Engine

Stephen Liedig, Solutions Architect
Customers are using AWS Lambda in new and interesting ways every day, from data processing of Amazon S3 objects, Amazon DynamoDB streams, and Amazon Kinesis triggers, to providing back-end processing logic for Amazon API Gateway.
In this post, I explore ways in which you can use Lambda as a policy engine to manage your AWS infrastructure. Lambda’s ability to react to platform events makes it an ideal solution for handling changes to your AWS resource state and enforcing organizational policy.
With support for a growing number of triggers, Lambda provides a lightweight, customizable, and cost effective solution to do things like:
- Shut down idle resources or schedule regular shutdowns during nights, weekends, and public holidays
- Clean up snapshots older than 6 months
- Execute regular patching/server maintenance by automating execution of Amazon EC2 Run Command scripts
- React to changes in your environment by evaluating AWS Config events
- Perform a custom action if resources are created in regions that you do not wish to run workloads
I have created a sample application that demonstrates how to create a Lambda function to verify whether instances launched into a VPC conform to organizational tagging policies.
Tagging policy solution
Tagging policies are important because they help customers manage and control their AWS resources. Many customers use tags to identify the lifespan of a resource, their security, or operational context, or to assist with billing and cost tracking by assigning cost center codes to resources and later using them to generate billing reports. For these reasons, it is not uncommon for customers to take a “hard-line” approach and simply terminate or isolate compute resources that haven’t been tagged appropriately, in order to drive cost efficiencies and maintain integrity in their environments.
The tagging policy example in this post takes a middle-ground approach, in that it applies some decision-making logic based on a collection of policy rules, and then notifies system administrators of the actions taken on an EC2 instance.
A high-level view of the solution looks like this:

- The tagging policy function uses an Amazon CloudWatch scheduled event, which allows you to schedule the execution of your Lambda functions using cron or rate expressions, thereby enabling policy control checks at regular intervals on new and existing EC2 resources.
- Tag policies are pulled from DynamoDB, which provides a fast and extensible solution for storing policy definitions that can be modified independently of the function execution.
- The function looks for EC2 instances within a specified VPC and verifies that the tags associated with each instance conform to the policy rules.
- If required, missing information, such as user name of the IAM user who launched the instance, is retrieved from AWS CloudTrail.
- A summary notification of actions undertaken is pushed to an Amazon SNS topic to notify administrators of the policy violations and actions performed.
Note that, while I have chosen to demonstrate the CloudWatch scheduled event trigger to invoke the Lambda function, there are a number of other ways in which you could trigger a tagging policy function. Using AWS CloudTrail or AWS Config, for example, youI could filter events of type ‘RunInstances’ or create a custom config rule, to determine whether newly-created EC2 resources match your tagging policies.
Define the policies
This walkthrough uses DynamoDB to store the policies for each of the tags. DynamoDB provides a scalable, single-digit millisecond latency data store, supporting both document and key-value data models that allows me to extend and evolve my policy model easily over time. Given the nature and size of the data, DynamoDB is also a cost-effective option over a relational database solution. The table you create for this example is straightforward, using a single HASH key to identify the rule.

CLI
Use the following AWS CLI command to create the table:
aws dynamodb create-table --table-name acme_cloud_policy_tagging_def --key-schema AttributeName=RuleId,KeyType=HASH --attribute-definitions AttributeName=RuleId,AttributeType=N --provisioned-throughput ReadCapacityUnits=5,WriteCapacityUnits=5The sample policy items have been extended with additional attributes:
- TagKey
- Action
- Required
- Default
These attributes will help build a list a list of policy definitions for each tag and the corresponding behavior that your function should implement should the tags be missing or have no value assigned to them.
The following items have been added to the tagging policy table:
| RuleId (N) | TagKey (S) | Action (S) | Required (S) | Default (S) |
|---|---|---|---|---|
| 1 | ProjectCode | Update | Y | Proj007 |
| 2 | CreatedBy | UserLookup | Y | |
| 3 | Expires | Function | N | today() |
In this example, the default behavior for instances launched into the VPC with no tags is to terminate them immediately. This action may not be appropriate for all scenarios, and could be enhanced by stopping the instance (rather than terminating it) and notifying the resource owners that further action is required.
The Update action either creates a tag key and sets the default value if they have been marked as required, or sets the default value if the tag key is present, but has no value.
The UserLookup action in this case searches CloudTrail logs for the IAM user that launched the EC2 instance, and sets the value if it is missing.
Now that the policies have been defined, take a closer look at the actual Lambda function implementation.
Set up the trigger
The first thing you need to do before you create the Lambda function to execute the tagging policy is to create a trigger that runs the function automatically after a specified fixed rate expression, such as run "rate(1 hour)”, or via a cron expression.

After it’s configured, the resulting event looks something like this:
{
  "account": "123456789012",
  "region": "ap-southeast-2",
  "detail": {},
  "detail-type": "Scheduled Event",
  "source": "aws.events",
  "time": "1970-01-01T00:00:00Z",
  "id": "cdc73f9d-aea9-11e3-9d5a-835b769c0d9c",
  "resources": [
    "arn:aws:events:ap-southeast-2:123456789012:rule/my-schedule"
  ]
}
Create the Lambda execution policy
The next thing you need to do is define the IAM role under which this Lambda function executes. In addition to the CloudWatchLogs permissions to enable logging on the function, you need to call ec2:DescribeInstances on your EC2 resources to find tag information for the instances in your environment. You also require permissions to read policy definitions from a specified DynamoDB table and to then be allowed to publish the policy reports via Amazon SNS. Working on the basis of least-privilege, the IAM role policy looks something like the following:
{
    "Version": "2012-10-17",
    "Statement": [
        {
            "Sid": "StmtReadOnlyDynamoDB",
            "Action": [
                "dynamodb:BatchGetItem",
                "dynamodb:GetItem"
            ],
            "Effect": "Allow",
            "Resource": "arn:aws:dynamodb:ap-southeast-2:123456789012:table/acme_cloud_policy_tagging_definitions"
        },
        {
            "Sid": "StmtLookupCloudTrailEvents",
            "Action": [
                "cloudtrail:LookupEvents"
            ],
            "Effect": "Allow",
            "Resource": "*"
        },
        {
            "Sid": "StmtLambdaCloudWatchLogs",
            "Action": [
                "logs:CreateLogGroup",
                "logs:CreateLogStream",
                "logs:PutLogEvents"
            ],
            "Effect": "Allow",
            "Resource": "arn:aws:logs:*:*:*"
        },
        {
            "Sid": "StmtPublishSnsNotifications",
            "Action": [
                "sns:Publish"
            ],
            "Effect": "Allow",
            "Resource": "arn:aws:sns:ap-southeast-2:123456789012:acme_cloud_policy_notifications"
        },
        {
            "Sid": "StmtDescribeEC2",
            "Action": [
                "ec2:DescribeInstances"
            ],
            "Effect": "Allow",
            "Resource": "*"
        }
    ]
}
Create the Lambda function
For this example, you create a Python function. The function itself is broken into a number of subroutines, each performing a specific function in the policy execution.
AWS Lambda function handler
def lambda_handler(event, context):
    print('Beginning Policy check.')
    policies = get_policy_definitions()
    for instance in find_instances('vpc-abc123c1'):
        validate_instance_tags(instance, policies)
    if len(report_items) > 0:
        send_notification()
    print('Policy check complete.')
    return 'OK'
The Lambda function orchestrates the policy logic in the following way:
- Load the policy rules from the DynamoDB table:
def get_policy_definitions():
    dynamodb = boto3.resource('dynamodb')
    policy_table = dynamodb.Table('acme_cloud_policy_tagging_def')
    response = policy_table.scan()
    policies = response['Items']
return policies - Find the tags for all EC2 instances within a specified VPC. Note that this rule processing revalidates every instance; this is to ensure that no changes have been made to instance tagging after the last policy execution. For simplicity, the VPC ID has been hard-coded into the function. In a production scenario, you would look this value up:
def find_instances(vpc_id):
    ec2 = boto3.resource('ec2')
    vpc = ec2.Vpc('%s' % vpc_id)
return list(vpc.instances.all())- After you have all the instances in the VPC, apply the policies:
def validate_instance_tags(instance, policies):
    print(u'Validating tags for instance: {0:s} '.format(instance.id))
    tags = instance.tags
    if tags is None:
        instance.terminate()
        report_items.append(u'{0:s} has been terminated. Reason: No tags found.'.format(instance.id))
        return

    for p in policies:
        policy_key = p['TagKey']
        policy_action = p['Action']
        if 'Default' in p:
            policy_default_value = p['Default']
        else:
            policy_default_value = ''
        if not policy_key_exists(tags, policy_key):
            print(u'Instance {0:s} is missing tag {1:s}. Applying policy.'.format(instance.id, policy_key))

            if policy_action == 'Update':
                instance.create_tags(Tags=[{'Key': policy_key, 'Value': policy_default_value}])
                report_items.append(u'Instance {0:s} missing tag {1:s}. New tag created.'.format(instance.id, policy_key))

            elif policy_action == 'UserLookup':
                try:
                    user_id = find_who_launched_instance(instance.id)
                    report_items.append(u'Instance {0:s} missing tag {1:s}. User name set.'.format(instance.id, e.message))
                except StandardError as e:
                    user_id = "Undefined"
                    report_items.append(u'Instance {0:s} missing tag {1:s}. User name set to Undefined.'.format(instance.id, e.message))

                instance.create_tags(Tags=[{'Key': policy_key, 'Value': user_id}])

            elif policy_action == 'Function':
                if policy_default_value == 'today()':
                    instance.create_tags(Tags=[{'Key': policy_key, 'Value': str(datetime.now().date())}])
report_items.append(u'Instance {0:s} missing tag {1:s}. New tag created.'.format(instance.id, policy_key))- The CreatedBy tag rule is defined as Lookup, meaning if the tag is missing or empty, you search the CloudTrail logs to determine the IAM user that launched a specified instance. If the IAM user ID is found, the tag value is set to the instance:
def find_who_launched_instance(instance_id):
    response = cloudtrail.lookup_events(
        LookupAttributes=[
            {
                'AttributeKey': 'EventName',
                'AttributeValue': 'RunInstances'
            }
        ],
        StartTime=datetime(2016, 6, 4),
        EndTime=datetime.now(),
        MaxResults=50
    )

    events_list = response['Events']
    for event in events_list:
        resources = event['Resources']
        for resource in resources:
            if (resource['ResourceType'] == 'AWS::EC2::Instance') and (resource['ResourceName'] == instance_id):
                return event['Username']
            else:
raise Exception("Unable to determine IAM user that launched instance.")- Finally, after all the policy rules have been applied to the instances in your VPC, send an Amazon SNS notification, to which your system administrators have been subscribed, to inform them of any policy violations and the actions taken by the Lambda function:
def send_notification():
    print("Sending notification.")

    topic_arn = 'arn:aws:sns:ap-southeast-2:12345678910:acme_cloud_policy_notifications'

    message = 'These following tagging policy violation occurred:\\n'

    for ri in report_items:
        message += '-- {0:s} \n'.format(ri)

    try:
        sns = boto3.client('sns')
        sns.publish(TopicArn=('%s' % topic_arn),
                    Subject='ACME Cloud Tagging Policy Report',
                    Message=message)
    except ClientError as ex:
        raise Exception(ex.message)
The emailed report generated by the policy engine generates the following output. The format of the notification is, of course, customisable and can contain as much or as little information as needed. These notifications can also act as a trigger themselves, allowing you to link policies.

Summary
As I have demonstrated, using Lambda as a policy engine to manage your AWS resources and to maintain operational integrity of your environment is an extremely lightweight, powerful, and customisable solution.
Policies can be composed in a number of ways, and integrating them with various triggers provides an ideal mechanism for creating a secure, automated, proactive, event-driven infrastructure across all your regions. And given that the first 1 million requests per month are free, you’d be able to manage a significant portion of your infrastructure for little or no cost.
Furthermore, the concepts presented in this post aren’t specific to managing your infrastructure; they can quite easily also be applied to a security context. Monitoring changes in your security groups or network ACLs through services like AWS Config allow you to proactively take action on unauthorised changes in your environment.
If you have questions or suggestions, please comment below.
Continuous Deployment for Serverless Applications
With a continuous deployment infrastructure, developers can quickly and safely release new features and bug fixes for their applications without manually triggering any deployment scripts. Amazon Web Services offers a number of products that make the creation of deployment pipelines easier:
- AWS CodePipeline
- AWS CodeCommit
- AWS CodeBuild – newly launched
A typical serverless application consists of one or more functions triggered by events such as object uploads to Amazon S3, Amazon SNS notifications, or API actions. Those functions can stand alone or leverage other resources such as Amazon DynamoDB tables or S3 buckets. The most basic serverless application is simply a function.
This post shows you how to leverage AWS services to create a continuous deployment pipeline for your serverless applications. You use the Serverless Application Model (SAM) to define the application and its resources, CodeCommit as your source repository, CodeBuild to package your source code and SAM templates, AWS CloudFormation to deploy your application, and CodePipeline to bring it all together and orchestrate your application deployment.
Creating a pipeline
Pipelines pick up source code changes from a repository, build and package the application, and then push the new update through a series of stages, running integration tests to ensure that all features are intact and backward-compatible on each stage.
Each stage uses its own resources; for example, if you have a "dev" stage that points to a "dev" function, they are completely separate from the "prod" stage that points to a "prod" function. If your application uses other AWS services, such as S3 or DynamoDB, you should also have different resources for each stage. You can use environment variables in your AWS Lambda function to parameterize the resource names in the Lambda code.
To make this easier for you, we have created a CloudFormation template that deploys the required resources. If your application conforms to the same specifications as our sample, this pipeline will work for you:
- The source repository contains an application SAM file and a test SAM file.
- The SAM file called
app-sam.yamldefines all of the resources and functions used by the application. In the sample, this is a single function that uses the Express framework and theaws-serverless-expresslibrary. - The application SAM template exports the API endpoint generated in a CloudFormation output variable called
ApiUrl. - The SAM file called
test-sam.yamldefines a single function in charge of running the integration tests on each stage of the deployment. - The test SAM file exports the name of the Lambda function that it creates to a CloudFormation output variable called
TestFunction.
You can find the link to start the pipeline deployment at the end of this section. The template asks for a name for the service being deployed (the sample is called TimeService) and creates a CodeCommit repository to hold the application's source code, a CodeBuild project to package the SAM templates and prepare them for deployment, an S3 bucket to store build artifacts along the way, and a multi-stage CodePipeline pipeline for deployments.
The pipeline picks up your code when it's committed to the source repository, runs the build process, and then proceeds to start the deployment to each stage. Before moving on to the next stage, the pipeline also executes integration tests: if the tests fail, the pipeline stops.
This pipeline consists of six stages:
- Source – the source step picks up new commits from the CodeCommit repository. CodePipeline also supports S3 and GitHub as sources for this step.
- Build – Using CodeBuild, you pull down your application's dependencies and use the AWS CLI to package your app and test SAM templates for deployment. The
buildspec.ymlfile in the root of the sample application defines the commands that CodeBuild executes at each step. - DeployTests – In the first step, you deploy the updated integration tests using the
test-sam.yamlfile from your application. You deploy the updated tests first so that they are ready to run on all the following stages of the pipeline. - Beta – This is the first step for your app's deployment. Using the SAM template packaged in the Build step, you deploy the Lambda function and API Gateway endpoint to the beta stage. At the end of the deployment, this stage run your test function against the beta API.
- Gamma – Push the updated function and API to the gamma stage, then run the integration tests again.
- Prod – Rinse, repeat. Before proceeding with the prod deployment, your sample pipeline has a manual approval step.
Running the template
- Choose Launch Stack below to create the pipeline in your AWS account. This button takes you to the Create stack page of the CloudFormation console with the S3 link to the pre-populated template.
- Choose Next and customize your StackName and ServiceName.
- Skip the Options screen, choose Next, acknowledge the fact that the template can create IAM roles in your account, and choose Create.

Running integration tests
Integration tests decide whether your pipeline can move on and deploy the app code to the next stage. To keep the pipeline completely serverless, we decided to use a Lambda function to run the integration tests.
To run the test function, the pipeline template also includes a Lambda function called <YourServiceName>_start_tests. The start_tests function reads the output of the test deployment CloudFormation stack as well as the current stage's stack, extracts the output values from the stacks (the API endpoint and the test function name), and triggers an asynchronous execution of the test function. The test function is then in charge of updating the CodePipeline job status with the outcome of the tests. The test function in the sample application generates a random success or failure output.
In the future, for more complex integration tests, you could use AWS Step Functions to execute multiple tests at the same time.
The sample application
The sample application is a very simple API; it exposes time and time/{timeZone} endpoints that return the current time. The code for the application is written in JavaScript and uses the moment-timezone library to generate and format the timestamps. Download the source code for the sample application.
The source code includes the application itself under the app folder, and the integration tests for the application under the test folder. In the root directory for the sample, you will find two SAM templates, one for the application and one for the test function. The buildspec.yml file contains the instructions for the CodeBuild container. At the moment, the buildspecs use npm to download the app's dependencies and then the CloudFormation package command of the AWS CLI to prepare the SAM deployment package. For a sophisticated application, you would run your unit tests in the build step.
After you have downloaded the sample code, you can push it to the CodeCommit repository created by the pipeline template. The app-sam.yaml and test-sam.yaml files should be in the root of the repository. Using the CodePipeline console, you can follow the progress of the application deployment. The first time the source code is imported, the deployment can take a few minutes to start. Keep in mind that for the purpose of this demo, the integration tests function generates random failures.
After the application is deployed to a stage, you can find the API endpoint URL in the CloudFormation console by selecting the correct stack in the list and opening the Outputs tab in the bottom frame.
Conclusion
Continuous deployment and integration are a must for modern application development. It allows teams to iterate on their app at a faster clip and deliver new features and fixes in customers' hands quickly. With this pipeline template, you can bring this automation to your serverless applications without writing any additional code or managing any infrastructure.
You can re-use the same pipeline template for multiple services. The only requirement is that they conform to the same structure as the sample app with the app-sam.yaml and test-sam.yaml in the same repository.
Scripting Languages for AWS Lambda: Running PHP, Ruby, and Go

Dimitrij Zub, Solutions Architect

Raphael Sack, Technical Trainer
In our daily work with partners and customers, we see a lot of different amazing skills, expertise and experience in many fields, and programming languages. From languages that have been around for a while to languages on the cutting edge, many teams have developed a deep understanding of concepts of each language; they want to apply these languages with and within the innovations coming from AWS, such as AWS Lambda.
Lambda provides native support for a wide array of languages, such as Java, Node.js, Python, and C#. In this post, we outline how you can use Lambda with different scripting languages.
For each language, you perform the following tasks:
- Prepare: Launch an instance from an AMI and log in via SSH
- Compile and package the language for Lambda
- Install: Create the Lambda package and test the code
The preparation and installation steps are similar between languages, but we provide step-by-step guides and examples for compiling and packaging PHP, Go, and Ruby.
Common steps to prepare
You can use the capabilities of Lambda to run arbitrary executables to prepare the binaries to be executed within the Lambda environment.
The following steps are only an overview on how to get PHP, Go, or Ruby up and running on Lambda; however, using this approach, you can add more specific libraries, extend the compilation scope, and leverage JSON to interconnect your Lambda function to Amazon API Gateway and other services.
After your binaries have been compiled and your basic folder structure is set up, you won’t need to redo those steps for new projects or variations of your code. Simply write the code to accept inputs from STDIN and return to STDOUT and the written Node.js wrapper takes care of bridging the runtimes for you.
For the sake of simplicity, we demonstrate the preparation steps for PHP only, but these steps are also applicable for the other environments described later.
In the Amazon EC2 console, choose Launch instance. When you choose an AMI, use one of the AMIs in the Lambda Execution Environment and Available Libraries list, for the same region in which you will run the PHP code and launch an EC2 instance to have a compiler. For more information, see Step 1: Launch an Instance.
Pick t2.large as the EC2 instance type to have two cores and 8 GB of memory for faster PHP compilation times.

Choose Review and Launch to use the defaults for storage and add the instance to a default, SSH only, security group generated by the wizard.
Choose Launch to continue; in the launch dialog, you can select an existing key-pair value for your login or create a new one. In this case, create a new key pair called “php” and download it.

After downloading the keys, navigate to the download folder and run the following command:
chmod 400 php.pemThis is required because of SSH security standards. You can now connect to the instance using the EC2 public DNS. Get the value by selecting the instance in the console and looking it up under Public DNS in the lower right part of the screen.
ssh -i php.pem ec2-user@[PUBLIC DNS]You’re done! With this instance up and running, you have the right AMI in the right region to be able to continue with all the other steps.
Getting ready for PHP
After you have logged in to your running AMI, you can start compiling and packaging your environment for Lambda. With PHP, you compile the PHP 7 environment from the source and make it ready to be packaged for the Lambda environment.
Setting up PHP on the instance
The next step is to prepare the instance to compile PHP 7, configure the PHP 7 compiler to output in a defined directory, and finally compile PHP 7 to the Lambda AMI.
Update the package manager by running the following command:
sudo yum update –yInstall the minimum necessary libraries to be able to compile PHP 7:
sudo yum install gcc gcc-c++ libxml2-devel -y With the dependencies installed, you need to download the PHP 7 sources available from
For this post, we were running the EC2 instance in Ireland, so we selected http://ie1.php.net/get/php-7.0.7.tar.bz2/from/this/mirror as our mirror. Run the following command to download the sources to the instance and choose your own mirror for the appropriate region.
cd ~

wget http://ie1.php.net/distributions/php-7.0.7.tar.bz2 .

Extract the files using the following command:

tar -jxvf php-7.0.7.tar.bz2
This creates the php-7.0.7 folder in your home directory. Next, create a dedicated folder for the php-7 binaries by running the following commands.
mkdir /home/ec2-user/php-7-bin

./configure --prefix=/home/ec2-user/php-7-bin/
This makes sure the PHP compilation is nicely packaged into the php binaries folder you created in your home directory. Keep in mind, that you only compile the baseline PHP here to reduce the amount of dependencies required for your Lambda function.
You can add more dependencies and more compiler options to your PHP binaries using the options available in ./configure. Run ./configure –h for more information about what can be packaged into your PHP distribution to be used with Lambda, but also keep in mind that this will increase the overall binaries package.
Finally, run the following command to start the compilation:
make install
After the compilation is complete, you can quickly confirm that PHP is functional by running the following command:
cd ~/php-7-bin/bin/

./php –v

PHP 7.0.7 (cli) (built: Jun 16 2016 09:14:04) ( NTS )

Copyright (c) 1997-2016 The PHP Group

Zend Engine v3.0.0, Copyright (c) 1998-2016 Zend Technologies
Time to code
Using your favorite editor, you can create an entry point PHP file, which in this case reads input from a Linux pipe and provide its output to stdout. Take a simple JSON document and count the amounts of top-level attributes for this matter. Name the file HelloLambda.php.
<?php

$data = stream_get_contents(STDIN);

$json = json_decode($data, true);

$result = json_encode(array('result' => count($json)));

echo $result."n";

?>
Creating the Lambda package
With PHP compiled and ready to go, all you need to do now is to create your Lambda package with the Node.js wrapper as an entry point.
First, tar the php-7-bin folder where the binaries reside using the following command:
cd ~

tar -zcvf php-7-bin.tar.gz php-7-bin/
Download it to your local project folder where you can continue development, by logging out and running the following command from your local machine (Linux or OSX), or using tools like WinSCP on Windows:
scp -i php.pem ec2-user@[EC2_HOST]:~/php-7-bin.tar.gz .With the package download, you create your Lambda project in a new folder, which you can call php-lambda for this specific example. Unpack all files into this folder, which should result in the following structure:
php-lambda

+-- php-7-bin
The next step is to create a Node.js wrapper file. The file takes the inputs of the Lambda invocations, invoke the PHP binary with helloLambda.php as a parameter, and provide the inputs via Linux pipe to PHP for processing. Call the file php.js and copy the following content:
process.env['PATH'] = process.env['PATH'] + ':' + process.env['LAMBDA_TASK_ROOT'];

const spawn = require('child_process').spawn;

exports.handler = function(event, context) {

    //var php = spawn('php',['helloLambda.php']); //local debug only
    var php = spawn('php-7-bin/bin/php',['helloLambda.php']);
    var output = "";

    //send the input event json as string via STDIN to php process
    php.stdin.write(JSON.stringify(event));

    //close the php stream to unblock php process
    php.stdin.end();

    //dynamically collect php output
    php.stdout.on('data', function(data) {
          output+=data;
    });

    //react to potential errors
    php.stderr.on('data', function(data) {
            console.log("STDERR: "+data);
    });

    //finalize when php process is done.
    php.on('close', function(code) {
            context.succeed(JSON.parse(output));
    });
}

//local debug only
//exports.handler(JSON.parse("{"hello":"world"}"));
With all the files finalized, the folder structure should look like the following:
php-lambda
+– php-7-bin
— helloLambda.php
— php.js
The final step before the deployment is to zip the package into an archive which can be uploaded to Lambda. Call the package LambdaPHP.zip. Feel free to remove unnecessary files, such as phpdebug, from the php-7-bin/bin folder to reduce the size of the archive.
Go, Lambda, go!
The following steps are an overview of how to compile and execute Go applications on Lambda. As with the PHP section, you are free to enhance and build upon the Lambda function with other AWS services and your application infrastructure. Though this example allows you to use your own Linux machine with a fitting distribution to work locally, it might still be useful to understand the Lambda AMIs for test and automation.
To further enhance your environment, you may want to create an automatic compilation pipeline and even deployment of the Go application to Lambda. Consider using versioning and aliases, as they help in managing new versions and dev/test/production code.
Setting up Go on the instance
The next step is to set up the Go binaries on the instance, so that you can compile the upcoming application.
First, make sure your packages are up to date (always):
sudo yum update -yNext, visit the official Go site, check for the latest version, and download it to EC2 or to your local machine if using Linux:
cd ~

wget https://storage.googleapis.com/golang/go1.6.2.linux-amd64.tar.gz .

Extract the files using the following command:

tar -xvf go1.6.2.linux-amd64.tar.
This creates a folder named “go” in your home directory.
Time to code
For this example, you create a very simple application that counts the amount of objects in the provided JSON element. Using your favorite editor, create a file named “HelloLambda.go” with the following code directly on the machine to which you have downloaded the Go package, which may be the EC2 instance you started in the beginning or your local environment, in which case you are not stuck with vi.
package main

import (
    "fmt"
    "os"
    "encoding/json"
)

func main() {
    var dat map[string]interface{}

    fmt.Printf( "Welcome to Lambda Go, now Go Go Go!n" )
    if len( os.Args ) < 2 {
        fmt.Println( "Missing args" )
        return
    }

    err := json.Unmarshal([]byte(os.Args[1]), &dat)

    if err == nil {
        fmt.Println( len( dat ) )
    } else {
        fmt.Println(err)
    }
}
Before compiling, configure an environment variable to tell the Go compiler where all the files are located:
export GOROOT=~/go/

You are now set to compile a nifty new application!

~/go/bin/go build ./HelloLambda.go

Start your application for the very first time:

./HelloLambda '{ "we" : "love", "using" : "Lambda" }'
You should see output similar to:
Welcome to Lambda Go, now Go Go Go!

2
Creating the Lambda package
You have already set up your machine to compile Go applications, written the code, and compiled it successfully; all that is left is to package it up and deploy it to Lambda.
If you used an EC2 instance, copy the binary from the compilation instance and prepare it for packaging. To copy out the binary, use the following command from your local machine (Linux or OSX), or using tools such as WinSCP on Windows.
scp -i GoLambdaGo.pem ec2-user@ec2-00-00-00-00.eu-west-1.compute.amazonaws.com:~/goLambdaGo .With the binary ready, create the Lambda project in a new folder, which you can call go-lambda.
The next step is to create a Node.js wrapper file to invoke the Go application; call it go.js. The file takes the inputs of the Lambda invocations and invokes the Go binary.
Here’s the content for another example of a Node.js wrapper:
const exec = require('child_process').exec;
exports.handler = function(event, context) {
    const child = exec('./goLambdaGo ' + ''' + JSON.stringify(event) + ''', (error) => {
        // Resolve with result of process
        context.done(error, 'Process complete!');
    });

    // Log process stdout and stderr
    child.stdout.on('data', console.log);
    child.stderr.on('data', console.error);

}
With all the files finalized and ready, your folder structure should look like the following:
go-lambda
— go.js
— goLambdaGo
The final step before deployment is to zip the package into an archive that can be uploaded to Lambda; call the package LambdaGo.zip.
On a Linux or OSX machine, run the following command:
zip -r go.zip ./goLambdaGo ./go.jsA gem in Lambda
For convenience, you can use the same previously used instance, but this time to compile Ruby for use with Lambda. You can also create a new instance using the same instructions.
Setting up Ruby on the instance
The next step is to set up the Ruby binaries and dependencies on the EC2 instance or local Linux environment, so that you can package the upcoming application.
First, make sure your packages are up to date (always):
sudo yum update -yFor this post, you use Traveling Ruby, a project that helps in creating “portable”, self-contained Ruby packages. You can download the latest version from Traveling Ruby linux-x86:
cd ~

wget http://d6r77u77i8pq3.cloudfront.net/releases/traveling-ruby-20150715-2.2.2-linux-x86_64.tar.gz .
Extract the files to a new folder using the following command:
mkdir LambdaRuby

tar -xvf traveling-ruby-20150715-2.2.2-linux-x86_64.tar.gz -C LambdaRuby
This creates the “LambdaRuby” folder in your home directory.
Time to code
For this demonstration, you create a very simple application that counts the amount of objects in a provided JSON element. Using your favorite editor, create a file named “lambdaRuby.rb” with the following code:
#!./bin/ruby

require 'json'

# You can use this to check your Ruby version from within puts(RUBY_VERSION)

if ARGV.length > 0
    puts JSON.parse( ARGV[0] ).length
else
    puts "0"
end
Now, start your application for the very first time, using the following command:
./lambdaRuby.rb '{ "we" : "love", "using" : "Lambda" }'You should see the amount of fields in the JSON as output (2).
Creating the Lambda package
You have downloaded the Ruby gem, written the code, and tested it successfully… all that is left is to package it up and deploy it to Lambda. Because Ruby is an interpreter-based language, you create a Node.js wrapper and package it with the Ruby script and all the Ruby files.
The next step is to create a Node.js wrapper file to invoke your Ruby application; call it ruby.js. The file takes the inputs of the Lambda invocations and invoke your Ruby application. Here’s the content for a sample Node.js wrapper:
const exec = require('child_process').exec;

exports.handler = function(event, context) {
    const child = exec('./lambdaRuby.rb ' + ''' + JSON.stringify(event) + ''', (result) => {
        // Resolve with result of process
        context.done(result);
    });

    // Log process stdout and stderr
    child.stdout.on('data', console.log);
    child.stderr.on('data', console.error);
}
With all the files finalized and ready, your folder structure should look like this:
LambdaRuby
+– bin
+– bin.real
+– info
— lambdaRuby.rb
+– lib
— ruby.js
The final step before the deployment is to zip the package into an archive to be uploaded to Lambda. Call the package LambdaRuby.zip.
On a Linux or OSX machine, run the following command:
zip -r ruby.zip ./Copy your zip file from the instance so you can upload it. To copy out the archive, use the following command from your local machine (Linux or OSX), or using tools such as WinSCP on Windows.
scp -i RubyLambda.pem ec2-user@ec2-00-00-00-00.eu-west-1.compute.amazonaws.com:~/LambdaRuby/LambdaRuby.zip .Common steps to install
With the package done, you are ready to deploy the PHP, Go, or Ruby runtime into Lambda.
Log in to the AWS Management Console and navigate to Lambda; make sure that the region matches the one which you selected the AMI for in the preparation step.
For simplicity, I’ve used PHP as an example for the deployment; however, the steps below are the same for Go and Ruby.
Creating the Lambda function
Choose Create a Lambda function, Skip. Select the following fields and upload your previously created archive.

The most important areas are:
- Name: The name to give your Lambda function
- Runtime: Node.js
- Lambda function code: Select the zip file created in the PHP, Go, or Ruby section, such as php.zip, go.zip, or ruby.zip
- Handler: php.handler (as in the code, the entry function is called handler and the file is php.js. If you have used the file names from the Go and Ruby sections use the following format: [js file name without .js].handler, i.e., go.handler)
- Role: Choose Basic Role if you have not yet created one, and create a role for your Lambda function execution
Choose Next, Create function to continue to testing.
Testing the Lambda function
To test the Lambda function, choose Test in the upper right corner, which displays a sample event with three top-level attributes.

Feel free to add more, or simply choose Save and test to see that your function has executed properly.

Conclusion
In this post, we outlined three different ways to create scripting language runtimes for Lambda, from compiling against the Lambda runtime for PHP and being able to run scripts, compiling the actuals as in Go, or using packaged binaries as much as possible with Ruby. We hope you enjoyed the ideas, found the hidden gems, and are now ready to go to create some pretty hefty projects in your favorite language, enjoying serverless, Amazon Kinesis, and API Gateway along the way.
If you have questions or suggestions, please comment below.
Serverless at re:Invent 2016 – Wrap-up
The re:Invent 2016 conference was an exciting week to be working on serverless at AWS. We announced new features like support for C# and dead letter queues, and launched new application constructs with Lambda such as Lambda@Edge, AWS Greengrass, Amazon Lex, and AWS Step Functions. In addition we also added support for surfacing services built using API Gateway in the AWS marketplace, expanded the capabilities for custom authorizers, and launched a reference developer portal for managing APIs. Catch up on all the great re:Invent launches here.
In addition to the serverless mini-con with deep dive talks and best practices, we also had deep customer talks by folks from Thomson Reuters, Vevo, Expedia, and FINRA. If you weren’t able to attend the mini-con or missed a specific session, here is a quick link to the entire Serverless Mini Conference Playlist. Other interesting sessions from other tracks are listed below.
Individual Sessions from the Mini Conference
- State of the Union – Serverless Mini Conference
- SVR201 – Serverless Apps with AWS Step Functions – [New Launch]
- SVR202 – What’s New with AWS Lambda – [New Launch]
- SVR301 – Real-time Data Processing Using AWS Lambda
- SVR302 – Optimizing the Data Tier in Serverless Web Applications – [Best Practices]
- SVR303 – Coca-Cola: Running Serverless Applications with Enterprise Requirements – [Best Practices]
- SVR304 – bots + serverless = ❤ – [New Launch]
- SVR305 – ↑↑↓↓←→←→ BA Lambda Start – [Best Practices]
- SVR306 – Serverless Computing Patterns at Expedia
- SVR307 – Application Lifecycle Management in a Serverless World – [Best Practices]
- SVR308 – Content and Data Platforms at Vevo: Rebuilding and Scaling from Zero
- SVR401 – Using AWS Lambda to Build Control Systems for Your AWS Infrastructure
- SVR402 – Operating Your Production API – [Best Practices]
Other Interesting Sessions
- DEV205 – Monitoring, Hold the Infrastructure: Getting the Most from AWS Lambda
- DEV207 – Developing Serverless C# Applications – [New Launch]
- DEV301 – Amazon CloudWatch Logs and AWS Lambda: A Match Made in Heaven
- DEV308 – Chalice: A Serverless Microframework for Python – [Best Practices]
- MBL305 – Developing Apps and Serverless Microservices for Enterprises using AWS
- MBL306 – Serverless Authentication and Authorization: Identity Management – [Best Practices]
- MBL404 – Native, Hybrid and Web patterns with Serverless and AWS Mobile services
- CTD206 – Bringing AWS Lambda to the Edge – [New Launch]
- CMP211 – Getting Started with Serverless Architectures – [Best Practices]
- ALX302 – Build a Serverless Back End for Your Alexa-Based Voice Interactions
- BDM303 – JustGiving: Serverless Data Pipelines, ETL & Stream Processing
- CMP305 – Serverless to 32 XLarge: A Unified Security Approach To AWS Compute
- IOT309 – Lambda Everywhere – [New Launch]
- IOT401 – Serverless IoT Back Ends
- SAC310 – Securing Serverless Architectures, and API Filtering at Layer 7 – [Best Practices]
- ARC402 – Serverless Architectural Patterns and Best Practices – [Best Practices]
- GPST404 – Building Complex Serverless Applications – [Best Practices]
If there are other sessions or talks you think I should capture in this list, let me know!
Robust Serverless Application Design with AWS Lambda Dead Letter Queues

Gene Ting, Solutions Architect
AWS Lambda is a serverless, event-driven compute service that allows developers to bring their functions to the cloud easily. A key challenge that Lambda developers often face is to create solutions that handle exceptions and failures gracefully. Some examples include:
- Notifying operations support when a function fails with context
- Sending jobs that have timed out to a handler that can either notify operations of a critical failure or rebalance jobs
Now, with the release of Lambda Dead Letter Queues, Lambda functions can be configured to notify when the function fails, with context on what the failure was.
In this post, we show how you can configure your function to deliver notification to an Amazon SQS queue or Amazon SNS topic, and how you can create a process to automatically generate more meaningful notifications when your Lambda functions fail.
Introducing Lambda Dead Letter Queues
Dead-letter queues are a powerful concept, which help software developers find software issue patterns in their asynchronous processing components. The way it works is simple—when your messaging component receives a message and detects a fatal or unhandled error while processing the message, it sends information about the message that failed to another location, such as another queue or another notification system. SQS provides dead letter queues today, sending messages that couldn’t be handled to a different queue for further investigation.
AWS Lambda Dead Letter Queues builds upon the concept by enabling Lambda functions to be configured with an SQS queue or SNS topic as a destination to which the Lambda service can send information about an asynchronous request when processing fails. The Lambda service sends information about the failed request when the request will no longer be retried. Supported invocations include:
- An event type invocation from a custom application
- Any AWS event source that’s not a DynamoDB table, Amazon Kinesis stream, or API Gateway resource request integration
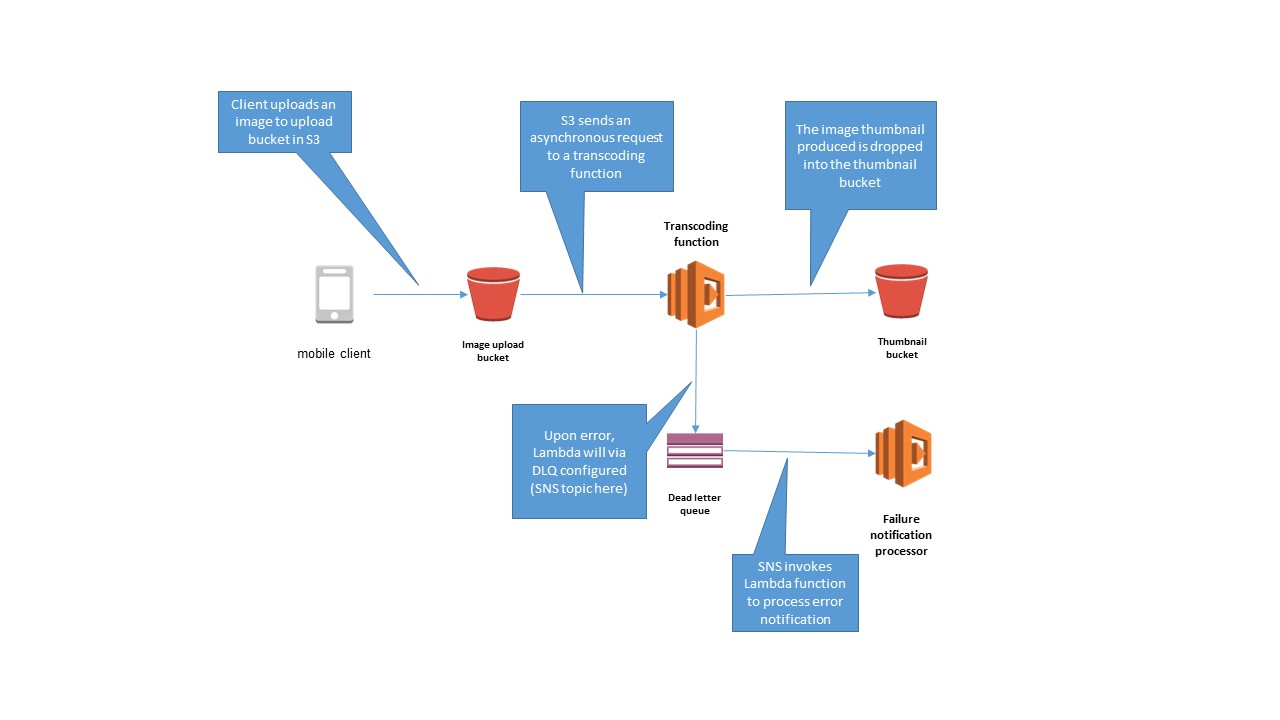
Take the typical beginner use case for learning about serverless applications on AWS: creating thumbnails from images dropped onto an S3 bucket. The transcoding Lambda function can be configured to send any transcoding failures to an SNS topic, which triggers a Lambda function for further investigation.
Now, you can set up a dead letter queue for an existing Lambda function and test out the feature.
Configuring a DLQ target for a Lambda function
First, make sure that the execution role for the Lambda function is allowed to publish to the SNS topic. For this demo, use the sns-lambda-test topic. An example is provided below:
{
   "Version":"2012-10-17",
   "Statement":[{
      "Effect":"Allow",
      "Action":"sns:Publish",
      "Resource":"arn:aws:sns:us-west-2:123456789012:sns-lambda-test"
      }
   ]
}
If an SQS queue is the intended target, you need a comparable policy that allows the appropriate SendMessage action to the queue.
Next, choose an existing Lambda function against which to configure a dead-letter queue. For this example, choose a predeployed function, such as CreateThumbnail.

Select the function, choose Configuration, expand the **Advanced settings **section in the middle of the page, and scroll to the DLQ Resource form. Choose SNS and for SNS Topic name, enter sns-lambda-test.

That’s it—the function is now configured and ready for testing.
Processing failure notifications
One easy way to test the handler for your dead letter queue is to submit an event that is known to fail for the Lambda function. In this example, you can simply drop a text file pretending to be an image to the S3 bucket, to be recognized by the image thumbnail creator as a non-image file, and have the handler exit with an error message.
When Lambda sends an error notification to an SNS topic, three additional message attributes are attached to the notification in the MessageAttributes object:
- RequestID – The request ID.
- ErrorCode – The HTTP response code that would have been given if the handler was synchronously called.
- ErrorMessage – The error message given back by the Lambda runtime. In the example above, it is the error message from the handler.
In addition to these attributes, the body of the event is held in the Message attribute of the Sns object. If you use an SQS queue instead, the additional attributes are in the MessageAttributes object and the event body is held in the Body attribute of the message.
Handling timeouts
One of the most common failures to occur in Lambda functions is a timeout. In this scenario, the Lambda function executes until it’s been forcefully terminated by the Lambda runtime, which sends an error message indicating that the function has timed out, as in the following example error message:
"ErrorMessage": {

"Type": "String",

"Value": "2016-11-29T04:27:36.789Z b4797725-b5eb-11e6-acb2-17876a085622 Task timed out after 300.00 seconds"

}
An error handler can simply parse for the string Task timed out after in the Value attribute, and act accordingly, such as breaking the request into multiple Lambda invocations, or sending to a different queue that spins up EC2 instances in an Auto Scaling group for handling larger jobs.
Handling critical failures
Another scenario that you may need to handle is when critical failures occur. Some examples of a critical failure are:
- A misconfiguration of the Lambda handler
- A system crash, such as an out-of-memory error
In either case, there’s very little that can be handled gracefully in application logic. These kinds of errors can be forwarded to operations support for root cause analysis or break glass fixes.
In the case of a system crash, your dead letter queue receives an error message similar to the following:
"RequestID": { "Type": "String", "Value": "6502cad0-b641-11e6-bd4e-279609143c53" },

"ErrorCode": { "Type": "String", "Value": "200" },

"ErrorMessage": { "Type": "String", "Value": "Process exited before completing request" }
For this example, the Lambda handler was forced to crash with an out-of-memory error, which can be found by searching in the Lambda handler’s log stream by the given RequestID.
In the case of a misconfiguration, your dead letter queue receives an error message along the following lines:
"ErrorMessage": { "Type": "String", "Value": "Cannot find module '/var/task/index'" }In this example, the Lambda handler was misconfigured to load a non-existent index.js module.
Monitoring Lambda functions configured with dead letter queues
Lambda functions with a configured dead letter queue also come with their own CloudWatch metric called “DeadLetterErrors”. The metric is incremented whenever the dead letter message payload can’t be sent to the dead letter queue at any time.
Conclusion
With the launch of Dead Letter Queues, Lambda function developers can now create much simpler functions by focusing only on the business logic, and leverage the AWS Lambda infrastructure to delegate error handling elsewhere in a more graceful manner.
For more information, read about Dead Letter Queues in the AWS Lambda Developer Guide. Happy coding everyone, and have fun creating awesome serverless applications!
Announcing C# Support for AWS Lambda
Today, we're excited to announce C# as a supported language for AWS Lambda! Using the new, open source .NET Core 1.0 runtime, you can easily publish C# code to AWS Lambda from a variety of popular .NET tools. .NET developers can now build Lambda functions and serverless applications with the C# language and .NET tools that they know and love. With tooling support in Visual Studio, Yeoman, and the dotnet CLI, you can easily deploy individual Lambda functions or entire serverless applications written in C# to Lambda and Amazon API Gateway.
Lambda is the core of the AWS serverless platform. Originally launched in 2015, Lambda enables customers to deploy Node.js, Python, and Java code to AWS without needing to worry about infrastructure or scaling. This allows developers to focus on the business logic for their application and not spend time maintaining and scaling infrastructure. Until today, .NET developers were not able to take advantage of this model. We're excited to add C# to the list of supported languages and enable a new category of developers to take advantage of Lambda and API Gateway to create serverless applications.
C# in Lambda
Look at a simple C# Lambda function. If you've already used Lambda with Node.js, Python, or Java, this should look familiar:
using System;
using System.IO;
using System.Text;

using Amazon.Lambda.Core;
using Amazon.Lambda.DynamoDBEvents;
using Amazon.Lambda.Serialization.Json;

namespace DynamoDBStreams
{
    public class DdbSample
    {
        private static readonly JsonSerializer _jsonSerializer = new JsonSerializer();

        [LambdaSerializer(typeof(JsonSerializer))]
        public void ProcessDynamoEvent(DynamoDBEvent dynamoEvent)
        {
            Console.WriteLine($"Beginning to process {dynamoEvent.Records.Count} records...");

            foreach (var record in dynamoEvent.Records)
            {
                Console.WriteLine($"Event ID: {record.EventID}");
                Console.WriteLine($"Event Name: {record.EventName}");

                string streamRecordJson = SerializeObject(record.Dynamodb);
                Console.WriteLine($"DynamoDB Record:");
                Console.WriteLine(streamRecordJson);
            }

            Console.WriteLine("Stream processing complete.");
        }


        private string SerializeObject(object streamRecord)
        {
            using (var ms = new MemoryStream())
            {
                _jsonSerializer.Serialize(streamRecord, ms);
                return Encoding.UTF8.GetString(ms.ToArray());
            }
        }
    }
}
As you can see, this is straightforward code, but there are a few important details to call out. Unlike other languages supported on Lambda, you don't need to implement a specific interface to mark your code as a Lambda function. Instead, just provide a handler string when uploading your code to tell Lambda where to start execution.
Similar to other languages supported on Lambda, you have a few choices for handling input and return types in your function. The most basic choice is to use a low-level stream interface of System.IO.Stream. Alternatively you can also apply the default serializer at the assembly or method level of your application, or you can define your own serialization logic by implementing the ILambdaSerializer interface, which is also provided by the Amazon.Lambda.Core library.
Look at the function signature for the ProcessDynamoEvent function and notice DynamoDBEvent in the signature. This comes from the Amazon.Lambda.Core library provided by Lambda, along with many more classes for other AWS event types. You can add a project dependency on this NuGet package to get access to a static Lambda logger, serialization interfaces, and a C# implementation of the Lambda context object.
For logging, you can use the static Write or WriteLine methods provided by the C# Console class, the Log method on the Amazon.Lambda.Core.LambdaLogger class, or the Logger property in the context object. You can get more information about the C# programming model in the AWS Lambda Developer Guide.
AWS Toolkit for Visual Studio
The AWS Toolkit for Visual Studio supports developing, testing, and deploying .NET Core Lambda functions and serverless applications. The toolkit has two new project templates to help you get started:
- The AWS Lambda Project template creates a simple project with a single C# Lambda function.
- The AWS Serverless Application template creates a small AWS serverless application, following the AWS Serverless Application Model (AWS SAM). This template shows how to develop a complete serverless application composed of multiple Lambda functions exposed through an API Gateway REST endpoint. Also, AWS SAM allows you to model the AWS resources that your application uses as part of your project's template.

After your code is ready, you can deploy directly from Visual Studio by right-clicking your project and choosing Publish to AWS Lambda… in the Solution Explorer. From there, the deployment wizard guides you through the deployment process.

Cross-platform development using the .NET Core CLI
One of the great features of .NET Core is cross-platform support. With the traditional .NET framework, developers are required to build and run their applications on Windows. However, .NET Core enables you to develop your C# code on any platform of your choice and deploy it to any platform as well.
If you're not developing on Windows and don't have access to the AWS Toolkit for Visual Studio, you can still use .NET tools to easily publish your C# Lambda functions and serverless applications to AWS. Even if you are using the AWS Toolkit for Visual Studio, knowing how to use the dotnet CLI can be helpful in automating your build and deployment process.
After you create a .NET Core project, enable the Lambda tools in the dotnet CLI using tools like Yeoman; just add a tools dependency on the Amazon.Lambda.Tools NuGet package to your new project.

The Amazon.Lambda.Tools NuGet package adds commands to the new dotnet CLI that allow you to deploy your Lambda functions and serverless applications to AWS, no matter what platform you're on. Even if you are developing in Visual Studio on Windows, the AWS Lambda tools in the dotnet CLI are helpful for setting up a CI/CD pipeline for your application.
To learn more about the new Lambda commands in the dotnet CLI, type dotnet lambda help in your project directory.

Summary
We're excited to open up AWS Lambda for C# applications through the .NET Core runtime. You can find more information on writing C# Lambda functions in the AWS Lambda Developer Guide. Download the AWS Toolkit for Visual Studio to get started or check out the Lambda extensions to the dotnet CLI.