Creazione di un'applicazione Web di base
TUTORIAL


Modulo 5: Maggiore interattività in un'applicazione Web
In questo modulo modificherai il sito Web statico per richiamare l'API e visualizzare il testo personalizzato.
Panoramica
In questo modulo aggiorneremo il sito Web statico creato nel Modulo 1 per richiamare la REST API creata nel Modulo 3. In tal modo sarà possibile visualizzare il testo in base a ciò che hai inserito.
Obiettivi
- Chiamata di un'API di API Gateway da una pagina HTML
- Caricamento di una nuova versione dell'applicazione Web alla console Amplify
Concetti chiave
Implementazione di un sito Web: rendere un sito Web disponibile agli utenti.
Ambiente: una fase, ad esempio "prod", "dev" o "staging" in cui è possibile eseguire un'applicazione o sito Web.
Richiamo di un'API: invio di un evento a un'API per attivare un comportamento specifico.
Tempo minimo richiesto per il completamento
5 minuti
Servizi utilizzati
Ultimo aggiornamento
Implementazione
-
Caricamento di un'applicazione Web con la console Amplify
- Apri il file index.html creato nel Modulo 1.
- Sostituisci il codice esistente con il seguente:
<!DOCTYPE html> <html> <head> <meta charset="UTF-8"> <title>Hello World</title> <!-- Add some CSS to change client UI --> <style> body { background-color: #232F3E; } label, button { color: #FF9900; font-family: Arial, Helvetica, sans-serif; font-size: 20px; margin-left: 40px; } input { color: #232F3E; font-family: Arial, Helvetica, sans-serif; font-size: 20px; margin-left: 20px; } </style> <script> // define the callAPI function that takes a first name and last name as parameters var callAPI = (firstName,lastName)=>{ // instantiate a headers object var myHeaders = new Headers(); // add content type header to object myHeaders.append("Content-Type", "application/json"); // using built in JSON utility package turn object to string and store in a variable var raw = JSON.stringify({"firstName":firstName,"lastName":lastName}); // create a JSON object with parameters for API call and store in a variable var requestOptions = { method: 'POST', headers: myHeaders, body: raw, redirect: 'follow' }; // make API call with parameters and use promises to get response fetch("YOUR-API-INVOKE-URL", requestOptions) .then(response => response.text()) .then(result => alert(JSON.parse(result).body)) .catch(error => console.log('error', error)); } </script> </head> <body> <form> <label>First Name :</label> <input type="text" id="fName"> <label>Last Name :</label> <input type="text" id="lName"> <!-- set button onClick method to call function we defined passing input values as parameters --> <button type="button" onclick="callAPI(document.getElementById('fName').value,document.getElementById('lName').value)">Call API</button> </form> </body> </html>3. Assicurati di aggiungere l'URL di chiamata dell'API alla riga 41 (dal Modulo 3). Nota: se non disponi dell'URL dell’API, puoi ottenerlo dalla console di Gateway API selezionando l'API e scegliendo le fasi.
4. Salva il file.
5. Comprimi solo il file HTML.
6. Apri la console Amplify.
7. Fai clic sull'applicazione Web creata nel Modulo 1.
8. Fai clic sul pulsante bianco Scegli file.
9. Seleziona il file ZIP creato nella fase 5.
10. Una volta caricato il file, si avvierà automaticamente un processo di implementazione. Non appena vedi una barra verde, significa che l’implementazione è completa.
- Apri il file index.html creato nel Modulo 1.
-
Test dell'app Web aggiornata
- Scegli l'URL sotto Dominio.
- Nel browser si dovrebbe caricare l'applicazione Web aggiornata.
- Immetti il tuo nome (o quello che preferisci) e fai clic sul pulsante Chiama API.
- Dovresti visualizzare un messaggio che inizia con Hello da Lambda seguito dal testo immesso.
Congratulazioni! Congratulazioni, la tua applicazione Web funzionante e implementata dalla console Amplify Console può richiamare una funzione Lambda tramite Gateway API.
Architettura applicativa
Ora che tutti i moduli sono stati completati, ecco l'architettura di ciò che hai costruito:
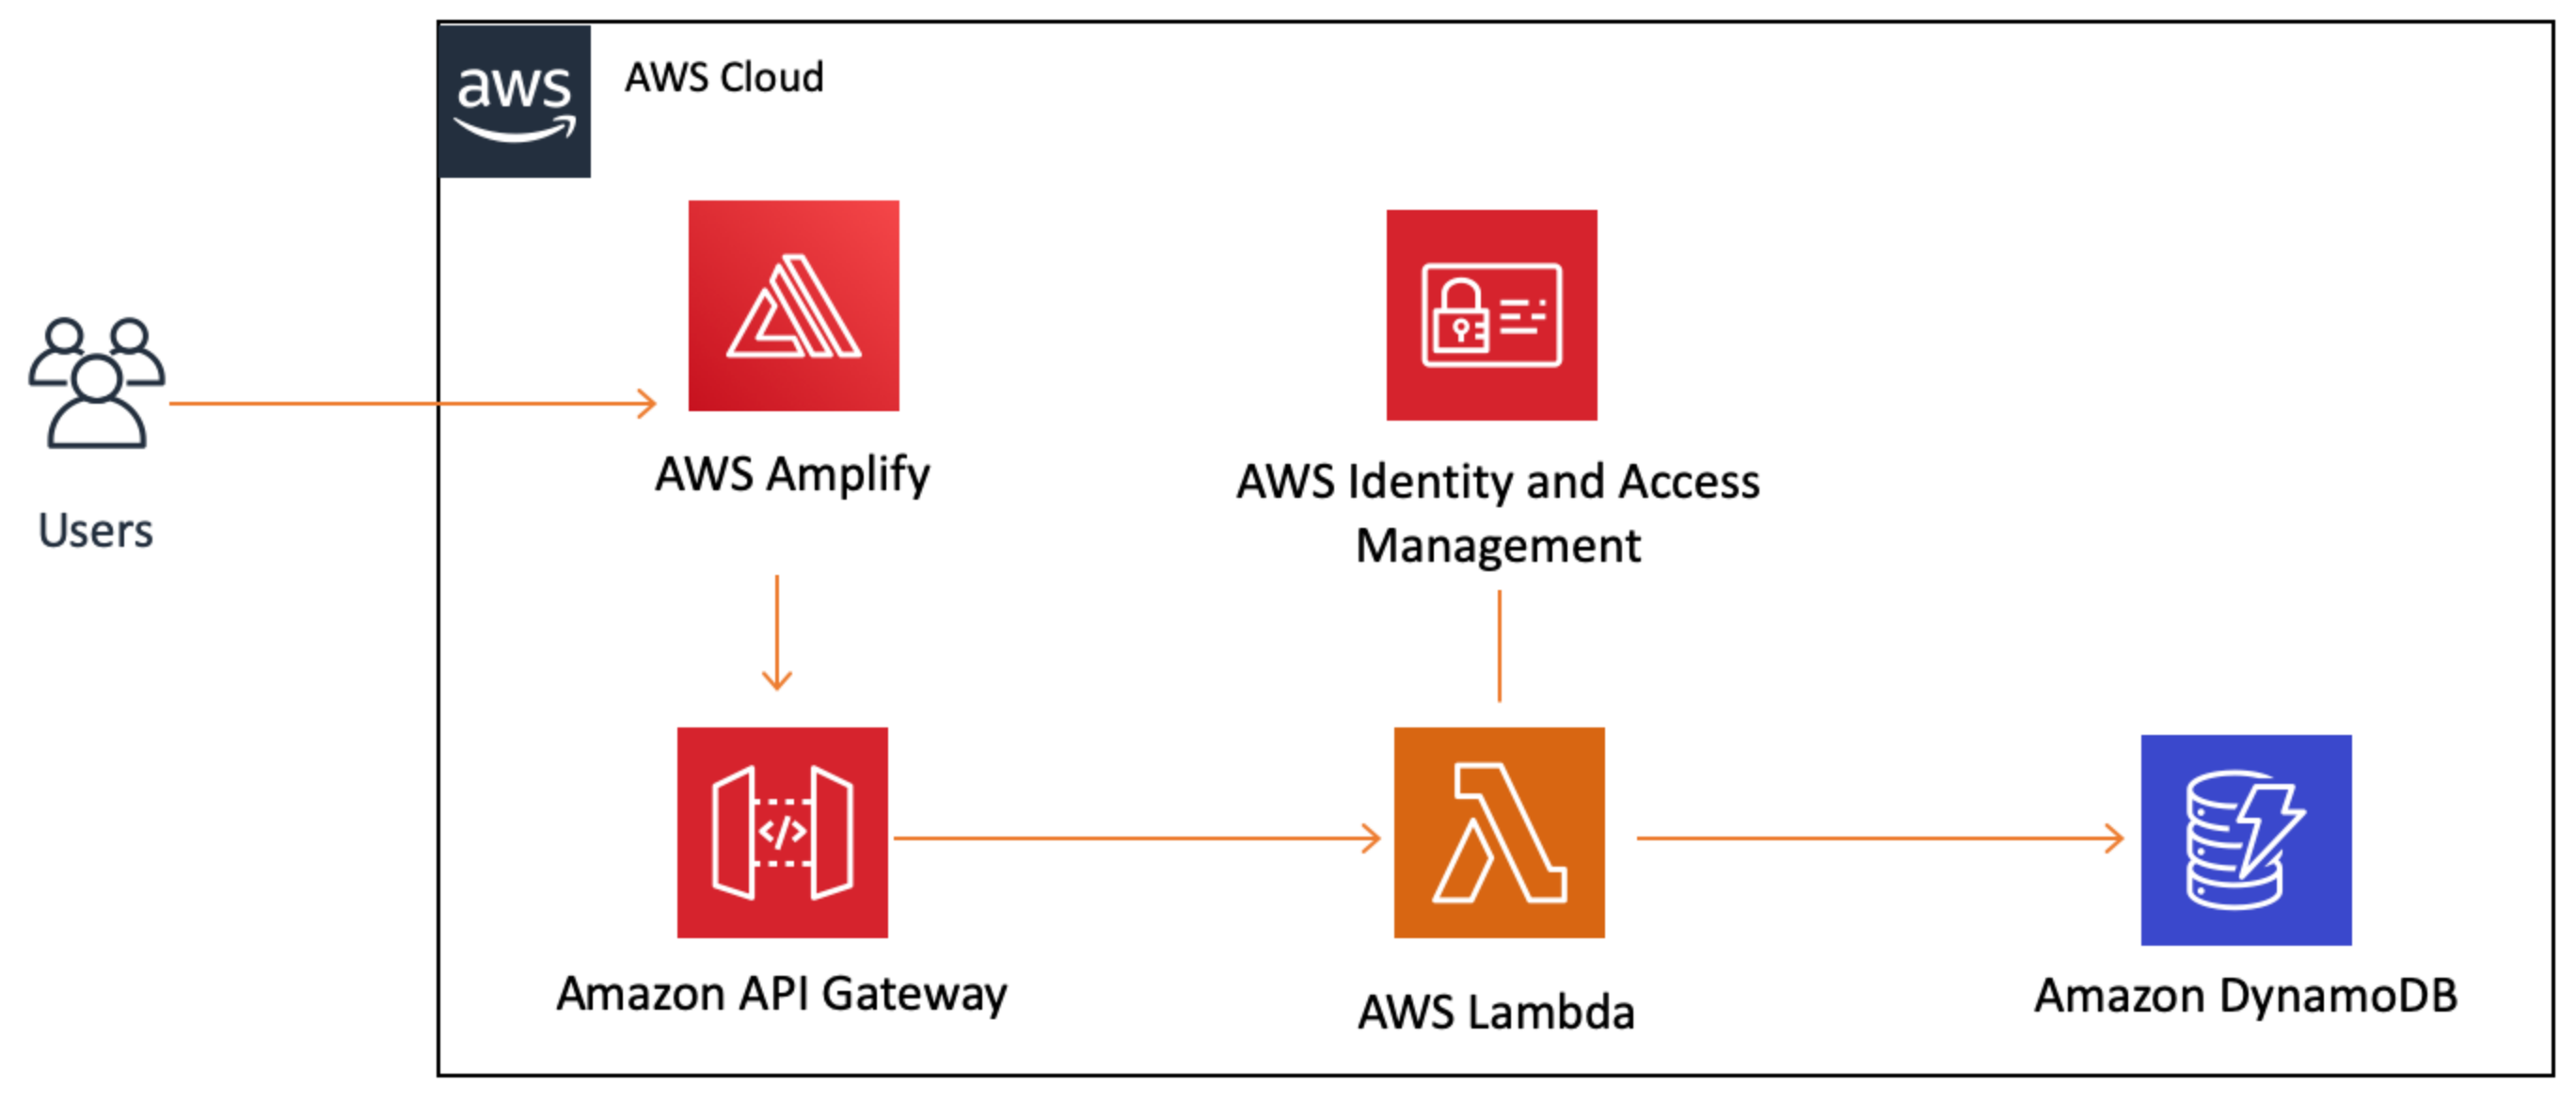
Tutti i servizi AWS configurati possono comunicare tra loro in modo sicuro. Quando un utente fa clic su un pulsante nell'applicazione Web, questo effettua una chiamata alla nostra API, attivando così la funzione Lambda. Questa scrive in un database e restituisce un messaggio al client tramite Gateway API. IAM gestisce tutte le autorizzazioni.
Congratulazioni!
Hai creato un'applicazione Web in AWS! Nel prossimo modulo, elimineremo le risorse utilizzate in questo tutorial in modo da non incorrere in addebiti indesiderati sul tuo account.