AWS Architecture Blog
Using DevOps Automation to Deploy Lambda APIs across Accounts and Environments
by Subrahmanyam Madduru – Global Partner Solutions Architect Leader, AWS, Sandipan Chakraborti – Senior AWS Architect, Wipro Limited, Abhishek Gautam – AWS Developer and Solutions Architect, Wipro Limited, Arati Deshmukh – AWS Architect, Infosys
As more and more enterprises adopt serverless technologies to deliver their business capabilities in a more agile manner, it is imperative to automate release processes. Multiple AWS Accounts are needed to separate and isolate workloads in production versus non-production environments. Release automation becomes critical when you have multiple business units within an enterprise, each consisting of a number of AWS accounts that are continuously deploying to production and non-production environments.
As a DevOps best practice, the DevOps engineering team responsible for build-test-deploy in a non-production environment should not release the application and infrastructure code on to both non-production and production environments. This risks introducing errors in application and infrastructure deployments in production environments. This in turn results in significant rework and delays in delivering functionalities and go-to-market initiatives. Deploying the code in a repeatable fashion while reducing manual error requires automating the entire release process. In this blog, we show how you can build a cross-account code pipeline that automates the releases across different environments using AWS CloudFormation templates and AWS cross-account access.
Cross-account code pipeline enables an AWS Identity & Access Management (IAM) user to assume an IAM Production role using AWS Secure Token Service (Managing AWS STS in an AWS Region – AWS Identity and Access Management) to switch between non-production and production deployments based as required. An automated release pipeline goes through all the release stages from source, to build, to deploy, on non-production AWS Account and then calls STS Assume Role API (cross-account access) to get temporary token and access to AWS Production Account for deployment. This follow the least privilege model for granting role-based access through IAM policies, which ensures the secure automation of the production pipeline release.
Solution Overview
In this blog post, we will show how a cross-account IAM assume role can be used to deploy AWS Lambda Serverless API code into pre-production and production environments. We are building on the process outlined in this blog post: Building a CI/CD pipeline for cross-account deployment of an AWS Lambda API with the Serverless Framework by programmatically automating the deployment of Amazon API Gateway using CloudFormation templates. For this use case, we are assuming a single tenant customer with separate AWS Accounts to isolate pre-production and production workloads. In Figure 1, we have represented the code pipeline workflow diagramatically for our use case.
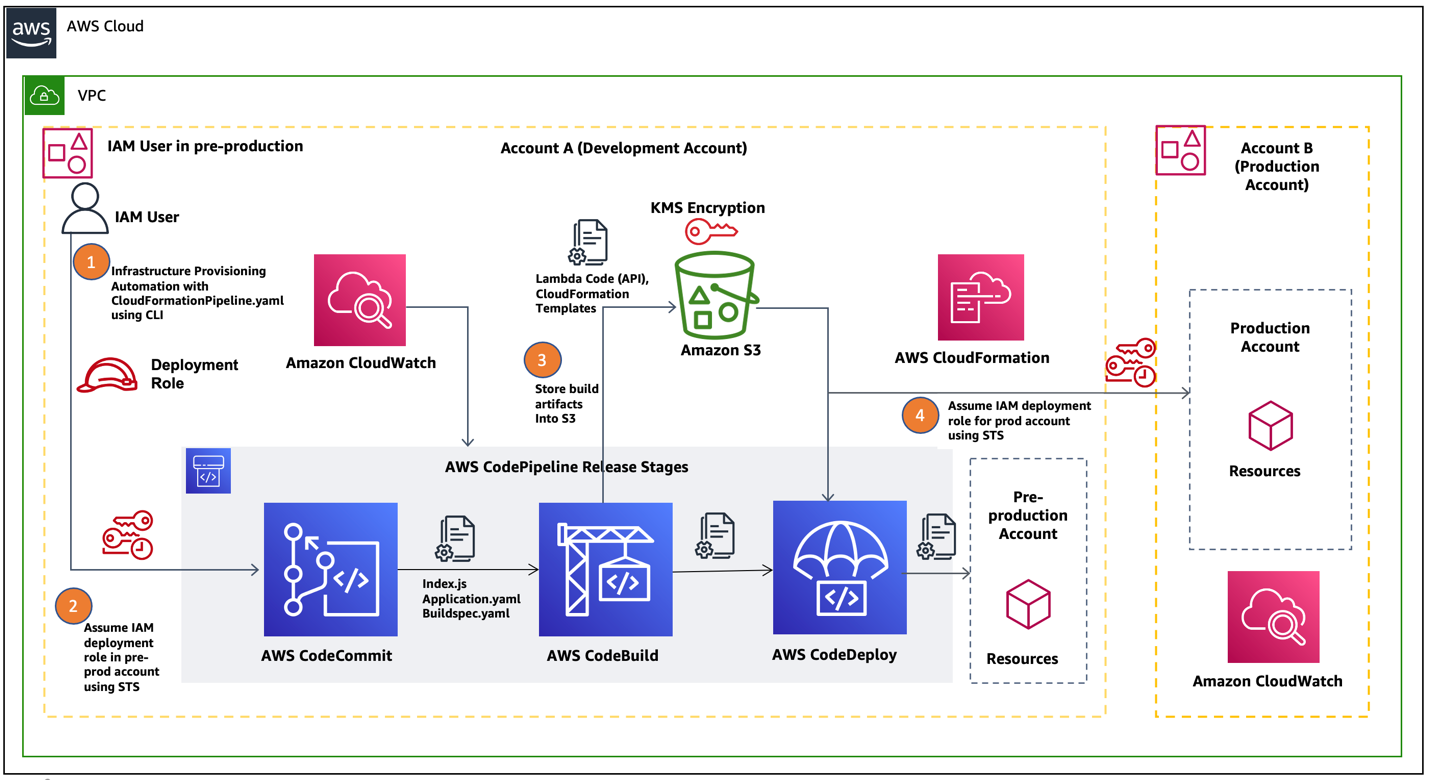
Figure 1. AWS cross-account AWS CodePipeline for production and non-production workloads
Let us describe the code pipeline workflow in detail for each step noted in the preceding diagram:
- An IAM user belonging to the DevOps engineering team logs in to AWS Command-line Interface (AWS CLI) from a local machine using an IAM secret and access key.
- Next, the IAM user assumes the IAM role to the corresponding activities – AWS Code Commit, AWS CodeBuild, AWS CodeDeploy, AWS CodePipeline Execution and deploys the code for pre-production.
- A typical AWS CodePipeline comprises of build, test and deploy stages. In the build stage, the AWS CodeBuild service generates the Cloudformation template stack (template-export.yaml) into Amazon S3.
- In the deploy stage, AWS CodePipeline uses a CloudFormation template (a yaml file) to deploy the code from an S3 bucket containing the application API endpoints via Amazon API Gateway in the pre-production environment.
- The final step in the pipeline workflow is to deploy the application code changes onto the Production environment by assuming STS production IAM role.
Since the AWS CodePipeline is fully automated, we can use the same pipeline by switching between pre-production and production accounts. These accounts assume the IAM role appropriate to the target environment and deploy the validated build to that environment using CloudFormation templates.
Prerequisites
Here are the pre-requisites before you get started with implementation.
- A user with appropriate privileges (for example: Project Admin) in a production AWS account
- A user with appropriate privileges (for example: Developer Lead) in a pre-production AWS account such as development
- A CloudFormation template for deploying infrastructure in the pre-production account
- Ensure your local machine has AWS CLI installed and configured
Implementation Steps
In this section, we show how you can use AWS CodePipeline to release a serverless API in a secure manner to pre-production and production environments. AWS CloudWatch logging will be used to monitor the events on the AWS CodePipeline.
1. Create Resources in a pre-production account
In this step, we create the required resources such as a code repository, an S3 bucket, and a KMS key in a pre-production environment.
- Clone the code repository into your CodeCommit. Make necessary changes to index.js and ensure the buildspec.yaml is there to build the artifacts.
- Using codebase (lambda APIs) as input, you output a CloudFormation template, and environmental configuration JSON files (used for configuring Production and other non-Production environments such as dev, test). The build artifacts are packaged using AWS Serverless Application Model into a zip file and uploads it to an S3 bucket created for storing artifacts. Make note of the repository name as it will be required later.
- Create an S3 bucket in a Region (Example: us-east-2). This bucket will be used by the pipeline for get and put artifacts. Make a note of the bucket name.
- Make sure you edit the bucket policy to have your production account ID and the bucket name. Refer to AWS S3 Bucket Policy documentation to make changes to Amazon S3 bucket policies and permissions.
- Navigate to AWS Key Management Service (KMS) and create a symmetric key.
- Then create a new secret, configure the KMS key and provide access to development and production account. Make a note of the ARN for the key.
2. Create IAM Roles in the Production Account and required policies
In this step, we create roles and policies required to deploy the code.
- Create a cross account access IAM role (CodePipelineCrossAccountRole) in the Production account.
- Create a read/write policy to access S3 bucket containing the resource artifacts
- Create a policy is to access KMS keys to AWS Production account.
{
"Version": "2012-10-17",
"Statement": [
{
"Effect": "Allow",
"Action": [
"kms:DescribeKey",
"kms:GenerateDataKey*",
"kms:Encrypt",
"kms:ReEncrypt*",
"kms:Decrypt"
],
"Resource": [
"Your KMS Key ARN you created in Development Account"
]
}
]
}
Once you’ve created both policies, attach them to the previously created cross-account role.
3. Create a CloudFormation Deployment role
In this step, you need to create another IAM role, “CloudFormationDeploymentRole” for Application deployment. Then attach the following four policies to it.
Policy 1: For Cloudformation to deploy the application in the Production account
{
"Version": "2012-10-17",
"Statement": [
{
"Sid": "VisualEditor0",
"Effect": "Allow",
"Action": [
"cloudformation:DetectStackDrift",
"cloudformation:CancelUpdateStack",
"cloudformation:DescribeStackResource",
"cloudformation:CreateChangeSet",
"cloudformation:ContinueUpdateRollback",
"cloudformation:DetectStackResourceDrift",
"cloudformation:DescribeStackEvents",
"cloudformation:UpdateStack",
"cloudformation:DescribeChangeSet",
"cloudformation:ExecuteChangeSet",
"cloudformation:ListStackResources",
"cloudformation:SetStackPolicy",
"cloudformation:ListStacks",
"cloudformation:DescribeStackResources",
"cloudformation:DescribePublisher",
"cloudformation:GetTemplateSummary",
"cloudformation:DescribeStacks",
"cloudformation:DescribeStackResourceDrifts",
"cloudformation:CreateStack",
"cloudformation:GetTemplate",
"cloudformation:DeleteStack",
"cloudformation:TagResource",
"cloudformation:UntagResource",
"cloudformation:ListChangeSets",
"cloudformation:ValidateTemplate"
],
"Resource": "arn:aws:cloudformation:us-east-2:940679525002:stack/DevOps-Automation-API*/*" }
]
}
Policy 2: For Cloudformation to perform required IAM actions
{
"Version": "2012-10-17",
"Statement": [
{
"Sid": "VisualEditor0",
"Effect": "Allow",
"Action": [
"iam:GetRole",
"iam:GetPolicy",
"iam:TagRole",
"iam:DeletePolicy",
"iam:CreateRole",
"iam:DeleteRole",
"iam:AttachRolePolicy",
"iam:PutRolePolicy",
"iam:TagPolicy",
"iam:CreatePolicy",
"iam:PassRole",
"iam:DetachRolePolicy",
"iam:DeleteRolePolicy"
],
"Resource": "*"
}
]
}
Policy 3: Lambda function service invocation policy
{
"Version": "2012-10-17",
"Statement": [
{
"Sid": "VisualEditor0",
"Effect": "Allow",
"Action": [
"lambda:CreateFunction",
"lambda:UpdateFunctionCode",
"lambda:AddPermission",
"lambda:InvokeFunction",
"lambda:GetFunction",
"lambda:DeleteFunction",
"lambda:PublishVersion",
"lambda:CreateAlias"
],
"Resource": "arn:aws:lambda:us-east-2:Your_Production_AccountID:function:SampleApplication*"
}
]
}
Policy 4: API Gateway service invocation policy
{
"Version": "2012-10-17",
"Statement": [
{
"Sid": "VisualEditor0",
"Effect": "Allow",
"Action": [
"apigateway:DELETE",
"apigateway:PATCH",
"apigateway:POST",
"apigateway:GET"
],
"Resource": [
"arn:aws:apigateway:*::/restapis/*/deployments/*",
"arn:aws:apigateway:*::/restapis/*/stages/*",
"arn:aws:apigateway:*::/clientcertificates",
"arn:aws:apigateway:*::/restapis/*/models",
"arn:aws:apigateway:*::/restapis/*/resources/*",
"arn:aws:apigateway:*::/restapis/*/models/*",
"arn:aws:apigateway:*::/restapis/*/gatewayresponses/*",
"arn:aws:apigateway:*::/restapis/*/stages",
"arn:aws:apigateway:*::/restapis/*/resources",
"arn:aws:apigateway:*::/restapis/*/gatewayresponses",
"arn:aws:apigateway:*::/clientcertificates/*",
"arn:aws:apigateway:*::/account",
"arn:aws:apigateway:*::/restapis/*/deployments",
"arn:aws:apigateway:*::/restapis"
]
},
{
"Sid": "VisualEditor1",
"Effect": "Allow",
"Action": [
"apigateway:DELETE",
"apigateway:PATCH",
"apigateway:POST",
"apigateway:GET"
],
"Resource": "arn:aws:apigateway:*::/restapis/*/resources/*/methods/*/responses/*"
},
{
"Sid": "VisualEditor2",
"Effect": "Allow",
"Action": [
"apigateway:DELETE",
"apigateway:PATCH",
"apigateway:GET"
],
"Resource": "arn:aws:apigateway:*::/restapis/*"
},
{
"Sid": "VisualEditor3",
"Effect": "Allow",
"Action": [
"apigateway:DELETE",
"apigateway:PATCH",
"apigateway:GET"
],
"Resource": "arn:aws:apigateway:*::/restapis/*/resources/*/methods/*"
}
]
}
Make sure you also attach the S3 read/write access and KMS policies created in Step-2, to the CloudFormationDeploymentRole.
4. Setup and launch CodePipeline
You can launch the CodePipeline either manually in the AWS console using “Launch Stack” or programmatically via command-line in CLI.
On your local machine go to terminal/ command prompt and launch this command:
aws cloudformation deploy –template-file <Path to pipeline.yaml> –region us-east-2 –stack-name <Name_Of_Your_Stack> –capabilities CAPABILITY_IAM –parameter-overrides ArtifactBucketName=<Your_Artifact_Bucket_Name> ArtifactEncryptionKeyArn=<Your_KMS_Key_ARN> ProductionAccountId=<Your_Production_Account_ID> ApplicationRepositoryName=<Your_Repository_Name> RepositoryBranch=master
If you have configured a profile in AWS CLI, mention that profile while executing the command:
–profile <your_profile_name>
After launching the pipeline, your serverless API gets deployed in pre-production as well as in the production Accounts. You can check the deployment of your API in production or pre-production Account, by navigating to the API Gateway in the AWS console and looking for your API in the Region where it was deployed.
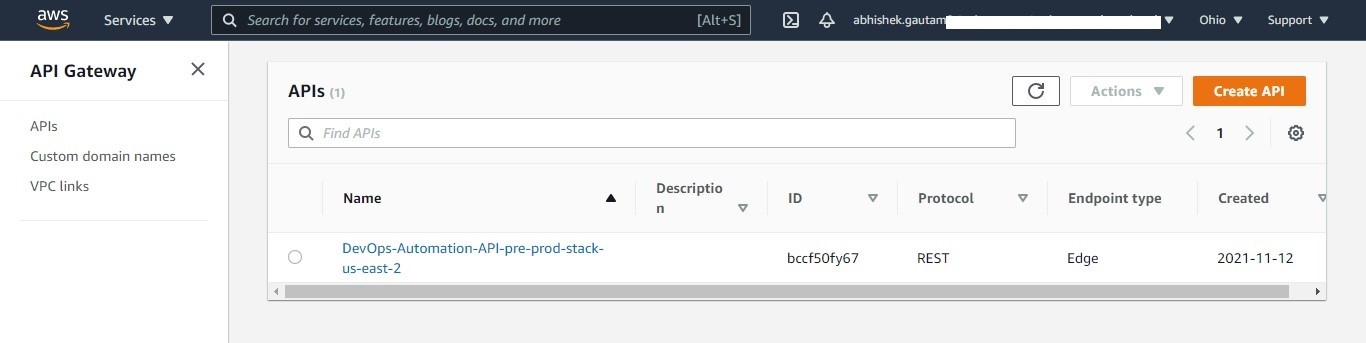
Figure 2. Check your deployment in pre-production/production environment
Then select your API and navigate to stages, to view the published API with an endpoint. Then validate your API response by selecting the API link.
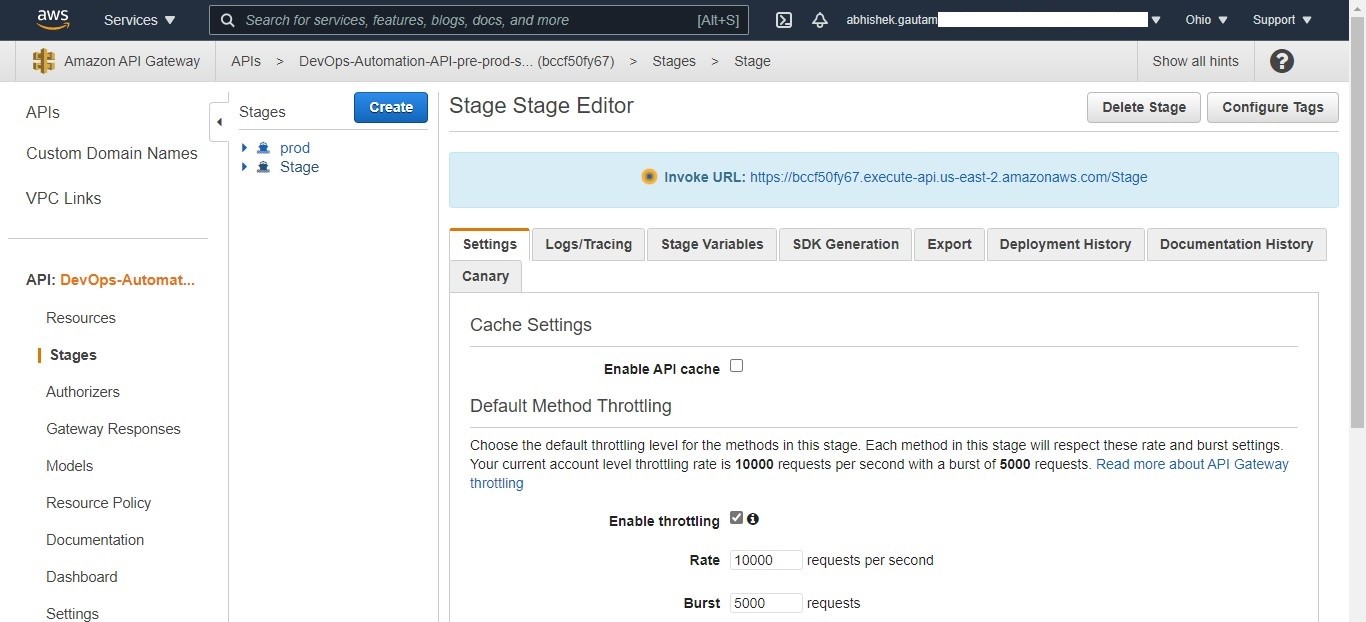
Figure 3. Check whether your API is being published in pre-production/production environment
Alternatively you can also navigate to your APIs by navigating through your deployed application CloudFormation stack and selecting the link for API in the Resources tab.
Cleanup
If you are trying this out in your AWS accounts, make sure to delete all the resources created during this exercise to avoid incurring any AWS charges.
Conclusion
In this blog, we showed how to build a cross-account code pipeline to automate releases across different environments using AWS CloudFormation templates and AWS Cross Account Access. You also learned how serveless APIs can be securely deployed across pre-production and production accounts. This helps enterprises automate release deployments in a repeatable and agile manner, reduce manual errors and deliver business cababilities more quickly.