AWS Machine Learning Blog
Ensure efficient compute resources on Amazon SageMaker
November 2023: This post was reviewed and updated for accuracy.
The adaptability of Amazon SageMaker allows you to manage more tasks with fewer resources, resulting in a faster, more efficient workload. SageMaker is a fully managed service that allows you to build, train, deploy, and monitor machine learning (ML) models. Its modular design lets you pick and choose the features that suit your use cases at different stages of the ML lifecycle. SageMaker offers capabilities that abstract the heavy lifting of infrastructure management and provide the agility and scalability you desire for large-scale ML activities with different features and a pay-as-you-use pricing model.
In this post, we outline the pricing model for SageMaker and offer some best practices on how you can optimize your cost of using SageMaker resources to effectively and efficiently build, train, and deploy your ML models. Understanding the cost structure allows you more control over achieving your ML goals within your budget. In addition, the post offers programmatic approaches for automatically detecting and stopping idle resources. This can save money by preventing unused instances—which often go unseen—from idling in the background and incurring cost.
Amazon SageMaker pricing
ML is an iterative process with different computational needs for prototyping the code and exploring the dataset, processing, training, and hosting the model for real-time and offline predictions. In a traditional paradigm, estimating the right amount of computational resources to support different workloads is difficult, and often leads to over-provisioning resources. The modular design of SageMaker offers flexibility to optimize the scalability, performance, and costs for your ML workloads depending on each stage of the ML lifecycle. For more information about how SageMaker works, see the following resources What Is Amazon SageMaker? and Get Started with Amazon SageMaker.
Each stage of the ML lifecycle has different environments—build, train, and deploy—that use separate compute resources with different pricing. Pricing within SageMaker is broken down by the ML stage: building, processing, training, and model deployment (or hosting), and is further explained in the following sections.
SageMaker Studio and Notebooks Instances
SageMaker offers two environments for building your ML models: Studio notebooks and on-demand Notebook Instances. Amazon SageMaker Studio is a fully integrated development environment (IDE) for ML, using a collaborative, flexible, and managed Jupyter notebook experience. You can now access Studio for free, and you only pay for the AWS services that you use within Studio. For more information, see Amazon SageMaker Studio Tour.
A SageMaker Notebook Instance is a fully managed compute instance running the Jupyter Notebook app. SageMaker manages creating the instance and related resources. Notebooks contain everything needed to run or recreate an ML workflow. You can use Jupyter notebooks in your notebook instance to prepare and process data, write code to train models, deploy models to SageMaker hosting, and test or validate your models.
Prices for compute instances are the same for both Studio and on-demand instances, as outlined in Amazon SageMaker Pricing. With Studio, your notebooks and associated artifacts such as data files and scripts are persisted on Amazon Elastic File System (Amazon EFS). For more information about storage charges, see Amazon EFS Pricing.
Processing
Amazon SageMaker Processing lets you easily run your preprocessing, postprocessing, and model evaluation workloads on a fully managed infrastructure. SageMaker manages the instances on your behalf, launches the instances for the job, and stops the instances when the job is done. For more information, see Amazon SageMaker Processing – Fully Managed Data Processing and Model Evaluation.
Training and tuning
Studio and Notebook Instances provide an interface for development where you spend the most time prototyping, adjusting code, and trying out different options. You can do all of this without having a GPU instance and at a low cost. When you’re ready to scale the training (depending on the size of your dataset, model parameters, and how fast you want to train), SageMaker lets you provision training resources in a decoupled environment separate from your development environment. SageMaker manages these resources on your behalf, provisions, launches, and then stops and deletes the compute resources automatically for the training jobs.
SageMaker automatic model tuning provides a mechanism to run your hyperparameter tuning jobs effectively. It finds the best version of a model by running many training jobs on your dataset using the algorithm and a range of hyperparameters that you specify.
With SageMaker training and tuning, you only pay for the time the instances were consumed.
Model deployment and inference
You can perform model deployment for inference in four different ways:
- Real-time inference – This is synchronous, so for each request, the application waits for the inference response. You need to pick the instance you want to use and how many of those instances you need. There is a wide variety of options, from general compute instances, accelerated instances, and our specialized AWS Inferentia instances dedicated to ML workloads. For production traffic, we generally recommend using at least two instances in different Availability Zones for redundancy. Real-time inference is popular for cases where you need a response quickly, such determining what ads to show a user, providing personalized recommendations for products and services, and detecting fraud. These use cases need to respond immediately to a request and quickly.
- Serverless inference – This is synchronous, so one request for one response. You don’t need to pick instances, you just tell us how much memory you need. You only pay for the duration of each inference request, and there is no cost for idle instances. This is good for workloads with intermittent and unpredictable traffic or that have periods of no usage. We automatically scale in response to traffic so you don’t need to worry about it. However, the first time the scaling event happens, you’ll see higher p99 latency, so your workload will need to be able to handle this. Serverless inference is intended for workloads where you have up to megabytes of payload that need to provide inference quickly.
- Asynchronous inference – This option is asynchronous, so you can send a request and the inference happens at a later point. You can pick the instance and number of instances that work best for the processing speed you need. This is good for workloads where you have large amounts of unstructured data, for example images or text documents. You can take up to 15 minutes for inference.
- Batch inference – Batch inference takes place offline, so you can provide a set of data you want to get inference from and we’ll run it. It’s similarly instance based, so you can select the optimal instance for your workload. Because there is no endpoint up and running, you only pay for the duration of the job. This option is good for processing gigabytes of data, and the job duration can be days.
The Amazon SageMaker pricing model
The following table summarizes the pricing model for Amazon SageMaker.
| . | ML Compute Instance | Storage | Data Processing In/Out |
| Build (On-Demand Notebook Instances) | Per instance-hour consumed while the notebook instance is running. | Cost of GB-month of provisioned storage. | No cost. |
| Build (Studio Notebooks) | Per instance-hour consumed while the instance is running. | Refer to Amazon EFS pricing. | No cost. |
| Processing | Per instance-hour consumed for each instance while the processing job is running. | Cost of GB-month of provisioned storage. | No cost. |
| Training and Tuning | On-Demand Instances: Per instance-hour consumed for each instance, from the time an instance is available for use until it is terminated or stopped. Each partial instance-hour consumed is billed per second. Spot Training: Save up to 90% costs compared to on-demand instances by using managed spot training. |
GB-month of provisioned storage. | No cost. |
| Batch Transform | Per instance-hour consumed for each instance while the batch transform job is running. | No cost. | No cost |
| Real Time Inference | Per instance-hour consumed for each instance while the endpoint is running. | GB-month of provisioned storage. | GB Data Processed IN and GB Data Processed OUT of the endpoint instance. |
| Async Inference | Per instance-hour consumed for each instance while the endpoint is running. | GB-month of provisioned storage. | GB Data Processed IN and GB Data Processed OUT of the endpoint instance. |
| Serverless Inference | No instance provisioning necessary. Provide the memory size and nmaximum concurrency. With Serverless Inference, you only pay for the compute capacity used to process inference requests, billed by the millisecond, and the amount of data processed. The compute charge depends on the memory configuration you choose. | GB-month of provisioned storage. | GB Data Processed IN and GB Data Processed OUT of the endpoint instance. |
You can also get started with Amazon SageMaker with the free tier. For more information about pricing, see Amazon SageMaker Pricing.
Right-sizing compute resources for Amazon SageMaker notebooks, processing jobs, training, and deployment
With the pricing broken down based on time and resources you use in each stage of an ML lifecycle, you can optimize the cost of SageMaker and only pay for what you really need. In this section, we discuss general guidelines to help you choose the right resources for your SageMaker ML lifecycle.
SageMaker currently offers ML compute instances on the following instance families:
- T – General-purpose burstable performance instances. This is ideal when you don’t need consistently high levels of CPU, but benefit significantly from having full access to very fast CPUs when you need them.
- M – General-purpose instances.
- C – Compute-optimized instances. This is ideal for compute-bound applications.
- R – Memory-optimized instances. This is designed to deliver fast performance for workloads that process large datasets in memory.
- P, G, Trn, and Inf – Accelerated compute instances. This uses hardware accelerators, or co-processors.
- EIA – Inference acceleration instances. This is used for Amazon Elastic Inference.
Instance type consideration for a computational workload running on an SageMaker ML compute instance is no different than running on an Amazon Elastic Compute Cloud (Amazon EC2) instance. For more information about instance specifications, such as number of virtual CPU and amount of memory, see Amazon SageMaker Pricing.
SageMaker Studio and Notebook Instances
The SageMaker Notebook Instance environment is suitable for interactive data exploration, script writing, and prototyping of feature engineering and modeling. We recommend using notebooks with instances that are smaller in compute for interactive building and leaving the heavy lifting to ephemeral training, tuning, and processing jobs with larger instances, as explained in the following sections. This way, you don’t keep a large instance (or a GPU) constantly running with your notebook. This can help you minimize your build costs by selecting the right instance.
For the building stage, the size of a SageMaker Notebook Instance depends on the amount of data you need to load in-memory for meaningful exploratory data analyses (EDA) and the amount of computation required. We recommend starting small with general-purpose instances (such as T or M families) and scale up as needed.
The burstable T family of instances is ideal for notebook activity because computation only comes when you run a cell but you want full power from CPU. For example, ml.t2.medium is sufficient for most of basic data processing, feature engineering, and EDA that deals with small datasets that can be held within 4 GB memory. You can select an instance with a larger memory capacity, such as ml.m5.12xlarge (192 GB memory), if you need to load significantly more data into the memory for feature engineering. If your feature engineering involves heavy computational work (such as image processing), you can use one of the compute-optimized C family instances, such as ml.c5.xlarge.
The benefit of Studio notebooks over Notebook Instances is that with Studio, the underlying compute resources are fully elastic and you can change the instance on the fly. This allows you to scale the compute up and down as your compute demand changes, for example from ml.t3.medium to ml.m5.4xlarge as your build compute demand increases, without interrupting your work or managing infrastructure. Moving from one instance to another is seamless, and you can continue working while the instance launches. With on-demand notebook instances, you need to stop the instance, update the setting, and restart with the new instance type.
You can visually monitor the CPU and memory utilization of Studio notebooks as shown in this post. Choose the metrics display to toggle between the utilization metrics for the notebook kernel and underlying compute instance. For more information on how to manage your Studio resources, refer to Manage Resources.
To keep your build costs down, we recommend stopping your on-demand notebook instances or shutting down your Studio instances and kernels when you don’t need them. You can shut down unused Studio notebook instances and kernels by choosing the power icon next to the instance or app. See Shut Down Resources to know more about shutting down kernels, apps, and instances. Note that you are charged by the instance, so ensure that your running instances are stopped to avoid paying for unused instances.
In addition, you can use AWS Identity and Access Management (IAM) condition keys as an effective way to restrict certain instance types, such as GPU instances, for specific users, thereby controlling costs. We go into more detail later in this post regarding recommendations for avoiding unnecessary costs.
With regards to storage, you can control the storage costs for SageMaker Notebook Instances by restricting the size of the Amazon Elastic Block Store (Amazon EBS) volume when creating the notebook. With Studio, storage is managed through Amazon EFS, therefore the storage grows as needed, and so does pricing. It’s recommended to load only a sample dataset to local storage to perform exploratory analysis using Studio notebooks, and run larger processing and training jobs on the complete dataset. You can also mount the underlying EFS volume to an EC2 instance to identify user profiles that take up too much storage on Amazon EFS, and attempt remediation as required manually.
Processing environment
After you complete data exploration and prototyping with a subset of your data and are ready to apply the preprocessing and transformation on the entire data, you can launch a SageMaker Processing job with your processing script that you authored during the EDA phase without scaling up the relatively small notebook instance you have been using. SageMaker Processing dispatches all things needed for processing the entire dataset, such as code, container, and data, to a compute infrastructure separate from the SageMaker notebook instance. SageMaker Processing takes care of the resource provisioning, data and artifact transfer, and shutdown of the infrastructure once the job finishes.
The benefit of using SageMaker Processing is that you only pay for the processing instances while the job is running. Therefore, you can take advantage of powerful instances without worrying too much about the cost. For example, as a general recommendation, you can use an ml.m5.4xlarge for medium jobs (MBs of GB of data), ml.c5.18xlarge for workloads requiring heavy computational capacity, or ml.r5.8xlarge when you want to load multiple GBs of data in memory for processing, and only pay for the time of the processing job. Sometimes, you may consider using a larger instance to get the job done quicker, and end up paying less in total cost of the job.
Alternatively, for distributed processing, you can use a cluster of smaller instances by increasing the instance count. For this purpose, you could shard input objects by Amazon Simple Storage Service (Amazon S3) key by setting s3_data_distribution_type='ShardedByS3Key' inside a ProcessingInput so that each instance receives about the same number of more manageable input objects, and instead you can use smaller instances in the cluster, leading to potential cost savings. Furthermore, you could perform the processing job asynchronously with .run(…, wait = False), in which you submit the job and get your notebook cell back immediately for other activities, leading to a more efficient use of your build compute instance time.
Training and tuning environment
When you use fully managed Amazon SageMaker Training, it dispatches all things needed for a training job, such as code, container, and data to a compute infrastructure separate from the SageMaker notebook instance. Therefore, your training jobs aren’t limited by the compute resource of the notebook instance. The SageMaker Training Python SDK lets you to launch the training and tuning jobs at will. It also supports asynchronous training when you call .fit(…, wait = False). You get your notebook cell back immediately for other activities, such as calling .fit() again for another training job with a different ML compute instance for profiling purposes, or a variation of the hyperparameter settings for experimentation purposes. Because ML training can often be a compute-intensive and time-consuming part of the ML lifecycle, with training jobs happening asynchronously in a remote compute infrastructure, you can safely shut down the notebook instance for cost-optimizing purposes if starting a training job is the last task of your day.
Cost-optimization factors that you need to consider when selecting instances for training include the following:
- Instance family – What type of instance is suitable for the training? You need to optimize for overall cost of training, and sometimes selecting a larger instance can lead to much faster training and therefore less total cost; can the algorithm even utilize a GPU instance?
- Instance size – What is the minimum compute and memory capacity your algorithm requires to run the training? Can you use distributed training?
- Instance count – If you can use distributed training, what instance type (CPU or GPU) can you use in the cluster, and how many?
Let’s discuss these considerations in detail.
For the choice of instance family and type, you could base your decision on what algorithms or frameworks you use for the workload. The following figure is a brief description of the instance families that are available on SageMaker. For details on pricing and size, refer to Amazon SageMaker Pricing.
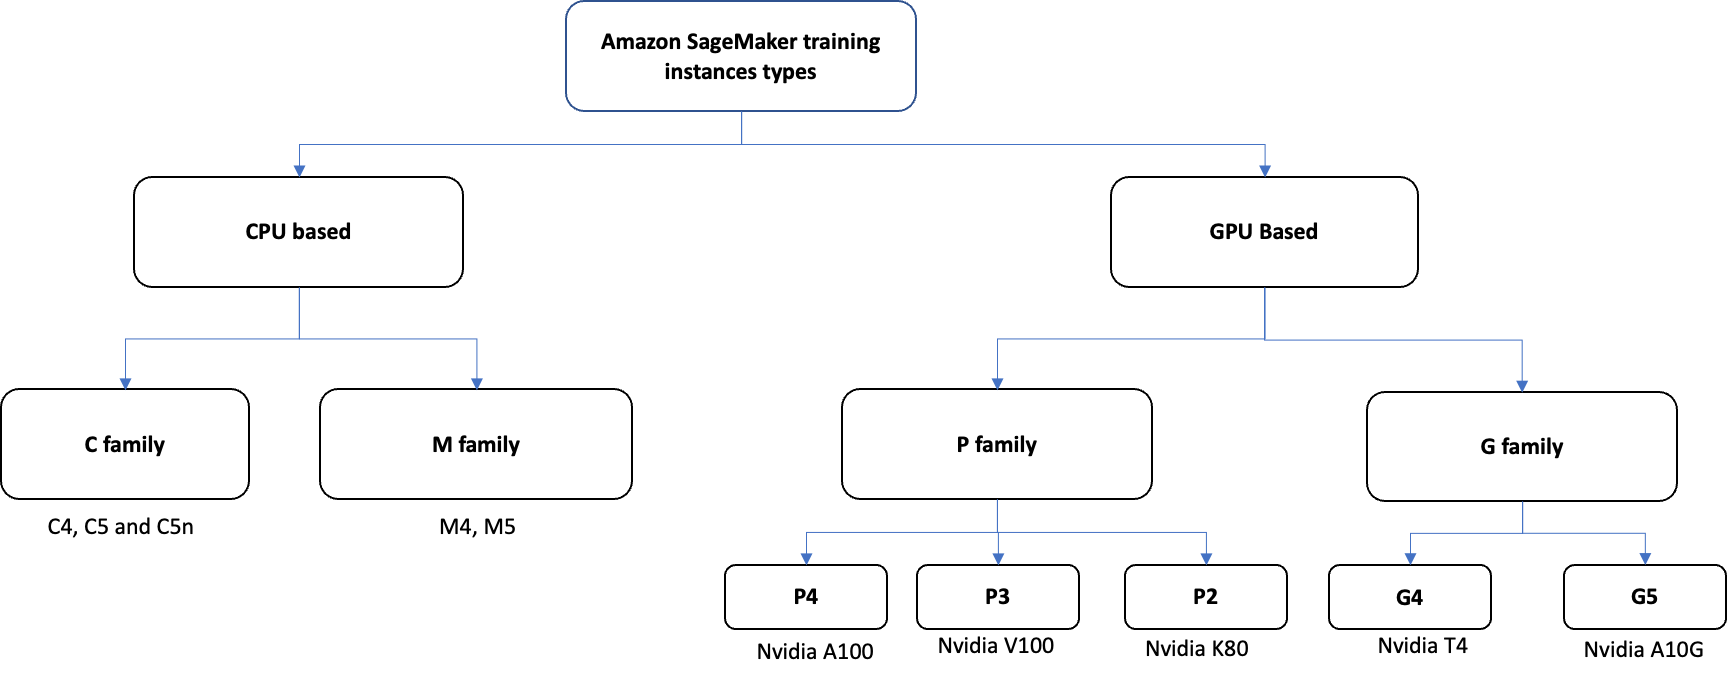
The instance types are as follows:
- CPU-based instances:
-
- M – This family provides a balance of compute, memory, and network resources, and is a good first choice for most CPU-based training jobs. These instances come with a balance of CPU and memory. The more CPU cores, the higher the memory size that comes with the instances.
- C – These instances are optimized for compute-intensive workloads and deliver cost-effective high performance at a low price per compute ratio. These instances are more appropriate for training jobs that consume more processing power and less memory.
- GPU-based instances:
- P3 – These instances are based on NVIDIA V100 GPUs. The P3 family has the best performing single GPU instance (P3.2xlarge). It’s suitable for workloads that needs high memory and don’t need multiple GPUs. Apart from single GPU, the P3 family also comes with 4 and 8 GPU options, which can be used for training large models.
- P4 – This is the most powerful GPU instance on the cloud, and is based on NVIDIA A100 GPUs. This instance type is typically used for distributed training on large models and datasets. Each P4 instance comes with A100 8 GPUs with 40 GB memory per GPU. This also includes third-generation NVLink for fast multi-GPU training.
- G4 – G4 instances provide lower performance than other options we looked at, but at lower cost for model development and training. G4s come with NVIDIA T4 GPU with 16 GB GPU memory. It’s based on the previous generation NVIDIA Turing architecture. Consider g4dn.(2/4/8/16)xlarge for more vCPUs and higher system memory if you have more preprocessing or postprocessing.
- G5 – This family of instances provides a low-cost alternative to P3 and P4 instances, and is equipped with single- and multi-GPU instances. They give three times better performance compared to the previous generation G4 instance family. These instances are equipped with NVidia’s latest A10G processors and provide 1, 4, and 8 GPU instance options.
- AWS Silicon based instances:
- Trainium: AWS custom built Trn1 instances deliver a high-performance, low-cost solution for training large deep learning models with 100B+ parameters. The largest instance size, trn1.32xlarge instances, features 16 Trainium accelerators with 512 GB of accelerator memory in a single instance delivering up to 3.4 petaflops of FP16/BF16 compute power. 16 Trainium accelerators are connected with ultra-high-speed NeuronLinkv2 for streamlined collective communications.
If you use the SageMaker built-in algorithms, which give you a head start without any sophisticated programming, see Instance Types for Built-in Algorithms for detailed guidelines. Each built-in algorithm comes with a guideline on which instance to use for training. For example, XGBoost currently only trains using CPUs. It’s a memory-bound (as opposed to compute-bound) algorithm. So, a general-purpose compute instance (for example, M5) is a better choice than a compute-optimized instance (for example, C4). Similarly, for the SageMaker image classification algorithm, using a GPU instance like P3 or G5 is a recommended option.
If you’re bringing your own algorithms with script mode or with custom containers, you need to first determine whether the framework or algorithm supports CPU, GPU, or both to decide the instance type to run the workload. For example, Scikit-learn doesn’t support GPU, meaning that training with accelerated compute instances like a G5 or P3 doesn’t result in any material gain in runtime but leads to overpaying for the instance. For GPU-based training, to determine which instance type and number of instances, you should profile your jobs to find the sweet spot between number of instances and runtime, which translates to cost. Amazon SageMaker Debugger helps profile training jobs in real time, optimize resource utilization by eliminating bottlenecks, improve training time, and reduce costs of your ML models. For more details on using this profiling feature, refer to Identify bottlenecks, improve resource utilization, and reduce ML training costs with the deep profiling feature in Amazon SageMaker Debugger.
It’s always recommended to start small and slowly increase the instance counts based on your requirement. SageMaker as a platform supports training large models with multiple instances. For an example, refer to the post Create, train, and deploy a billion-parameter language model on terabytes of data with TensorFlow and Amazon SageMaker, which talks about training billion-parameter models.
So far, we have discussed instances and right-sizing. Another important factor to consider while running training is the data source and how the data is handled during training. SageMaker supports three different data sources for training: Amazon EFS, Amazon S3, and Amazon FSx for Lustre. Depending on the size of data and where the data currently resides, you can use the following flowchart to choose the right data source for your training job.
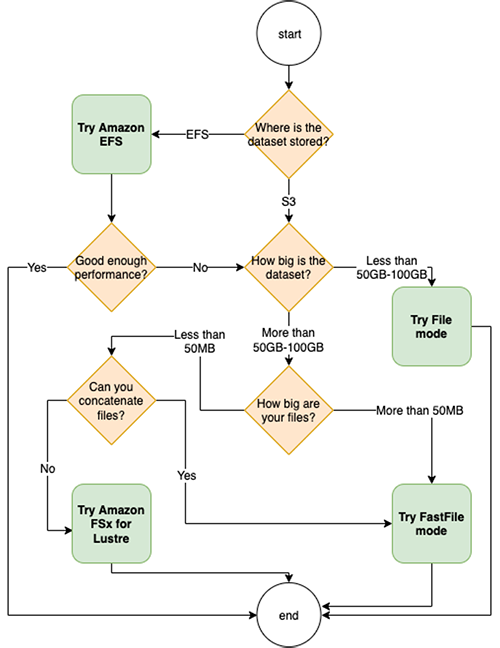
For more information about choosing the right data source, refer to Choose the best data source for your Amazon SageMaker training job.
Another factor to consider in training is that you can select from either On-Demand Instances or Spot Instances. On-Demand ML Instances for training let you pay for ML compute capacity based on the time the instance is consumed, at On-Demand rates. However, for jobs that can be interrupted or don’t need to start and stop at specific times, you can choose managed Spot Instances (Managed Spot Training). SageMaker can reduce the cost of training models by up to 90% over On-Demand Instances, and manages the Spot interruptions on your behalf.
Finally, Amazon SageMaker Training Compiler automatically compiles your Python training code for supported frameworks and generates GPU kernels specifically for your model. As a result, the training code uses less memory and compute, and therefore trains faster. For example, when fine-tuning the Hugging Face GPT-2 model, SageMaker Training Compiler reduced training time from nearly 3 hours to 90 minutes.
Model deployment and inference environment
In many cases, up to 90% of the infrastructure spend for developing and running an ML application is on inference, making the need for high-performance, cost-effective ML inference infrastructure critical. This is mainly because the build and training jobs aren’t frequent and you only pay for the duration of build and training, but an endpoint instance is running all the time (while the instance is in service). Therefore, selecting the right way to host and the right type of instance can have a large impact on the total cost of ML projects.
For model deployment, it’s important to work backward from your use case. What is the frequency of the prediction? Do you expect live traffic to your application and real-time response to your clients? Do you have many models trained for different subsets of data for the same use case? Does the prediction traffic fluctuate? Is latency of inference a concern?
There are hosting options from SageMaker for each of these situations.
Determine the inference type for your model deployment
The choice of inference and instance type has significant impact on cost. You need to understand the latency requirements, synchronous vs. asynchronous needs, traffic patterns, and real time vs. batch needs, and then choose the right inference type that meets all the requirements. Choosing the right instance for your model helps ensure you have the most performant instance at the lowest cost for your models.
1. Choose the inference type best for the job
Consider the following inference options:
- Real-time inference – Use for low-latency workloads with predictable traffic patterns that need to have consistent latency characteristics and are always available. The payload size should be less than 6 MB, and requests time out at 60 seconds. You pay for using the instance.
- Serverless inference – Use for synchronous workloads that have an intermittent or unpredictable traffic pattern and can tolerate variations in the p99 latency. Serverless inference automatically scales to meet your workload traffic so you don’t pay for any idle resources. You only pay for the duration of the inference request. You can use the same model and containers with both real-time and serverless inference, so you can switch between these two modes if your needs change. Payload size should be less than 4 MB and requests time out in 60 seconds.
- Asynchronous inference – Use for asynchronous workloads that process up to 1 GB of data (such as text corpus, image, video, and audio) that are latency insensitive and cost sensitive. Asynchronous inference comes with a built-in queue for requests, and processing time (per request) can be up to 15 minutes. With asynchronous inference, you can control costs by specifying an auto scaling group of instances for the optimal processing rate instead of provisioning for the peak. You can also scale down to zero to save additional costs.
- Batch inference – Use for workloads for which you need inference for a large set of data for processes that happen offline (that is, you don’t need a persistent endpoint). You pay for the instance for the duration of the batch inference job.
2. Choose the right deployment option for your models
Costs can quickly add up when you deploy multiple endpoints, especially if the endpoints don’t fully utilize the underlying instances. To understand if the instance is under-utilized, check the utilization metrics (CPU, GPU, and so on) in Amazon CloudWatch for your instances.
The following diagram offers a decision tree for choosing your deployment strategy.

If you have several under-utilized endpoint instances, consider the following hosting options to consolidate usage to fewer endpoint instances:
- With multi-model endpoints (MMEs), you can deploy thousands of ML models to a single endpoint. MMEs work best when all models are of similar size and latency. Because not all models will be in memory at all times, this option is cost-effective for real-time inferencing workloads that can tolerate cold starts. To learn more, see Save on inference costs by using Amazon SageMaker multi-model endpoints.
- With multi-container endpoints (MCEs), you can deploy up to 15 distinct containers on a single endpoint, and each container could be a different model, using a different ML framework. Because containers are always in memory, MCEs don’t suffer from the cold start problem compared to MMEs. Containers can be invoked directly or serially. To learn more, see Deploy multiple serving containers on a single instance using Amazon SageMaker multi-container endpoints.
- Invoking containers serially, also called a serial inference pipeline, is a special case of MCE that provides many advantages. With this hosting option, you can combine the data preprocessing transformers (developed while training models) and the model inferencing on the same endpoint. This pattern supports both real-time and batch inferencing. The pipeline is triggered by invoking the first container and is immutable once defined.
3. Determine instance type and size for your model deployment
You should understand the requirements for the hosted endpoints, including steady state and peak usage, and then make decisions around instance type and size.
4. Use the most optimal instance type and size for inference
With Amazon SageMaker Inference Recommender, you can get instance type recommendations based on your throughput, latency, and cost considerations. Inference Recommender comes with a feature to perform load tests, and endpoint recommendations include instance type, instance count, expected latency, and cost per hour. You can obtain these recommendations through CloudWatch and also view them in Studio. Note that integration with the SageMaker model registry is a prerequisite for using Inference Recommender.
Consider the following CloudWatch metrics:
- If your motivation is overall price-performance with an emphasis on throughput, then you should focus on
CostPerInference - If your motivation is a balance between latency and throughput, then you should focus on
ModelLatencyandMaxInvocationsmetrics. Note thatMaxInvocationsis a measure of throughput.
With the following recommendations, you can choose the most suitable instances for your needs:
- Selecting a GPU-based instance for handling peak loads for a deep learning application may not be the best option in terms of cost if resources aren’t utilized fully. Consider using Elastic Inference, which allows you to attach low-cost, GPU-powered acceleration to SageMaker instances to reduce cost for deep learning inference.
- You can use NVIDIA Triton Inference Server on SageMaker for deploying transformer models at scale. NVIDIA Triton Inference Server is an open-source inference serving software with features to maximize throughput and hardware utilization with ultra-low (single-digit milliseconds) inference latency.
In addition, you can use Auto Scaling for Amazon SageMaker to add and remove capacity or accelerated instances to your endpoints automatically, whenever needed. With this feature, instead of having to closely monitor inference volume and change the endpoint configuration in response, your endpoint automatically adjusts the number of instances up or down in response to actual workloads, determined by using CloudWatch metrics and target values defined in the policy. For more information, see AWS Auto Scaling and Configuring autoscaling inference endpoints in Amazon SageMaker.
Recommendations for saving costs
This section outlines some recommendations to save on costs while using SageMaker.
Studio and SageMaker Notebook Instances:
1. Restrict the instance types that can be started by users
With SageMaker notebook instances, and with Studio, administrators can restrict users from creating notebooks that are too large through IAM policies. The following is a sample policy that only allows users to create smaller SageMaker notebook instances:
Similarly, for Studio, see the following a sample policy. Note that administrators need to allow the system instance for the default Jupyter Server apps.
Administrators can also use the AWS Service Catalog to allow for self-service of SageMaker notebooks. This allows you to restrict the instance types that are available to users when creating a notebook. For more information, see Enable self-service, secured data science using Amazon SageMaker notebooks and AWS Service Catalog and Launch Amazon SageMaker Studio using AWS Service Catalog and AWS SSO in AWS Control Tower Environment.
2. Automatically stop idle on-demand notebook instances
One way to avoid the cost of idle notebook resources is to automatically stop them. We have developed the following mechanisms to accomplish that for both SageMaker notebook instances and Studio.
Stop SageMaker Notebook Instances with lifecycle configuration
With lifecycle configurations in SageMaker notebook instances, you can customize your notebook environment by installing packages or sample notebooks on your notebook instance, configuring networking and security for it, or otherwise using a shell script to customize it. Such flexibility allows you to have more control over how your notebook environment is set up and run.
AWS maintains a public repository of notebook lifecycle configuration scripts that address common use cases for customizing notebook instances, including a sample bash script for stopping idle notebooks.
You can configure your notebook instance using a lifecycle configuration to automatically stop itself if it’s idle for a certain period of time (a parameter that you set). The idle state for a Jupyter notebook is defined in the following GitHub issue. To create a new lifecycle configuration, see Customize a Notebook Instance Using a Lifecycle Configuration Script.
The bash script to use for this purpose can be found in the AWS Samples repository for lifecycle configuration samples. This script is basically running a cron job at a specific period of idle time, as defined with parameter IDLE_TIME in the script. You can change this time to your preference and change the script as needed on the lifecycle configuration page.
For this script to work, the notebook should meet the following criteria:
- The notebook instance has internet connectivity either through direct internet access or through an interface endpoint (AWS PrivateLink) or a NAT gateway in the VPC in which the notebook instance is launched. For more information, refer to Connect a Notebook Instance in a VPC to External Resources.
- The notebook instance execution role needs permissions to
sageMaker:StopNotebookInstanceto stop the notebook andsageMaker:DescribeNotebookInstanceto describe the notebook.
If you create notebook instances in a VPC that doesn’t allow public internet connectivity to perform wget from GitHub, you need to add the Python script (autostop.py) inline in the bash script. The script is available on the GitHub repo. Enter it in your bash script as follows, and use this for your lifecycle configuration instead:
Alternatively, you can store the script on Amazon S3 and connect to the script through a VPC endpoint. For more information, see New – VPC Endpoint for Amazon S3.
Now that you have created the lifecycle configuration, you can assign it to your notebook instance when creating a new one or when updating existing notebooks.
3. Stop Studio kernels with the JupyterLab extension
To automatically shut down idle kernels in Studio, you can install and use a JupyterLab extension available on GitHub as a Studio lifecycle configuration. This extension automatically shuts down kernels and apps in Studio when they’re idle for a stipulated period of time. You can configure an idle time threshold (in minutes) by setting the TIMEOUT_IN_MINS parameter in the lifecycle configuration script. After the kernels have stayed idle long enough, the extension automatically turns them off. For detailed instructions on the Studio architecture and adding the extension, see Save costs by automatically shutting down idle resources within Amazon SageMaker Studio.
SageMaker Notebooks:
1. Schedule start and stop of notebook instances
Another approach is to schedule your notebooks to start and stop at specific times. For example, if you want to start your notebooks (such as notebooks of specific groups or all notebooks in your account) at 7:00 AM and stop all of them at 9:00 PM during weekdays (Monday through Friday), you can accomplish this by using Amazon EventBridge and Lambda functions. For more information about configuring your Lambda functions, see Configuring Lambda function options. After you have created the functions, you can create rules to trigger these functions on a specific schedule, for example, start the notebooks every weekday at 7:00 AM. See Creating an Amazon EventBridge rule that runs on a schedule for instructions.
2. Start notebooks with a Lambda function
To start your notebooks with a Lambda function, complete the following steps:
- On the Lambda console, create a Lambda function for starting on-demand notebook instances with specific keywords in their name. For this post, our development team’s on-demand notebook instances have names starting with
dev-. - Use Python as the runtime for the function, and name the function
start-dev-notebooks. - In the Configuration section, under General Configuration, change the timeout to 15 minutes to allow for starting multiple notebook instances.
- Under Permissions, make sure to attach the
AmazonSageMakerFullAccesspolicy to its execution role. - Enter the following script in the Code Source editing area:
- Choose Deploy to save your function.
3. Stop notebooks with a Lambda function
To stop your notebooks with a Lambda function, follow the same steps, use the following script, and name the function stop-dev-notebooks:
SageMaker hosting
Optimizing hosting costs isn’t a one-time event. It’s a continuous process of monitoring deployed infrastructure, usage patterns, and performance, and also keeping a keen eye on new innovative solutions that AWS releases that could impact cost.
1. Evaluate endpoint usage patterns and select the appropriate pricing model
For steady state usage of endpoints, opt in to an Amazon SageMaker Savings Plan to help reduce your costs by up to 64%.
Amazon SageMaker Savings Plans provide a flexible pricing model for SageMaker, in exchange for a commitment to a consistent amount of usage (measured in $ per hour) for a 1-year or 3-year term. These plans automatically apply to eligible SageMaker ML instance usages, including Studio notebooks, SageMaker On-Demand notebooks, SageMaker Processing, Amazon SageMaker Data Wrangler, SageMaker Training, SageMaker real-time inference, and SageMaker batch transform, regardless of instance family, size, or Region. For example, you can change usage from a CPU ml.c5.xlarge instance running in US East (Ohio) to an ml.Inf1 instance in US West (Oregon) for inference workloads at any time and automatically continue to pay the Savings Plan price.
2. Establish a budget and cost tracking mechanism
Set up a SageMaker budget using AWS Budgets and monitor it. Use the SageMaker pricing page and AWS Pricing Calculator to estimate and predict endpoints costs. For example, real-time inference costs include instance cost, storage cost, inference acceleration cost, and data processing costs. Based on these calculations, set up thresholds and alerts in AWS Budgets when costs exceed the budget.
3. Monitor system metrics of hosting instances
From a cost management perspective, it’s important to identify under-utilized (or over-sized) instances and bring the instance size and counts, if required, in line with workload requirements. Common system metrics like CPU/GPU utilization and memory utilization are written to CloudWatch for all hosting instances.
For real-time and asynchronous endpoints, SageMaker makes several additional metrics available in CloudWatch. Some of commonly monitored metrics include invocation counts, and invocation 4xx/5xx errors. For full list of these metrics, refer to Monitor Amazon SageMaker with Amazon CloudWatch.
With a complete view of the metrics of interest for your hosting option and workload requirements, you can continually optimize the size and counts of hosting instances for costs.
4. Optimize models to run better
Unoptimized models can lead to longer runtimes and use more resources. You can choose to use more or bigger instances to improve performance; however, this leads to higher costs. Consider the following:
- By optimizing your models to be more performant, you may be able to lower costs by using fewer or smaller instances while keeping the same or better performance characteristics. You can use Amazon SageMaker Neo with SageMaker inference to automatically optimize models. For more details and samples, see Optimize model performance using Neo.
- In addition, you can optimize your workload by applying optimization techniques. For an example demonstrating how to optimize TensorFlow performance, see Maximize TensorFlow performance on Amazon SageMaker endpoints for real-time inference.
- Use Neo and TensorFlow Lite to optimize models for deployment to edge or small devices, with limited memory and compute resources.
- Apply model optimization techniques such as pruning (removing neuron connections) and quantization (reducing complexity of mathematical operations), which help models run with less compute power and therefore lower costs.
5. Avoid over-provisioning by setting up auto scaling to match your workload requirements for real-time and asynchronous inference
Without auto scaling, you need to provision for peak traffic or risk model unavailability. Unless the traffic to your model is steady throughout the day, there will be excess unused capacity. This leads to low utilization and wasted resources. Auto scaling is an out-of-the-box feature that monitors your workloads and dynamically adjusts the capacity to maintain steady and predictable performance at the possible lowest cost. When the workload increases, auto scaling brings more instances online. When the workload decreases, auto scaling removes unnecessary instances, helping you reduce your compute cost. To learn more, see Configuring autoscaling inference endpoints in Amazon SageMaker.
You can scale down the asynchronous inference endpoints instance count to zero when the endpoint is not actively processing requests. You need to define the scaling policy that scaled on the ApproximateBacklogPerInstance custom metric and set the MinCapacity value to zero.
6. Evaluate cost benefits of a6utomation
Automating ML deployment removes the manual effort that can be prone to errors, boosts productivity of data scientists and ML engineers, and results in faster time to production. SageMaker offers many purpose-built tools for ML operations, and when combined with AWS CodePipeline and AWS CodeDeploy, it’s easy to create a continuous delivery service to deploy endpoints. Amazon SageMaker Projects is another tool that lets you orchestrate and manage the ML lifecycle, including deploying models.
7. Evaluate and adopt new cost-effective solutions
At AWS, new services and features are regularly announced. Review new service releases frequently to understand the price and performance. It’s also important to set up a regular review of workloads and architectural decisions to ensure they remain cost-effective and to know if there are opportunities to use the new services and features to gain cost benefits.
8. Clean up unused endpoints
SageMaker provides great tools for deploying and testing models, such as deploying two model variants for A/B testing. It’s important to periodically review the endpoints and delete them when testing is complete or if there are no downstream consumers. Because the model artifacts are stored in Amazon S3 and by setting up a robust ML Ops pipeline, endpoints can be quickly created if needed.
You can also define a CloudWatch alarm to identify idle SageMaker real-time inference endpoints and then use an AWS Lambda function to delete them, as described in the section below.
9. Automatically detect idle SageMaker endpoints
You can deploy your ML models as endpoints to test the model for real-time inference. Sometimes these endpoints are accidentally left in service, leading to ongoing charges on the account. You can automatically detect these endpoints and take corrective actions (such as deleting them) by using CloudWatch Events and Lambda functions. For example, you can detect if endpoints have been idle for the past number of hours (with no invocations over a certain period, such as 24 hours). The function script we provide in this section detects idle endpoints and publishes a message to an Amazon Simple Notification Service (Amazon SNS) topic with the list of idle endpoints. You can subscribe the account admins to this topic, and they receive emails with the list of idle endpoints when detected. To create this scheduled event, follow these steps:
- Create an SNS topic and subscribe your email or phone number to it.
- Create a Lambda function with the following script.
Your Lambda function should have the following policies attached to its IAM execution role: CloudWatchReadOnlyAccess, AmazonSNSFullAccess, and AmazonSageMakerReadOnly.
You can also revise this code to filter the endpoints based on resource tags. For more information, see Boto3 documentation.
10. Investigate endpoints
This script sends an email (or text message, depending on how the SNS topic is configured) with the list of detected idle endpoints. You can then sign in to the SageMaker console and investigate those endpoints, and delete them if you find them to be unused stray endpoints. To do so, complete the following steps:
- On the SageMaker console, under Inference, choose Endpoints.
You can see the list of all endpoints on your account in that Region. - Choose the endpoint that you want to investigate, and under Monitor, choose View invocation metrics.
- Under All metrics, choose Invocations.
You can see the invocation activities on the endpoint. If you notice no invocation event (or activity) for the duration of your interest, it means the endpoint isn’t in use and you can delete it. - When you’re confident you want to delete the endpoint, go back to the list of endpoints, select the endpoint you want to delete, and on the Actions menu, choose Delete.
11. Evaluate endpoint usage patterns and select the appropriate pricing model
As discussed earlier, for steady state usage of endpoints, opt in to an Amazon SageMaker Savings Plan to help reduce your costs by up to 64%.
Conclusion
This post walked you through how Amazon SageMaker pricing works, best practices for right-sizing Amazon SageMaker compute resources for different stages of an ML project, and best practices for avoiding unnecessary costs of unused resources by either automatically stopping idle on-demand notebook instances, SageMaker Studio notebook instances/kernels or automatically detecting idle Amazon SageMaker endpoints so you can take corrective actions.
By understanding how Amazon SageMaker works and the pricing model for Amazon SageMaker resources, you can take steps in optimizing your total cost of ML projects even further.
About the authors
 Nick Minaie is an Artificial Intelligence and Machine Learning (AI/ML) Specialist Solution Architect, helping customers on their journey to well-architected machine learning solutions at scale. In his spare time, Nick enjoys family time, abstract painting, and exploring nature.
 Michael Hsieh is a Senior AI/ML Specialist Solutions Architect. He works with customers to advance their ML journey with a combination of AWS ML offerings and his ML domain knowledge. As a Seattle transplant, he loves exploring the great mother nature the city has to offer such as the hiking trails, scenic kayaking in the SLU, and the sunset at the Shilshole Bay.
 Neel Sendas is a Senior Technical Account Manager at Amazon Web Services. Neel works with enterprise customers to design, deploy, and scale cloud applications to achieve their business goals. He has worked on various ML use cases, ranging from anomaly detection to predictive product quality for manufacturing and logistics optimization. When he is not helping customers, he dabbles in golf and salsa dancing.
 Pavan Kumar Sunder is a Senior Solutions Architect with Envision Engineering team at Amazon Web Services. He provides technical guidance and helps customers accelerate their ability to innovate through showing the art of the possible on AWS. He has built multiple prototypes around AI/ML, IoT, and Robotics for our customers.
 Shawn Sachdev is a Senior Technical Account Manager at AWS. He works with Enterprise customer, and provides technical guidance to help them innovate and build a secure, scalable cloud on the AWS platform. Before AWS, he worked in several Analytics and System Engineering roles. Outside of work, he loves watching sports, is an avid foodie and a craft-beer enthusiast.
 Raghu Ramesha is an ML Solutions Architect with the Amazon SageMaker Service team. He focuses on helping customers build, deploy, and migrate ML production workloads to SageMaker at scale. He specializes in machine learning, AI, and computer vision domains, and holds a master’s degree in Computer Science from UT Dallas. In his free time, he enjoys traveling and photography.
 Durga Sury is a ML Solutions Architect in the Amazon SageMaker Service SA team. She is passionate about making machine learning accessible to everyone. During her time at AWS, she has helped set up AI/ML platforms for enterprise customers. Outside of work, she loves exploring the Canadian trails with her husky.
 Arun Kumar Lokanatha is a Senior ML Solutions Architect with the Amazon SageMaker Service team. He focuses on helping customers build, train, and migrate ML production workloads to SageMaker at scale. He specializes in Deep Learning especially in the area of NLP and CV. Outside of work, he enjoys Running and hiking.