AWS Security Blog
Using ACM Private Certificate Authority in a multi-account environment by using IAM roles
In this post, we show you how you can use AWS Certificate Manager (ACM) Private Certificate Authority (CA) to request or issue private certificates across a multi-account environment by using IAM roles. This solution allows you to centralize your ACM Private CA inside your AWS Organization, which reduces the complexity and the cost of having more than one ACM Private CA deployed.
ACM Private CA provides you a highly-available private CA service without the upfront investment and ongoing maintenance costs and risks of operating your own private CA infrastructure. Using ACM Private CA, you can create and manage private certificates for your connected resources in one place with a secure, pay as you go, managed private CA service. For a comparison of the capabilities of AWS Certificate Manager (ACM) versus ACM Private CA, see Issuing a Private End-Entity Certificate in the AWS Private Certificate Authority User Guide.
Solution overview
The following architecture diagram presents an overview of the solution:
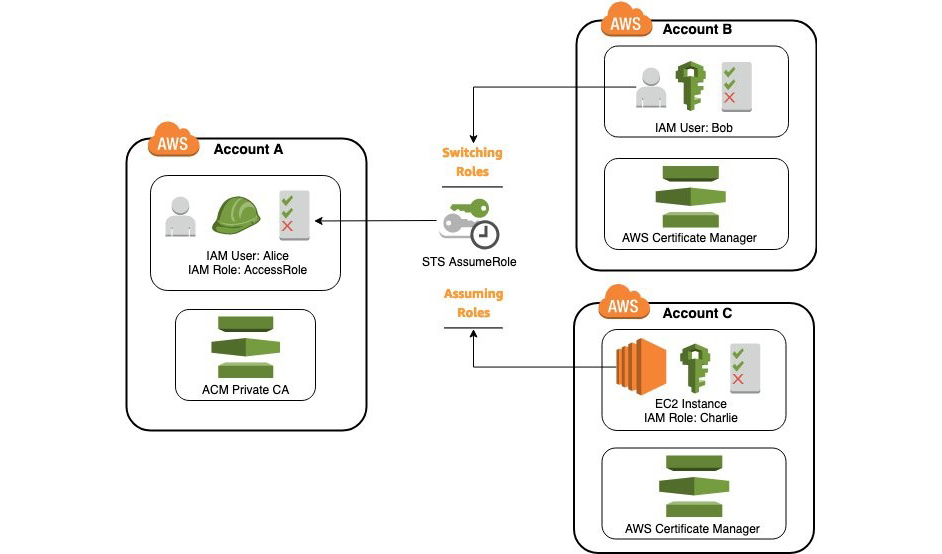
Figure 1: Solution architecture
In the example described in this post, an administrator Alice deploys an ACM Private CA in her security account A inside her AWS Organization. Alice wants to allow private certificates to be used in accounts B and C. Following this solution, Alice allows the IAM user Bob in account B to switch to the role of account A. To do this, Bob uses the AWS Management Console to request private certificates. Alice allows the IAM role Charlie in account C to programmatically assume the role of account A to interact with ACM Private CA Issue Certificate API call.
Prerequisites
You need to have already deployed an ACM Private CA in your account A. You can learn more about how to deploy a subordinate ACM Private CA at AWS Certificate Manager Launches Private Certificate Authority, or how to deploy a root ACM Private CA at How to host and manage an entire private certificate infrastructure in AWS.
This solution uses the following AWS services:
- AWS Certificate Manager (ACM)
- AWS Identity and Access Management (IAM)
- AWS Security Token Service (AWS STS)
Implement the solution
To implement the solution, follow these steps:
- Step 1: Create the IAM role and IAM policies in your account A.
- Step 2: Create the IAM policies in your accounts B and C.
Step 1: Create the IAM role and IAM policies in your account A
The IAM role establishes a trust relationship between your trusting account A and your trusted accounts B and C by using the following trust policy. Be sure to replace the values in italics with your values:
The trust policy allows the IAM user Bob in account B, and the IAM role Charlie in account C, to assume the account A role by using the AssumeRole operation.
Note: You must have the IAM principals already created. When using IAM users and roles in a trust policy, the ARNs are transformed to the unique principal ID of the user or role at the moment the policy is saved.
The IAM role allows ACM read-only access by using the AWS managed policy AWSCertificateManagerReadOnly, and allows ACM Private CA access to work with end entity certificates by using the following customer-managed policies based on principle of least privilege. Be sure to replace the values in italics with your values:
To create the IAM role (console)
- Sign in to the AWS Management Console in your account A and open the IAM console at https://console.aws.amazon.com/iam/.
- In the IAM console navigation pane, choose Roles and then choose Create role.
- Choose the Another AWS account role type.
- For Account ID, enter the ID number for your AWS account B.
- Choose Next: Permissions.
- Choose Create policy to open a new browser tab and create a new policy from scratch.
- Choose the JSON tab.
- Copy and paste the JSON policy document mentioned above to grant ACM Private CA access.
- Replace the ARN using your ACM Private CA.
- When you are finished, choose Review policy.
- On the Review policy page, enter a Name and a Description (optional) for the policy that you are creating. Review the policy Summary to see the permissions that are granted by your policy. Then choose Create policy to save your work.
- After you create the policy, close that tab and return to your original tab.
- Select Refresh and search for your newly created customer policy to select.
- Search and select the managed policy AWSCertificateManagerReadOnly.
- Choose Next: Tags.
- Choose Next: Review.
- For Role name, enter a name for your role. Role names must be unique within your AWS account.
- (Optional) For Role description, type a description for the new role.
- Review the role and then choose Create role.
For additional information, see Creating a Role to Delegate Permissions to an IAM User in the IAM User Guide.
After you create the IAM role you need to update the trust policy to allow account C as principal.
To modify a role trust policy (console)
- Open the IAM console at https://console.aws.amazon.com/iam/.
- In the IAM console navigation pane, choose Roles.
- In the list of roles in your account, choose the name of the role that you want to modify.
- Choose the Trust relationships tab, and then choose Edit trust relationship.
- Edit the trust policy following the example provided above that includes account B and account C in the Principal element.
- When you are finished editing your trust policy, choose Update Trust Policy to save your changes.
For additional information, see Modifying a Role Trust Policy in the IAM User Guide.
Step 2: Create the IAM policies in your accounts B and C
First, you create a customer IAM policy in your accounts B and C with proper permissions to assume the account A role using the AssumeRole operation.
To use the JSON policy editor to create a policy (console)
- Sign in to the AWS Management Console in your accounts B and C and open the IAM console https://console.aws.amazon.com/iam/.
- In the IAM console navigation pane, choose Policies.
- Choose Create policy.
- Choose the JSON tab.
- Copy and paste the following JSON policy document. Be sure to replace the values in italics with your values.
- Replace IAM role ARN with the one you created in account A.
- When you are finished, choose Review policy.
- On the Review policy page, type a Name and a Description (optional) for the policy that you are creating. Review the policy Summary to see the permissions that are granted by your policy. Then choose Create policy to save your work.
For more information, see Creating Policies on the JSON Tab in the IAM User Guide.
Next, you attach the customer IAM policy and the AWS managed policy AWSCertificateManagerFullAccess to your IAM user Bob in account B.
To add permissions to a user by directly attaching managed policies (console)
- Sign in to the AWS Management Console in your account B and open the IAM console at https://console.aws.amazon.com/iam/.
- Choose Users in the navigation pane, choose the IAM user Bob, and then choose the Permissions tab.
- Choose Add permissions, and then choose Attach existing policies directly to user.
- Select your customer IAM policy created in previous step and the AWS managed AWSCertificateManagerFullAccess policy.
- Choose Next: Review to see the list of policies that are to be attached to the user. Then choose Add permissions.
For more information, see Adding Permissions by Attaching Policies Directly to the User in the IAM User Guide.
Then, you attach the customer IAM policy and the AWS managed AWSCertificateManagerFullAccess to your IAM role Charlie in account C.
To change the permissions allowed by a role (console)
- Sign in to the AWS Management Console in your account C and open the IAM console at https://console.aws.amazon.com/iam/.
- In the IAM console navigation pane, choose Roles.
- Choose the IAM role Charlie, and then choose the Permissions tab.
- Choose Add permissions to attach an existing managed policy to the role.
- Select your customer IAM policy created in previous step and the AWS managed AWSCertificateManagerFullAccess policy.
- Choose Attach policy.
For more information, see Modifying a Role Permissions Policy in the IAM User Guide.
Test the solution from account B
To test the solution from account B, you use the AWS Management Console, switch role into account A, request and export an ACM private certificate to import it into ACM in account B.
Step 1: Switch role to account A
Logged as IAM user Bob, you switch role into account A.
To switch to a role (console)
- Sign in to the AWS Management Console as the IAM user Bob at https://console.aws.amazon.com/.
- Choose your user name on the navigation bar in the upper right. It should look like this: bob@accountB.
- Choose Switch Role.
- On the Switch Role page, enter the account A ID number and the name of the role ROLE-NAME, as shown in the following screenshot.

Figure 2: Switch Role from account B to account A
- Choose Switch Role. The display name and color replace your user name on the navigation bar, and you can start using the permissions that the role grants you.
For more information, see Switching to a Role (Console) in the IAM User Guide.
Step 2: Request a new private certificate
After you have switched into account A, go to the ACM Console and request a new private certificate. You choose the current ACM Private CA and add the domains names that you need.
Requesting a Private Certificate Using the ACM Console
- Open the ACM console at https://console.aws.amazon.com/acm/home.
- Choose Request a certificate.
- On the Request a certificate page, select Request a private certificate, then choose the Request a certificate button to continue.

Figure 3: Request a certificate page
- On the Select a certificate authority (CA) page, choose the CA drop-down list to view the list of available private CAs. Choose your CA from the list. Then choose Next.

Figure 4: Select certificate authority (CA) page
- On the Add domain names page, in the Domain name field, enter your domain name.

Figure 5: Add domain names page
- To add another name, choose Add another name to this certificate and enter the name in the text box. Then choose Next.
- If the Review and request page contains correct information about your request, choose Confirm and request.

Figure 6: Review and request
For more information, see Request a Private Certificate in the ACM User Guide.
Step 3: Export private certificate
Now you can export your new private certificate from actions. It requires you to enter a passphrase to encrypt the private key of the certificate. Then you click on generate PEM encoding to be able to either copy/paste the content of the certificate, chain and encrypted private key, or download it all into TXT files.
Note: The passphrase will be needed to decrypt the PEM encoded private key before importing into ACM.
To export a private certificate (console)
- Open the ACM console at https://console.aws.amazon.com/acm/home.
- Select the certificate that you want to export.
- On the Actions menu, choose Export (private certificates only).

Figure 7: Export (private certificates only)
- Enter your passphrase for the private key in both the Enter a passphrase and the Confirm a passphrase fields.
- Choose Generate PEM Encoding.

Figure 8: Export certificate page
- You can copy the certificate, certificate chain, and encrypted key to memory, or choose Export to a file for each.

Figure 9: Get the PEM-encoded certificate, certificate chain, and private key
- Choose Done.
For more information, see Export a Private Certificate in the ACM User Guide.
Step 4: Import private certificate
Finally, you switch back to Bob to account B, and in the ACM console you import the new private certificate by copying and pasting the content of the certificate body, certificate chain, and private key.
Note: you have to decrypt the private key by using your passphrase. You can do this by performing the following OpenSSL command:
To import a private certificate (console)
- Open the ACM console at https://console.aws.amazon.com/acm/home.
- Choose Import a certificate.
- On the Select a certificate page, do the following:
- For Certificate body, paste the PEM-encoded certificate to import.
- For Certificate private key, paste the PEM-encoded, unencrypted private key that matches the certificate’s public key.
- For Certificate chain, paste the PEM-encoded certificate chain.
- Choose Next.

Figure 10: Select a certificate page
- Choose Review and import.
- Review the information about your certificate, then choose Import.

Figure 11: Review and import page
For more information, see Import a Certificate in the ACM User Guide.
Test the solution from account C
To test the solution from account C, you will interact with ACM and ACM Private CA in a programmatic way. You access an EC2 instance running in your account C. The EC2 instance has attached the IAM role Charlie that you created in the previous steps.
Step 1: Configure credentials
You can use the following example code to configure the AWS Command Line Interface (AWS CLI) to use an IAM role by defining a profile for the role in the ~/.aws/credentials file. Using this new profile helps you to automatically assume the role in account A with proper temporal credentials. Be sure to replace the values in italics with your values.
For more information about how to allow an EC2 instance profile role to switch to a cross-account role (AWS CLI), see Switching to an IAM Role (AWS CLI) in the IAM User Guide.
Use the following example code to confirm the identity of the profile by calling the AWS STS GetCallerIdentity API operation.
Use the following example code to confirm IAM role Charlie credentials without using profile parameter.
Step 2: Issue private certificate
To issue a new private certificate, first you create the certificate signing request (CSR) and a 2048-bit RSA private key using the following OpenSSL command:
Then you use the CSR file test_cert.csr to call the ACM Private CA IssueCertificate API action. You must specify the ARN of your ACM Private CA and the profile AccessAccountA. Be sure to replace the values in italics with your values.
Step 3: Get private certificate
To get the private certificate body and the certificate chain in PEM format, use the following example code to call the ACM Private CA GetCertificate API operation. You must specify the ARN of your ACM private CA, the ARN of the issued certificate, and the profile AccessAccountA. Be sure to replace the values in italics with your values.
Step 4: Import private certificate
Before importing the private certificate into ACM in your account C, you have to copy and paste the output of the previous command into files. The first block BEGIN CERTIFICATE to END CERTIFICATE contains the certificate body, copy and save it as cert.pem. The second block BEGIN CERTIFICATE to END CERTIFICATE contains the certificate chain, copy and save it as chain.pem.
Next, you decrypt the private key created in previous step, by using the following OpenSSL command:
Now, use the following example code to call the ACM ImportCertificate API operation, to import the private certificate into account C. You must to specify files cert.pem, chain.pem, and decrypted_test_priv_key.pem without any profile.
The import-certificate command outputs the ARN of the private certificate in your Account C. Now, you can use it with the AWS services that are integrated with ACM.
Summary
In this post, we showed you how to you can interact with an ACM Private CA from multiple accounts inside your AWS Organization by using IAM roles. You can use the AWS Management Console with ACM integration to request private certificates and AWS CLI from an EC2 instance to issue private certificates.
If you have feedback about this post, submit comments in the Comments section below. If you have questions about this post, start a new thread on the AWS Certificate Manager forum or contact AWS Support.
Want more AWS Security how-to content, news, and feature announcements? Follow us on Twitter.