개요
이 자습서에서는 Amazon SageMaker Pipelines, Amazon SageMaker Model Registry 및 Amazon SageMaker Clarify를 사용하여 엔드 투 엔드 기계 학습 워크플로를 생성하고 자동화하는 방법을 학습합니다.
Amazon SageMaker Pipelines는 ML을 위해 특별히 구축된 최초의 지속적 통합 및 지속적 전달(CI/CD) 서비스입니다. SageMaker Pipelines를 사용하면 데이터 로드, 데이터 변환, 훈련, 튜닝, 평가 및 배포를 포함한 ML 워크플로의 여러 단계를 자동화할 수 있습니다. SageMaker Model Registry를 사용하면 중앙 리포지토리에서 모델 버전, 사용 사례 그룹화와 같은 메타데이터 및 모델 성능 지표 기준을 추적하고 비즈니스 요구 사항에 따라 배포에 적합한 모델을 손쉽게 선택할 수 있습니다. SageMaker Clarify는 훈련 데이터 및 모델에 대한 가시성을 개선하여 바이어스를 식별 및 제한하고 예측을 설명할 수 있도록 합니다.
이 자습서에서는 자동차 보험 청구의 사기 가능성을 예측하는 XGBoost 바이너리 분류의 구축, 훈련 및 배포를 위한 SageMaker 파이프라인을 구현합니다. 여기에서는 가상의 자동차 보험 청구 데이터 세트를 사용하게 됩니다. 원시 입력은 청구 테이블과 고객 테이블이라는 2개의 보험 데이터 테이블입니다. 청구 테이블에는 청구의 사기 여부를 나타내는 fraud라는 열이 있습니다. 이 자습서에서 구현할 파이프라인은 이 원시 데이터를 처리하고 훈련, 검증 및 테스트 데이터 세트를 생성하며 바이너리 분류 모델을 구축하고 평가합니다. 그리고 SageMaker Clarify를 사용하여 모델 바이어스 및 설명 가능성을 테스트하고, 마지막으로 추론을 위해 모델을 배포합니다.
학습 목표
이 가이드에서는 다음을 수행합니다.
- SageMaker 파이프라인을 구축하고 실행하여 엔드 투 엔드 ML 수명 주기를 자동화
- 배포된 모델을 사용하여 예측 생성
사전 요구 사항
이 가이드를 시작하기 전에 필요한 사항은 다음과 같습니다.
- AWS 계정: 아직 계정이 없는 경우 AWS 환경 설정 시작하기 가이드에서 간략한 개요를 확인합니다.
AWS 경험
소요 시간
120분
완료 비용
이 자습서의 예상 비용은 SageMaker 요금을 참조하세요.
필요 사항
AWS 계정에 로그인해야 합니다.
사용 서비스
Amazon SageMaker Studio, Amazon SageMaker Pipelines, Amazon SageMaker Clarify, Amazon SageMaker Model Registry
최종 업데이트 날짜
2022년 6월 24일
구현
1단계: Amazon SageMaker Studio 도메인 설정
AWS 계정은 리전당 1개의 SageMaker Studio 도메인만 설정할 수 있습니다. 미국 동부(버지니아 북부) 리전에 이미 SageMaker Studio 도메인이 있는 경우 ML 워크플로에 대한 SageMaker Studio 설정 가이드에 따라 필요한 AWS IAM 정책을 SageMaker Studio 계정에 연결한 다음 1단계를 건너뛰고 2단계로 바로 넘어가세요.
기존 SageMaker Studio 도메인이 없는 경우 1단계를 계속 진행하여 AWS CloudFormation 템플릿을 실행합니다. 그러면 SageMaker Studio 도메인이 생성되고 이 자습서의 나머지 부분에 필요한 권한이 추가됩니다.
AWS CloudFormation 스택 링크를 선택합니다. 이 링크를 누르면 AWS CloudFormation 콘솔이 열리고 SageMaker Studio 도메인과 studio-user라는 이름의 사용자가 생성됩니다. 또한 필요한 권한이 SageMaker Studio 계정에 추가됩니다. CloudFormation 콘솔에서 미국 동부(버지니아 북부)(US East (N. Virginia))가 오른쪽 위에 표시된 리전인지 확인합니다. 스택 이름(Stack name)은 CFN-SM-IM-Lambda-catalog여야 하며 변경할 수 없습니다. 이 스택은 모든 리소스를 생성하는 데 약 10분이 걸립니다.
이 스택은 퍼블릭 VPC가 계정에 이미 설정되어 있는 것으로 가정합니다. 퍼블릭 VPC가 없는 경우 단일 퍼블릭 서브넷이 있는 VPC를 참조하여 퍼블릭 VPC 생성 방법에 대해 알아보세요.

AWS CloudFormation이 IAM 리소스를 생성할 수 있음을 동의합니다(I acknowledge that AWS CloudFormation might create IAM resources)를 선택하고 스택 생성(Create stack)을 선택합니다.

CloudFormation 창에서 스택(Stacks)을 선택합니다. 스택이 생성되는 데 약 10분이 걸립니다. 스택이 생성되면 스택 상태가 CREATE_IN_PROGRESS에서 CREATE_COMPLETE로 바뀝니다.

2단계: SageMaker Studio 노트북 설정 및 파이프라인 파라미터화
이 단계에서는 새 SageMaker Studio 노트북을 시작하고 Amazon Simple Storage Service(S3)와의 상호 작용에 필요한 SageMaker 변수를 구성합니다.
SageMaker Studio를 AWS Console 검색 창에 입력하고 SageMaker Studio를 선택합니다. 콘솔의 오른쪽 위에 있는 리전(Region) 드롭다운 목록에서 미국 동부(버지니아 북부)(US East (N. Virginia))를 선택합니다.

앱 시작(Launch app)에서 Studio를 선택하고 studio-user 프로필을 사용하여 SageMaker Studio를 엽니다.

SageMaker Studio 탐색 모음에서 파일(File), 새로 만들기(New), 노트북(Notebook)을 선택합니다.

노트북 환경 설정(Set up notebook environment) 대화 상자의 이미지(Image)에서 데이터 과학(Data Science)을 선택합니다. Python 3 커널이 자동으로 선택됩니다. 선택(Select)을 선택합니다.

노트북의 오른쪽 위에 있는 커널(kernel)에 이제 Python 3(데이터 과학)(Python 3 (Data Science))이 표시됩니다.

필요한 라이브러리를 가져오려면 다음 코드를 복사하여 노트북 셀에 붙여 넣고 셀을 실행합니다.
import pandas as pd
import json
import boto3
import pathlib
import io
import sagemaker


from sagemaker.deserializers import CSVDeserializer
from sagemaker.serializers import CSVSerializer

from sagemaker.xgboost.estimator import XGBoost
from sagemaker.sklearn.processing import SKLearnProcessor
from sagemaker.processing import (
    ProcessingInput,
    ProcessingOutput,
    ScriptProcessor
)
from sagemaker.inputs import TrainingInput

from sagemaker.workflow.pipeline import Pipeline
from sagemaker.workflow.steps import (
    ProcessingStep,
    TrainingStep,
    CreateModelStep
)
from sagemaker.workflow.check_job_config import CheckJobConfig
from sagemaker.workflow.parameters import (
    ParameterInteger,
    ParameterFloat,
    ParameterString,
    ParameterBoolean
)
from sagemaker.workflow.clarify_check_step import (
    ModelBiasCheckConfig,
    ClarifyCheckStep,
    ModelExplainabilityCheckConfig
)
from sagemaker.workflow.step_collections import RegisterModel
from sagemaker.workflow.conditions import ConditionGreaterThanOrEqualTo
from sagemaker.workflow.properties import PropertyFile
from sagemaker.workflow.condition_step import ConditionStep
from sagemaker.workflow.functions import JsonGet

from sagemaker.workflow.lambda_step import (
    LambdaStep,
    LambdaOutput,
    LambdaOutputTypeEnum,
)
from sagemaker.lambda_helper import Lambda

from sagemaker.model_metrics import (
    MetricsSource,
    ModelMetrics,
    FileSource
)
from sagemaker.drift_check_baselines import DriftCheckBaselines

from sagemaker.image_uris import retrieve다음 코드 블록을 복사 후 셀에 붙여 넣고 실행하여 SageMaker 및 AWS SDK를 통해 SageMaker 및 S3 클라이언트 객체를 설정합니다. 이러한 객체는 SageMaker에서 엔드포인트를 배포 및 호출하고 Amazon S3 및 AWS Lambda와 상호 작용하는 등의 다양한 작업을 수행하는 데 필요합니다. 이 코드는 원시 데이터 세트 및 처리된 데이터 세트와 모델 아티팩트가 저장되는 S3 버킷 위치도 설정합니다. 읽기 버킷과 쓰기 버킷은 별개입니다. 읽기 버킷은 sagemaker-sample-files라는 이름의 퍼블릭 S3 버킷이며 원시 데이터 세트를 포함합니다. 쓰기 버킷은 계정에 연결된 sagemaker-<your- Region>-<your-account-id>라는 이름의 기본 S3 버킷이며 이 자습서의 후반부에서 처리된 데이터 세트와 아티팩트를 저장하는 데 사용됩니다.
# Instantiate AWS services session and client objects
sess = sagemaker.Session()
write_bucket = sess.default_bucket()
write_prefix = "fraud-detect-demo"

region = sess.boto_region_name
s3_client = boto3.client("s3", region_name=region)
sm_client = boto3.client("sagemaker", region_name=region)
sm_runtime_client = boto3.client("sagemaker-runtime")

# Fetch SageMaker execution role
sagemaker_role = sagemaker.get_execution_role()


# S3 locations used for parameterizing the notebook run
read_bucket = "sagemaker-sample-files"
read_prefix = "datasets/tabular/synthetic_automobile_claims"

# S3 location where raw data to be fetched from
raw_data_key = f"s3://{read_bucket}/{read_prefix}"

# S3 location where processed data to be uploaded
processed_data_key = f"{write_prefix}/processed"

# S3 location where train data to be uploaded
train_data_key = f"{write_prefix}/train"

# S3 location where validation data to be uploaded
validation_data_key = f"{write_prefix}/validation"

# S3 location where test data to be uploaded
test_data_key = f"{write_prefix}/test"


# Full S3 paths
claims_data_uri = f"{raw_data_key}/claims.csv"
customers_data_uri = f"{raw_data_key}/customers.csv"
output_data_uri = f"s3://{write_bucket}/{write_prefix}/"
scripts_uri = f"s3://{write_bucket}/{write_prefix}/scripts"
estimator_output_uri = f"s3://{write_bucket}/{write_prefix}/training_jobs"
processing_output_uri = f"s3://{write_bucket}/{write_prefix}/processing_jobs"
model_eval_output_uri = f"s3://{write_bucket}/{write_prefix}/model_eval"
clarify_bias_config_output_uri = f"s3://{write_bucket}/{write_prefix}/model_monitor/bias_config"
clarify_explainability_config_output_uri = f"s3://{write_bucket}/{write_prefix}/model_monitor/explainability_config"
bias_report_output_uri = f"s3://{write_bucket}/{write_prefix}/clarify_output/pipeline/bias"
explainability_report_output_uri = f"s3://{write_bucket}/{write_prefix}/clarify_output/pipeline/explainability"

# Retrieve training image
training_image = retrieve(framework="xgboost", region=region, version="1.3-1")다음 코드를 복사하고 붙여 넣어 모델 및 엔드포인트와 같은 다양한 SageMaker 파이프라인 구성 요소의 이름을 설정하고 훈련 및 추론 인스턴스 유형과 개수를 지정합니다. 이러한 값은 파이프라인을 파라미터화하는 데 사용됩니다.
# Set names of pipeline objects
pipeline_name = "FraudDetectXGBPipeline"
pipeline_model_name = "fraud-detect-xgb-pipeline"
model_package_group_name = "fraud-detect-xgb-model-group"
base_job_name_prefix = "fraud-detect"
endpoint_config_name = f"{pipeline_model_name}-endpoint-config"
endpoint_name = f"{pipeline_model_name}-endpoint"

# Set data parameters
target_col = "fraud"

# Set instance types and counts
process_instance_type = "ml.c5.xlarge"
train_instance_count = 1
train_instance_type = "ml.m4.xlarge"
predictor_instance_count = 1
predictor_instance_type = "ml.m4.xlarge"
clarify_instance_count = 1
clarify_instance_type = "ml.m4.xlarge"SageMaker Pipelines는 파라미터화를 지원합니다. 파라미터화를 수행하면 파이프라인 코드 변경 없이 런타임 시 입력 파라미터를 지정할 수 있습니다. sagemaker.workflow.parameters 모듈에서 ParameterInteger, ParameterFloat, ParameterString 및 ParameterBoolean과 같은 모듈을 사용하여 다양한 데이터 유형의 파이프라인 파라미터를 지정할 수 있습니다. 다음 코드를 복사하고 붙여 넣은 후 실행하여 SageMaker Clarify 구성을 포함한 다수의 입력 파라미터를 설정합니다.
# Set up pipeline input parameters

# Set processing instance type
process_instance_type_param = ParameterString(
    name="ProcessingInstanceType",
    default_value=process_instance_type,
)

# Set training instance type
train_instance_type_param = ParameterString(
    name="TrainingInstanceType",
    default_value=train_instance_type,
)

# Set training instance count
train_instance_count_param = ParameterInteger(
    name="TrainingInstanceCount",
    default_value=train_instance_count
)

# Set deployment instance type
deploy_instance_type_param = ParameterString(
    name="DeployInstanceType",
    default_value=predictor_instance_type,
)

# Set deployment instance count
deploy_instance_count_param = ParameterInteger(
    name="DeployInstanceCount",
    default_value=predictor_instance_count
)

# Set Clarify check instance type
clarify_instance_type_param = ParameterString(
    name="ClarifyInstanceType",
    default_value=clarify_instance_type,
)

# Set model bias check params
skip_check_model_bias_param = ParameterBoolean(
    name="SkipModelBiasCheck",
    default_value=False
)

register_new_baseline_model_bias_param = ParameterBoolean(
    name="RegisterNewModelBiasBaseline",
    default_value=False
)

supplied_baseline_constraints_model_bias_param = ParameterString(
    name="ModelBiasSuppliedBaselineConstraints",
    default_value=""
)

# Set model explainability check params
skip_check_model_explainability_param = ParameterBoolean(
    name="SkipModelExplainabilityCheck",
    default_value=False
)

register_new_baseline_model_explainability_param = ParameterBoolean(
    name="RegisterNewModelExplainabilityBaseline",
    default_value=False
)

supplied_baseline_constraints_model_explainability_param = ParameterString(
    name="ModelExplainabilitySuppliedBaselineConstraints",
    default_value=""
)

# Set model approval param
model_approval_status_param = ParameterString(
    name="ModelApprovalStatus", default_value="Approved"
)3단계: 파이프라인 구성 요소 구축
파이프라인은 개별적으로 구축한 다음 하나로 모아 ML 워크플로를 형성하는 단계의 순서입니다. 다음 다이어그램은 파이프라인의 개괄적 단계를 보여줍니다.
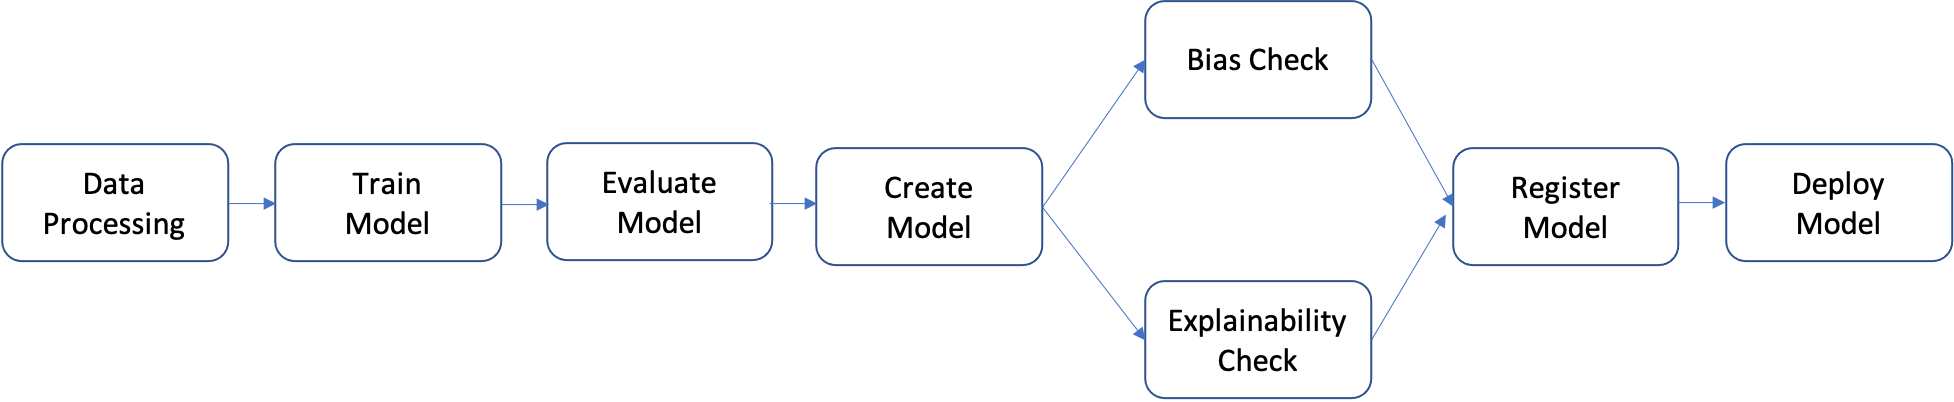
이 자습서에서는 다음 단계가 포함된 파이프라인을 구축합니다.
- 데이터 처리 단계: S3의 입력 원시 데이터를 사용하여 SageMaker 처리 작업을 실행하고 훈련, 검증 및 테스트 분할을 S3로 출력합니다.
- 훈련 단계: SageMaker 훈련 작업에서 S3의 훈련 및 검증 데이터를 입력으로 사용하여 XGBoost 모델을 훈련하고 훈련된 모델 아티팩트를 S3에 저장합니다.
- 평가 단계: S3의 테스트 데이터 및 모델 아티팩트를 입력으로 사용하여 SageMaker 처리 작업을 실행하는 방법으로 테스트 데이터 세트에서 모델을 평가하고 출력 모델 성능 평가 보고서를 S3에 저장합니다.
- 조건부 단계: 테스트 데이터 세트에서 임계값을 기준으로 모델 성능을 비교합니다. S3의 모델 성능 평가 보고서를 입력으로 사용하여 SageMaker Pipelines의 미리 정의된 단계를 실행하고 모델 성능이 허용 가능한 수준일 경우 실행할 파이프라인 단계의 출력 목록을 저장합니다.
- 모델 생성 단계: S3의 모델 아티팩트를 입력으로 사용하여 SageMaker Pipelines의 미리 정의된 단계를 실행하고 출력 SageMaker 모델을 S3에 저장합니다.
- 바이어스 확인 단계: SageMaker Clarify에서 S3의 훈련 데이터 및 모델 아티팩트를 입력으로 사용하여 모델 바이어스를 확인하고 모델 바이어스 보고서 및 기준 지표를 S3에 저장합니다.
- 모델 설명 가능성 단계: S3의 훈련 데이터 및 모델 아티팩트를 입력으로 사용하여 SageMaker Clarify를 실행하고 모델 설명 가능성 보고서 및 기준 지표를 S3에 저장합니다.
- 등록 단계: 모델, 바이어스 및 설명 가능성 기준 지표를 입력으로 사용하여 SageMaker Pipelines의 미리 정의된 단계를 실행하고 SageMaker Model Registry에 모델을 등록합니다.
- 배포 단계: AWS Lambda의 핸들러 함수, 모델 및 엔드포인트 구성을 입력으로 사용하여 SageMaker Pipelines의 미리 정의된 단계를 실행하는 방법으로 SageMaker 실시간 추론 엔드포인트에 모델을 배포합니다.
SageMaker Pipelines는 데이터 처리 단계, 모델 훈련 단계, 모델 튜닝 단계 및 배치 변환 단계 등 다수의 미리 정의된 단계 유형을 제공합니다. 자세한 내용은 Amazon SageMaker 개발자 안내서에서 파이프라인 단계를 참조하세요. 다음 단계에서는 각 파이프라인 단계를 개별적으로 구성하고 정의한 다음 파이프라인 단계와 입력 파라미터를 결합하여 파이프라인 자체를 정의합니다.
데이터 처리 단계: 이 단계에서는 원시 파일을 수집하고 누락 값 대체 및 특성 추출과 같은 처리를 수행하며 모델 구축에 사용할 훈련, 검증 및 테스트 분할을 큐레이팅하는 Python 스크립트를 준비합니다. 다음 코드를 복사하고 붙여 넣은 후 실행하여 처리 스크립트를 작성합니다.
%%writefile preprocessing.py

import argparse
import pathlib
import boto3
import os
import pandas as pd
import logging
from sklearn.model_selection import train_test_split

logger = logging.getLogger()
logger.setLevel(logging.INFO)
logger.addHandler(logging.StreamHandler())


if __name__ == "__main__":
    parser = argparse.ArgumentParser()
    parser.add_argument("--train-ratio", type=float, default=0.8)
    parser.add_argument("--validation-ratio", type=float, default=0.1)
    parser.add_argument("--test-ratio", type=float, default=0.1)
    args, _ = parser.parse_known_args()
    logger.info("Received arguments {}".format(args))

    # Set local path prefix in the processing container
    local_dir = "/opt/ml/processing"

    input_data_path_claims = os.path.join("/opt/ml/processing/claims", "claims.csv")
    input_data_path_customers = os.path.join("/opt/ml/processing/customers", "customers.csv")

    logger.info("Reading claims data from {}".format(input_data_path_claims))
    df_claims = pd.read_csv(input_data_path_claims)

    logger.info("Reading customers data from {}".format(input_data_path_customers))
    df_customers = pd.read_csv(input_data_path_customers)

    logger.debug("Formatting column names.")
    # Format column names
    df_claims = df_claims.rename({c : c.lower().strip().replace(' ', '_') for c in df_claims.columns}, axis = 1)
    df_customers = df_customers.rename({c : c.lower().strip().replace(' ', '_') for c in df_customers.columns}, axis = 1)

    logger.debug("Joining datasets.")
    # Join datasets
    df_data = df_claims.merge(df_customers, on = 'policy_id', how = 'left')

    # Drop selected columns not required for model building
    df_data = df_data.drop(['customer_zip'], axis = 1)

    # Select Ordinal columns
    ordinal_cols = ["police_report_available", "policy_liability", "customer_education"]

    # Select categorical columns and filling with na
    cat_cols_all = list(df_data.select_dtypes('object').columns)
    cat_cols = [c for c in cat_cols_all if c not in ordinal_cols]
    df_data[cat_cols] = df_data[cat_cols].fillna('na')

    logger.debug("One-hot encoding categorical columns.")
    # One-hot encoding categorical columns
    df_data = pd.get_dummies(df_data, columns = cat_cols)

    logger.debug("Encoding ordinal columns.")
    # Ordinal encoding
    mapping = {
               "Yes": "1",
               "No": "0"
              }
    df_data['police_report_available'] = df_data['police_report_available'].map(mapping)
    df_data['police_report_available'] = df_data['police_report_available'].astype(float)

    mapping = {
               "15/30": "0",
               "25/50": "1",
               "30/60": "2",
               "100/200": "3"
              }

    df_data['policy_liability'] = df_data['policy_liability'].map(mapping)
    df_data['policy_liability'] = df_data['policy_liability'].astype(float)

    mapping = {
               "Below High School": "0",
               "High School": "1",
               "Associate": "2",
               "Bachelor": "3",
               "Advanced Degree": "4"
              }

    df_data['customer_education'] = df_data['customer_education'].map(mapping)
    df_data['customer_education'] = df_data['customer_education'].astype(float)

    df_processed = df_data.copy()
    df_processed.columns = [c.lower() for c in df_data.columns]
    df_processed = df_processed.drop(["policy_id", "customer_gender_unkown"], axis=1)

    # Split into train, validation, and test sets
    train_ratio = args.train_ratio
    val_ratio = args.validation_ratio
    test_ratio = args.test_ratio

    logger.debug("Splitting data into train, validation, and test sets")

    y = df_processed['fraud']
    X = df_processed.drop(['fraud'], axis = 1)
    X_train_val, X_test, y_train_val, y_test = train_test_split(X, y, test_size=test_ratio, random_state=42)
    X_train, X_val, y_train, y_val = train_test_split(X_train_val, y_train_val, test_size=val_ratio, random_state=42)

    train_df = pd.concat([y_train, X_train], axis = 1)
    val_df = pd.concat([y_val, X_val], axis = 1)
    test_df = pd.concat([y_test, X_test], axis = 1)
    dataset_df = pd.concat([y, X], axis = 1)

    logger.info("Train data shape after preprocessing: {}".format(train_df.shape))
    logger.info("Validation data shape after preprocessing: {}".format(val_df.shape))
    logger.info("Test data shape after preprocessing: {}".format(test_df.shape))

    # Save processed datasets to the local paths in the processing container.
    # SageMaker will upload the contents of these paths to S3 bucket
    logger.debug("Writing processed datasets to container local path.")
    train_output_path = os.path.join(f"{local_dir}/train", "train.csv")
    validation_output_path = os.path.join(f"{local_dir}/val", "validation.csv")
    test_output_path = os.path.join(f"{local_dir}/test", "test.csv")
    full_processed_output_path = os.path.join(f"{local_dir}/full", "dataset.csv")

    logger.info("Saving train data to {}".format(train_output_path))
    train_df.to_csv(train_output_path, index=False)

    logger.info("Saving validation data to {}".format(validation_output_path))
    val_df.to_csv(validation_output_path, index=False)

    logger.info("Saving test data to {}".format(test_output_path))
    test_df.to_csv(test_output_path, index=False)

    logger.info("Saving full processed data to {}".format(full_processed_output_path))
    dataset_df.to_csv(full_processed_output_path, index=False)
다음 코드 블록을 복사하고 붙여 넣은 후 실행하여 프로세서 및 SageMaker Pipelines 단계를 인스턴스화하고 처리 스크립트를 실행합니다. 처리 스크립트는 Pandas로 작성되므로 SKLearnProcessor를 사용합니다. SageMaker Pipelines ProcessingStep 함수는 프로세서, 원시 데이터 세트의 입력 S3 위치 및 처리된 데이터 세트를 저장할 출력 S3 위치를 인수로 사용합니다. 훈련, 검증 및 테스트 분할 비율과 같은 추가 인수는 job_arguments 인수를 통해 제공됩니다.
from sagemaker.workflow.pipeline_context import PipelineSession
# Upload processing script to S3
s3_client.upload_file(
    Filename="preprocessing.py", Bucket=write_bucket, Key=f"{write_prefix}/scripts/preprocessing.py"
)

# Define the SKLearnProcessor configuration
sklearn_processor = SKLearnProcessor(
    framework_version="0.23-1",
    role=sagemaker_role,
    instance_count=1,
    instance_type=process_instance_type,
    base_job_name=f"{base_job_name_prefix}-processing",
)

# Define pipeline processing step
process_step = ProcessingStep(
    name="DataProcessing",
    processor=sklearn_processor,
    inputs=[
        ProcessingInput(source=claims_data_uri, destination="/opt/ml/processing/claims"),
        ProcessingInput(source=customers_data_uri, destination="/opt/ml/processing/customers")
    ],
    outputs=[
        ProcessingOutput(destination=f"{processing_output_uri}/train_data", output_name="train_data", source="/opt/ml/processing/train"),
        ProcessingOutput(destination=f"{processing_output_uri}/validation_data", output_name="validation_data", source="/opt/ml/processing/val"),
        ProcessingOutput(destination=f"{processing_output_uri}/test_data", output_name="test_data", source="/opt/ml/processing/test"),
        ProcessingOutput(destination=f"{processing_output_uri}/processed_data", output_name="processed_data", source="/opt/ml/processing/full")
    ],
    job_arguments=[
        "--train-ratio", "0.8",
        "--validation-ratio", "0.1",
        "--test-ratio", "0.1"
    ],
    code=f"s3://{write_bucket}/{write_prefix}/scripts/preprocessing.py"
)다음 코드 블록을 복사하고 붙여 넣은 후 실행하여 훈련 스크립트를 준비합니다. 이 스크립트는 XGBoost 바이너리 분류기의 훈련 로직을 캡슐화합니다. 모델 훈련에 사용된 하이퍼파라미터는 자습서의 후반부에서 훈련 단계 정의를 통해 제공됩니다.
%%writefile xgboost_train.py

import argparse
import os
import joblib
import json
import pandas as pd
import xgboost as xgb
from sklearn.metrics import roc_auc_score

if __name__ == "__main__":
    parser = argparse.ArgumentParser()

    # Hyperparameters and algorithm parameters are described here
    parser.add_argument("--num_round", type=int, default=100)
    parser.add_argument("--max_depth", type=int, default=3)
    parser.add_argument("--eta", type=float, default=0.2)
    parser.add_argument("--subsample", type=float, default=0.9)
    parser.add_argument("--colsample_bytree", type=float, default=0.8)
    parser.add_argument("--objective", type=str, default="binary:logistic")
    parser.add_argument("--eval_metric", type=str, default="auc")
    parser.add_argument("--nfold", type=int, default=3)
    parser.add_argument("--early_stopping_rounds", type=int, default=3)


    # SageMaker specific arguments. Defaults are set in the environment variables
    # Set location of input training data
    parser.add_argument("--train_data_dir", type=str, default=os.environ.get("SM_CHANNEL_TRAIN"))
    # Set location of input validation data
    parser.add_argument("--validation_data_dir", type=str, default=os.environ.get("SM_CHANNEL_VALIDATION"))
    # Set location where trained model will be stored. Default set by SageMaker, /opt/ml/model
    parser.add_argument("--model_dir", type=str, default=os.environ.get("SM_MODEL_DIR"))
    # Set location where model artifacts will be stored. Default set by SageMaker, /opt/ml/output/data
    parser.add_argument("--output_data_dir", type=str, default=os.environ.get("SM_OUTPUT_DATA_DIR"))

    args = parser.parse_args()

    data_train = pd.read_csv(f"{args.train_data_dir}/train.csv")
    train = data_train.drop("fraud", axis=1)
    label_train = pd.DataFrame(data_train["fraud"])
    dtrain = xgb.DMatrix(train, label=label_train)


    data_validation = pd.read_csv(f"{args.validation_data_dir}/validation.csv")
    validation = data_validation.drop("fraud", axis=1)
    label_validation = pd.DataFrame(data_validation["fraud"])
    dvalidation = xgb.DMatrix(validation, label=label_validation)

    # Choose XGBoost model hyperparameters
    params = {"max_depth": args.max_depth,
              "eta": args.eta,
              "objective": args.objective,
              "subsample" : args.subsample,
              "colsample_bytree":args.colsample_bytree
             }

    num_boost_round = args.num_round
    nfold = args.nfold
    early_stopping_rounds = args.early_stopping_rounds

    # Cross-validate train XGBoost model
    cv_results = xgb.cv(
        params=params,
        dtrain=dtrain,
        num_boost_round=num_boost_round,
        nfold=nfold,
        early_stopping_rounds=early_stopping_rounds,
        metrics=["auc"],
        seed=42,
    )

    model = xgb.train(params=params, dtrain=dtrain, num_boost_round=len(cv_results))

    train_pred = model.predict(dtrain)
    validation_pred = model.predict(dvalidation)

    train_auc = roc_auc_score(label_train, train_pred)
    validation_auc = roc_auc_score(label_validation, validation_pred)

    print(f"[0]#011train-auc:{train_auc:.2f}")
    print(f"[0]#011validation-auc:{validation_auc:.2f}")

    metrics_data = {"hyperparameters" : params,
                    "binary_classification_metrics": {"validation:auc": {"value": validation_auc},
                                                      "train:auc": {"value": train_auc}
                                                     }
                   }

    # Save the evaluation metrics to the location specified by output_data_dir
    metrics_location = args.output_data_dir + "/metrics.json"

    # Save the trained model to the location specified by model_dir
    model_location = args.model_dir + "/xgboost-model"

    with open(metrics_location, "w") as f:
        json.dump(metrics_data, f)

    with open(model_location, "wb") as f:
joblib.dump(model, f)SageMaker XGBoost 추정기 및 SageMaker Pipelines TrainingStep 함수를 사용하여 모델 훈련을 설정합니다.
# Set XGBoost model hyperparameters
hyperparams = {
"eval_metric" : "auc",
"objective": "binary:logistic",
"num_round": "5",
"max_depth":"5",
"subsample":"0.75",
"colsample_bytree":"0.75",
"eta":"0.5"
}

# Set XGBoost estimator
xgb_estimator = XGBoost(
entry_point="xgboost_train.py",
output_path=estimator_output_uri,
code_location=estimator_output_uri,
hyperparameters=hyperparams,
role=sagemaker_role,
# Fetch instance type and count from pipeline parameters
instance_count=train_instance_count,
instance_type=train_instance_type,
framework_version="1.3-1"
)

# Access the location where the preceding processing step saved train and validation datasets
# Pipeline step properties can give access to outputs which can be used in succeeding steps
s3_input_train = TrainingInput(
s3_data=process_step.properties.ProcessingOutputConfig.Outputs["train_data"].S3Output.S3Uri,
content_type="csv",
s3_data_type="S3Prefix"
)
s3_input_validation = TrainingInput(
s3_data=process_step.properties.ProcessingOutputConfig.Outputs["validation_data"].S3Output.S3Uri,
content_type="csv",
s3_data_type="S3Prefix"
)

# Set pipeline training step
train_step = TrainingStep(
name="XGBModelTraining",
estimator=xgb_estimator,
inputs={
"train":s3_input_train, # Train channel
"validation": s3_input_validation # Validation channel
}
)다음 코드 블록을 복사하고 붙여 넣은 후 실행합니다. 이 코드 블록은 SageMaker Pipelines CreateModelStep 함수를 사용하여 SageMaker 모델을 생성하는 데 사용됩니다. 이 단계에서는 훈련 단계의 출력을 활용하여 배포할 모델을 패키지로 만듭니다. 인스턴스 유형 인수의 값은 이 자습서의 앞 부분에서 정의한 SageMaker Pipelines 파라미터를 사용하여 전달됩니다.
# Create a SageMaker model
model = sagemaker.model.Model(
    image_uri=training_image,
    model_data=train_step.properties.ModelArtifacts.S3ModelArtifacts,
    sagemaker_session=sess,
    role=sagemaker_role
)

# Specify model deployment instance type
inputs = sagemaker.inputs.CreateModelInput(instance_type=deploy_instance_type_param)

create_model_step = CreateModelStep(name="FraudDetModel", model=model, inputs=inputs)ML 워크플로에서는 훈련된 모델의 잠재적 바이어스를 평가하고 입력 데이터의 다양한 특성이 모델 예측에 미치는 영향을 파악하는 것이 중요합니다. SageMaker Pipelines는 데이터 바이어스 확인(훈련 전), 모델 바이어스 확인(훈련 후) 및 모델 설명 가능성 확인이라는 3가지 유형의 확인을 수행하는 데 사용할 수 있는 ClarifyCheckStep 함수를 제공합니다. 실행 시간을 줄이기 위해 이 자습서에서는 바이어스 및 설명 가능성 확인만 구현합니다. 다음 코드 블록을 복사하고 붙여 넣은 후 실행하여 SageMaker Clarify에서 모델 바이어스 확인을 설정합니다. 이 단계에서는 properties 속성을 통해 훈련 데이터 및 이전 단계에서 만든 SageMaker 모델과 같은 자산을 가져옵니다. 파이프라인이 실행될 때 이 단계는 입력을 제공하는 단계의 실행이 완료되기 전까지 시작되지 않습니다. 자세한 내용은 Amazon SageMaker 개발자 안내서에서 단계 간 데이터 종속성을 참조하세요. 비용과 자습서 실행 시간을 관리하기 위해 ModelBiasCheckConfig 함수는 바이어스 지표 DPPL 1개만 계산하도록 구성됩니다. SageMaker Clarify에서 사용할 수 있는 바이어스 지표에 대한 자세한 내용은 Amazon SageMaker 개발자 안내서에서 훈련 후 데이터 및 모델 바이어스 측정을 참조하세요.
# Set up common configuration parameters to be used across multiple steps
check_job_config = CheckJobConfig(
    role=sagemaker_role,
    instance_count=1,
    instance_type=clarify_instance_type,
    volume_size_in_gb=30,
    sagemaker_session=sess,
)

# Set up configuration of data to be used for model bias check
model_bias_data_config = sagemaker.clarify.DataConfig(
    # Fetch S3 location where processing step saved train data
    s3_data_input_path=process_step.properties.ProcessingOutputConfig.Outputs["train_data"].S3Output.S3Uri,
    s3_output_path=bias_report_output_uri,
    label=target_col,
    dataset_type="text/csv",
    s3_analysis_config_output_path=clarify_bias_config_output_uri
)

# Set up details of the trained model to be checked for bias
model_config = sagemaker.clarify.ModelConfig(
    # Pull model name from model creation step
    model_name=create_model_step.properties.ModelName,
    instance_count=train_instance_count,
    instance_type=train_instance_type
)

# Set up column and categories that are to be checked for bias
model_bias_config = sagemaker.clarify.BiasConfig(
    label_values_or_threshold=[0],
    facet_name="customer_gender_female",
    facet_values_or_threshold=[1]
)

# Set up model predictions configuration to get binary labels from probabilities
model_predictions_config = sagemaker.clarify.ModelPredictedLabelConfig(probability_threshold=0.5)

model_bias_check_config = ModelBiasCheckConfig(
    data_config=model_bias_data_config,
    data_bias_config=model_bias_config,
    model_config=model_config,
    model_predicted_label_config=model_predictions_config,
    methods=["DPPL"]
)

# Set up pipeline model bias check step
model_bias_check_step = ClarifyCheckStep(
    name="ModelBiasCheck",
    clarify_check_config=model_bias_check_config,
    check_job_config=check_job_config,
    skip_check=skip_check_model_bias_param,
    register_new_baseline=register_new_baseline_model_bias_param,
    supplied_baseline_constraints=supplied_baseline_constraints_model_bias_param
)다음 코드 블록을 복사하고 붙여 넣은 후 실행하여 모델 설명 가능성 확인을 설정합니다. 이 단계는 특성 중요도(입력 특성이 모델 예측에 미치는 영향)와 같은 인사이트를 제공합니다.
# Set configuration of data to be used for model explainability check
model_explainability_data_config = sagemaker.clarify.DataConfig(
    # Fetch S3 location where processing step saved train data
    s3_data_input_path=process_step.properties.ProcessingOutputConfig.Outputs["train_data"].S3Output.S3Uri,
    s3_output_path=explainability_report_output_uri,
    label=target_col,
    dataset_type="text/csv",
    s3_analysis_config_output_path=clarify_explainability_config_output_uri
)

# Set SHAP configuration for Clarify to compute global and local SHAP values for feature importance
shap_config = sagemaker.clarify.SHAPConfig(
    seed=42,
    num_samples=100,
    agg_method="mean_abs",
    save_local_shap_values=True
)

model_explainability_config = ModelExplainabilityCheckConfig(
    data_config=model_explainability_data_config,
    model_config=model_config,
    explainability_config=shap_config
)

# Set pipeline model explainability check step
model_explainability_step = ClarifyCheckStep(
    name="ModelExplainabilityCheck",
    clarify_check_config=model_explainability_config,
    check_job_config=check_job_config,
    skip_check=skip_check_model_explainability_param,
    register_new_baseline=register_new_baseline_model_explainability_param,
    supplied_baseline_constraints=supplied_baseline_constraints_model_explainability_param
)프로덕션 시스템에서는 훈련된 모든 모델이 배포되지는 않습니다. 일반적으로, 선택한 평가 지표의 임계값보다 높은 성능을 제공하는 모델만 배포됩니다. 이 단계에서는 수신기 조작 특성 - 곡선 영역(ROC-AUC) 지표를 사용하여 테스트 세트에서 모델의 점수를 계산하는 Python 스크립트를 구축합니다. 이 지표에 대한 모델의 성능은 후속 단계에서 모델을 등록하고 배포할지 여부를 결정하는 데 사용됩니다. 다음 코드를 복사하고 붙여 넣은 후 실행하여 테스트 데이터 세트를 수집하고 AUC 지표를 생성하는 평가 스크립트를 구축합니다.
%%writefile evaluate.py

import json
import logging
import pathlib
import pickle
import tarfile

import numpy as np
import pandas as pd
import xgboost as xgb

from sklearn.metrics import roc_auc_score

logger = logging.getLogger()
logger.setLevel(logging.INFO)
logger.addHandler(logging.StreamHandler())


if __name__ == "__main__":
    model_path = "/opt/ml/processing/model/model.tar.gz"
    with tarfile.open(model_path) as tar:
        tar.extractall(path=".")

    logger.debug("Loading xgboost model.")
    # The name of the file should match how the model was saved in the training script
    model = pickle.load(open("xgboost-model", "rb"))

    logger.debug("Reading test data.")
    test_local_path = "/opt/ml/processing/test/test.csv"
    df_test = pd.read_csv(test_local_path)

    # Extract test set target column
    y_test = df_test.iloc[:, 0].values

    cols_when_train = model.feature_names
    # Extract test set feature columns
    X = df_test[cols_when_train].copy()
    X_test = xgb.DMatrix(X)

    logger.info("Generating predictions for test data.")
    pred = model.predict(X_test)

    # Calculate model evaluation score
    logger.debug("Calculating ROC-AUC score.")
    auc = roc_auc_score(y_test, pred)
    metric_dict = {
        "classification_metrics": {"roc_auc": {"value": auc}}
    }

    # Save model evaluation metrics
    output_dir = "/opt/ml/processing/evaluation"
    pathlib.Path(output_dir).mkdir(parents=True, exist_ok=True)

    logger.info("Writing evaluation report with ROC-AUC: %f", auc)
    evaluation_path = f"{output_dir}/evaluation.json"
    with open(evaluation_path, "w") as f:
f.write(json.dumps(metric_dict))다음 코드 블록을 복사하고 붙여 넣은 후 실행하여 프로세서 및 SageMaker Pipelines 단계를 인스턴스화하고 평가 스크립트를 실행합니다. 사용자 지정 스크립트를 처리하려면 ScriptProcessor를 사용합니다. SageMaker Pipelines ProcessingStep 함수는 프로세서, 테스트 데이터 세트의 S3 입력 위치, 모델 아티팩트 및 평가 결과를 저장할 출력 위치를 인수로 사용합니다. property_files 인수도 제공됩니다. 속성 파일은 처리 단계의 출력에서 나온 정보를 저장하는 데 사용됩니다. 이 예에서는 모델 성능 지표가 포함된 json 파일이 여기에 해당합니다. 자습서의 후반부에서 나오듯이 속성 파일은 조건부 단계를 실행할 시기를 결정하는 데 특히 유용합니다.
# Upload model evaluation script to S3
s3_client.upload_file(
    Filename="evaluate.py", Bucket=write_bucket, Key=f"{write_prefix}/scripts/evaluate.py"
)

eval_processor = ScriptProcessor(
    image_uri=training_image,
    command=["python3"],
    instance_type=predictor_instance_type,
    instance_count=predictor_instance_count,
    base_job_name=f"{base_job_name_prefix}-model-eval",
    sagemaker_session=sess,
    role=sagemaker_role,
)
evaluation_report = PropertyFile(
    name="FraudDetEvaluationReport",
    output_name="evaluation",
    path="evaluation.json",
)

# Set model evaluation step
evaluation_step = ProcessingStep(
    name="XGBModelEvaluate",
    processor=eval_processor,
    inputs=[
        ProcessingInput(
            # Fetch S3 location where train step saved model artifacts
            source=train_step.properties.ModelArtifacts.S3ModelArtifacts,
            destination="/opt/ml/processing/model",
        ),
        ProcessingInput(
            # Fetch S3 location where processing step saved test data
            source=process_step.properties.ProcessingOutputConfig.Outputs["test_data"].S3Output.S3Uri,
            destination="/opt/ml/processing/test",
        ),
    ],
    outputs=[
        ProcessingOutput(destination=f"{model_eval_output_uri}", output_name="evaluation", source="/opt/ml/processing/evaluation"),
    ],
    code=f"s3://{write_bucket}/{write_prefix}/scripts/evaluate.py",
    property_files=[evaluation_report],
)SageMaker Model Registry를 사용하면 모델을 카탈로그로 만들고 모델 버전을 관리하며 모델을 선택적으로 프로덕션에 배포할 수 있습니다. 다음 코드 블록을 복사하고 붙여 넣은 후 실행하여 모델 등록 단계를 설정합니다. model_metrics와 drift_check_baselines라는 2개의 파라미터에는 이 자습서에서 ClarifyCheckStep 함수를 통해 이전에 계산한 기준 지표가 포함됩니다. 자체 사용자 지정 기준 지표를 제공해도 됩니다. 이 두 파라미터는 모델에 연결된 기준을 구성하여 드리프트 확인 및 모델 모니터링 작업에 사용할 수 있도록 하기 위한 것입니다. 파이프라인이 실행될 때마다 새로 계산된 기준으로 이 파라미터를 업데이트하도록 선택할 수 있습니다.
# Fetch baseline constraints to record in model registry
model_metrics = ModelMetrics(
    bias_post_training=MetricsSource(
        s3_uri=model_bias_check_step.properties.CalculatedBaselineConstraints,
        content_type="application/json"
    ),
    explainability=MetricsSource(
        s3_uri=model_explainability_step.properties.CalculatedBaselineConstraints,
        content_type="application/json"
    ),
)

# Fetch baselines to record in model registry for drift check
drift_check_baselines = DriftCheckBaselines(
    bias_post_training_constraints=MetricsSource(
        s3_uri=model_bias_check_step.properties.BaselineUsedForDriftCheckConstraints,
        content_type="application/json",
    ),
    explainability_constraints=MetricsSource(
        s3_uri=model_explainability_step.properties.BaselineUsedForDriftCheckConstraints,
        content_type="application/json",
    ),
    explainability_config_file=FileSource(
        s3_uri=model_explainability_config.monitoring_analysis_config_uri,
        content_type="application/json",
    ),
)

# Define register model step
register_step = RegisterModel(
    name="XGBRegisterModel",
    estimator=xgb_estimator,
    # Fetching S3 location where train step saved model artifacts
    model_data=train_step.properties.ModelArtifacts.S3ModelArtifacts,
    content_types=["text/csv"],
    response_types=["text/csv"],
    inference_instances=[predictor_instance_type],
    transform_instances=[predictor_instance_type],
    model_package_group_name=model_package_group_name,
    approval_status=model_approval_status_param,
    # Registering baselines metrics that can be used for model monitoring
    model_metrics=model_metrics,
    drift_check_baselines=drift_check_baselines
)Amazon SageMaker에서는 추론을 위해 등록된 모델을 배포할 때 다양한 방법을 사용할 수 있습니다. 이 단계에서는 LambdaStep 함수를 사용하여 모델을 배포합니다. 일반적으로는 CI/CD 모범 사례를 따르는 강력한 모델 배포를 위해 SageMaker Projects를 사용하지만 낮은 트래픽 볼륨을 처리하는 개발, 테스트 및 내부 엔드포인트에 경량 모델을 배포하려는 경우 상황에 따라 LambdaStep을 사용하는 것이 더 적절할 수 있습니다. LambdaStep 함수는 AWS Lambda와 기본적으로 통합되므로 서버를 프로비저닝하거나 관리하지 않고도 파이프라인에 사용자 지정 로직을 구현할 수 있습니다. SageMaker Pipelines의 컨텍스트에서 LambdaStep을 사용하면 AWS Lambda 함수를 파이프라인에 추가하여 임의의 컴퓨팅 작업, 특히 기간이 짧은 경량 작업을 지원할 수 있습니다. SageMaker Pipelines LambdaStep에서 Lambda 함수의 최대 런타임은 10분으로 제한되며 수정 가능한 기본 시간 초과는 2분입니다.
LambdaStep을 파이프라인에 추가하는 방법은 2가지입니다. 첫 번째 방법은 AWS Cloud Development Kit(AWS CDK), AWS Management Console 또는 다른 방법으로 생성한 기존 Lambda 함수의 ARN을 제공하는 것입니다. 두 번째 방법은 고급 SageMaker Python SDK의 Lambda 헬퍼 convenience 클래스를 사용하여 파이프라인을 정의하는 다른 코드와 함께 새 Lambda 함수를 생성하는 것입니다. 이 자습서에서는 두 번째 방법을 사용합니다. 다음 코드를 복사하고 붙여 넣은 후 실행하여 Lambda 핸들러 함수를 정의합니다. 이 사용자 지정 Python 스크립트는 모델 이름과 같은 모델 속성을 가져와서 실시간 엔드포인트에 배포합니다.
%%writefile lambda_deployer.py

"""
Lambda function creates an endpoint configuration and deploys a model to real-time endpoint.
Required parameters for deployment are retrieved from the event object
"""

import json
import boto3


def lambda_handler(event, context):
    sm_client = boto3.client("sagemaker")

    # Details of the model created in the Pipeline CreateModelStep
    model_name = event["model_name"]
    model_package_arn = event["model_package_arn"]
    endpoint_config_name = event["endpoint_config_name"]
    endpoint_name = event["endpoint_name"]
    role = event["role"]
    instance_type = event["instance_type"]
    instance_count = event["instance_count"]
    primary_container = {"ModelPackageName": model_package_arn}

    # Create model
    model = sm_client.create_model(
        ModelName=model_name,
        PrimaryContainer=primary_container,
        ExecutionRoleArn=role
    )

    # Create endpoint configuration
    create_endpoint_config_response = sm_client.create_endpoint_config(
        EndpointConfigName=endpoint_config_name,
        ProductionVariants=[
        {
            "VariantName": "Alltraffic",
            "ModelName": model_name,
            "InitialInstanceCount": instance_count,
            "InstanceType": instance_type,
            "InitialVariantWeight": 1
        }
        ]
    )

    # Create endpoint
    create_endpoint_response = sm_client.create_endpoint(
        EndpointName=endpoint_name,
        EndpointConfigName=endpoint_config_name
)다음 코드 블록을 복사하고 붙여 넣은 후 실행하여 LambdaStep을 생성합니다. 모델, 엔드포인트 이름 및 배포 인스턴스 유형과 개수와 같은 모든 파라미터는 inputs 인수를 사용하여 제공됩니다.
# The function name must contain sagemaker
function_name = "sagemaker-fraud-det-demo-lambda-step"
# Define Lambda helper class can be used to create the Lambda function required in the Lambda step
func = Lambda(
    function_name=function_name,
    execution_role_arn=sagemaker_role,
    script="lambda_deployer.py",
    handler="lambda_deployer.lambda_handler",
    timeout=600,
    memory_size=10240,
)

# The inputs used in the lambda handler are passed through the inputs argument in the
# LambdaStep and retrieved via the `event` object within the `lambda_handler` function

lambda_deploy_step = LambdaStep(
    name="LambdaStepRealTimeDeploy",
    lambda_func=func,
    inputs={
        "model_name": pipeline_model_name,
        "endpoint_config_name": endpoint_config_name,
        "endpoint_name": endpoint_name,
        "model_package_arn": register_step.steps[0].properties.ModelPackageArn,
        "role": sagemaker_role,
        "instance_type": deploy_instance_type_param,
        "instance_count": deploy_instance_count_param
    }
)이 단계에서는 ConditionStep을 사용하여 곡선 영역(AUC) 지표를 기준으로 현재 모델의 성능을 비교합니다. 파이프라인은 성능이 임계값 AUC(여기에서는 0.7 선택)보다 크거나 같은 경우에만 성능 바이어스 및 설명 가능성 확인을 수행하고 모델을 등록하며 배포합니다. 이 단계와 같은 조건부 단계는 최상의 모델을 선택적으로 프로덕션에 배포하는 데 도움이 됩니다. 다음 코드를 복사하고 붙여 넣은 후 실행하여 조건부 단계를 정의합니다.
# Evaluate model performance on test set
cond_gte = ConditionGreaterThanOrEqualTo(
    left=JsonGet(
        step_name=evaluation_step.name,
        property_file=evaluation_report,
        json_path="classification_metrics.roc_auc.value",
    ),
    right=0.7, # Threshold to compare model performance against
)
condition_step = ConditionStep(
    name="CheckFraudDetXGBEvaluation",
    conditions=[cond_gte],
    if_steps=[create_model_step, model_bias_check_step, model_explainability_step, register_step, lambda_deploy_step],
    else_steps=[]
)4단계: 파이프라인 구축 및 실행
모든 구성 요소 단계를 정의한 후에는 SageMaker Pipelines 객체로 어셈블링할 수 있습니다. SageMaker Pipelines는 단계 간 종속성을 바탕으로 실행 순서를 자동으로 유추하므로 실행 순서를 따로 지정할 필요가 없습니다.
다음 코드를 복사하고 붙여 넣은 후 실행하여 파이프라인을 설정합니다. 파이프라인 정의에는 2단계에서 정의된 모든 파라미터와 구성 요소 단계 목록이 사용됩니다. 모델, 바이어스 및 설명 가능성 확인 생성, 모델 등록, lambda 배포와 같은 단계는 파이프라인 정의에 나열되지 않는데, 이러한 단계는 조건부 단계가 true로 평가되어야 실행되기 때문입니다. 조건부 단계가 true인 경우 후속 단계는 지정된 입력 및 출력에 따른 순서로 실행됩니다.
# Create the Pipeline with all component steps and parameters
pipeline = Pipeline(
    name=pipeline_name,
    parameters=[process_instance_type_param,
                train_instance_type_param,
                train_instance_count_param,
                deploy_instance_type_param,
                deploy_instance_count_param,
                clarify_instance_type_param,
                skip_check_model_bias_param,
                register_new_baseline_model_bias_param,
                supplied_baseline_constraints_model_bias_param,
                skip_check_model_explainability_param,
                register_new_baseline_model_explainability_param,
                supplied_baseline_constraints_model_explainability_param,
                model_approval_status_param],
    steps=[
        process_step,
        train_step,
        evaluation_step,
        condition_step
    ],
    sagemaker_session=sess

)다음 코드를 복사하고 노트북 셀에 붙여 넣은 후 실행합니다. 파이프라인이 이미 있는 경우 이 코드는 파이프라인을 업데이트합니다. 파이프라인이 없는 경우 새 파이프라인이 생성됩니다. 다음과 같은 SageMaker SDK 경고는 무시해도 됩니다. "이 추정기에 연결된 훈련 작업 중에 완료된 작업을 찾을 수 없습니다(No finished training job found associated with this estimator). 이 추정기가 워크플로 구성을 작성하는 데만 사용되는지 확인하세요(Please make sure this estimator is only used for building workflow config)."
# Create a new or update existing Pipeline
pipeline.upsert(role_arn=sagemaker_role)

# Full Pipeline description
pipeline_definition = json.loads(pipeline.describe()['PipelineDefinition'])
pipeline_definitionSageMaker는 각 노드가 단계를 나타내고 노드 간 연결이 종속성을 나타내는 방향성 비사이클 그래프(DAG)로 파이프라인을 인코딩합니다. SageMaker Studio 인터페이스에서 파이프라인 DAG를 검사하려면 왼쪽 패널에서 SageMaker 리소스(SageMaker Resources) 탭을 선택하고 드롭다운 목록에서 파이프라인(Pipelines)을 선택한 다음 FraudDetectXGBPipeline, 그래프(Graph)를 차례로 선택합니다. 생성한 파이프라인 단계가 그래프에서 노드로 표현되고 단계 정의에서 제공한 입력 및 출력에 따라 SageMaker가 노드 간 연결을 유추한 것을 볼 수 있습니다.

다음 코드 문을 실행하여 파이프라인을 실행합니다. 파이프라인 실행 파라미터는 이 단계에서 인수로 제공됩니다. 왼쪽 패널에서 SageMaker 리소스(SageMaker Resources) 탭으로 이동하고 드롭다운 목록에서 파이프라인(Pipelines)을 선택한 다음 FraudDetectXGBPipeline, 실행(Executions)을 차례로 선택합니다. 파이프라인의 현재 실행이 나열됩니다.
# Execute Pipeline
start_response = pipeline.start(parameters=dict(
        SkipModelBiasCheck=True,
        RegisterNewModelBiasBaseline=True,
        SkipModelExplainabilityCheck=True,
        RegisterNewModelExplainabilityBaseline=True)
                               )
파이프라인 실행을 검토하려면 상태(Status) 탭을 선택합니다. 모든 단계가 성공적으로 실행되면 그래프의 노드가 녹색으로 바뀝니다.

SageMaker Studio 인터페이스의 왼쪽 패널에서 SageMaker 리소스(SageMaker Resources) 탭을 선택하고 드롭다운 목록에서 모델 레지스트리(Model registry)를 선택합니다. 왼쪽 창의 모델 그룹 이름(Model group name)에 등록된 모델이 나열됩니다. 모델 그룹 이름을 선택하여 모델 버전 목록을 표시합니다. 모델 버전이 평가에 대한 조건부 임계값을 충족하면 파이프라인을 실행할 때마다 새 모델 버전이 레지스트리에 추가됩니다. 모델 버전을 선택하여 모델 엔드포인트 및 모델 설명 가능성 보고서와 같은 세부 정보를 봅니다.

5단계: 엔드포인트를 호출하여 파이프라인 테스트
이 자습서에서 모델은 선택한 임계값인 0.7 AUC보다 높은 점수를 달성합니다. 따라서 조건부 단계에 따라 모델이 등록되고 실시간 추론 엔드포인트에 배포됩니다.
SageMaker Studio 인터페이스의 왼쪽 패널에서 SageMaker 리소스(SageMaker Resources) 탭을 선택하고 엔드포인트(Endpoints)를 선택한 후 fraud-detect-xgb-pipeline-endpoint의 상태가 InService로 바뀔 때까지 기다립니다.

엔드포인트 상태(Endpoint status)가 InService로 바뀌면 다음 코드를 복사하고 붙여 넣은 후 실행하여 엔드포인트를 호출하고 샘플 추론을 실행합니다. 이 코드는 테스트 데이터 세트에서 처음 5개 샘플의 모델 예측을 반환합니다.
# Fetch test data to run predictions with the endpoint
test_df = pd.read_csv(f"{processing_output_uri}/test_data/test.csv")

# Create SageMaker Predictor from the deployed endpoint
predictor = sagemaker.predictor.Predictor(endpoint_name,
                                          sagemaker_session=sess,
                                          serializer=CSVSerializer(),
                                          deserializer=CSVDeserializer()
                                         )
# Test endpoint with payload of 5 samples
payload = test_df.drop(["fraud"], axis=1).iloc[:5]
result = predictor.predict(payload.values)
prediction_df = pd.DataFrame()
prediction_df["Prediction"] = result
prediction_df["Label"] = test_df["fraud"].iloc[:5].values
prediction_df6단계: 리소스 정리
사용하지 않는 리소스를 삭제하여 의도하지 않은 비용이 부과되지 않도록 하는 것이 모범 사례입니다.
다음 코드 블록을 복사하고 붙여 넣어 이 자습서에서 생성한 Lambda 함수, 모델, 엔드포인트 구성, 엔드포인트 및 파이프라인을 삭제합니다.
# Delete the Lambda function
func.delete()

# Delete the endpoint
sm_client.delete_endpoint(EndpointName=endpoint_name)

# Delete the EndpointConfig
sm_client.delete_endpoint_config(EndpointConfigName=endpoint_config_name)

# Delete the model
sm_client.delete_model(ModelName=pipeline_model_name)

# Delete the pipeline
sm_client.delete_pipeline(PipelineName=pipeline_name)S3 버킷을 삭제하려면 다음을 수행합니다.
- Amazon S3 콘솔을 엽니다. 탐색 모음에서 버킷(Buckets), sagemaker-<your-Region>-<your-account-id>,를 선택한 다음 fraud-detect-demo 옆의 확인란을 선택합니다. 그런 다음 삭제(Delete)를 선택합니다.
- 객체 삭제(Delete objects) 대화 상자에서 삭제할 객체를 올바르게 선택했는지 확인하고 이 객체를 영구적으로 삭제(Permanently delete objects) 확인 입력란에 영구 삭제(permanently delete)를 입력합니다.
- 완료되면 버킷이 비워지고 동일한 절차를 다시 사용하여sagemaker-<your-Region>-<your-account-id> 버킷을 삭제할 수 있습니다.

이 자습서에서 노트북 이미지를 실행하는 데 사용된 데이터 과학(Data Science) 커널은 커널을 중지하거나 다음 단계를 수행하여 앱을 삭제할 때까지 변경 사항을 누적합니다. 자세한 내용은 Amazon SageMaker 개발자 안내서에서 리소스 종료를 참조하세요.
SageMaker Studio 앱을 삭제하려면 다음을 수행합니다. SageMaker Studio 콘솔에서 studio-user를 선택한 다음 앱 삭제(Delete app)를 선택하여 앱(Apps)에 나열된 모든 앱을 삭제합니다. 상태(Status)가 삭제됨(Deleted)으로 변경될 때까지 기다립니다.

1단계에서 기존 SageMaker Studio 도메인을 사용한 경우 6단계로 건너뛰고 결론 섹션으로 바로 진행합니다.
1단계에서 CloudFormation 템플릿을 실행하여 새 SageMaker Studio 도메인을 생성한 경우 다음 단계를 계속 진행하여 CloudFormation 템플릿으로 생성된 도메인, 사용자 및 리소스를 삭제합니다.
CloudFormation 콘솔을 열려면 AWS Console 검색 창에 CloudFormation을 입력하고 검색 결과에서 CloudFormation을 선택합니다.

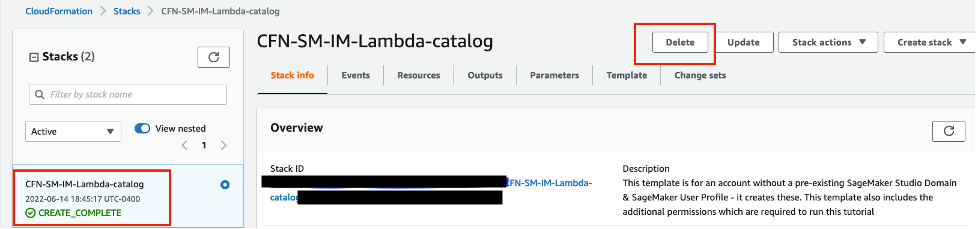
CloudFormation 창에서 스택(Stacks)을 선택합니다. 상태 드롭다운 목록에서 활성(Active)을 선택합니다. 스택 이름(Stack name) 아래에서 CFN-SM-IM-Lambda-catalog를 선택하여 스택 세부 정보 페이지를 엽니다.

CFN-SM-IM-Lambda-catalog 스택 세부 정보 페이지에서 삭제(Delete)를 선택하여 스택과 함께 1단계에서 생성된 리소스를 삭제합니다.
결론
축하합니다! 기계 학습 워크플로 자동화 자습서를 완료하셨습니다.
Amazon SageMaker Pipelines를 사용하여 데이터 처리를 시작으로 모델 훈련, 모델 평가, 바이어스 및 설명 가능성 확인, 조건부 모델 등록과 배포에 이르는 엔드 투 엔드 ML 워크플로를 자동화했습니다. 마지막으로, SageMaker SDK를 사용하여 모델을 실시간 추론 엔드포인트에 배포하고 샘플 페이로드를 통해 테스트했습니다.
아래의 다음 단계 섹션에 따라 Amazon SageMaker를 통한 기계 학습 여정을 계속할 수 있습니다.