Train and tune a deep learning model at scale
with Amazon SageMaker
In this tutorial, you learn how to use Amazon SageMaker to build, train, and tune a TensorFlow deep learning model.
Amazon SageMaker is a fully managed service that provides machine learning (ML) developers and data scientists with the ability to build, train, and deploy ML models quickly. Amazon SageMaker provides you with everything you need to train and tune models at scale without the need to manage infrastructure. You can use Amazon SageMaker Studio, the first integrated development environment (IDE) for machine learning, to quickly visualize experiments and track training progress without ever leaving the familiar Jupyter Notebook interface. Within Amazon SageMaker Studio, you can use Amazon SageMaker Experiments to track, evaluate, and organize experiments easily.
In this tutorial, you learn how to:
- Set up Amazon SageMaker Studio
- Download a public dataset using an Amazon SageMaker Studio Notebook and upload it to Amazon S3
- Create an Amazon SageMaker Experiment to track and manage training jobs
- Run a TensorFlow training job on a fully managed GPU instance using one-click training with Amazon SageMaker
- Improve accuracy by running a large-scale Amazon SageMaker Automatic Model Tuning job to find the best model hyperparameters
- Visualize training results
You’ll be using the CIFAR-10 dataset to train a model in TensorFlow to classify images into 10 classes. This dataset consists of 60,000 32x32 color images, split into 40,000 images for training, 10,000 images for validation and 10,000 images for testing.
| About this Tutorial | |
|---|---|
| Time | 1 hour |
| Cost | Approx. $100 |
| Use Case | Machine Learning |
| Products | Amazon SageMaker |
| Audience | Developer |
| Level | Intermediate |
| Last Updated | July 1, 2021 |
Step 1. Create an AWS Account
The cost of this tutorial is approximately $100.
Already have an account? Sign-in
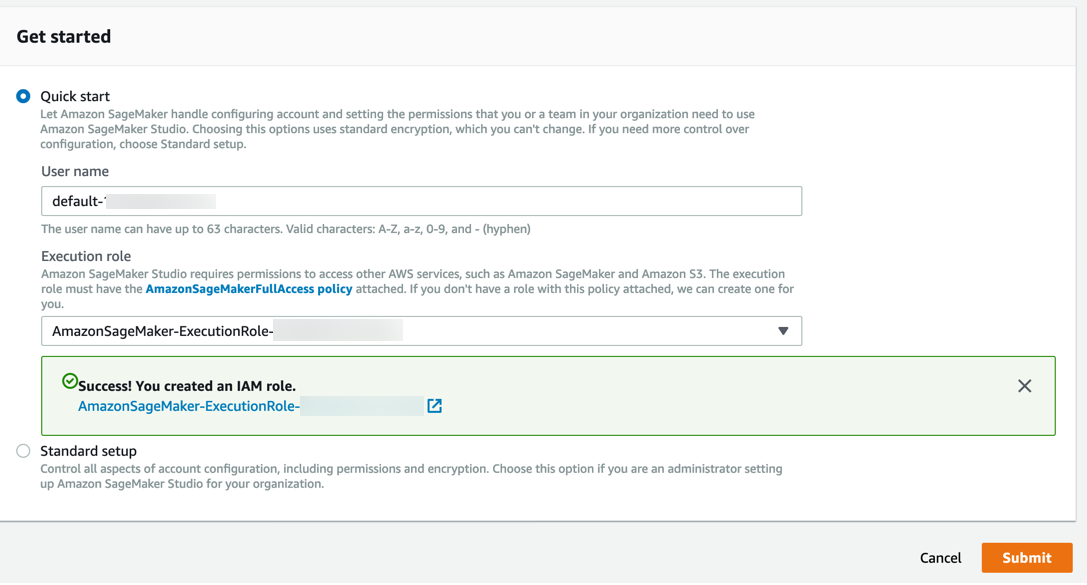
Step 2. Set up Amazon SageMaker Studio
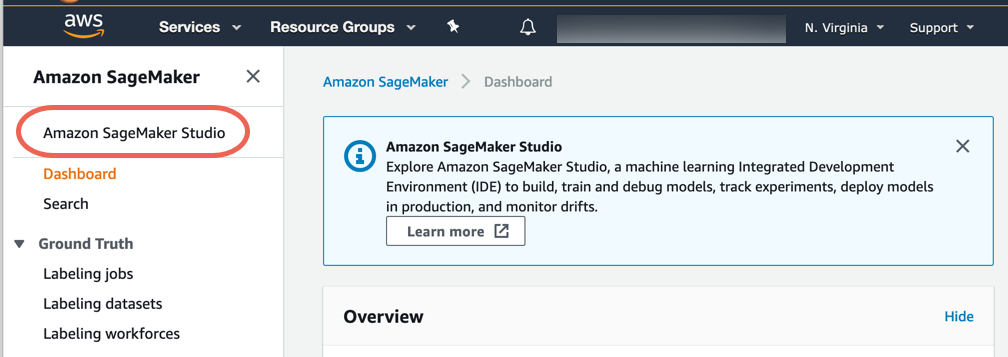
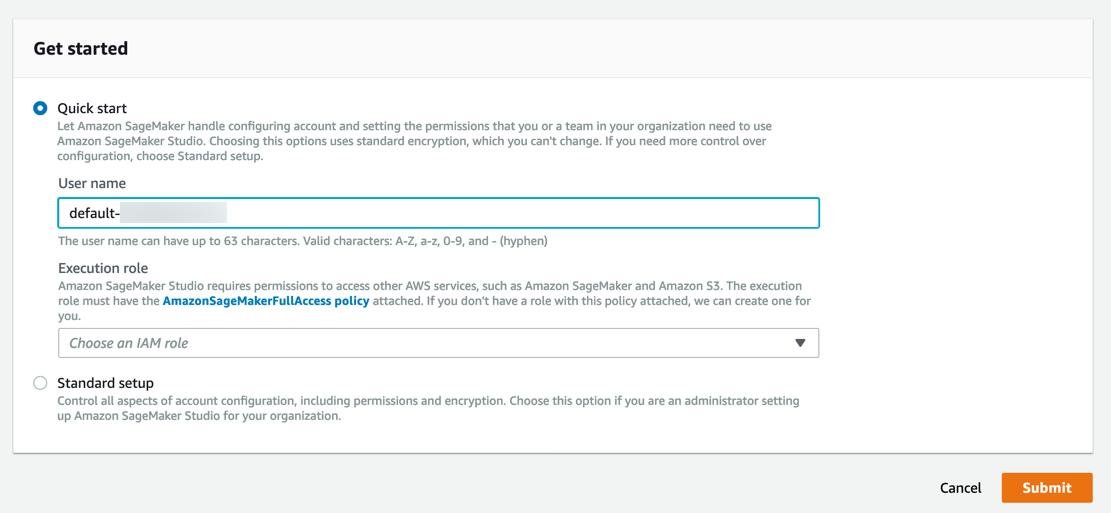
Complete the following steps to onboard to Amazon SageMaker Studio and set up your Amazon SageMaker Studio Control Panel.
Note: For more information, see Get Started with Amazon SageMaker Studio in the Amazon SageMaker documentation.
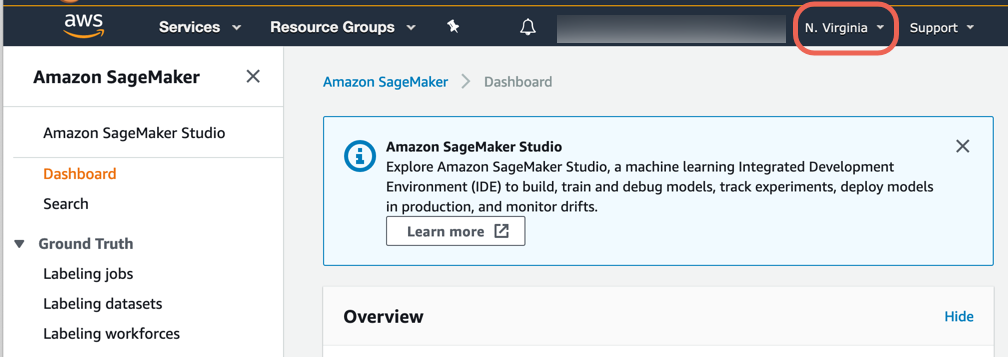
a. Sign in to the Amazon SageMaker console.
Note: In the top right corner, make sure to select an AWS Region where SageMaker Studio is available. For a list of Regions, see Onboard to Amazon SageMaker Studio.
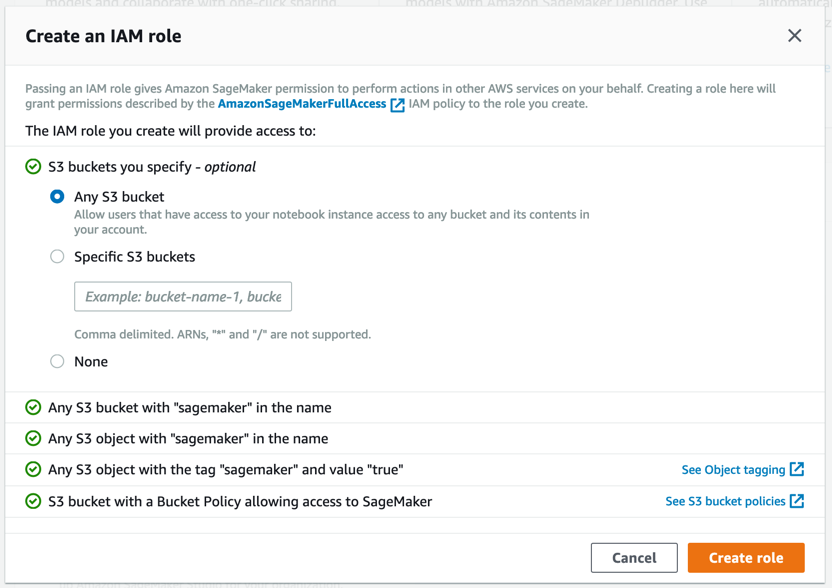
Amazon SageMaker creates a role with the required permissions and assigns it to your instance.
Step 3. Download the dataset
Amazon SageMaker Studio notebooks are one-click Jupyter notebooks that contain everything you need to build and test your training scripts. SageMaker Studio also includes experiment tracking and visualization so that it’s easy to manage your entire machine learning workflow in one place.
Complete the following steps to create a SageMaker Notebook, download the dataset, convert the dataset into TensorFlow supported TFRecord format, and then upload the dataset to Amazon S3.
Note: For more information, see Use Amazon SageMaker Studio Notebooks in the Amazon SageMaker documentation.
https://github.com/aws/amazon-sagemaker-examples/blob/master/advanced_functionality/tensorflow_bring_your_own/utils/generate_cifar10_tfrecords.py!pip install ipywidgets
!python generate_cifar10_tfrecords.py --data-dir cifar10
import time, os, sys
import sagemaker, boto3
import numpy as np
import pandas as pd

sess = boto3.Session()
sm   = sess.client('sagemaker')
role = sagemaker.get_execution_role()
sagemaker_session = sagemaker.Session(boto_session=sess)

datasets = sagemaker_session.upload_data(path='cifar10', key_prefix='datasets/cifar10-dataset')
datasets
Step 4. Create an Amazon SageMaker Experiment
Now that you have downloaded and staged your dataset in Amazon S3, you can create an Amazon SageMaker Experiment. An experiment is a collection of processing and training jobs related to the same machine learning project. Amazon SageMaker Experiments automatically manages and tracks your training runs for you.
Complete the following steps to create a new experiment.
Note: For more information, see Experiments in the Amazon SageMaker documentation.
from smexperiments.experiment import Experiment
from smexperiments.trial import Trial
from smexperiments.trial_component import TrialComponent

training_experiment = Experiment.create(
                                experiment_name = "sagemaker-training-experiments",
                                description     = "Experiment to track cifar10 training trials",
                                sagemaker_boto_client=sm)
Step 5. Create the trial and training script
To train a classifier on the CIFAR-10 dataset, you need a training script. In this step, you create your trial and training script for the TensorFlow training job. Each trial is an iteration of your end-to-end training job. In addition to the training job, the trial can also track preprocessing, post processing jobs as well as datasets and other metadata. A single experiment can include multiple trials which makes it easy for you to track multiple iterations over time within the Amazon SageMaker Studio Experiments pane.
Complete the following steps to create a new trial and training script for the TensorFlow training job.
Note: For more information, see Use TensorFlow with Amazon SageMaker in the Amazon SageMaker documentation.
single_gpu_trial = Trial.create(
    trial_name = 'sagemaker-single-gpu-training',
    experiment_name = training_experiment.experiment_name,
    sagemaker_boto_client = sm,
)

trial_comp_name = 'single-gpu-training-job'
experiment_config = {"ExperimentName": training_experiment.experiment_name,
                       "TrialName": single_gpu_trial.trial_name,
                       "TrialComponentDisplayName": trial_comp_name}
Each trial is an iteration of your end-to-end training job. In addition to the training job, a trial can also track preprocessing jobs, postprocessing jobs, datasets, and other metadata. A single experiment can include multiple trials which makes it easy for you to track multiple iterations over time within the Amazon SageMaker Studio Experiments pane.
import tensorflow as tf
from tensorflow import keras
from tensorflow.keras.callbacks import ModelCheckpoint
from tensorflow.keras.layers import Input, Dense, Flatten
from tensorflow.keras.models import Model, load_model
from tensorflow.keras.optimizers import Adam, SGD
import argparse
import os
import re
import time

HEIGHT = 32
WIDTH = 32
DEPTH = 3
NUM_CLASSES = 10

def single_example_parser(serialized_example):
    """Parses a single tf.Example into image and label tensors."""
    # Dimensions of the images in the CIFAR-10 dataset.
    # See http://www.cs.toronto.edu/~kriz/cifar.html for a description of the
    # input format.
    features = tf.io.parse_single_example(
        serialized_example,
        features={
            'image': tf.io.FixedLenFeature([], tf.string),
            'label': tf.io.FixedLenFeature([], tf.int64),
        })
    image = tf.decode_raw(features['image'], tf.uint8)
    image.set_shape([DEPTH * HEIGHT * WIDTH])

    # Reshape from [depth * height * width] to [depth, height, width].
    image = tf.cast(
        tf.transpose(tf.reshape(image, [DEPTH, HEIGHT, WIDTH]), [1, 2, 0]),
        tf.float32)
    label = tf.cast(features['label'], tf.int32)

    image = train_preprocess_fn(image)
    label = tf.one_hot(label, NUM_CLASSES)

    return image, label

def train_preprocess_fn(image):

    # Resize the image to add four extra pixels on each side.
    image = tf.image.resize_with_crop_or_pad(image, HEIGHT + 8, WIDTH + 8)

    # Randomly crop a [HEIGHT, WIDTH] section of the image.
    image = tf.image.random_crop(image, [HEIGHT, WIDTH, DEPTH])

    # Randomly flip the image horizontally.
    image = tf.image.random_flip_left_right(image)
    return image

def get_dataset(filenames, batch_size):
    """Read the images and labels from 'filenames'."""
    # Repeat infinitely.
    dataset = tf.data.TFRecordDataset(filenames).repeat().shuffle(10000)

    # Parse records.
    dataset = dataset.map(single_example_parser, num_parallel_calls=tf.data.experimental.AUTOTUNE)

    # Batch it up.
    dataset = dataset.batch(batch_size, drop_remainder=True)
    return dataset

def get_model(input_shape, learning_rate, weight_decay, optimizer, momentum):
    input_tensor = Input(shape=input_shape)
    base_model = keras.applications.resnet50.ResNet50(include_top=False,
                                                          weights='imagenet',
                                                          input_tensor=input_tensor,
                                                          input_shape=input_shape,
                                                          classes=None)
    x = Flatten()(base_model.output)
    predictions = Dense(NUM_CLASSES, activation='softmax')(x)
    model = Model(inputs=base_model.input, outputs=predictions)
    return model

def main(args):
    # Hyper-parameters
    epochs       = args.epochs
    lr           = args.learning_rate
    batch_size   = args.batch_size
    momentum     = args.momentum
    weight_decay = args.weight_decay
    optimizer    = args.optimizer

    # SageMaker options
    training_dir   = args.training
    validation_dir = args.validation
    eval_dir       = args.eval

    train_dataset = get_dataset(training_dir+'/train.tfrecords',  batch_size)
    val_dataset   = get_dataset(validation_dir+'/validation.tfrecords', batch_size)
    eval_dataset  = get_dataset(eval_dir+'/eval.tfrecords', batch_size)

    input_shape = (HEIGHT, WIDTH, DEPTH)
    model = get_model(input_shape, lr, weight_decay, optimizer, momentum)

    # Optimizer
    if optimizer.lower() == 'sgd':
        opt = SGD(lr=lr, decay=weight_decay, momentum=momentum)
    else:
        opt = Adam(lr=lr, decay=weight_decay)

    # Compile model
    model.compile(optimizer=opt,
                  loss='categorical_crossentropy',
                  metrics=['accuracy'])

    # Train model
    history = model.fit(train_dataset, steps_per_epoch=40000 // batch_size,
                        validation_data=val_dataset,
                        validation_steps=10000 // batch_size,
                        epochs=epochs)


    # Evaluate model performance
    score = model.evaluate(eval_dataset, steps=10000 // batch_size, verbose=1)
    print('Test loss    :', score[0])
    print('Test accuracy:', score[1])

    # Save model to model directory
    model.save(f'{os.environ["SM_MODEL_DIR"]}/{time.strftime("%m%d%H%M%S", time.gmtime())}', save_format='tf')


#%%
if __name__ == "__main__":

    parser = argparse.ArgumentParser()
    # Hyper-parameters
    parser.add_argument('--epochs',        type=int,   default=10)
    parser.add_argument('--learning-rate', type=float, default=0.01)
    parser.add_argument('--batch-size',    type=int,   default=128)
    parser.add_argument('--weight-decay',  type=float, default=2e-4)
    parser.add_argument('--momentum',      type=float, default='0.9')
    parser.add_argument('--optimizer',     type=str,   default='sgd')

    # SageMaker parameters
    parser.add_argument('--model_dir',        type=str)
    parser.add_argument('--training',         type=str,   default=os.environ['SM_CHANNEL_TRAINING'])
    parser.add_argument('--validation',       type=str,   default=os.environ['SM_CHANNEL_VALIDATION'])
    parser.add_argument('--eval',             type=str,   default=os.environ['SM_CHANNEL_EVAL'])

    args = parser.parse_args()
    main(args)
Step 6. Run the TensorFlow training job and visualize the results
In this step, you run a TensorFlow training job using Amazon SageMaker. Training models is easy with Amazon SageMaker. You specify the location of your dataset in Amazon S3 and type of training instance, and then Amazon SageMaker manages the training infrastructure for you.
Complete the following steps to run the TensorFlow training job and then visualize the results.
Note: For more information, see Use TensorFlow with Amazon SageMaker in the Amazon SageMaker documentation.
from sagemaker.tensorflow import TensorFlow

hyperparams={'epochs'       : 30,
             'learning-rate': 0.01,
             'batch-size'   : 256,
             'weight-decay' : 2e-4,
             'momentum'     : 0.9,
             'optimizer'    : 'adam'}

bucket_name = sagemaker_session.default_bucket()
output_path = f's3://{bucket_name}/jobs'
metric_definitions = [{'Name': 'val_acc', 'Regex': 'val_acc: ([0-9\\.]+)'}]

tf_estimator = TensorFlow(entry_point          = 'cifar10-training-sagemaker.py',
                          output_path          = f'{output_path}/',
                          code_location        = output_path,
                          role                 = role,
                          train_instance_count = 1,
                          train_instance_type  = 'ml.g4dn.xlarge',
                          framework_version    = '1.15.2',
                          py_version           = 'py3',
                          script_mode          = True,
                          metric_definitions   = metric_definitions,
                          sagemaker_session    = sagemaker_session,
                          hyperparameters      = hyperparams)

job_name=f'tensorflow-single-gpu-{time.strftime("%Y-%m-%d-%H-%M-%S", time.gmtime())}'
tf_estimator.fit({'training'  : datasets,
                  'validation': datasets,
                  'eval'      : datasets},
                 job_name = job_name,
                 experiment_config=experiment_config)
This code includes three parts:
- Specifies training job hyperparameters
- Calls an Amazon SageMaker Estimator function and provides training job details (name of the training script, what instance type to train on, framework version, etc.)
- Calls the fit function to initiate the training job
Amazon SageMaker automatically provisions the requested instances, downloads the dataset, pulls the TensorFlow container, downloads the training script, and starts training.
In this example, you submit an Amazon SageMaker training job to run on ml.g4dn.xlarge which is a GPU instance. Deep learning training is computationally intensive and GPU instances are recommended for getting results faster.
c. Visualize the results. Choose Charts then Add chart. In the Chart Properties pane, make the following selections:
- Chart type: Line
- X-axis dimension: Epoch
- Y-axis: val_acc_EVAL_avg
You should see a graph showing the change in evaluation accuracy as training progresses, ending with the final accuracy in Step 6a.
Step 7. Tune the model with Amazon SageMaker automatic model tuning
In this step you run an Amazon SageMaker automatic model tuning job to find the best hyperparameters and improve upon the training accuracy obtained in Step 6. To run a model tuning job, you need to provide Amazon SageMaker with hyperparameter ranges rather than fixed values, so that it can explore the hyperparameter space and automatically find the best values for you.
Complete the following steps to run the automatic model tuning job.
Note: For more information, see Perform Automatic Model Tuning in the Amazon SageMaker documentation.
Note: You can safely ignore any deprecation warnings (for example, sagemaker.deprecations:train_instance_type has been renamed...). This warnings are due to version changes and do not cause any training failures.
from sagemaker.tuner import IntegerParameter, CategoricalParameter, ContinuousParameter, HyperparameterTuner

hyperparameter_ranges = {
    'epochs'        : IntegerParameter(5, 30),
    'learning-rate' : ContinuousParameter(0.001, 0.1, scaling_type='Logarithmic'),
    'batch-size'    : CategoricalParameter(['128', '256', '512']),
    'momentum'      : ContinuousParameter(0.9, 0.99),
    'optimizer'     : CategoricalParameter(['sgd', 'adam'])
}

objective_metric_name = 'val_acc'
objective_type = 'Maximize'
metric_definitions = [{'Name': 'val_acc', 'Regex': 'val_acc: ([0-9\\.]+)'}]

tf_estimator = TensorFlow(entry_point          = 'cifar10-training-sagemaker.py',
                          output_path          = f'{output_path}/',
                          code_location        = output_path,
                          role                 = role,
                          train_instance_count = 1,
                          train_instance_type  = 'ml.g4dn.xlarge',
                          framework_version    = '1.15',
                          py_version           = 'py3',
                          script_mode          = True,
                          metric_definitions   = metric_definitions,
                          sagemaker_session    = sagemaker_session)

tuner = HyperparameterTuner(estimator             = tf_estimator,
                            objective_metric_name = objective_metric_name,
                            hyperparameter_ranges = hyperparameter_ranges,
                            metric_definitions    = metric_definitions,
                            max_jobs              = 16,
                            max_parallel_jobs     = 8,
                            objective_type        = objective_type)

job_name=f'tf-hpo-{time.strftime("%Y-%m-%d-%H-%M-%S", time.gmtime())}'
tuner.fit({'training'  : datasets,
           'validation': datasets,
           'eval'      : datasets},
            job_name = job_name)
This code includes four parts:
- Specifies range of values for hyperparameters. These could be integer ranges (eg. Epoch numbers), continuous ranges (eg. Learning rate), or categorical values (eg. Optimizer type sgd or adam).
- Calls an Estimator function similar to the one in Step 6
- Creates a HyperparameterTuner object with hyperparameter ranges, maximum number of jobs, and number of parallel jobs to run
- Calls the fit function to initiate hyperparameter tuning job
Note: You can reduce the max_jobs variable from 16 to a smaller number to save tuning job costs. However, by reducing the number of tuning jobs, you reduce the chances of finding a better model. You can also reduce the max_parallel_jobs variable to a number less than or equal to max_jobs. You can get results faster when max_parallel_jobs is equal to max_jobs. Make sure that max_parallel_jobs is lower than the instance limits of your AWS account to avoid running into resource errors.
Step 8. Clean up
In this step, you terminate the resources you used in this lab.
Important: Terminating resources that are not actively being used reduces costs and is a best practice. Not terminating your resources will result in charges to your account.
Stop training jobs:
- Open the Amazon SageMaker Console.
- In the left navigation pane under Training, choose Training Jobs.
- Confirm that there are no training jobs that have a status of In Progress. For any in progress training jobs, you can either wait for the job to finish training, or select the training job name and choose Stop.
(Optional) Clean up all training artifacts: If you want to clean up all training artifacts (models, preprocessed data sets, etc.), in your Jupyter notebook, copy and paste the following code and choose Run.
Note: Make sure to replace ACCOUNT_NUMBER with your account number.
!aws s3 rm --recursive s3://sagemaker-us-west-2-ACCOUNT_NUMBER/datasets/cifar10-dataset
!aws s3 rm --recursive s3://sagemaker-us-west-2-ACCOUNT_NUMBER/jobsConclusion
