AWS Marketplace
How to automate Personal Protective Equipment monitoring for healthcare and life science workplaces
By guest authors Anton Chudaev, DevOps Competence Manager at VITech, Yevheniia Minaieva, Product marketing lead at VITech Lab, and Dmitry Spodarets, Head of VITech Lab
When managing Personal Protective Equipment (PPЕ) compliance, temporary absence of safety engineers and human fatigue can lead to unnoticed safety rule breaches. VITech Lab offers a solution to help healthcare and life sciences industry customers automate PPE detection and temperature monitoring. In this post, we show you how to deploy the solution using machine learning (ML)-powered vision on AWS, which is tied to connected closed circuit television (CCTV) and thermal camera feeds. This real-time, around-the-clock solution is compatible with existing high-resolution cameras and can help you automate the PPE compliance process.
Automate real-time detection of PPE with machine learning
In this post, we show how to automate real-time PPE detection in your workplace using the Automated PPE compliance monitoring solution now available in AWS Marketplace.
The solution consists of two components:
- The machine learning (ML) model, which analyzes images from your surveillance cameras
- Web interface, which transfers images from the cameras to the ML model for analysis. The interface serves as the dashboard for end users. It provides the ability to:
-
- Control the cameras,
- Observe the process of video stream analysis in real time,
- Get and configure notifications about detected non-compliance cases,
- Get access to all the detected violations, automatically saved to an archive, and
- Manage users and access.
Prerequisites
For this solution, you need:
- The administrative access to your Domain Name Service
- Access to Amazon SageMaker, Amazon Simple Email Service (Amazon SES), Amazon Simple Storage Service (Amazon S3), Amazon RDS, Amazon Fargate, Amazon Route 53, and AWS Marketplace
- AWS Marketplace subscription access to one of the VITech Lab ML models from AWS Marketplace
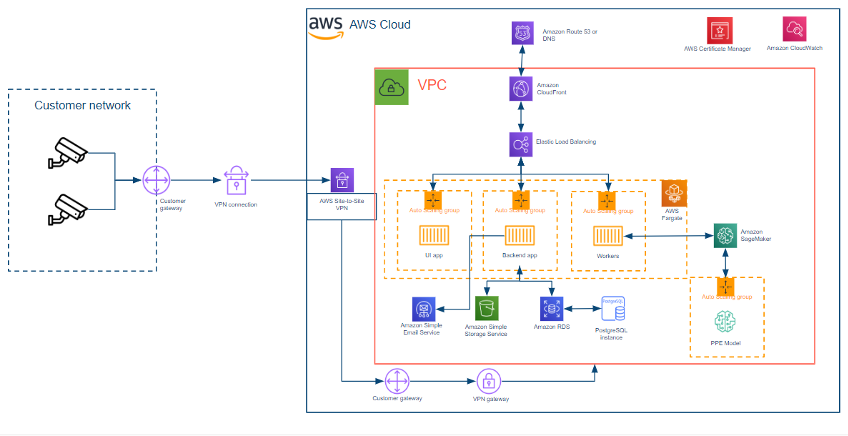
Architecture overview
- Users manage cameras through the frontend UI application. The backend application manages webcams, users, and PPE violation alerts. Refer to the following diagram.

- The backend application connects to the workers to set up new video streams, as shown in the following diagram.

- The workers get video streams from the cameras as shown in the following diagram.

- The workers send images from video streams to a VITech Lab ML model running in Amazon SageMaker for the detection of PPE violations as shown in the following diagram.

- Images with violations are sent to the backend application and stored in Amazon S3, as shown in the following diagram.

- Users can view the live video streams through the frontend UI application, as shown in the following diagram.

- Amazon SES sends reports and provides user management, as shown in the following diagram.

A full architecture overview diagram of the VITech Lab solution is here.
Solution walkthrough
The following steps deploy the container application that integrates with your cameras, the ML model for PPE detection, and other AWS services.
Step 1: Setting up the Amazon Simple Email Services (Amazon SES) for email notifications
The application uses Amazon SES to send notifications of PPE violations to users.
- Follow these steps to verify a new domain to send from.
- Follow these steps to verify an email address to send from. You will use this email address later.
I recommend increasing sending limits to 50,000 messages per day. To do this, contact AWS Support.
Step 2: Creating an SSL certificate for your domain or subdomain for the application
Your frontend application uses HTTPS, which requires a public certificate issued by AWS Certificate Manager.
- Follow this guide to verify a domain or subdomain and create a public certificate.
- After the public certificate is verified and issued, write down its Amazon Resource Number (ARN).
Step 3. Deploying the VITech Lab machine learning (ML) model for PPE detection
An ML model running in Amazon SageMaker performs the safety gear detection.
- In AWS Marketplace, subscribe to and use a with one of the following supported VITech Lab Amazon SageMaker model packages:
- PPE Detector for Employee Safety is a real-time computer vision model for identifying PPE non-compliance in working environments. The solution is a tool to ensure worker safety on building sites, fabrication lines, laboratories, steel, oil and gas enterprises, and other industrial environments where safety rules should be strictly followed. It detects if any of the following objects are missing: masks, glasses, gloves, helmets, vests, and coats.
- PPE Detector for Laboratory Safety is a real-time computer vision model for identifying safety breaches and ensuring quality control policies in a laboratory or healthcare facilities. It works with live footage from CCTV cameras and detects people not wearing any of four objects: coats, glasses, gloves, and masks. This ML model is useful in schools and universities, industry, and other laboratories where safety rules and regulations should be strictly followed.
- Mask Detector for Epidemiological Safety is a real-time computer vision model for identifying safety breaches and ensuring epidemiological safety in laboratories, healthcare facilities, universities, and industrial companies, and government offices. It works with live footage from CCTV cameras and detects missing masks.
- Deploy your selected model to a real-time endpoint. In the Amazon SageMaker console left sidebar, choose Inference and then Endpoints followed by Create endpoint. Then follow these steps on the next screen:
- Enter your endpoint name.
- Select Create a new endpoint configuration.
- Enter an endpoint configuration name.
- Choose Add Model and choose your model from the list. This is the model you subscribed to in step 3.1.
- Choose Create endpoint configuration.
- Choose Create endpoint.
- Wait up to 10 minutes until the Status shows your endpoint as InService.
Step 4. Deploying via AWS CloudFormation
- In AWS Marketplace, search for and subscribe to the VITech Lab PPE Monitoring Platform. This application allows you to manage cameras, notifications, and users. It communicates between the actual cameras and the machine learning model for detection.
- Click Launch Stack to deploy the template using the AWS CloudFormation Console.
- Enter the name of the endpoint you used in step 3.2. Review the parameters that automatically appear in the AWS CloudFormation console. Fill in the empty parameters with the missing values: your website name, the endpoint name. Continue to the final page. Verify and acknowledge all capabilities and choose Create stack.
Step 5. Updating the AWS CloudFormation stack
During the stack creation process you completed in step 4.3, Amazon ECS service discovery created an Amazon Route 53 private hosted zone for connectivity between containers. A private hosted zone is a container that holds information about how you want Route 53 to respond to Domain Name System (DNS) queries for a domain. You must update the stack with the ID of the hosted zone.
- The process of the stack creation might last up to half an hour. Make sure the stack is completed correctly. To do this, when the process is complete, double check your entry of the following input parameters: the PPE EndpointName from step 3.2.1, the DNSName, which is the domain or subdomain for the frontend UI, the Certificate ARN from step 2.2, and SesEmail from step 1.2.
- Log in to the Amazon Route 53 console. In the left side bar, choose hosted zones. Locate a hosted zone where the domain name is srv. and copy its Hosted Zone ID.
- In the AWS CloudFormation console, select the completed stack and choose Update. Choose Use current template and choose Next. On the parameters page, for HostedZoneId, enter the ID of the hosted zone you copied in the previous step. Continue to the final page. Acknowledge and check all capabilities. Choose Update stack.
Step 6. Adding a CNAME Record to your DNS
For users to connect to the frontend application with your domain or subdomain name, you must add a Canonical Name Record or Alias Record (CNAME) record in your DNS to point to the application. CNAME is a type of resource record in the DNS. It specifies that one domain name is an alias of another canonical domain name. To do this:
- Go to the AWS CloudFormation console. Proceed to section Stacks, then choose tab Outputs to view your stack’s outputs.
- To locate the frontend UI DNS Name, in the template list choose nested ECS stack, and then in the Outputs menu, choose item outputs. Copy the frontend UI DNS name. In my case, I used yourdomain.com.
- To locate the Amazon CloudFront Domain Name, in the template list, choose Nested stack CloudFront stack, and in the outputs menu, choose Outputs. Copy the frontend UI DNS name. I copied XXXXXX.cloudfront.net.
- To point your CNAME to the AWS CloudFront distribution, navigate to your DNS provider’s web page. Add a new CNAME record using the frontend UI DNS name you copied in step 6.2 and the Amazon CloudFront Domain Name you copied in step 6.3. Instructions on this vary depending on your DNS provider. Please see your DNS provider’s documentation for support.
Step 7. Accessing web UI
- In your web browser, navigate to the frontend UI for the DNS name (yourdomain.com) you set in step 6.2
- Use the admin email and password you specified in the AWS CloudFormation template parameters in step 4.3 to log in and connect your cameras.
If you have any questions during your trial period or need solutions customization, contact VITech Lab for support at support@vitechlab.com.
Cleanup
To end your trial and avoid charges in the future, you may clean up the resources you have used during this trial.
To do so:
- Go to the AWS CloudFormation console.
- Select appropriate stack you created as part of this trial, select delete.
Conclusion
In this post, we showed how to use VITech Lab’s PPE Detector for Employee Safety to automate real-time detection of PPE using machine learning. This solution allows you to use ML-powered computer vision and image analysis by Amazon SageMaker on AWS. This packaged solution is now available in AWS Marketplace in all Regions except AWS GovCloud (US). It is accessible as a 30-day proof-of-value trial that can be deployed with support from VITech for automating PPE compliance detection with security camera feeds. For more information, watch this demo video or contact us.
Disclaimer:
AWS is not responsible for the content or accuracy of this post. The content and opinions in this post are solely those of the third-party author. It is each customers responsibility to determine whether they are subject to HIPAA, and if so, how best to comply with HIPAA and its implementing regulations. Before using AWS in connection with protected health information, customers must enter an AWS Business Associate Addendum (BAA) and follow its configuration requirements.
AWS Team: Joseph Shih, Kanchan Waikar, Madhu Raman