AWS Startups Blog
How to Accelerate Your WordPress Site with Amazon CloudFront
Blogging and content production have become the marketing tool of choice for many startups and a fair number of founders find themselves choosing WordPress to power their messaging. Already the content management system (CMS) of choice for 28% of the web, WordPress is the biggest self-hosted blogging tool in the world and perhaps the only open source project that is used by Harvard Law, the Walt Disney Company, the official site of Sweden, and Rackspace.
WordPress performs reasonably well out of the box, but there is room for improvement—the number of WordPress plugins that address performance is evidence of this. However, the easiest way to improve the user experience is to accelerate one’s entire WordPress website by using CloudFront. Doing this will not only improve your site’s responsiveness, but it may also reduce the overall cost of operating your WordPress infrastructure, as reducing the load on your web servers may help you scale down the required infrastructure. In fact, CloudFront can significantly help your site cope with an unexpected load when your site gets popular.
Now, if you have previously searched the internet for advice on accelerating your WordPress site, you might have found a number of guides to CloudFront configurations with varying and sometimes conflicting advice. Today, this post will definitively explain how to give your WordPress site or blog a performance boost, for any reasonably standard configuration. (This solution will also include the benefits of AWS Shield standard, such as protection against the most common DDoS attacks, at a startup-friendly, no extra charge.) However, if your site has any additional plugins installed, you may want to run some extra tests just in case the plugins cause WordPress to behave in a way that I have not tested.
How does CloudFront help?
Many AWS customers have users spread across the globe that they want to reach. However, what once required an immense engineering effort can now be easily built using AWS Regions and Edge locations, which allow you to serve content from the locations closest to those users.
Data transfers on the internet depend largely on global networks of fiber optic cables, allowing very high bandwidth data transfers (see James Hamilton’s excellent re:Invent talk on AWS global networking). These fiber networks already send data at the speed of light, but humans are impatient and small delays can be noticeable when content is accessed from the other side of the world. As the speed of light is proving a difficult challenge to overcome, Amazon CloudFront improves the experience for users accessing your websites in several other ways, including:
- Anycast DNS ensures your customers are routed to the nearest edge location.
- Cached content, when available, is delivered to your users from the edge location.
- When data needs to be fetched from your site CloudFront optimizes network throughput by managing the transfers between Edge Locations and your website. This traffic runs over the Amazon Global Backbone, where optimized TCP configuration ensures more bytes are in-flight on the network, improving throughput, while TCP connection re-use eliminates much of the latency associated with establishing connections. In this way, whether content is cached or not, it will be accelerated by delivery over optimized network paths.
- Finally, negotiating and offloading Transport Layer Security (TLS) at the CloudFront Edge further improves performance, reducing connection setup latency, and further supporting back-end connection re-use.
Solution Overview
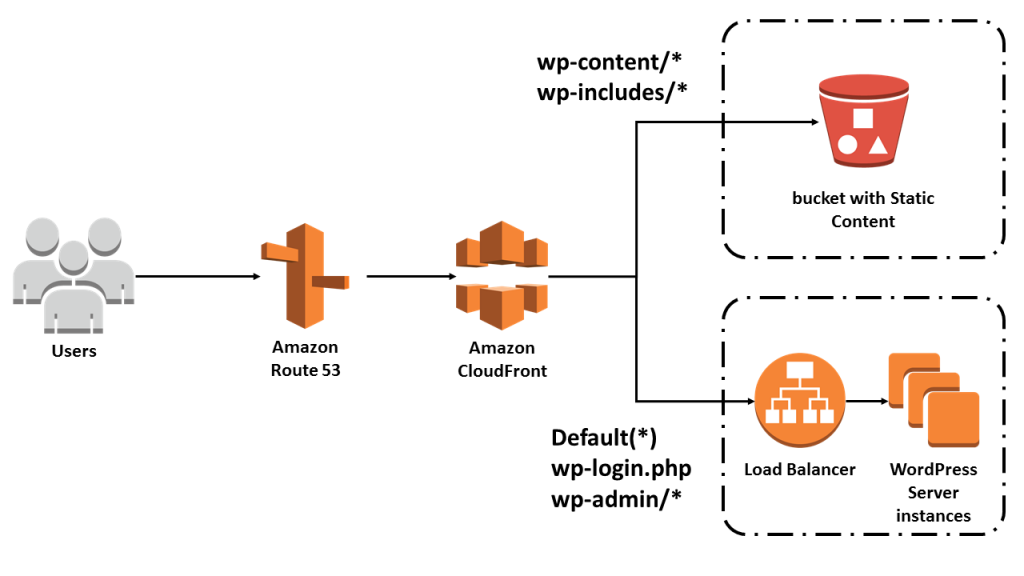
The simplified architecture above describes a common architecture for WordPress, with static content stored in AWS S3, and WordPress running on EC2, Lightsail or another hosting facility. WordPress defaults to storing everything locally on the web server. However, there are several plugins that make it easy to move static content to S3 and one example is W3 Total Cache. The advice here is relevant whether your site stores static content in S3 or not, and will accelerate your website in either case.
Distributions, Origins, and Behaviors
First, I’ll offer a brief recap on some terminology to make sure we are on the same page. A CloudFront configuration with a DNS endpoint is called a distribution. All of the configuration settings for a website may be configured with a single distribution, though there may be content with different attributes such as images, which are cacheable, and dynamically generated content, customized to a viewer, which should not be cached. WordPress separates content into the folder structure described in the table below. We can configure CloudFront with appropriate settings to serve each class of content through cache behaviors, which allow request URLs, typically grouped by file extension or path prefix, to have appropriate cache configuration applied.
Even a relatively simple website may serve content from separate locations. CloudFront refers to these separate locations as origins. An origin can be either an Amazon S3 bucket or an HTTP endpoint. Your HTTP servers can be hosted on AWS or any Internet-facing HTTP system. In the diagram above S3 and the WordPress servers would be configured as separate origins in your distribution settings.
I’ll next describe the three main steps to configuring CloudFront:
- Creating a distribution
- Defining your origin(s)
- Configuring cache behaviors
Origins

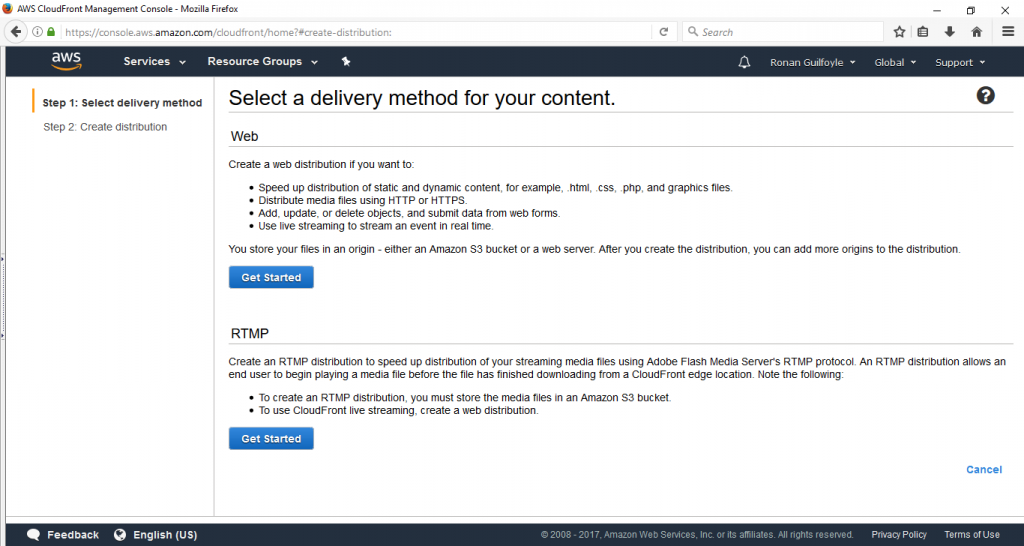
Creating a CloudFront distribution
I’m making an assumption that your WordPress site is up and running. If not, see the AWS WordPress reference architecture page for a scripted solution to get you up and running in minutes. You should have a domain name registered with, perhaps a “www” entry pointing towards your WordPress site or server. In my case, the “www” record directs to the CNAME for my Application Load Balancer. However, in your case, the DNS record will refer to your WordPress site by DNS name or IP address.
www.example.com ⇒ wordpress-abxdef-111222333.eu-west1.elb.amazonaws.com
or more generically;
<DNS.friendly.name> ⇒ <WordPress DNS name or IP>
Now, from the CloudFront console, you should create a CloudFront Web distribution. If I don’t mention a configuration you can assume that I’ve accepted the default options.
Fill in the required details for the distribution.
The Origin Domain Name is the target of your current DNS record, in my case my Application Load Balancer, but you may have chosen Amazon Lightsail, EC2, or a hosted WordPress service. The CloudFront console will offer a drop-down listing the S3 buckets and any Load Balancers configured in your AWS account to help avoid errors, but you can simply type the DNS name or IP address if it not listed.
Note: CloudFront can be configured to accelerate your website whether the website in hosted on AWS or not.

TLS/SSL
Amazon Certificate Manager makes TLS/SSL certificates available for free, for use with CloudFront and AWS Elastic or Application Load Balancers. Because encrypting data in transit helps to build trust with your users, I’m going to assume that you will use TLS encryption.
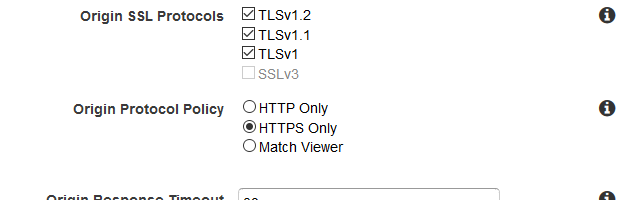
Choose the SSL protocols that CloudFront may use when communicating with your WordPress site. This is relevant if you have configured your site to accept HTTPS traffic. AWS does not recommend configuring SSLv3, unless your back-end cannot support Transport Layer Security (TLS).
The Origin Protocol Policy determines how CloudFront communicates with your Origin (WordPress server). You can choose to always have CloudFront use HTTP, regardless of the original Web viewer (client or browser) request, have CloudFront use HTTPS for Origin connections, or match the viewer’s request. I have configured a certificate on my site using Amazon Certificate Manager, so I will choose HTTPS Only to ensure communication is encrypted between CloudFront and my Origin.
Timeouts & Ports
CloudFront allows users to configure the Origin response and Keep-alive timeouts. It is unlikely your WordPress site would need a longer request timeout. However, if your site receives light traffic, it might be useful to increase the keep-alive timeout, possibly up to the maximum of 60 seconds. This will cause CloudFront to hold open TCP connections to your Origin between requests, avoiding the latency associated with re-establishing connections for subsequent users or page fetches. The default behavior is to close connections that have been idle for 5 seconds.
Note: If you configure a long keep-alive and your site gets heavy traffic, you could find that you need to scale up the Origin to maintain many open connections to CloudFront.

Custom Headers
CloudFront has the ability to add user-specified headers to each request sent to the Origin, potentially overriding headers set by the viewer. This may be used, for example, to add a secret or “key”, indicating that the request was served through CloudFront. Your web application, or perhaps an AWS WAF rule on an Application Load Balancer, can validate this header to ensure that only traffic from your CloudFront distribution is accepted.
Default Cache Behavior Settings
These default settings are the “catch-all” behavior and must be appropriate for any request not handled by more specific rules that we will define according to the Behaviors table above.

For my Viewer Protocol Policy, I’ll configure CloudFront to redirect any HTTP requests to HTTPS. Note that if you choose HTTPS Only, your users may have to type the full https://url when they visit your site, unless they will always be following a link from another page to navigate there.
For Allowed methods, as WordPress makes use of forms, which require a POST, I have chosen to enable all HTTP methods. Additionally, I have enabled caching of Options requests, which can speed CORS requests.
Headers

When your web server is configured to host multiple sites (through virtual hosts etc.), the Host header determines the content that will be served. I recommend caching based on Whitelisted headers with both Host and Origin headers configured at a minimum. You should forward headers that you process through your web application, or which vary the content returned to viewers. You may also want to forward the referrer header if you track the referrers that are sending users to your website.
Note: if you choose “None” then CloudFront could serve the wrong content in certain circumstances, such as when you host content for multiple websites on the same server. On the other hand, if you choose “All”, CloudFront will not cache objects but will instead send all requests to your Origin for processing, reducing cache hit ratio and adding additional load to your Origins. Getting the balance right requires knowledge of your environment that I don’t have, and so further tweaking may be needed if, for example, you host multiple sites.
Object Caching
WordPress, by default, does not set cache control headers such as Expires or max-age. You can install a plugin (see the WordPress docs on caching) or configure ‘.htaccess’ files to set these headers. If you choose not to configure WordPress in this way you can still have CloudFront cache content for you by choosing to customize under Object Caching. (If you have configured WordPress to add Cache Control headers then choose “User Origin Cache Headers” instead). The “Default TTL” setting below tells CloudFront to cache objects for 300 seconds, when the WordPress server does not configure caching headers.

This will cache dynamic pages on your site and may also prevent non-logged-in users from seeing comments posted to pages until the cache expires in 1 minutes / 300 seconds. Choose a lower default TTL if you want users to see comments soon after posting. This caching will reduce the load on your server, especially if your site has a sudden spike in traffic as most visitors will see the cached page.
Cookies
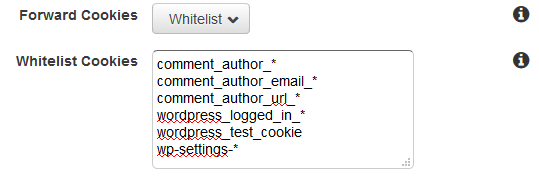
WordPress makes extensive use of cookies, and I recommend forwarding cookies based on a whitelist. Your mileage may vary, depending on the configuration of your site or plugins, but the following cookies should be enough for most cases. You can find details of WordPress cookie usage on the official docs here.
Query Strings
WordPress uses Query Strings to determine the content to return, for example, the results of a search or an individual article request. These should, therefore, be sent to the Origin (WordPress) but also we should cache, for a short time, based on the actual query string, to avoid returning cached results from a previous user’s query, for example.
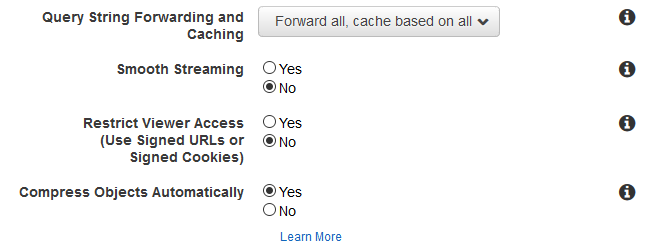
Media Streaming (smooth streaming) and restricting content (for example behind a pay-wall) are out of scope for this article so we will leave them at their default values.
I recommend turning on Compress Objects Automatically. With this option, CloudFront will compress certain files when the requesting viewer or browser includes the header: “Accept-Encoding: gzip”. Delivering compressed objects will improve performance for your users.
Distribution Settings
CloudFront allows many configuration options, but I’ll concentrate on the options that might be relevant for a WordPress site. You will also see that I have not configured AWS WAF, again as it is beyond the scope of this article, though is certainly worth considering this additional protection for your website.
TLS/SSL
As mentioned I have created a free TLS/SSL certificate with Amazon Certificate Manager. This certificate is configured on my Application Load Balancer, and I can also use a certificate with CloudFront in order to secure communications between my users and the CloudFront edge location, in addition to securing the back-end traffic between CloudFront and my website.
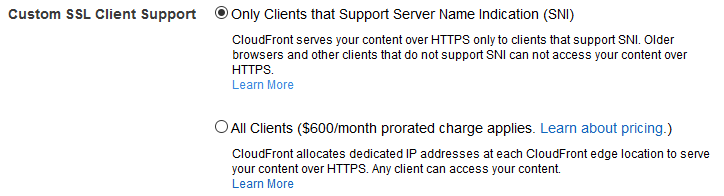
Custom TLS/SSL Client Support
CloudFront offers two options for hosting TLS/SSL certificates. The default option is to serve only clients that support Server Name Indication (SNI). With this default option CloudFront associates your certificate with an IP address that is not dedicated to your distribution. SNI is an extension to the TLS protocol, supported by most modern browsers, that includes the domain name in the request header. This allows CloudFront to determine which certificate to use when negotiating an encrypted channel. If a client browser does not support SNI the connection cannot be secured and will be dropped.

The alternative is to have CloudFront provide dedicated IP addresses in each Edge location that hosts your distribution. In this case, a browser that does not support SNI will be able to negotiate a secure connection to your website. Note: This option incurs an additional monthly charge.
Wikipedia lists browsers that support SNI on this page.
I recommend the default option of using Server Name Indication.
Security Policy
CloudFront supports a variety of security policies that allow you to improve the security of your web applications by enforcing, for example, TLS v1.2 and eliminate weak ciphers like RC4. We recommend, however, that you use the TLSv1.2_2016 security policy for broadest browser compatibility. Using more recent security policies will require browser support for later TLS versions and will additionally drop support for weak ciphers, such as 3DES. See the CloudFront documentation for cipher and protocol details.

Default Root Object
This is not relevant with WordPress as your site will automatically be configured to serve index.php. If you were hosting a static site from and S3 origin, you might choose to server index.html as the default.
Logging
Depending on your own requirements you can choose to log HTTP requests handled by CloudFront, by an Elastic or Application Load Balancer, by your WordPress server, or all of the above. The default is not to log all viewer requests and for the moment I’ll keep this default setting.
Finally, you may add a comment, select “enabled as the distribution state and click create distribution.

Status: In Progress
Once you create the distribution you will be redirected back to the CloudFront web console, where you can see your distribution listed with a status of “In Progress”. It may take several minutes for the status to change to Deployed, but we can continue to specify Origins and Behaviors for the WordPress content.
Adding Origins & Behaviors
Select your Distribution and click the Distributions Settings button to edit the settings.

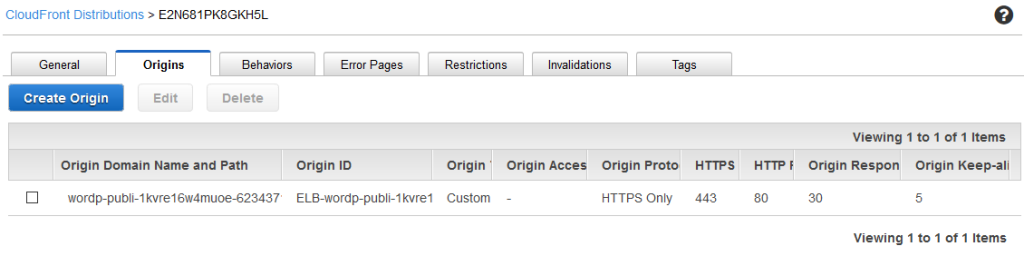
On the Origins tab you should see one Origin, created during the initial setup as below:
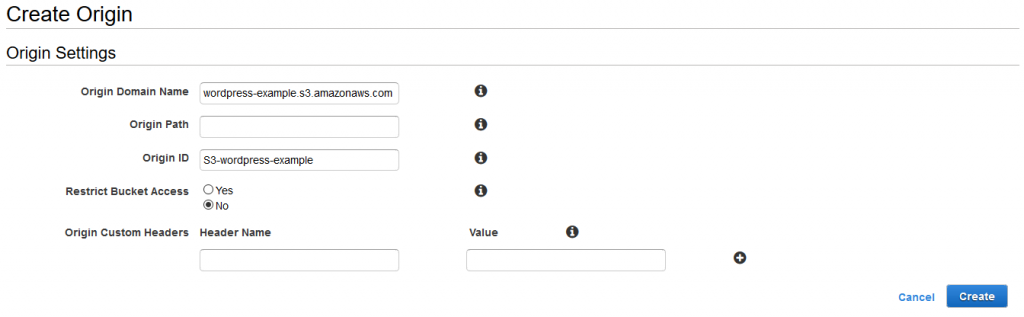
Select Create Origin to add a source that CloudFront will request content from.
As I have configured my WordPress to store static content like images, css and JavaScript files in S3, I will add the S3 bucket as an Origin and configure appropriate Cache Behavior.
Next, from the Behaviors tab, we will create the configurations we mentioned in the table above.
Currently, you will see the Default(*) behavior only:

I have described the settings above, so I will not go into detail again, but you should create four more Behaviors with these settings.

As the content is static, it should be very cacheable.
Don’t forget DNS
At this point, the changes made to your distribution will be applying (status: In Progress). However, we have not made any changes to your WordPress site yet. It will still be available at www.example.com as before.
In order to make the CloudFront configuration active for your domain you simply have to update the DNS record, creating a CNAME or ALIAS pointing to your CloudFront distribution’s DNS name. If you host your DNS in Route 53 this is a quick and easy change, but I’ll leave that as an exercise for the reader. However, before you make this change for all your users you can test the settings, overriding DNS for your own computer by editing the host’s file:
1. From a command line perform a DNS lookup on your CloudFront distribution;
dig dywhc8e9dt67j.cloudfront.net
dywhc8e9dt67j.cloudfront.net. 54 IN A 54.192.31.130
dywhc8e9dt67j.cloudfront.net. 54 IN A 54.192.31.131
…
…
2. Pick any of the IP addresses returned and add to your hosts file C:\Windows\System32\drivers\etc\hosts on windows
or /etc/hosts on a Mac or Linux system
Append a line to the bottom of the file, it should look like this;
www.example.com 54.192.31.130
3. Now when you visit your site with your browser, the hosts file will overwrite DNS and you will be directed to your CloudFront distribution for testing. Make sure you fully test all areas of your site, including the admin interface and plugin behavior.
4. Finally, once you are happy with the improvements, remove the entry from your hosts file and in your DNS create a CNAME pointing www.example.com at your CloudFront Distribution DNS endpoint dywhc8e9dt67j.cloudfront.net in my case, but yours will be different.
Summary
This step by step guide should have your WordPress site running better than ever and ready for any sudden traffic spikes. For more detail on the options I’ve described here, please refer to the Amazon CloudFront – Getting Started site. Also, check out the WordPress reference architecture on GitHub, which provides CloudFormation scripts to get a scalable WordPress architecture up and running in minutes, including CloudFront acceleration.