Build a Basic Web Application
TUTORIAL


Module 5: Add Interactivity to Your Web App
In this module, you will modify your static website to invoke your API and display custom text
Overview
In this module, we will update the static website we created in module one to invoke the REST API we created in module three. This will add the ability to display text based on what you input.
What you will accomplish
- Call an API Gateway API from an HTML page
- Upload a new version of a web app to the Amplify console
Key concepts
Deploying a website – Making a website available to users.
Environment – A stage such as "prod," "dev," or "staging," where an application or website can be executed.
Invoking an API – Sending an event to an API to trigger a specific behavior.
Minimum time to complete
5 minutes
Services used
Last updated
Implementation
-
Update web app with Amplify console
- Open the index.html file you created in module one.
- Replace the existing code with the following:
<!DOCTYPE html> <html> <head> <meta charset="UTF-8"> <title>Hello World</title> <!-- Add some CSS to change client UI --> <style> body { background-color: #232F3E; } label, button { color: #FF9900; font-family: Arial, Helvetica, sans-serif; font-size: 20px; margin-left: 40px; } input { color: #232F3E; font-family: Arial, Helvetica, sans-serif; font-size: 20px; margin-left: 20px; } </style> <script> // define the callAPI function that takes a first name and last name as parameters var callAPI = (firstName,lastName)=>{ // instantiate a headers object var myHeaders = new Headers(); // add content type header to object myHeaders.append("Content-Type", "application/json"); // using built in JSON utility package turn object to string and store in a variable var raw = JSON.stringify({"firstName":firstName,"lastName":lastName}); // create a JSON object with parameters for API call and store in a variable var requestOptions = { method: 'POST', headers: myHeaders, body: raw, redirect: 'follow' }; // make API call with parameters and use promises to get response fetch("YOUR-API-INVOKE-URL", requestOptions) .then(response => response.text()) .then(result => alert(JSON.parse(result).body)) .catch(error => console.log('error', error)); } </script> </head> <body> <form> <label>First Name :</label> <input type="text" id="fName"> <label>Last Name :</label> <input type="text" id="lName"> <!-- set button onClick method to call function we defined passing input values as parameters --> <button type="button" onclick="callAPI(document.getElementById('fName').value,document.getElementById('lName').value)">Call API</button> </form> </body> </html>3. Make sure you add your API Invoke URL on Line 41 (from module three). Note: If you do not have your API's URL, you can get it from the API Gateway console by selecting your API and choosing stages.
4. Save the file.
5. ZIP (compress) only the HTML file.
6. Open the Amplify console.
7. Choose the web app created in module one.
8. Choose the white Choose files button.
9. Select the ZIP file you created in Step 5.
10. When the file is uploaded, a deployment process will automatically begin. Once you see a green bar, your deployment will be complete.
- Open the index.html file you created in module one.
-
Test the updated web app
- Choose the URL under Domain.
- Your updated web app should load in your browser.
- Fill in your name (or whatever you prefer) and choose the Call API button.
- You should see a message that starts with Hello from Lambda followed by the text you filled in.
Congratulations! You now have a working web app deployed by Amplify console that can call a Lambda function via API Gateway.
Application architecture
With all modules now completed, here's the architecture of what you built:
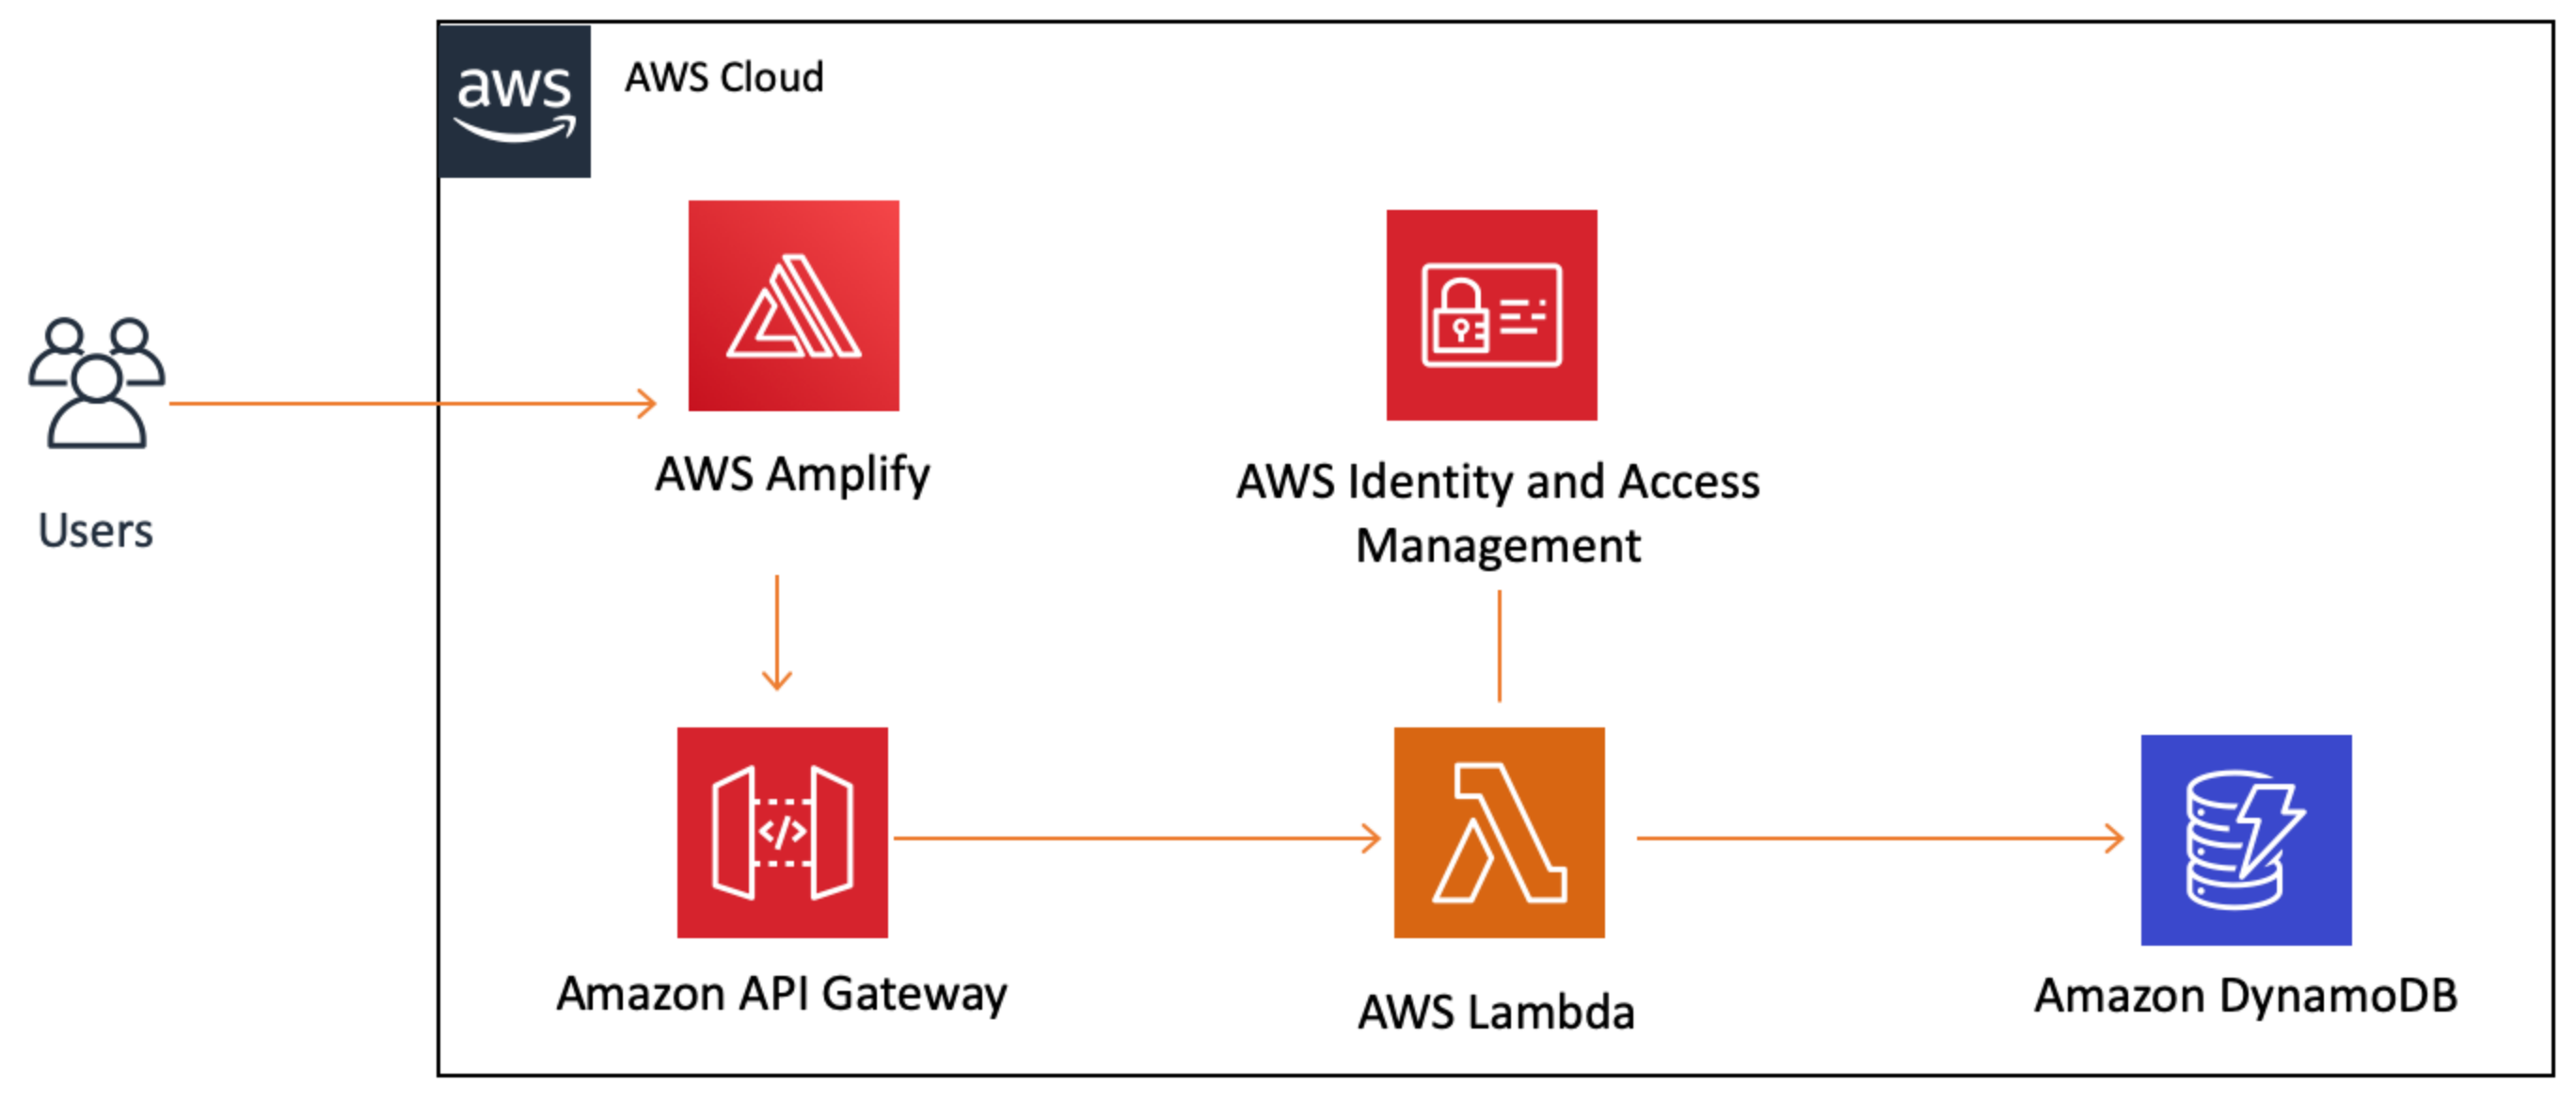
All the AWS services we set up can securely communicate with each other. When a user chooses a button in the web app, it makes a call to our API, which triggers our Lambda function. Our Lambda function writes to a database and returns a message to our client via API Gateway. IAM manages all of the permissions.
Congratulations!
You successfully built a web application on AWS! In the next module, we will clean up the resources used in this tutorial so that you don't incur unwanted charges to your account.