AWS 入門
建置無伺服器 Web 應用程式
使用 AWS Lambda、Amazon API Gateway、AWS Amplify、Amazon DynamoDB 和 Amazon Cognito
單元 3:無伺服器服務後端
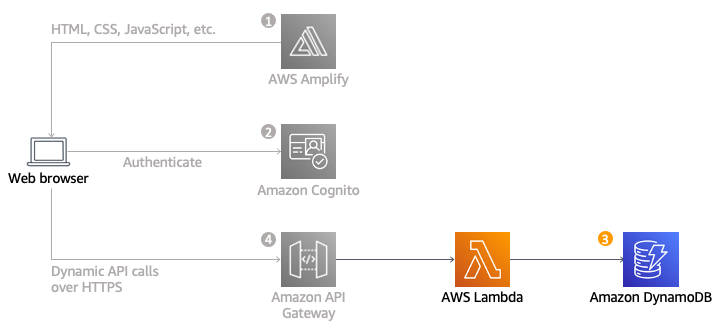
您將看到 AWS Lambda 和 Amazon DynamoDB 建置後端程序,以處理 Web 應用程式的請求
概觀
在本單元中,您將看到 AWS Lambda 和 Amazon DynamoDB 建置後端程序,以處理 Web 應用程式的請求。您在第一個單元中部署的瀏覽器應用程式可讓使用者請求將獨角獸傳送至其選擇的位置。若要實現那些請求,在瀏覽器中執行的 JavaScript 將需要調用在雲端中執行的服務。
架構概觀

每當使用者請求獨角獸時,您將會實作調用 Lambda 函數。此函數會從機群中選取一個獨角獸、在 DynamoDB 表中記錄請求,然後再向前端應用程式回應有關目前所分派獨角獸的詳細資訊。
使用 Amazon API Gateway 從瀏覽器調用此函數。您將在下一個單元中實作該連線。對於本單元,您將只會隔離測試您的功能。
完成時間
30 分鐘
使用的服務
實作
-
建立 Amazon DynamoDB 資料表
使用 Amazon DynamoDB 主控台來建立新的 DynamoDB 資料表。
- 在 Amazon DynamoDB 主控台中,選擇建立資料表。
- 對於資料表名稱,輸入 Rides。 此欄位會區分大小寫。
- 對於分割區索引鍵,輸入 RideId,然後選取字串作為索引鍵類型。此欄位會區分大小寫。
- 在資料表設定區段中,確定已選取預設設定,然後選擇建立資料表。
- 在資料表頁面上,等待您的資料表建立完成。完成後,狀態將顯示為作用中。選取您的資料表名稱。
- 在新資料表的概觀標籤 > 一般資訊區段中,選擇其他資訊。複製 ARN。您會在下一個區段中使用此 ARN。
-
為 Lambda 函數建立 IAM 角色
每個 Lambda 函數皆有與其關聯的 IAM 角色。此角色會定義允許函數與哪些其他 AWS 服務進行互動。針對本教學之用途,您必須建立一個 IAM 角色,授與 Lambda 函數許可將記錄寫入至 Amazon CloudWatch Logs,以及將項目寫入至 DynamoDB 表格的存取權。
- 在 IAM 主控台中,選取左側導覽窗格中的角色,然後選擇建立角色。
- 在信任的實體類型區段中,選取 AWS 服務。對於使用案例,選取 Lambda,然後選擇下一步。
備註:選取角色類型會自動為您的角色建立信任政策,允許 AWS 服務代表您採用此角色。如果您是使用 CLI、AWS CloudFormation 或另一個機制,來建立此角色,則會直接指定信任政策。 - 在篩選條件文字方塊中輸入 AWSLambdaBasicExecutionRole,然後按 Enter。
- 選取 AWSLambdaBasicExecutionRole 政策名稱,然後選擇下一步。
- 輸入 WildRydesLambda 作為角色名稱。將其他參數的預設設定保持不變。
- 選擇建立角色。
- 在角色頁面的篩選條件方塊中,輸入 WildRydesLambda,然後選取剛建立的角色名稱。
- 在許可標籤的新增許可下,選擇建立內嵌政策。
- 在選取服務區段中,在搜尋列中輸入 DynamoDB,並在其出現時選取 DynamoDB 。
- 選擇選取動作。
- 在允許的動作區段中,在搜尋列中輸入PutItem,並在其出現時選取 PutItem 旁的核取方塊。
- 在資源區段中,選取具體選項後,選擇新增 ARN 連結。
- 選取文字標籤。貼上您在 DynamoDB 中建立之表格的 ARN (上一節的步驟 6),然後選擇新增 ARN。
- 選擇下一步。
- 輸入 DynamoDBWriteAccess 作為政策名稱,然後選擇 建立政策。
-
建立 Lambda 函數以處理請求
AWS Lambda 將執行您的程式碼,以回應 HTTP 請求之類的事件。在此步驟中,您將建置核心函數,處理來自 Web 應用程式的 API 請求,以分派獨角獸。在下一個單元中,您將使用 Amazon API Gateway,來建立 RESTful API,以公開可從使用者的瀏覽器呼叫的 HTTP 端點。接著,您會將此步驟中建立的 Lambda 函數連線至該 API,以為 Web 應用程式建立完整功能的後端。
使用 AWS Lambda 主控台建立名為 RequestUnicorn 的新 Lambda 函數,用以處理 API 請求。針對函數程式碼,使用下列 requestUnicorn.js 範例實作。只從該檔案複製並貼入 AWS Lambda 主控台的編輯器中。
務必將函數設為使用您在上一節中建立的 WildRydesLambda IAM 角色。
- 從 AWS Lambda 主控台,選擇建立函數。
- 將預設的從頭編寫卡片保持選取的狀態。
- 在函數名稱欄位中,輸入 RequestUnicorn。
- 為執行期選取 Node.js 16.x (較新版本的 Node.js 將不適用於本教學)。
- 從變更預設執行角色下拉式清單中,選取使用現有的角色。
- 從現有的角色下拉式清單中,選取 WildRydesLambda。
- 按一下建立函數。
- 向下捲動到程式碼來源區段,並將 index.js 程式碼編輯器中的退出程式碼取代為 requestUnicorn.js 的內容。以下程式碼區塊會顯示 requestUnicorn.js 檔案。將此程式碼複製並貼到程式碼編輯器的 index.js 標籤中。
const randomBytes = require('crypto').randomBytes; const AWS = require('aws-sdk'); const ddb = new AWS.DynamoDB.DocumentClient(); const fleet = [ { Name: 'Angel', Color: 'White', Gender: 'Female', }, { Name: 'Gil', Color: 'White', Gender: 'Male', }, { Name: 'Rocinante', Color: 'Yellow', Gender: 'Female', }, ]; exports.handler = (event, context, callback) => { if (!event.requestContext.authorizer) { errorResponse('Authorization not configured', context.awsRequestId, callback); return; } const rideId = toUrlString(randomBytes(16)); console.log('Received event (', rideId, '): ', event); // Because we're using a Cognito User Pools authorizer, all of the claims // included in the authentication token are provided in the request context. // This includes the username as well as other attributes. const username = event.requestContext.authorizer.claims['cognito:username']; // The body field of the event in a proxy integration is a raw string. // In order to extract meaningful values, we need to first parse this string // into an object. A more robust implementation might inspect the Content-Type // header first and use a different parsing strategy based on that value. const requestBody = JSON.parse(event.body); const pickupLocation = requestBody.PickupLocation; const unicorn = findUnicorn(pickupLocation); recordRide(rideId, username, unicorn).then(() => { // You can use the callback function to provide a return value from your Node.js // Lambda functions. The first parameter is used for failed invocations. The // second parameter specifies the result data of the invocation. // Because this Lambda function is called by an API Gateway proxy integration // the result object must use the following structure. callback(null, { statusCode: 201, body: JSON.stringify({ RideId: rideId, Unicorn: unicorn, Eta: '30 seconds', Rider: username, }), headers: { 'Access-Control-Allow-Origin': '*', }, }); }).catch((err) => { console.error(err); // If there is an error during processing, catch it and return // from the Lambda function successfully. Specify a 500 HTTP status // code and provide an error message in the body. This will provide a // more meaningful error response to the end client. errorResponse(err.message, context.awsRequestId, callback) }); }; // This is where you would implement logic to find the optimal unicorn for // this ride (possibly invoking another Lambda function as a microservice.) // For simplicity, we'll just pick a unicorn at random. function findUnicorn(pickupLocation) { console.log('Finding unicorn for ', pickupLocation.Latitude, ', ', pickupLocation.Longitude); return fleet[Math.floor(Math.random() * fleet.length)]; } function recordRide(rideId, username, unicorn) { return ddb.put({ TableName: 'Rides', Item: { RideId: rideId, User: username, Unicorn: unicorn, RequestTime: new Date().toISOString(), }, }).promise(); } function toUrlString(buffer) { return buffer.toString('base64') .replace(/\+/g, '-') .replace(/\//g, '_') .replace(/=/g, ''); } function errorResponse(errorMessage, awsRequestId, callback) { callback(null, { statusCode: 500, body: JSON.stringify({ Error: errorMessage, Reference: awsRequestId, }), headers: { 'Access-Control-Allow-Origin': '*', }, }); }9.選擇部署。
-
驗證您的實作
在本單元中,您會測試使用 AWS Lambda 主控台建立的函數。在下個單元中,您會使用 API Gateway 來新增 REST API,如此即可從您在第一個單元中部署,且以瀏覽器為基礎的應用程式,來調用函數。
- 在您於上一節中建置的 RequestUnicorn 函數中,在程式碼來源中選擇測試,然後從下拉式清單中選取設定測試事件。
- 保留建立新事件預設選項。
- 在事件名稱欄位中,輸入 TestRequestEvent。
- 將下列測試事件複製並貼至 Event JSON 區段:
{ "path": "/ride", "httpMethod": "POST", "headers": { "Accept": "*/*", "Authorization": "eyJraWQiOiJLTzRVMWZs", "content-type": "application/json; charset=UTF-8" }, "queryStringParameters": null, "pathParameters": null, "requestContext": { "authorizer": { "claims": { "cognito:username": "the_username" } } }, "body": "{\"PickupLocation\":{\"Latitude\":47.6174755835663,\"Longitude\":-122.28837066650185}}" }5.選擇 Save (儲存)。
6.在函數的程式碼來源區段中,選擇測試,然後從下拉式清單中選取 TestRequestEvent。
7. 在測試標籤上,選擇測試。
8.在出現的 Executing function:succeeded 訊息中,展開詳細資訊下拉式清單。
9.確認函數結果類似如下:
{
    "statusCode": 201,
    "body": "{\"RideId\":\"SvLnijIAtg6inAFUBRT+Fg==\",\"Unicorn\":{\"Name\":\"Rocinante\",\"Color\":\"Yellow\",\"Gender\":\"Female\"},\"Eta\":\"30 seconds\"}",
    "headers": {
        "Access-Control-Allow-Origin": "*"
    }
}


