- AWS›
- 入门资源中心
使用 API 直接开发 Agentic AI 平台
教程简介
本项目提供基于 Bedrock 中 Nova, Claude 等大模型的页面交互服务,同时引入 MCP,极大增强并延伸 Agent 产品的场景通用性,可支持本地文件系统、数据库、开发工具、互联网检索等无缝接入。如果说包含大模型的 Agent 相当于大脑的话,那引入 MCP 后就相当于装上了胳膊腿,真正让大模型动起来、跟各种现存系统和数据联通。
工作流程
a. 用户通过 Web 界面发送查询
b. 后端服务接收查询并转发给 Bedrock 模型
c. 如果模型需要使用工具,MCP 客户端会调用相应的 MCP 服务器
d. 工具调用结果返回给模型,模型生成最终响应
e. 响应返回给用户,包括工具调用过程和结果
第一步 创建资源
全部打开EC2 是亚马逊云科技的云服务器,本 workshop 中,您将在 EC2 上运行 MCP 环境,在此步骤中,将带您创建一台 EC2 服务器。
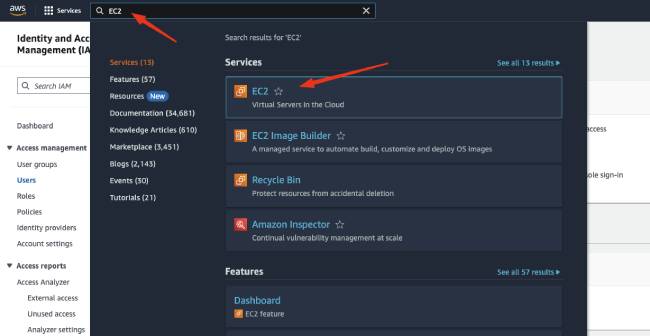
在亚马逊云科技控制台顶部的搜索栏中,输入“EC2”,进入 EC2 的控制台页面。
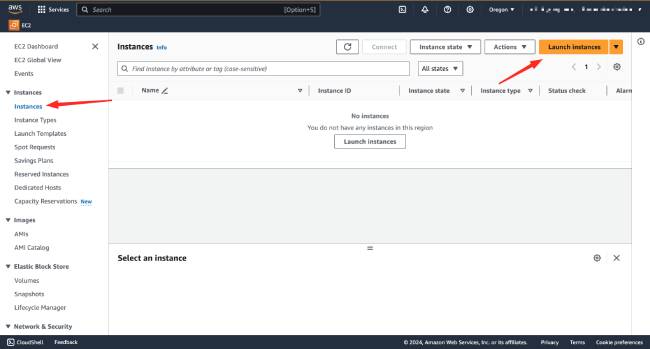
在 EC2 控制台中,点击侧边栏的“Instances”,进入实例页面,点击右上方的橙色按钮“Launch instances”创建新实例。
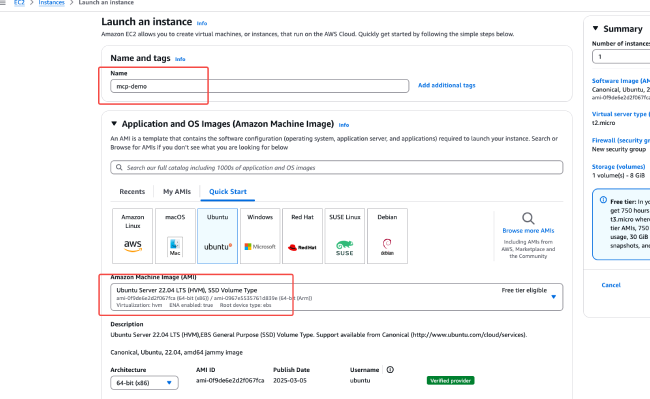
在 Launch an instance 页面中,Name 处填写任意名称。在 Application and OS Images (Amazon Machine Image)选栏中,点击 Ubuntu,在 Amazon Machine Image 中选择 "Ubuntu Server 22.04 LTS (HVM)”。
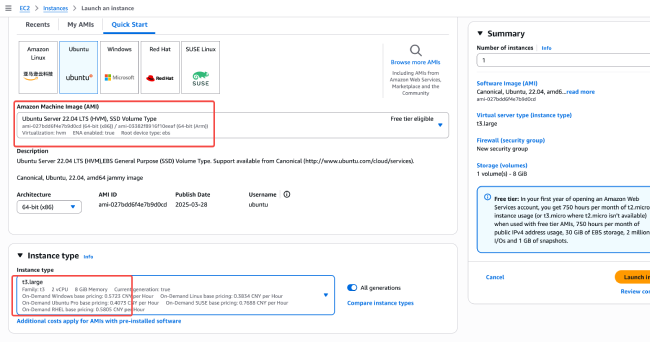
下方的 Instance type 中,在下拉选单中搜索“t3”,选择“t3.large”类型。此为 2 核 4G 机型,能够运行聊天前端页面和角色编辑器。
在下方的 Key pair 选项中,点击“Create new key pair”生成新的密钥对,后面您将使用此密钥登录到 EC2 服务器来配置聊天页面和角色管理器。
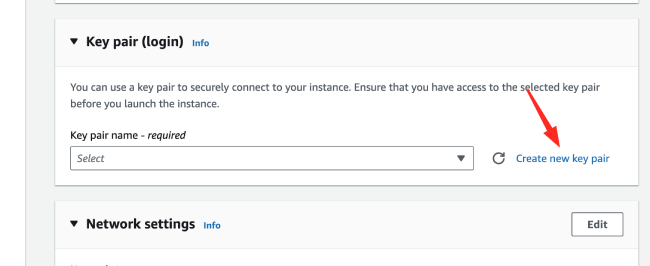
点击“Create”后,密钥对的私钥将会自动下载到本地,请到浏览器的默认目录找到名为 < Key pair name>.pem 的私钥文件,供后续步骤使用。
在 Network settings 中,点击右侧的“Edit”编辑网络设置。其中,注意检查 Auto-assign public IP 是否为 Enable,Firewall (security groups)选择 Create security group,name 填写任意名称,如 mcp-demo-sg

- 7002
- 5901
- 5006
- 3000
在接下来的 Inbound Security Group Rules 中,需要配置三条规则:
1. 默认应已经包含了一条 SSH 规则,检查其 Protocol 是否为 TCP,Port range 为 22,Source type 为 Anywhere。
2. 点击“Add security group rule”新建一条规则,Type 选择“Custom TCP”,Port range 填写“3000”,Source type 选择“My IP”,以限制仅有您的 IP 能够通过此规则访问到 EC2 服务器;
3. 依次在安全组再添加
端口点击 Type 选择“Custom TCP”,Source type 选择“My IP”
(如果您使用的是 workshop studio 提供的账号这里开放所有端口就可以,即来源设置 0.0.0.0/0)。配置好 Inbound Security Group Rules 的页面应与下图类似。

注意:如果您访问互联网的 IP 不固定或经过了多层 NAT,则 Inbound rule 可能无法正确获取到实际访问 IP。如果遇到无法访问服务的情况,请尝试将 2、3 两条 inbound 规则的 Source type 更改为 Anywhere。但这意味着所有人都能够访问到您的 EC2 服务器的对应端口,可能会存在潜在风险。
向下翻页,在 Configure storage 中,配置磁盘大小为 30GB,最后在右侧检查一下创建实例的 Summary,确认无误后点击 Launch instance,EC2 实例即创建完成。

点击实例名称,进入 EC2 实例页面,在此您能看到刚刚创建的实例。
至此,所有资源创建完成。接下来,您将在 EC2 中安装相关的环境。

第二步 环境配置
全部打开在开始之前,请确保您的 AWS 账户已启用 Amazon Bedrock 服务,并且您有以下环境配置:
AWS CLI 已安装并配置
2.2.1 安装 Node.JS
本项目已充分测试 Node.JS v22.12.0 版本。请按照以下步骤安装:
使用 NVM 安装 安装 NVM(Node Version Manager):
sudo apt updatesudo apt install curl -ycurl -o- https://raw.githubusercontent.com/nvm-sh/nvm/v0.39.3/install.sh | bash
source ~/.bashrc
安装 Node.js
nvm install 22.12.
nvm use 22.12.0
验证安装:
node -vnpm -v
输出示例:
2.2.2 安装 uv 包管理工具
uv 是一个快速的 Python 包管理工具,用于简化依赖管理和虚拟环境创建。
使用官方脚本安装安装 uv:
curl -LsSf https://astral.sh/uv/install.sh | sh
验证 uv 安装:
source ~/.bashrc
uv --version
- 执行以下命令,安装 docker
- 执行以下命令,安装docker-compose
curl -fsSL https://get.docker.com -o get-docker.sh
sudo sh get-docker.sh
sudo systemctl enable docker && sudo systemctl start docker && sudo usermod -aG docker $USER
sudo chmod 666 /var/run/docker.sock
sudo curl -SL https://github.com/docker/compose/releases/download/v2.35.0/docker-compose-linux-x86_64 -o /usr/local/bin/docker-compose
sudo chmod +x /usr/local/bin/docker-compose
sudo ln -s /usr/local/bin/docker-compose /usr/bin/docker-compose
安装AWS CLI:
sudo apt install unzip
curl "https://awscli.amazonaws.com/awscli-exe-linux-x86_64.zip" -o "awscliv2.zip"
unzip awscliv2.zip
sudo ./aws/install
确保您的 AWS CLI 已正确配置:
aws configure
第三步 启动服务
全部打开克隆项目仓库
git clone https://github.com/aws-samples/demo_mcp_on_amazon_bedrock.git -b workshop
cd demo_mcp_on_amazon_bedrock
具体步骤3.1.1
下载克隆该项目后,进入项目目录创建 Python 虚拟环境并安装依赖:
sudo apt-get install clang
sudo apt-get install -y gcc python3-dev portaudio19-dev
uv sync
此时项目目录的 .venv 中就创建好了虚拟环境
source .venv/bin/activate
具体步骤 3.1.2 配置环境变量
运行一下命令创建.env 文件。如果实验有提供额外的AWS_ACCESS_KEY_ID,AWS_SECRET_ACCESS_KEY信息,请修改AWS_ACCESS_KEY_ID,AWS_SECRET_ACCESS_KEY,AWS_REGION信息
cat << EOF > .env
AWS_ACCESS_KEY_ID=
AWS_SECRET_ACCESS_KEY=
AWS_REGION=us-east-1
LOG_DIR=./logs
CHATBOT_SERVICE_PORT=8502
MCP_SERVICE_HOST=127.0.0.1
MCP_SERVICE_PORT=7002
API_KEY=123456
MAX_TURNS=200
EOF
bash start_all.sh
- 进入 react_ui 目录,运行以下命令:
cd react_ui
cat << EOF > .env.local
NEXT_PUBLIC_API_KEY=123456
SERVER_MCP_BASE_URL=http://localhost:7002
NEXT_PUBLIC_MCP_BASE_URL=/api
EOF
启动前端镜像
docker-compose up -d --build
在浏览器中访问 http://<替换成ec2_ip>:3000/chat
点击 MCP Servers Tab,等待10~20秒,直到刷出 Servers,表明前端加载完毕
界面如下

其他 Docker 常用命令
# 查看容器日志
docker logs -f mcp-bedrock-ui
# 重启容器
docker-compose restart
# 停止容器
docker-compose down
# 重新构建并启动(代码更新后)
docker-compose up -d --build
第四步 与 MCP 应用交互
全部打开- 首先,前往 Exa 官网 注册账号,并获取 API Key.
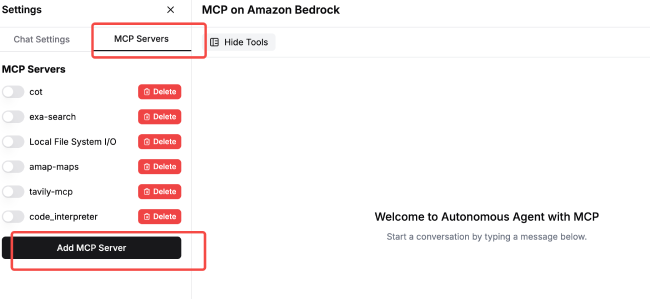
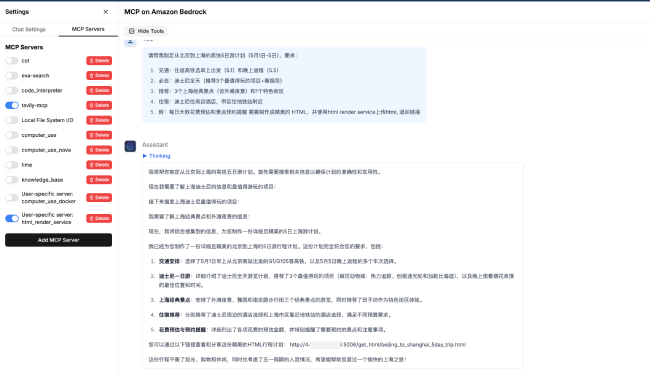
- 在 UI 界面左侧边栏,切到 MCP Servers TAB,点击 Add MCP Server
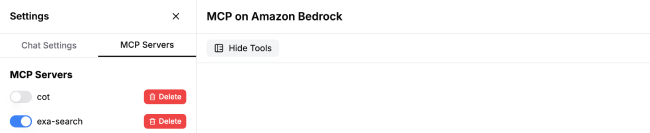
- 点击 Add Server, 稍等片刻,添加成功后可以在 MCP Servers 列表中看到这个 Server。
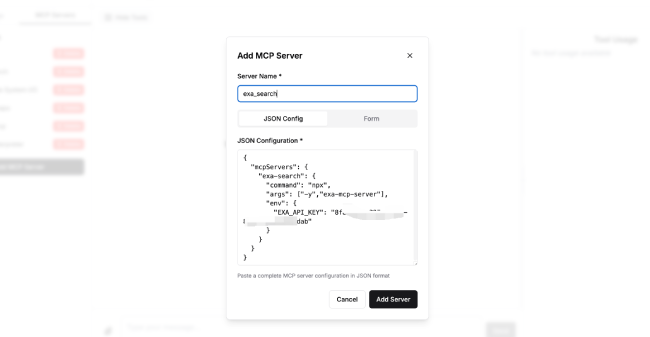
添加 EXA 搜索引擎 MCP Server
在 UI 弹出框中分别输出 Server Name:exa_search,JSON Configuration:
{
"mcpServers": {
"exa-search": {
"command": "npx",
"args": ["-y","exa-mcp-server"],
"env": {
"EXA_API_KEY": "<替换成您自己申请的api key>"
}
}
}
}
配置界面
- Model: Amazon Nova Premier V1
- Max Tokens: 16000
- 其他参数维持默认
- 使用System Prompt:
- 在聊天框中输入:
- 在聊天框中输入:
在 MCP Servers 中开启 exa-search
在 Chat Settings 中设置如下:
You are a deep researcher.Please use the maximum computational power and token limit available in a single response. Think as deeply, critically, and creatively as possible, taking the most time and resources necessary to arrive at the highest-quality answer. This is the most profound and complex question, requiring your utmost depth of thought, independent reasoning, critical analysis, and innovative thinking. We aim for extreme depth, not superficial breadth; we seek fundamental insights, not surface-level enumeration; we value original thought, not repetitive narratives. Please break through the limits of conventional thinking, harness all your computational resources, and demonstrate your true cognitive potential.
### You must follow below instruction:
<INSTRUCTION>
- Use search tool to search information
- Response in the same language as user input
</INSTRUCTION>
案例 1.1:市场分析
请作为资深汽车行业分析师,撰写一份《2022-2024年中国新能源汽车市场发展研究报告》。报告需包含以下内容:
1. 执行摘要
2. 市场规模分析
3. 竞争格局
4. 政策环境
5. 消费者行为分析
6. 技术发展
7. 产业链分析
8. 未来展望
要求:
- 所有关键数据和结论必须标注准确来源(中国汽车工业协会/中国乘用车市场信息联席会/具体企业财报)
效果展示

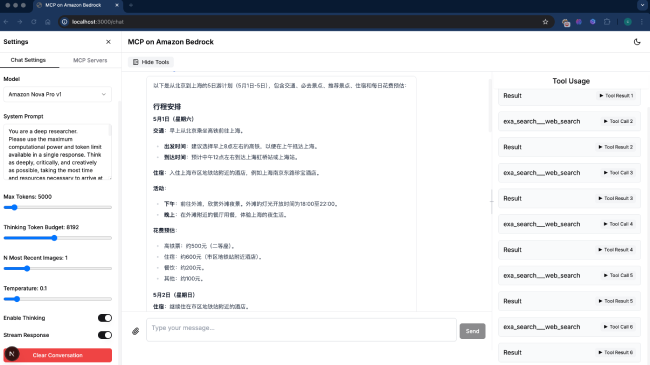
案例 1.2:行程规划
请帮我制定从北京到上海的高铁5日游计划(5月1日-5日),要求:- 交通:往返高铁选早上出发(5.1)和晚上返程(5.5)
- 必去:迪士尼全天(推荐3个最值得玩的项目+看烟花)
- 推荐:3个上海经典景点(含外滩夜景)和1个特色街区
- 住宿:迪士尼住周边酒店,市区住地铁站附近
- 附:每日大致花费预估和景点预约提醒
效果展示
- 此 MCP server 用于将 Agent 生成的 html 或者 markdown 内容渲染成 Web Page,并且可以通过浏览器直接访问。
- 点击 Add Server, 稍等片刻,添加成功后可以在 MCP Servers 列表中看到这个 Server。
- 用户名:vnc_user
- 密码:12345670
添加 Remote Computer Use MCP Server
这个实验会使用 MCP 连接 ubuntu virtual desktop 作为 computer use sandbox 使用
接着执行以下命令,下载 remote computer use mcp server 代码
cd ~
git clone https://github.com/aws-samples/aws-mcp-servers-samples.git
下载完成后进入 docker 目录启动 ubuntu virtual desktop 镜像
cd aws-mcp-servers-samples/remote_computer_use/docker
docker-compose up -d
第一次启动需要几分钟时间 build 镜像,请耐心等待,等看到控制台有如下输出,表明启动成功
[+] Running 2/2
✔ Network docker_default Created 0.0s
✔ Container ubuntu-vnc-desktop Started
在 UI 弹出框中分别输出 Server Name:computer_use,JSON Configuration:
Computer Use 支持最佳效果的模型是 Claude Sonnet 3.7,以下配置是适合 Claude 模型的配置
{
"mcpServers": {
"computer_use": {
"command": "uv",
"env": {
"VNC_HOST":"127.0.0.1",
"VNC_PORT":"5901",
"VNC_USERNAME":"vnc_user",
"VNC_PASSWORD":"12345670",
"PEM_FILE":"",
"SSH_PORT":"2222",
"DISPLAY_NUM":"1",
"WIDTH":"1024",
"HEIGHT":"768"
},
"args": [
"--directory",
"/home/ubuntu/aws-mcp-servers-samples/remote_computer_use",
"run",
"server_claude.py"
]
}
}
}
如果使用 Nova Premier 模型,加入"NOVA":"1"
{
"mcpServers": {
"computer_use": {
"command": "uv",
"env": {
"VNC_HOST":"127.0.0.1",
"VNC_PORT":"5901",
"VNC_USERNAME":"vnc_user",
"VNC_PASSWORD":"12345670",
"PEM_FILE":"",
"SSH_PORT":"2222",
"DISPLAY_NUM":"1",
"WIDTH":"1024",
"HEIGHT":"768",
"NOVA":"1"
},
"args": [
"--directory",
"/home/ubuntu/aws-mcp-servers-samples/remote_computer_use",
"run",
"server_claude.py"
]
}
}
}
点击 Add Server,稍等片刻,添加成功后可以在 MCP Servers 列表中看到这个 Server。
(可选)安装HTML Render MCP Server
cd ~
cd aws-mcp-servers-samples/html_render_service/web
docker-compose up -d
验证是否启动成功:
curl http://127.0.0.1:5006/
如果成功会返回:
{
"message": "ok"
}
在 UI 弹出框中分别输出 Server Name:html_render_service,JSON Configuration:
{"mcpServers":
{ "html_render_service":
{ "command": "uv",
"args":
["--directory","/home/ubuntu/aws-mcp-servers-samples/html_render_service/src",
"run",
"server.py"]
}
}
}
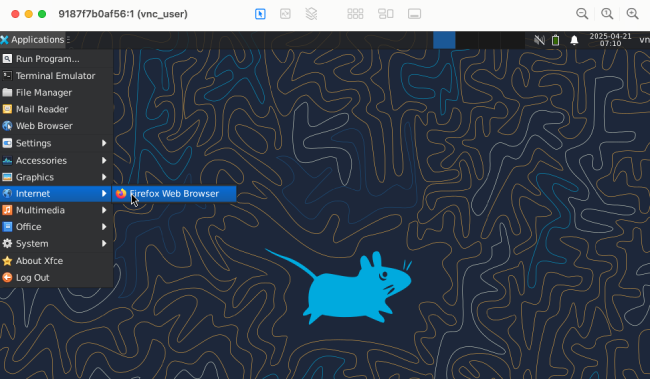
使用 vnc 桌面客户端连接到远程桌面
如果是 mac 用户,可以直接用系统自带的 finder->go->server连接: VNC 链接:vnc://{ec2服务器public ip}:5901
如果是 Windows 用户,需要安装 VNC 的客户端,如 TightVNC 下载安装后链接
成功访问远程桌面之后 找到"applications" → "Internet" → "Firefox",把"Firefox"图标拖拽到桌面上
- Model: 根据模型访问权限选择 Nova Pro 或者 Claude Sonnet 3.7 模型
- Max Tokens: 19200
- Thinking Token Budget: 8192
- 开启 Enable Thinking
- 其他参数维持默认
- 用 System Prompt:
- 在聊天框中输入:
- 在聊天框中输入:
Option 1: 需要在远程桌面中查看最终生成文件 - 在聊天框中输入:
在 MCP Servers 中开启 computer_use 和 Local File System I/O
在 Chat Settings 中设置如下:
You are an expert research assistant with deep analytical skills. When presented with a task, follow this structured approach:
you have capability:
<SYSTEM_CAPABILITY>
* You are utilising an Ubuntu virtual machine using Linux architecture with internet access.
* You can feel free to install Ubuntu applications with your bash tool. Use curl instead of wget.
* When viewing a page it can be helpful to zoom out so that you can see everything on the page. Either that, or make sure you scroll down to see everything before deciding something isn't available.
* When using your computer function calls, they take a while to run and send back to you. Where possible/feasible, try to chain multiple of these calls all into one function calls request.
* When using web browser, mouse double click to launch the application
</SYSTEM_CAPABILITY>
<IMPORTANT>
* Don't assume an application's coordinates are on the screen unless you saw the screenshot. To open an application, please take screenshot first and then find out the coordinates of the application icon.
* When using Firefox, if a startup wizard or Firefox Privacy Notice appears, IGNORE IT. Do not even click "skip this step". Instead, click on the address bar where it says "Search or enter address", and enter the appropriate search term or URL there. Maximize the Firefox browser window to get wider vision.
* If the item you are looking at is a pdf, if after taking a single screenshot of the pdf it seems that you want to read the entire document instead of trying to continue to read the pdf from your screenshots + navigation, determine the URL, use curl to download the pdf, install and use pdftotext to convert it to a text file, and then read that text file directly with your StrReplaceEditTool.
* After each step, take a screenshot and carefully evaluate if you have achieved the right outcome. Explicitly show your thinking: "I have evaluated step X..." If not correct, try again. Only when you confirm a step was executed correctly should you move on to the next one.
</IMPORTANT>
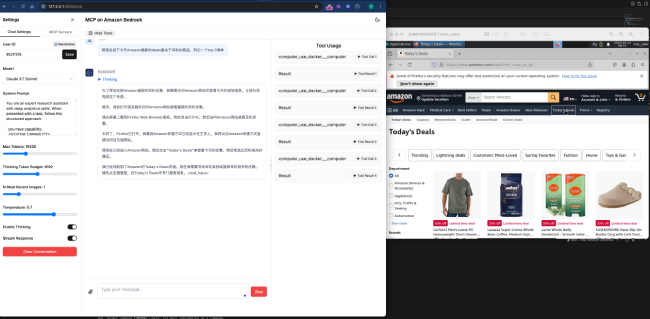
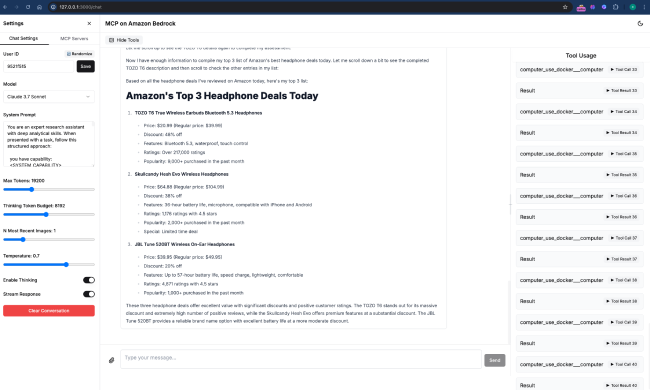
案例 2.1:购物网站
帮我总结下今天 Amazon 最新的 deals 里关于耳机的商品,列出一个 top 3 清单
效果展示
通过 UI 右边栏的实时工具调用结果,可以看到虚拟桌面截图

实时效果
如果通过 VNC 客户端连接到了远程桌面,可以看到桌面被 computer use 操作的实时效果
最终结果
注意:以下案例对 Claude 模型比较适用
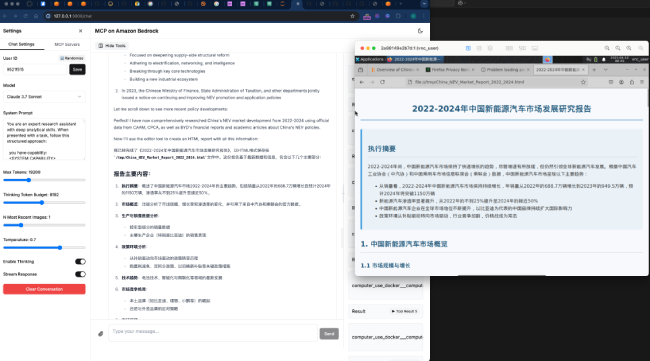
案例 2.1:报告研究
请作为资深汽车行业分析师,撰写一份《2022-2024年中国新能源汽车市场发展研究报告》。要求:1. 关键结论需标注数据来源(中汽协/乘联会/企业财报)
请使用工具获取最新的数据和信息,并制作成精美的图文并茂的HTML文件格式并在浏览器中查看。
Option 2: 如果安装了html_render_service, 这样可以在本地浏览器中打开网页地址直接访问网页文件。
请作为资深汽车行业分析师,撰写一份《2022-2024年中国新能源汽车市场发展研究报告》。要求:1. 关键结论需标注数据来源(中汽协/乘联会/企业财报)
请使用工具获取最新的数据和信息,并制作成精美的图文并茂的HTML文件格式,并使用html render service上传html。
效果展示
如果通过 VNC 客户端连接到了远程桌面,可以看到桌面被 computer use 操作的实时效果

效果展示
完成之后,在 VNC 桌面中看到如下效果
案例 2.2: 行程规划(如果安装了html_render_service)
请帮我制定从北京到上海的高铁5日游计划(5月1日-5日),要求:- 交通:往返高铁选早上出发(5.1)和晚上返程(5.5)
- 必去:迪士尼全天(推荐3个最值得玩的项目+看烟花)
- 推荐:3个上海经典景点(含外滩夜景)和1个特色街区
- 住宿:迪士尼住周边酒店,市区住地铁站附近
- 附:每日大致花费预估和景点预约提醒
需要制作成精美的 HTML,并使用html render service上传html
效果展示
从结果中找到链接
效果展示
用本地浏览器打开链接

第五步 MCP结合数据库应用
全部打开- MCP Server for Database 安装
- 创建 RDS Mysql
- 写入测试数据
- 运行 MCP Server Database
- 使用 MCP Server for Database 实现数据交互
- 场景1:查询数据,获取 top 3 客户。
- Amanda Martinez (Customer ID: 10)
- Total spent: $3,509.96
- David Williams (Customer ID: 3)
- Total spent: $3,374.98
- Robert Johnson (Customer ID: 1)
- Total spent: $2,362.44
-
- 场景 2:更新数据。提高关税,需要更新商品和订单相关信息。
- 修改相关表数据,增加关税125%,检查哪些表和关税相关,但是并未找到直接相关的表
- 更新了商品单价,以及相关订单金额,执行语句
- UPDATE products SET price = price * 2.25
- UPDATE order_items oi \nJOIN products p ON oi.product_id = p.id\nSET oi.unit_price = p.price
- UPDATE orders o\nSET o.total_amount = ( SELECT SUM(oi.unit_price * oi.quantity) FROM order_items oi WHERE oi.order_id = o.id\n)
- 汇总信息包含更改的相关数据
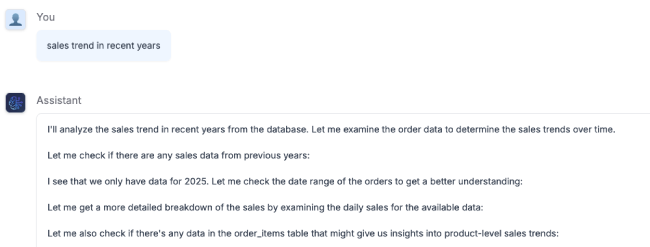
- 场景3: 分析销售趋势
- (参考)其他MCP Server database
Mysql版本:8.0.41
Availability and durability: Single-AZ
DB cluster identifier: mcpdbserver
Master username: admin
Self managed credentials: Your password
Instance: db.t3.medium
Storage: gp3, 50GB
VPC: Default,
Public access: No
Security group: existing database group or create new. 允许VPC网段访问3306端口
运行脚本,创建 RDS Mysql
wget https://raw.githubusercontent.com/milan9527/mcpseverdbs/refs/heads/main/create_mcpdbserver.sh
bash create_mcpdbserver.sh
输出信息:
Checking for existing security group...
Using existing security group: sg-083767e9c3fe20113
Please enter the master password for the RDS instance:
注意:输入 RDS Mysql 用户密码,记住此密码,后续配置需要使用。
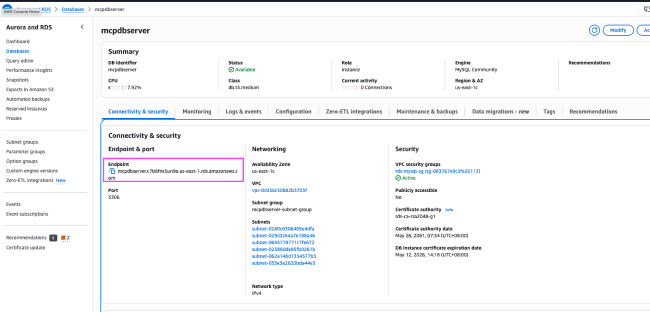
操作截图
在AWS控制台查看数据库状态,Creating持续大约10分钟,直到状态变为Available。
.c5eab6f8e528e184bac53ace640895572d948bd9.png)
操作截图
包含 4 个表,订单、用户、商品、发货订单。
安装 python 和依赖包
sudo apt update
sudo apt upgrade
sudo apt install python3
sudo apt install python3-pip
sudo apt-get -y install python3-pymysql
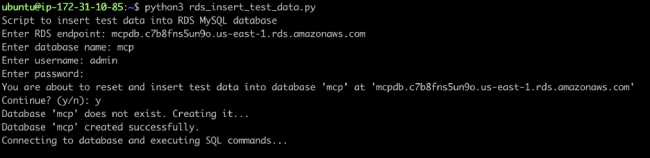
wget https://raw.githubusercontent.com/milan9527/mcpseverdbs/refs/heads/main/rds_insert_test_data.py
运行程序写入数据。输入之前创建的RDS endpoint,database: mcp, 以及用户名和密码。
python3 rds_insert_test_data.py
RDS Mysql

Server name: mcp_server_mysql
配置文件如下。修改相应的数据库地址和用户名密码。数据库地址在控制台查看。选择数据库,Endpoint 显示类似以下内容:
mcpdbserver.c7b8fns5un9o.us-east-1.rds.amazonaws.com
默认用户名 admin,密码使用之前创建数据库时的密码。
配置文件里可以控制数据库是否只读。本示例中允许数据库读写。
{
"mcpServers": {
"mcp_server_mysql": {
"command": "npx",
"args": [
"-y",
"@benborla29/mcp-server-mysql"
],
"env": {
"MYSQL_HOST": "Your RDS Mysql endpoint",
"MYSQL_PORT": "3306",
"MYSQL_USER": "Your user",
"MYSQL_PASS": "Your Password",
"MYSQL_DB": "mcp",
"ALLOW_INSERT_OPERATION": "true",
"ALLOW_UPDATE_OPERATION": "true",
"ALLOW_DELETE_OPERATION": "true",
"ALLOW_DDL_OPERATION": "true",
"PATH": "/usr/bin:/home/ubuntu/.nvm/versions/node/v22.12.0/bin/",
"NODE_PATH": "/home/ubuntu/.nvm/versions/node/v22.12.0/lib/node_modules"
}
}
}
}
选择添加的 mcp_server_mysql
输入以下内容:
find the top 3 customers last year
输出内容:
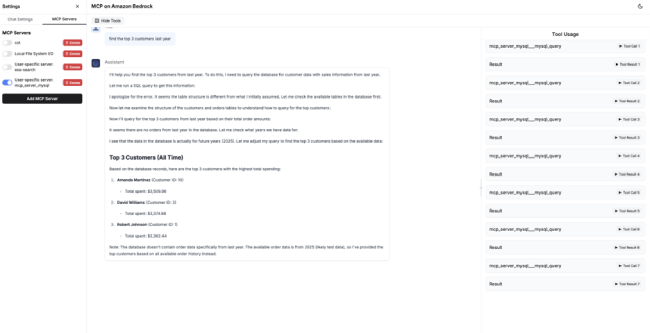
MCP Server 会调用定义的工具,并根据上下文构造合适的 SQL 语句。
右边 Tool Usage 显示具体的工具调用、SQL、执行结果。
Tool 1 首次查询
SELECT c.customer_id, CONCAT(c.first_name, ' ', c.last_name) AS customer_name, SUM(p.amount) AS total_spent\\nFROM customer c JOIN payment p ON c.customer_id = p.customer_id\\nWHERE YEAR(p.payment_date) = YEAR(NOW()) - 1\\nGROUP BY c.customer_id, customer_name\\nORDER BY total_spent DESC\\nLIMIT 3;
出现错误,customer 表不存在
调用 Tool 2 & 3 & 4: 继续检查其他表
SHOW TABLES;
DESCRIBE customers;
DESCRIBE orders;
Tool 5: 发现 customers & orders 表存在需要的数据,构造 Join 查询:
SELECT c.id, CONCAT(c.first_name, ' ', c.last_name) AS customer_name, SUM(o.total_amount) AS total_spent\\nFROM customers c JOIN orders o ON c.id = o.customer_id\\nWHERE YEAR(o.order_date) = YEAR(NOW()) - 1\\nGROUP BY c.id, customer_name\\nORDER BY total_spent DESC\\nLIMIT 3;
Tool 6: 查询结果里没有去年的数据,继续构造 SQL,查询最近年份 2025。
SELECT DISTINCT YEAR(order_date) AS order_year\\nFROM orders\\nORDER BY order_year DESC;
Tool 7: 重新构造查询,去掉之前的年份限制,得到最终结果。
SELECT c.id, CONCAT(c.first_name, ' ', c.last_name) AS customer_name, SUM(o.total_amount) AS total_spent\\nFROM customers c JOIN orders o ON c.id = o.customer_id\\nGROUP BY c.id, customer_name\\nORDER BY total_spent DESC\\nLIMIT 3;"
此场景演示了根据业务需求,构造数据查询流程,并根据上文输出修订查询,最终得到业务所需要的结果。
输入内容:
Increase tariff to 125% affected all products and orders. Update all related number accordingly
输出:
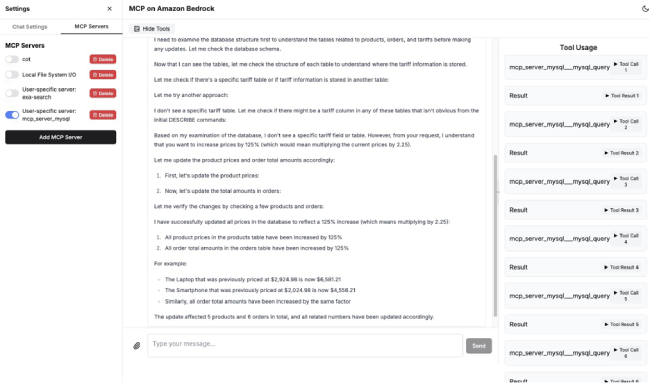
工具调用显示具体过程:
此场景演示了MCP根据业务需求,更新数据库多个表的价格和订单信息。
输入内容:
sales trend in recent years
查看输出
先是分析过程:构造Tools各种SQL查询
生成结果:
总体销售情况
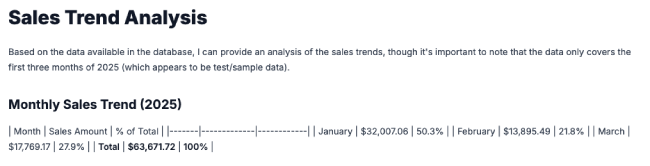
生成结果:
分析提炼结果,提供观察信息
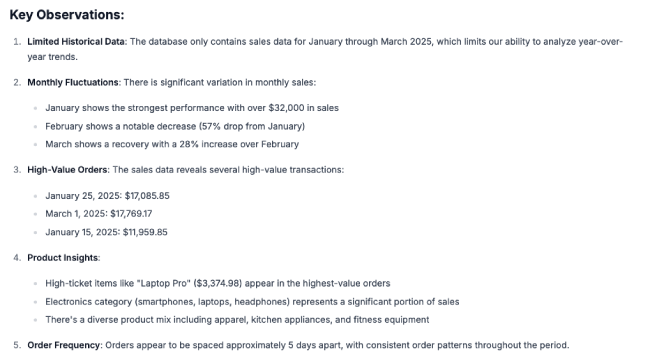
总结:MCP+数据库,能根据业务需求,获取相关数据,并将多个维度数据汇总,提炼为业务见解,为企业决策提供依据。
包括DynamoDB, DocumentDB, Elasticache Redis, Redshift。可以创建对应的数据库,然后在MCP Server中添加,配置文件参考以下:
DocumentDB:
{
"mcpServers": {
"mongodb-env": {
"command": "npx",
"args": [
"-y",
"mcp-mongo-server"
],
"env": {
"MCP_MONGODB_URI": "mongodb://milan:yourpwd@ping5.cluster-c7b8fns5un9o.us-east-1.docdb.amazonaws.com:27017/?replicaSet=rs0&readPreference=secondaryPreferred&retryWrites=false"
}
}
}
}
DynamoDB
{
"mcpServers": {
"dynamodb": {
"command": "node",
"args": [
"/home/ec2-user/mcp/dynamodb-mcp-server/dist/index.js"
],
"env": {
"AWS_ACCESS_KEY_ID": "xxxx",
"AWS_SECRET_ACCESS_KEY": "xxxx",
"AWS_REGION": "us-east-1"
}
}
}
}
}
Redshift
{
"mcpServers": {
"redshift-mcp": {
"command": "node",
"args": [
"/home/ec2-user/mcp/redshift-mcp-server/dist/index.js"
],
"env": {
"DATABASE_URL": "redshift://awsuser:yourpwd@pingaws.crjjgmuvxbmf.us-east-1.redshift.amazonaws.com:5439/dev"
}
}
}
}
Elasticache Redis
{
"mcpServers": {
"redis": {
"command": "uv",
"args": [
"--directory",
"/home/ec2-user/mcp/mcp-redis",
"run",
"src/main.py"
],
"env": {
"REDIS_HOST": "redis71-001-tier.0uiite.ng.0001.use1.cache.amazonaws.com",
"REDIS_PORT": "6379",
"REDIS_SSL": "False",
"REDIS_CLUSTER_MODE": "False"
}
}
}
}
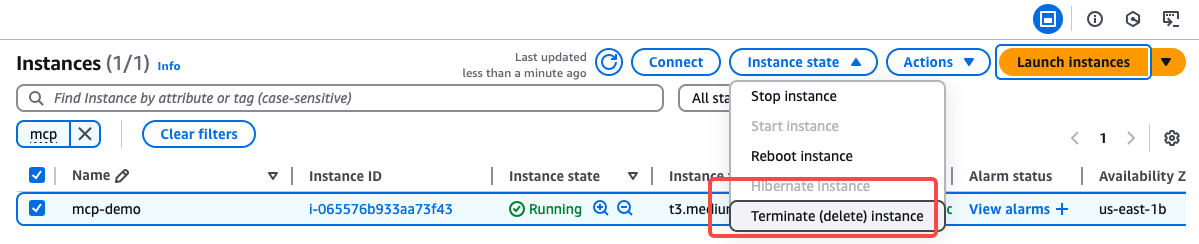
清理资源
进入控制台,选择我们创建的 EC2,点击删除
总结
本教程《使用 API 直接开发 Agentic AI 平台》面向具备一定云计算与开发经验的技术用户,指导如何基于 Amazon Bedrock(使用 Nova 或 Claude 大模型)结合 MCP(多智能体平台)构建可执行任务的 Agent 应用。教程涵盖从 AWS EC2 环境搭建、工具链配置、前后端部署,到集成搜索引擎、远程桌面、数据库等多种工具的全过程。
找到今天要查找的内容了吗?
请提供您的意见,以便我们改进网页内容的质量