.NET on AWS Blog
Modernize ASP.NET Web Forms UI to Blazor with AWS Transform
AWS Transform is an agentic service that accelerates modernization, including .NET applications. With it, you can transform .NET Framework Windows applications to cross-platform .NET and reduce operating costs up to 40% by running on Linux. For ASP.NET web applications, AWS Transform can port the UI layer to ASP.NET Core. In this post, I’ll explain how to transform ASP.NET Web Forms UI to modern .NET.
I’ll first explain how Web Forms porting works, then walk you through the steps to transform a Web Forms application with AWS Transform. When we’re done, we’ll have transformed a .NET Framework 4.8 Web Forms application to a .NET 10 Blazor application.
How Web Forms to Blazor porting works
Because Web Forms is not supported on ASP.NET Core, it is necessary to move to a supported UI (“apples to oranges” porting). AWS Transform rewrites your Web Forms UI layer code for Blazor with server-side hosting.
The following table shows how Web Forms files map to Blazor files.
| From | To | Description |
| *.aspx, *.ascx | *.razor | .aspx pages and .ascx custom controls become .razor files |
| Web.config | appsettings.json | Web.config settings become appsettings.json settings |
| Global.asax | Program.cs | Global.asax code becomes Program.cs code |
| *.master | *layout.razor | Master files become layout.razor files |
Project structure after transformation
In the transformed Blazor project, files reside in the following project locations, shown visually in Figure 1.
- Components folder: All razor components (*.razor) are placed in a Components folder, at the same level as the .csproj file.
- Pages mapping: Web Forms pages (*.aspx) become .razor files in Components/Pages.
- Controls mapping: Web Forms controls (*.ascx) become .razor files in Components.
- Static files mapping: .css, .js, and image files are placed in the wwroot folder.
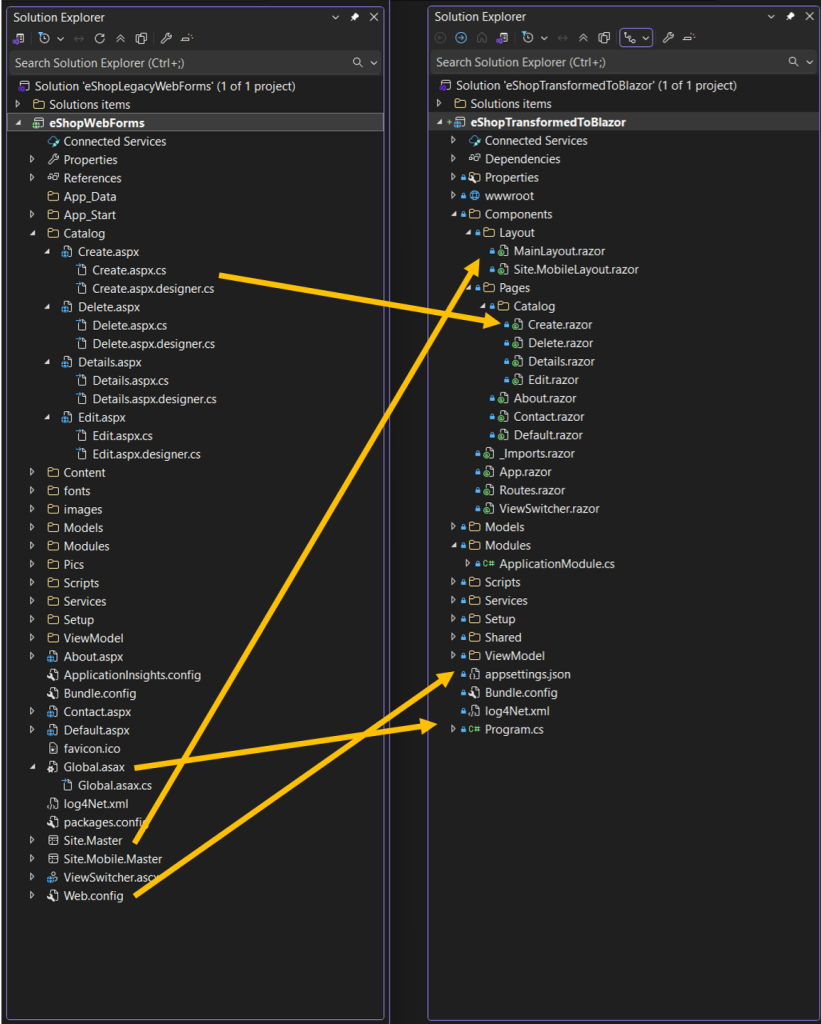
Figure 1: File transformation mapping
Limitations and unsupported features
Currently, AWS Transform supports transformation of Web Application projects with a .csproj file. If instead you have Web Site projects, you must convert them over to Web Application projects in order to use AWS Transform. You can find Microsoft conversion guidance at Converting a Web Site Project to a Web Application Project.
The following features are not supported at present. If your applications use them, you’ll need to handle that part of the porting yourself or with an AI code companion.
- .asmx files (XML web service)
- .svc files (service files)
- .ashx files (generic handler files)
- Service references & web references (reference.map, reference.cs, .wsdl files)
- Third-party vendor UI libraries/controls
Walkthrough
In this walkthrough, we’ll transform eShop, a public Web Forms sample, from ASP.NET to ASP.NET Core using AWS Transform in Visual Studio 2026. You can see a preview of the walkthrough in this interactive demo video.
Prerequisites
If you care to follow along and perform the walkthrough on your own machine, be sure you have the following:
- A Windows development machine.
- Visual Studio 2026 is installed.
- AWS Toolkit is installed from Visual Studio Marketplace (latest version).
- AWS Transform setup is complete.
- An IAM Identity Center user credential for AWS Transform.
Step 1: Setup
In this step, you’ll download the sample application and get familiar with it.
- Download the eShop sample from GitHub, which contains a Web Forms project.
- Open the eShopLegacyWebForms project in Visual Studio.
- Confirm the eShop project is a .NET Framework 4.8 project, and that it builds, as shown in Figure 2.
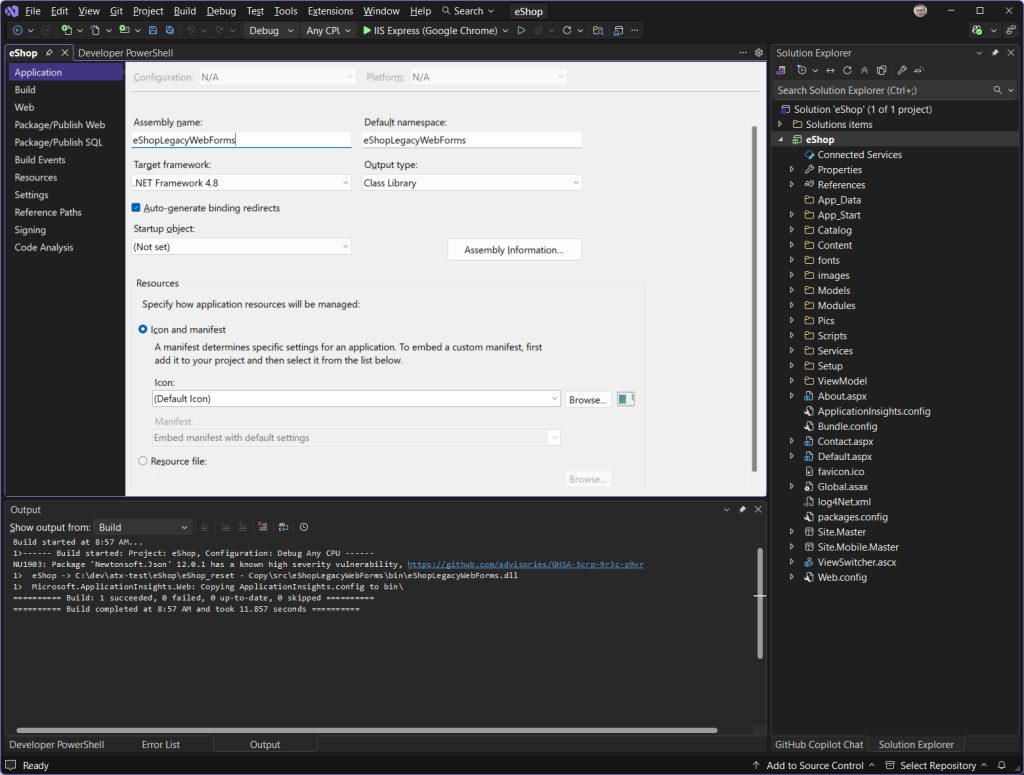
Figure 2: eShop in Visual Studio
- Run the app with F5 or Debug > Start Debugging to see its appearance and behavior, then stop debugging. It should look like Figure 3.

Figure 3: eShop Web Forms app running in browser
Step 2: Sign in to AWS Transform
Next, we’ll sign in to AWS Transform.
- From the Visual Studio menu, select Extensions > AWS Transform > Getting Started.
- On the AWS Transform panel, sign-in to AWS Transform with your IAM Identity Center credentials. Once you complete sign-in, Connected with IAM Identity Center should appear in the panel, as shown in Figure 4.
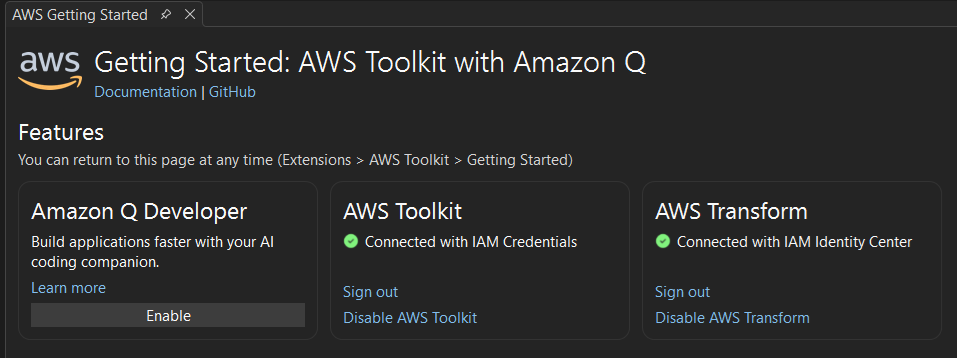
Figure 4: Signed in to AWS Transform
Step 3: Transform the application
Now we’re ready to transform. Let’s get a transformation job started.
- Open a .cs code file from the solution in the code editor, such as
Default.aspx.cs. - In Solution Explorer, right-click the eShop project and choose Port project with AWS Transform.
- On the Port project dialog, shown in Figure 5, create or choose a workspace and set the .NET target to net10.0.
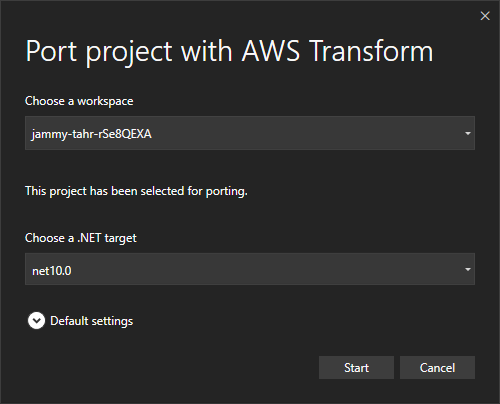
Figure 5: Port project dialog
- Choose Start to begin the transformation. You’ll soon see a notification at top confirming that a transformation job is in progress, as shown in Figure 6. You can view job progress in the AWS Transform Hub window.

Figure 6: Transformation job started
- After a few minutes, AWS Transform will ask if you want to review a transformation plan. Choose Continue with Transformation.
- As the code is transformed, monitor transformation progress and view details in the AWS Transform Hub window, shown in Figure 7.
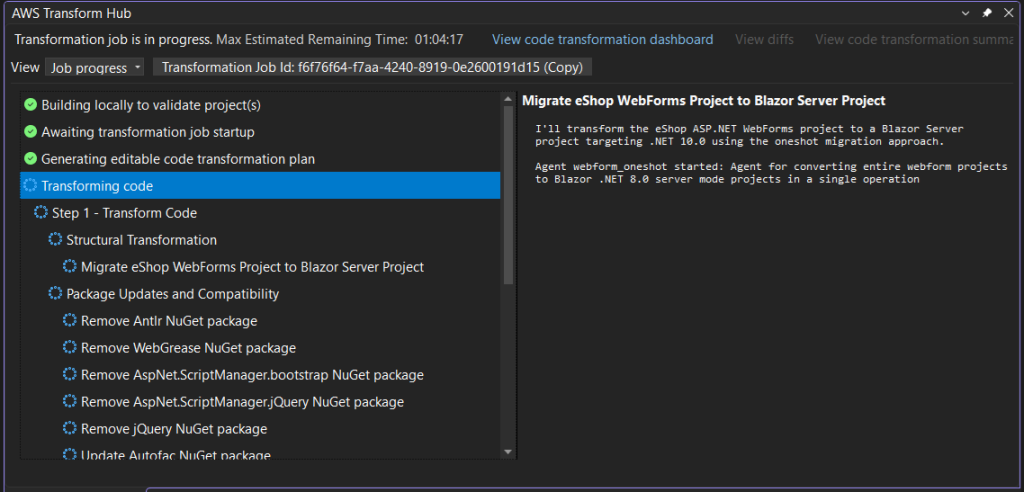
Figure 7: AWS Transformation Hub
- Wait for the transformation to complete. When it finishes, a Your transformation is completed notification will appear at the top of Visual Studio, shown in Figure 8.

Figure 8: Transformation complete
Step 4: Review the transformation report
Let’s understand what AWS Transform did, and why.
- Choose View code transformation summary and then Download transformation report.
- Open the HTML transformation report and review the description of what was changed, shown in Figure 9. In our case, we see UI-related changes under the Application Model and Routing & Navigation sections.
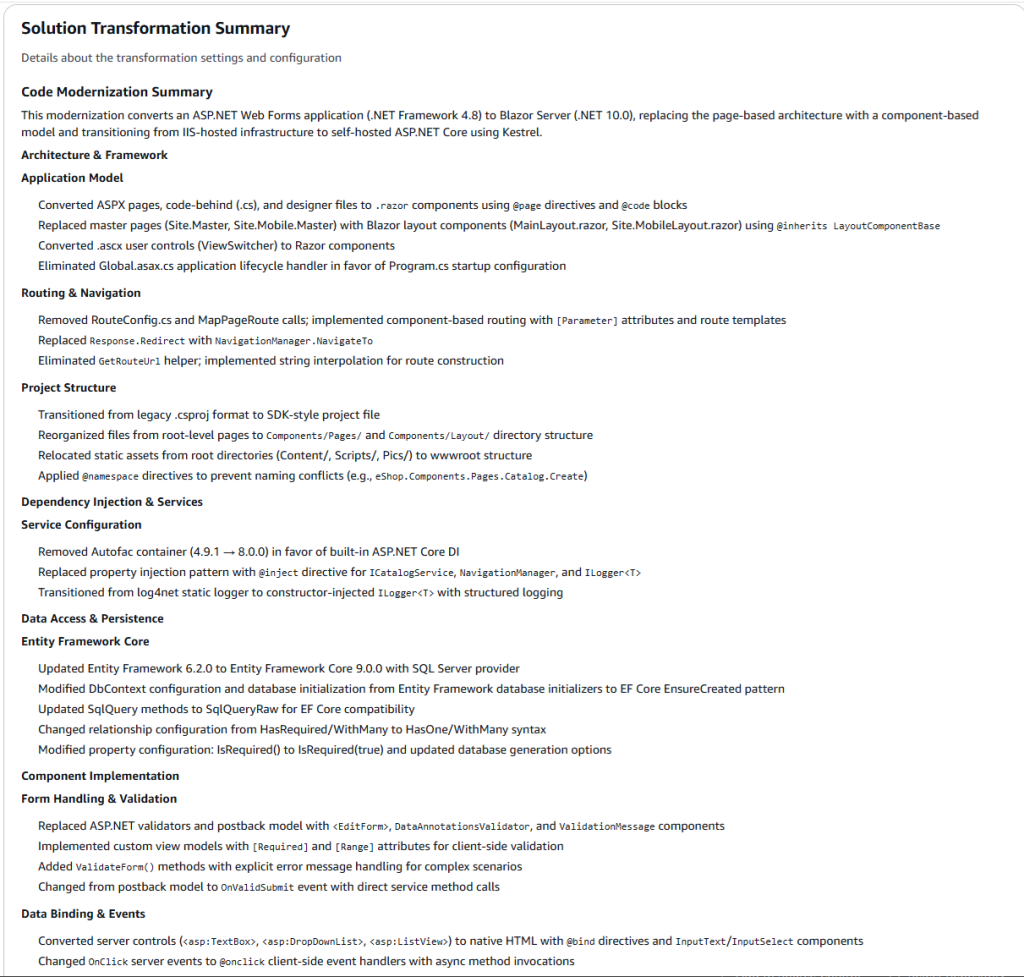
Figure 9: Transformation Report
- Choose View code transformation summary and then View diffs. A list of file changes appears, where you can view added, modified, renamed, or removed code files.
- Review the file changes to see what was added, removed, and modified. Give special attention to added .razor files such as
Default.razor, shown in Figure 10. - Also note using statement changes to .cs files, which no longer use
System.Data.Entityand instead useMicrosoft.EntityFrameworkCorenamespaces.
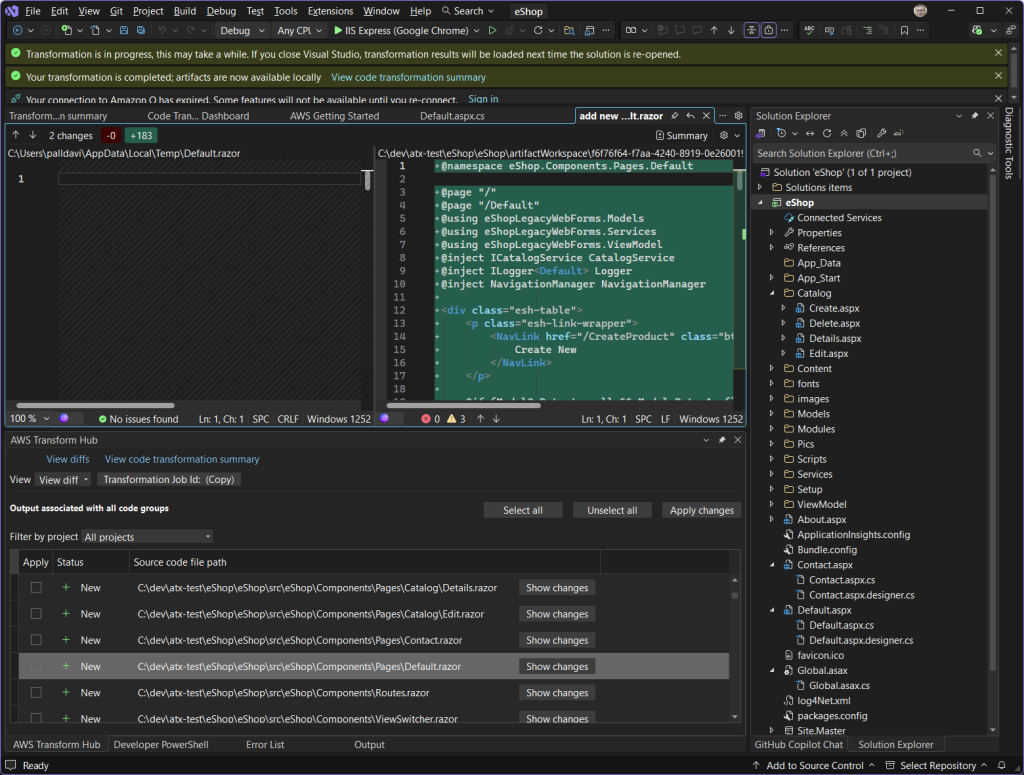
Figure 10: Reviewing code diff changes
Step 5: Apply the code changes
Now, we’ll apply the code changes and examine the updated application.
- On the View diff list, choose Select all and then Apply changes. The file changes are applied to your project, and Visual Studio prompts you to reload all files.
- In Solution Explorer, check the project properties. eShop is now a .NET 10 project, as shown in Figure 11.
- Review the solution structure. It is now a Blazor project, with .razor files.
- Next, build the solution. In our case, there were no build errors.

Figure 11: Application is .NET 10 and is now a Blazor project.
Step 6: Complete porting
AWS Transform does the heavy lifting in modernizing your code, but a transformed application is not necessarily complete, even if it builds. As the developer, your role is to review the application for correctness and complete any remaining porting tasks. There may be build errors or runtime errors to address. In my example, I had runtime errors and used an AI code companion to resolve them. If the project does not build, review the transformation report from Step 4, which provides details and advice about build errors as well as a downloadable Next Steps prompt.
I changed “Web Forms” to “Blazor” in the MainLayout.razor page to display the new platform. You can see the transformed ASP.NET Core Blazor code running on .NET 10 in Figure 12.
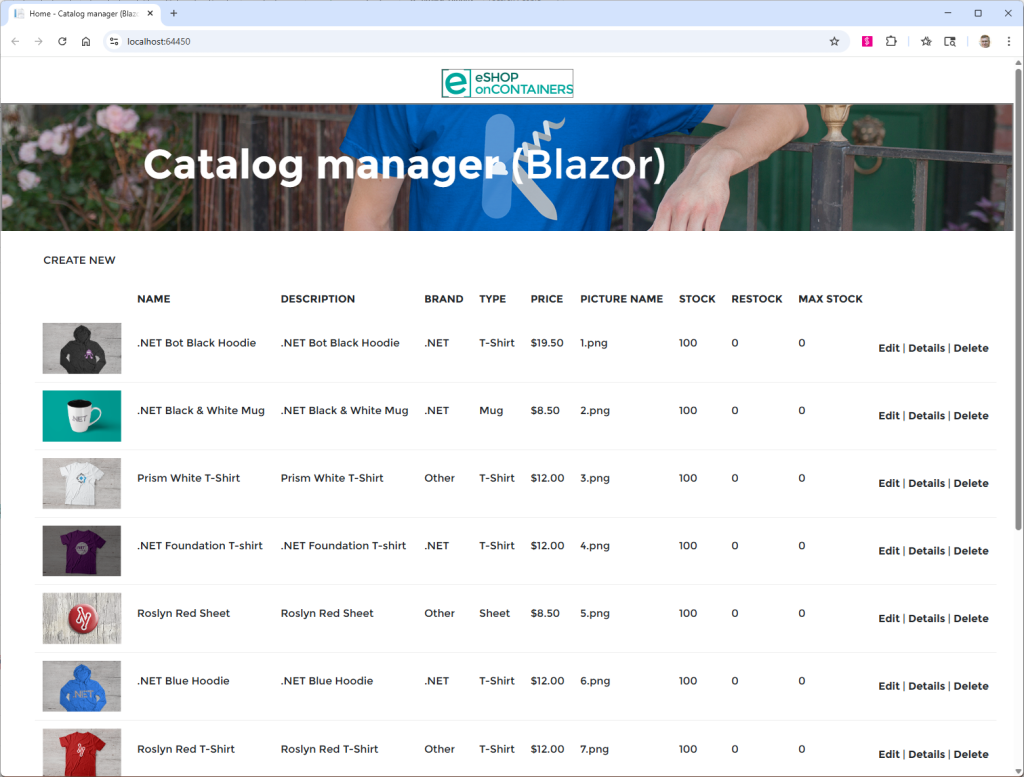
Figure 12: Transformed Blazor application running
Conclusion
AWS Transform provides full-stack Windows modernization, including ASP.NET UI porting to ASP.NET Core. In this post, we learned how to port Web Forms UI to Blazor on ASP.NET Core. AWS Transform can also port MVC Razor UI. For more information about AWS Transform, refer to the AWS Transform User Guide.