AWS Developer Tools Blog
Using the AWS Lambda Project in Visual Studio
Last week we launched C# and .NET Core support for AWS Lambda. That release provided updated tooling for Visual Studio to help you get started writing your AWS Lambda functions and deploy them right from Visual Studio. In this post, we describe how to create, deploy, and test an AWS Lambda project.
Creating a Lambda Project
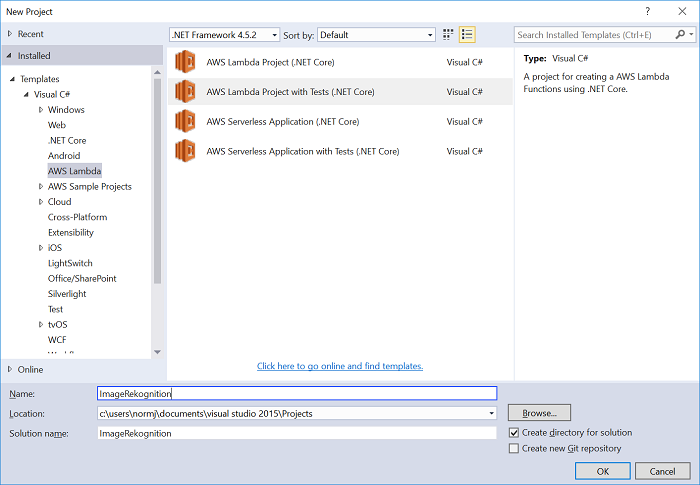
To get started writing Lambda functions in Visual Studio, you first need to create an AWS Lambda project. You can do this by using the Visual Studio 2015 New Project wizard. Under the Visual C# templates, there is a new category called AWS Lambda. You can choose between two types of project, AWS Lambda Project and AWS Serverless Application, and you also have the option to add a test project. In this post, we’ll focus on the AWS Lambda project and save AWS Serverless Application for a separate post. To begin, choose AWS Lambda Project with Tests (.NET Core), name the project ImageRekognition, and then choose OK.
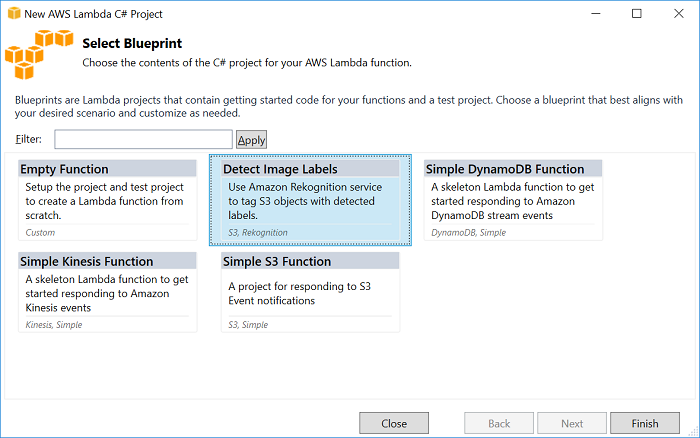
On the next page, you choose the blueprint you want to get started with. Blueprints provide starting code to help you write your Lambda functions. For this example, choose the Detect Image Labels blueprint. This blueprint provides code for listening to Amazon S3 events and uses the newly released Amazon Rekognition service to detect labels and then add them to the S3 object as tags.
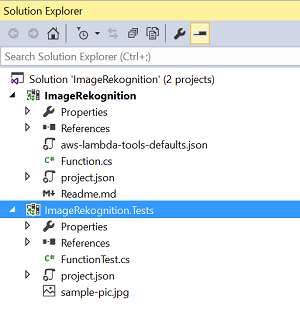
When the project is complete, you will have a solution with two projects, as shown: the source project that contains your Lambda function code that will be deployed to AWS Lambda, and a test project using xUnit for testing your function locally.
You might notice when you first create your projects that Visual Studio does not find all the NuGet references. This happens because these blueprints require dependencies that must be retrieved from NuGet. When new projects are created, Visual Studio only pulls in local references and not remote references from NuGet. You can fix this easily by right-clicking your references and choosing Restore Packages.
Lambda Function Source
Now let’s open the Function.cs file and look at the code that came with the blueprint. The first bit of code is the assembly attribute that is added to the top of the file.
// Assembly attribute to enable the Lambda function's JSON input to be converted into a .NET class.
[assembly: LambdaSerializerAttribute(typeof(Amazon.Lambda.Serialization.Json.JsonSerializer))]
By default, Lambda accepts only input parameters and return types of type System.IO.Stream. To use typed classes for input parameters and return types, we have to register a serializer. This assembly attribute is registering the Lambda JSON serializer, which uses Newtonsoft.Json to convert the streams to typed classes. The serializer can be set at the assembly or method level.
The class has two constructors. The first is a default constructor that is used when Lambda invokes your function. This constructor creates the S3 and Rekognition service clients, and will get the AWS credentials for these clients from the IAM role we’ll assign to the function when we deploy it. The AWS Region for the clients will be set to the region your Lambda function is running in. In this blueprint, we only want to add tags to our S3 object if the Rekognition service has a minimum level of confidence about the label. This constructor will check the environment variable MinConfidence to determine the acceptable confidence level. We can set this environment variable when we deploy the Lambda function.
public Function()
{
    this.S3Client = new AmazonS3Client();
    this.RekognitionClient = new AmazonRekognitionClient();

    var environmentMinConfidence = System.Environment.GetEnvironmentVariable(MIN_CONFIDENCE_ENVIRONMENT_VARIABLE_NAME);
    if(!string.IsNullOrWhiteSpace(environmentMinConfidence))
    {
        float value;
        if(float.TryParse(environmentMinConfidence, out value))
        {
            this.MinConfidence = value;
            Console.WriteLine($"Setting minimum confidence to {this.MinConfidence}");
        }
        else
        {
            Console.WriteLine($"Failed to parse value {environmentMinConfidence} for minimum confidence. Reverting back to default of {this.MinConfidence}");
        }
    }
    else
    {
        Console.WriteLine($"Using default minimum confidence of {this.MinConfidence}");
    }
}
We can use the second constructor for testing. Our test project configures its own S3 and Rekognition clients and passes them in.
public Function(IAmazonS3 s3Client, IAmazonRekognition rekognitionClient, float minConfidence)
{
    this.S3Client = s3Client;
    this.RekognitionClient = rekognitionClient;
    this.MinConfidence = minConfidence;
}
FunctionHandler is the method Lambda will call after it constructs the instance. Notice that the input parameter is of type S3Event and not a Stream. We can do this because of our registered serializer. The S3Event contains all the information about the event triggered in S3. The function loops through all the S3 objects that were part of the event and tells Rekognition to detect labels. After the labels are detected, they are added as tags to the S3 object.
public async Task FunctionHandler(S3Event input, ILambdaContext context)
{
    foreach(var record in input.Records)
    {
        if(!SupportedImageTypes.Contains(Path.GetExtension(record.S3.Object.Key)))
        {
            Console.WriteLine($"Object {record.S3.Bucket.Name}:{record.S3.Object.Key} is not a supported image type");
            continue;
        }

        Console.WriteLine($"Looking for labels in image {record.S3.Bucket.Name}:{record.S3.Object.Key}");
        var detectResponses = await this.RekognitionClient.DetectLabelsAsync(new DetectLabelsRequest
        {
            MinConfidence = MinConfidence,
            Image = new Image
            {
                S3Object = new Amazon.Rekognition.Model.S3Object
                {
                    Bucket = record.S3.Bucket.Name,
                    Name = record.S3.Object.Key
                }
            }
        });

        var tags = new List();
        foreach(var label in detectResponses.Labels)
        {
            if(tags.Count < 10)
            {
                Console.WriteLine($"\tFound Label {label.Name} with confidence {label.Confidence}");
                tags.Add(new Tag { Key = label.Name, Value = label.Confidence.ToString() });
            }
            else
            {
                Console.WriteLine($"\tSkipped label {label.Name} with confidence {label.Confidence} because maximum number of tags reached");
            }
        }

        await this.S3Client.PutObjectTaggingAsync(new PutObjectTaggingRequest
        {
            BucketName = record.S3.Bucket.Name,
            Key = record.S3.Object.Key,
            Tagging = new Tagging
            {
                TagSet = tags
            }
        });
    }
    return;
}
Notice that the code contains calls to Console.WriteLine(). When the function is being run in AWS Lambda, all calls to Console.WriteLine() will redirect to Amazon CloudWatch Logs.
Default Settings File
Another file that was created with the blueprint is aws-lambda-tools-defaults.json. This file contains default values that the blueprint has set to help prepopulate some of the fields in the deployment wizard. It is also helpful in setting command line options with our integration with the new .NET Core CLI. We’ll dive deeper into the CLI integration in a later post, but to get started using it, navigate to the function’s project directory and type dotnet lambda help.
{
  "Information" : [
    "This file provides default values for the deployment wizard inside Visual Studio and the AWS Lambda commands added to the .NET Core CLI.",
    "To learn more about the Lambda commands with the .NET Core CLI execute the following command at the command line in the project root directory.",

    "dotnet lambda help",

    "All the command line options for the Lambda command can be specified in this file."
  ],

  "profile":"",
  "region" : "",
  "configuration" : "Release",
  "framework" : "netcoreapp1.0",
  "function-runtime":"dotnetcore1.0",
  "function-memory-size" : 256,
  "function-timeout" : 30,
  "function-handler" : "ImageRekognition::ImageRekognition.Function::FunctionHandler"
}
An important field to understand is the function-handler. This indicates to Lambda the method to call in our code in response to our function being invoked. The format of this field is <assembly-name>::<full-type-name>::<method-name>. Be sure to include the namespace with the type name.
Deploying the Function
To get started deploying the function, right-click the Lambda project and then choose
Publish to AWS Lambda. This starts the deployment wizard. Notice that many of the fields are already set. These values came from the aws-lambda-tools-defaults.json file described earlier. We do need to enter a function name. For this example, let’s name it ImageRekognition, and then choose Next.

On the next page, we need to select an IAM role that gives permission for our code to access S3 and Rekognition. To keep this post short, let’s select the Power User managed policy; the tools create a role for us based on this policy. Note that the Power User managed policy was added to use to create a role in version 1.11.1.0 of the toolkit.
Finally, we set the environment variable MinConfidence to 60, and then choose Publish.

This launches the deployment process, which builds and packages the Lambda project and then creates the Lambda function. Once publishing is complete, the Function view in the AWS Explorer window is displayed. From here, we can invoke a test function, view CloudWatch Logs for the function, and configure event sources.

With our function deployed, we need to configure S3 to send its events to our new function. We do this by going to the event source tab and choosing Add. Then, we choose Amazon S3 and choose the bucket we want to connect to our Lambda function. The bucket must be in the same region as the region where the Lambda function was deployed.
Testing the Function
Now that the function is deployed and an S3 bucket is configured as an event source for it, open the S3 bucket browser from the AWS Explorer for the bucket we selected and upload some images.
When the upload is complete, we can confirm that our function ran by looking at the logs from our function view. Or, we can right-click the images in the bucket browser and select Properties. In the Properties dialog box on the Tags tab, we can view the tags that were applied to our object.

Conclusion
We hope this post gives you a good understanding of how our tooling inside Visual Studio works for developing and creating Lambda functions. We’ll be adding more blueprints over time to help you get started using other AWS services with Lambda. The blueprints are hosted in our new Lambda .NET GitHub repository. If you have any suggestions for new blueprints, open an issue and let us know.