AWS Cloud Financial Management
Cost Reporting Based on AWS Organizations Account ID Tags
Voiced by Amazon Polly
This blog post is contributed by Christian Volkmer, AWS Solutions Architect
AWS offers you several services to tags your resources, so you can get the granular cost and usage information by the dimension you desired. Read our previous blogs “AWS-generated vs. user-generated cost allocation tag” and “Enforce and validate AWS resource tags” to learn about how you can create or activate these tags. Once you activate your cost allocation tags, these metadata information will be available in your AWS cost management reports, such as AWS Cost Explorer, and AWS Cost & Usage Report.
In addition to tagging resources used by an AWS account, tags can also be applied to AWS accounts via AWS Organizations itself. As of today, you can’t run or build cost reports based on AWS Organizations Account tags via AWS Cost Explorer or AWS Cost & Usage Reports.
This blog post will walk you through how to:
· retrieve Account information including tags from AWS Organizations
· get cost details from the AWS Cost Explorer API
· store this information in a CSV file in Amazon S3
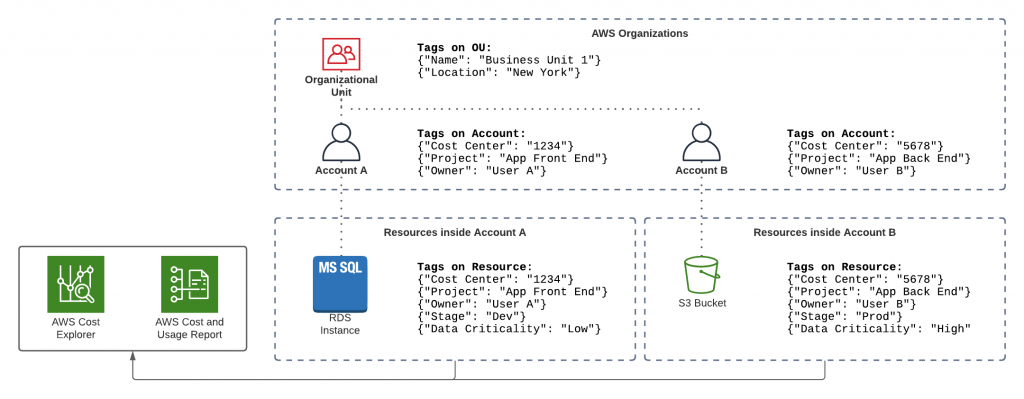
Figure 1: Overview about tagging options
Overview
The following diagram shows the architecture and workflow needed to retrieve information from AWS Organizations, query the AWS Cost Explorer API, and store the data in Amazon S3. The solution has to be deployed in the AWS Organizations Management account.
- An Amazon CloudWatch Event schedule triggers an AWS Lambda function once a month.
- The AWS Lambda function queries AWS Organizations for all AWS account IDs.
- For each account ID, it queries for 3 pre-defined tags (see section “Add Tags to your AWS Accounts” below).
- Once all account information is retrieved, the AWS Lambda function calls the AWS Cost Explorer API to retrieve the blended cost for each account.
- The information is written to a .CSV file and uploaded to an Amazon S3 bucket.
You can download the sources (AWS CloudFormation template and AWS Lambda function) of this solution on our GitHub repository.
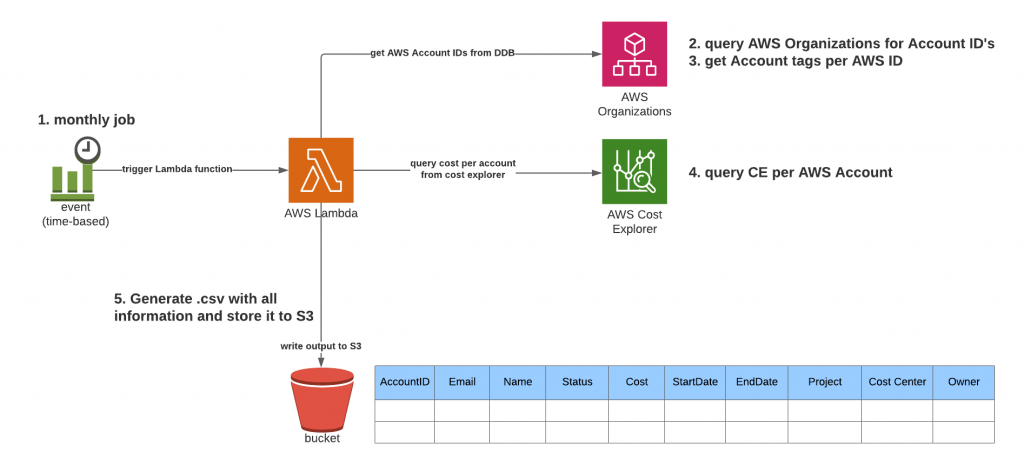
Figure 2: Architecture Overview
Walk-through
Prerequisites
For this walkthrough, you should have the following prerequisites:
- An AWS account
- AWS Organizations setup via AWS Control Tower or Manually
- Admin user or role in your AWS Organizations Management account
Add Tags to your AWS Accounts
This example solution uses 3 AWS account tags in order to work. You have to add these tags to your AWS accounts in AWS Organizations.
- Log in to the AWS Console using your admin user or role in the AWS Organizations Management Account.
- Open AWS Organizations.
- Select one of your AWS accounts and add the following 3 tags and provide some sample data:
- “Cost Center”
- “Project”
- “Owner”
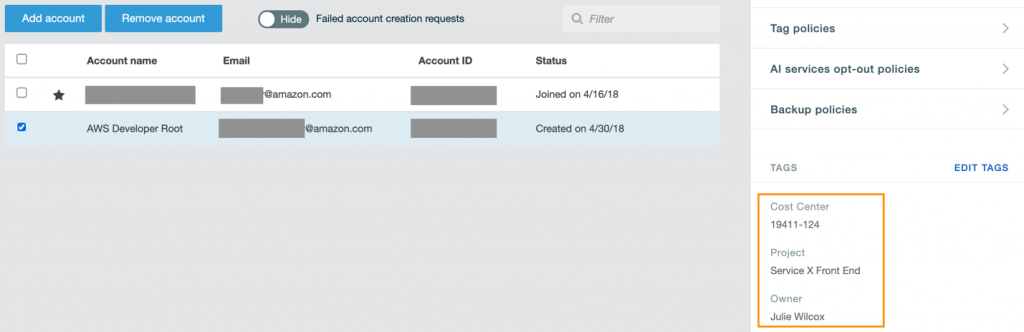
Figure 3: Adding tags to AWS Accounts in AWS Organizations
4. Repeat the previous step for other accounts.
5. Go back to the AWS Console.
As default, the AWS Lambda function queries and exports the three tags that you’ve added in this section. But you can also modify which tags will be exported to the output file, if you’re updating the code of the AWS Lambda function accordingly (please see section “Modify AWS Lambda output tags” below).
Deploy AWS CloudFormation Template
Please run the AWS CloudFormation template referenced below in your AWS Management account. This will provision all resources needed like Amazon CloudWatch Event, IAM Policies and Role, AWS Lambda function, and Amazon S3 output bucket.
- Click on the Launch Stack Button
- Leave the Parameters provided and scroll down.
- Select “I acknowledge that AWS CloudFormation might create IAM resources” and click “Create stack”.
Please review the “Resources” section of your Amazon CloudWatch Stack, once the deployment is finished. Take note of the S3 bucket that has been created. This is where your billing information will be stored.
Review Amazon CloudWatch Event
The CloudFormation template will set up an Amazon CloudWatch Event that triggers the AWS Lambda function once a month. You can modify the cron schedule and adjust it to your needs. If it runs more frequently than once a month, the file in Amazon S3 will be overwritten with the same information.
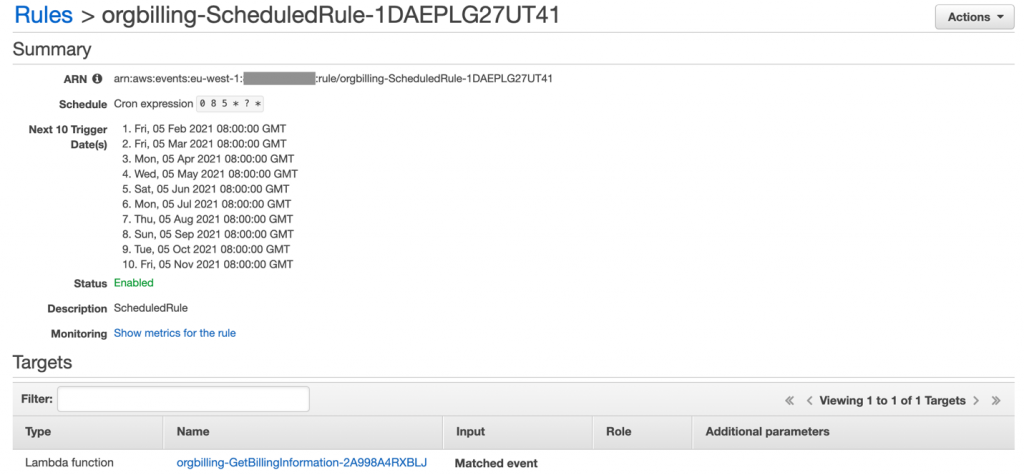
Figure 4: CloudWatch events schedule
Executing the AWS Lambda function
The AWS Lambda function is scheduled via an Amazon CloudWatch Events cron schedule. If you want to execute the AWS Lambda function on demand, please do the following:
- In the AWS Console: in the services search, enter “Lambda”, and click “select”.
- Open the Lambda function (you can see its name in the resources section in AWS CloudFormation).
- In the Lambda function main section, click on “Test”.
- On the “Configure Test Event”, enter an Event Name, scroll down, and click on “Create”. The AWS Lambda function does not need any input, that’s why you don’t have to specify an input event.
- Back to the AWS Lambda function, make sure you’ve selected your test event and click on “Test”. This will run the AWS Lambda function and you should see “Execution result: succeeded”.
If you’d like to modify or enhance the AWS Lambda function and deploy it yourself, please check out the source code from the GitHub repository.
Check Output
Let’s check the Amazon S3 bucket and review the output file:
- In the AWS Console: in the services search, enter “S3”, and click “select”.
- Open the Amazon S3 output bucket. The name starts with “org-billing-outputbucket-…”.
- Select the file starting with “costinformation-YYYY-MM-DD.csv”, and click on “Actions” and “Download”.
- Open the file locally.

Figure 5: Sample output file
You will see a table as in the example above including the tags that you’ve added to the accounts in AWS Organizations.
Modify AWS Lambda output tags
You can modify and delete/add more tags to your accounts. Please modify the AWS Lambda function code, if you would like to capture them in the output file. By default, the AWS Lambda function adds all tags specified in the code regardless if they’re having a value at the corresponding AWS account in AWS Organizations or not.
To add/modify or remove tags from your output file, please take the following steps:
- In the AWS Console in the services search enter and “Lambda” and click select.
- Open the function named like “org-billing-GetBillingInformation….”
- In the function code section look for the following line to modify your output tags: cost_reporting_tags = {‘Cost Center’,’Project’,’Owner’}
- Click on “Deploy” to store the changes.
Conclusion
This blog post shared how you can query your AWS account data from AWS Organizations, including their tags, query Cost Explorer API, and store the result in S3. The output contains the monthly spend per account and has the additional metadata stored in AWS Organizations as well. You can also enhance the sample code according to your needs, for example, to analyze data based on Organizational Units.