AWS Compute Blog
Creating a Simple “Fetch & Run” AWS Batch Job
Updated on April 26, 2018 to reflect changes in IAM create role process.

Dougal Ballantyne, Principal Product Manager – AWS Batch
Docker enables you to create highly customized images that are used to execute your jobs. These images allow you to easily share complex applications between teams and even organizations. However, sometimes you might just need to run a script!
This post details the steps to create and run a simple “fetch & run” job in AWS Batch. AWS Batch executes jobs as Docker containers using Amazon ECS. You build a simple Docker image containing a helper application that can download your script or even a zip file from Amazon S3. AWS Batch then launches an instance of your container image to retrieve your script and run your job.
AWS Batch overview
AWS Batch enables developers, scientists, and engineers to easily and efficiently run hundreds of thousands of batch computing jobs on AWS. AWS Batch dynamically provisions the optimal quantity and type of compute resources (e.g., CPU or memory optimized instances) based on the volume and specific resource requirements of the batch jobs submitted.
With AWS Batch, there is no need to install and manage batch computing software or server clusters that you use to run your jobs, allowing you to focus on analyzing results and solving problems. AWS Batch plans, schedules, and executes your batch computing workloads across the full range of AWS compute services and features, such as Amazon EC2 Spot Instances.
“Fetch & run” walkthrough
The following steps get everything working:
- Build a Docker image with the fetch & run script
- Create an Amazon ECR repository for the image
- Push the built image to ECR
- Create a simple job script and upload it to S3
- Create an IAM role to be used by jobs to access S3
- Create a job definition that uses the built image
- Submit and run a job that execute the job script from S3
Prerequisites
Before you get started, there a few things to prepare. If this is the first time you have used AWS Batch, you should follow the Getting Started Guide and ensure you have a valid job queue and compute environment.
After you are up and running with AWS Batch, the next thing is to have an environment to build and register the Docker image to be used. For this post, register this image in an ECR repository. This is a private repository by default and can easily be used by AWS Batch jobs
You also need a working Docker environment to complete the walkthrough. For the examples, I used Docker for Mac. Alternatively, you could easily launch an EC2 instance running Amazon Linux and install Docker.
You need the AWS CLI installed. For more information, see Installing the AWS Command Line Interface.
Building the fetch & run Docker image
The fetch & run Docker image is based on Amazon Linux. It includes a simple script that reads some environment variables and then uses the AWS CLI to download the job script (or zip file) to be executed.
To get started, download the source code from the aws-batch-helpers GitHub repository. The following link pulls the latest version: https://github.com/awslabs/aws-batch-helpers/archive/master.zip. Unzip the downloaded file and navigate to the “fetch-and-run” folder. Inside this folder are two files:
- Dockerfile
- fetch_and_run.sh
Dockerfile is used by Docker to build an image. Look at the contents; you should see something like the following:
FROM amazonlinux:latest

RUN yum -y install unzip aws-cli
ADD fetch_and_run.sh /usr/local/bin/fetch_and_run.sh
WORKDIR /tmp
USER nobody

ENTRYPOINT ["/usr/local/bin/fetch_and_run.sh"]- The FROM line instructs Docker to pull the base image from the amazonlinux repository, using the latest tag.
- The RUN line executes a shell command as part of the image build process.
- The ADD line, copies the fetch_and_run.sh script into the /usr/local/bin directory inside the image.
- The WORKDIR line, sets the default directory to /tmp when the image is used to start a container.
- The USER line sets the default user that the container executes as.
- Finally, the ENTRYPOINT line instructs Docker to call the /usr/local/bin/fetch_and_run.sh script when it starts the container. When running as an AWS Batch job, it is passed the contents of the command parameter.
Now, build the Docker image! Assuming that the docker command is in your PATH and you don’t need sudo to access it, you can build the image with the following command (note the dot at the end of the command):
docker build -t awsbatch/fetch_and_run . This command should produce an output similar to the following:
Sending build context to Docker daemon 373.8 kB

Step 1/6 : FROM amazonlinux:latest
latest: Pulling from library/amazonlinux
c9141092a50d: Pull complete
Digest: sha256:2010c88ac1e7c118d61793eec71dcfe0e276d72b38dd86bd3e49da1f8c48bf54
Status: Downloaded newer image for amazonlinux:latest
 ---> 8ae6f52035b5
Step 2/6 : RUN yum -y install unzip aws-cli
 ---> Running in e49cba995ea6
Loaded plugins: ovl, priorities
Resolving Dependencies
--> Running transaction check
---> Package aws-cli.noarch 0:1.11.29-1.45.amzn1 will be installed

  << removed for brevity >>

Complete!
 ---> b30dfc9b1b0e
Removing intermediate container e49cba995ea6
Step 3/6 : ADD fetch_and_run.sh /usr/local/bin/fetch_and_run.sh
 ---> 256343139922
Removing intermediate container 326092094ede
Step 4/6 : WORKDIR /tmp
 ---> 5a8660e40d85
Removing intermediate container b48a7b9c7b74
Step 5/6 : USER nobody
 ---> Running in 72c2be3af547
 ---> fb17633a64fe
Removing intermediate container 72c2be3af547
Step 6/6 : ENTRYPOINT /usr/local/bin/fetch_and_run.sh
 ---> Running in aa454b301d37
 ---> fe753d94c372

Removing intermediate container aa454b301d37
Successfully built 9aa226c28efc
In addition, you should see a new local repository called fetch_and_run, when you run the following command:
docker imagesREPOSITORY TAG IMAGE ID CREATED SIZE
awsbatch/fetch_and_run latest 9aa226c28efc 19 seconds ago 374 MB
amazonlinux latest 8ae6f52035b5 5 weeks ago 292 MBTo add more packages to the image, you could update the RUN line or add a second one, right after it.
Creating an ECR repository
The next step is to create an ECR repository to store the Docker image, so that it can be retrieved by AWS Batch when running jobs.
- In the ECR console, choose Get Started or Create repository.
- Enter a name for the repository, for example: awsbatch/fetch_and_run.
- Choose Next step and follow the instructions.

You can keep the console open, as the tips can be helpful.
Push the built image to ECR
Now that you have a Docker image and an ECR repository, it is time to push the image to the repository. Use the following AWS CLI commands, if you have used the previous example names. Replace the AWS account number in red with your own account.
aws ecr get-login --region us-east-1

docker tag awsbatch/fetch_and_run:latest 012345678901.dkr.ecr.us-east-1.amazonaws.com/awsbatch/fetch_and_run:latest

docker push 012345678901.dkr.ecr.us-east-1.amazonaws.com/awsbatch/fetch_and_run:latest
Create a simple job script and upload to S3
Next, create and upload a simple job script that is executed using the fetch_and_run image that you just built and registered in ECR. Start by creating a file called myjob.sh with the example content below:
#!/bin/bash
date
echo "Args: $@"
env
echo "This is my simple test job!."
echo "jobId: $AWS_BATCH_JOB_ID"
echo "jobQueue: $AWS_BATCH_JQ_NAME"
echo "computeEnvironment: $AWS_BATCH_CE_NAME"
sleep $1
date
echo "bye bye!!"
Upload the script to an S3 bucket.
aws s3 cp myjob.sh s3://<bucket>/myjob.shCreate an IAM role
When the fetch_and_run image runs as an AWS Batch job, it fetches the job script from Amazon S3. You need an IAM role that the AWS Batch job can use to access S3.
- In the IAM console, choose Roles, Create New Role.
- Under type of trusted entity, choose AWS service then Elastic Container Service. For use case, select Elastic Container Service Task, and choose Next: Permissions.
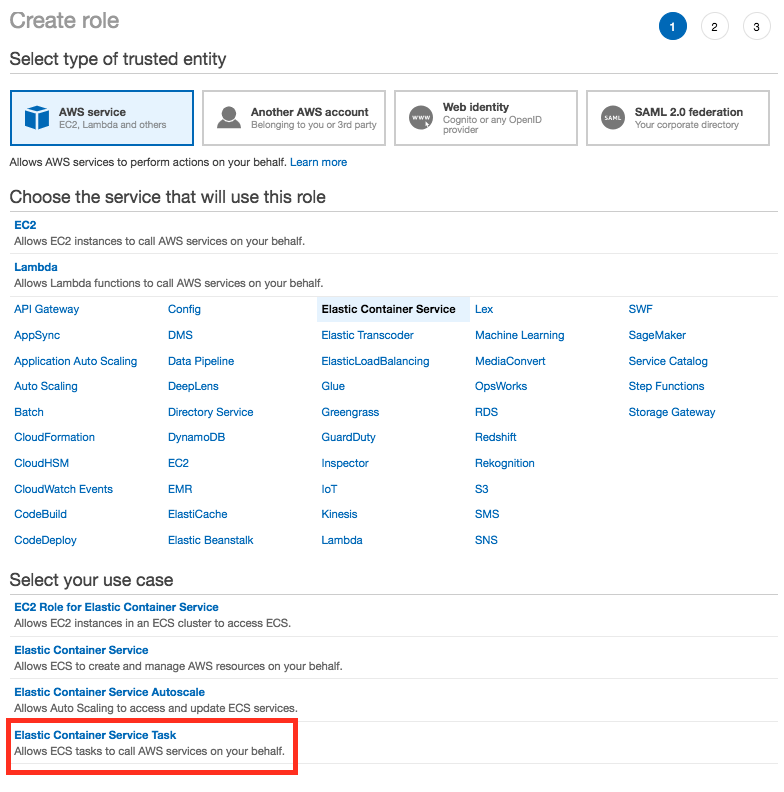
- On the Attach Policy page, type “AmazonS3ReadOnlyAccess” into the Filter field and then select the check box for that policy. Then, choose Next:Review.

- Enter a name for your new role, for example: batchJobRole, and choose Create Role. You see the details of the new role.

Create a job definition
Now that you’ve have created all the resources needed, pull everything together and build a job definition that you can use to run one or many AWS Batch jobs.
- In the AWS Batch console, choose Job Definitions, Create.
- For the Job Definition, enter a name, for example, fetch_and_run.
- For IAM Role, choose the role that you created earlier, batchJobRole.
- For ECR Repository URI, enter the URI where the fetch_and_run image was pushed, for example: 012345678901.dkr.ecr.us-east-1.amazonaws.com/awsbatch/fetch_and_run.
- Leave the Command field blank.
- For vCPUs, enter 1. For Memory, enter 500.

- For User, enter “nobody”.
- Choose Create job definition.
Submit and run a job
Now, submit and run a job that uses the fetch_and_run image to download the job script and execute it.
- In the AWS Batch console, choose Jobs, Submit Job.
- Enter a name for the job, for example: script_test.
- Choose the latest fetch_and_run job definition.
- For Job Queue, choose a queue, for example: first-run-job-queue.
- For Command, enter myjob.sh,60.
- Choose Validate Command.

- Enter the following environment variables and then choose Submit job.
- Key=BATCH_FILE_TYPE, Value=script
- Key=BATCH_FILE_S3_URL, Value=s3:///myjob.sh. Don’t forget to use the correct URL for your file.

- After the job is completed, check the final status in the console.

- In the job details page, you can also choose View logs for this job in CloudWatch console to see your job log.

How the fetch and run image works
The fetch_and_run image works as a combination of the Docker ENTRYPOINT and COMMAND feature, and a shell script that reads environment variables set as part of the AWS Batch job. When building the Docker image, it starts with a base image from Amazon Linux and installs a few packages from the yum repository. This becomes the execution environment for the job.
If the script you planned to run needed more packages, you would add them using the RUN parameter in the Dockerfile. You could even change it to a different base image such as Ubuntu, by updating the FROM parameter.
Next, the fetch_and_run.sh script is added to the image and set as the container ENTRYPOINT. The script simply reads some environment variables and then downloads and runs the script/zip file from S3. It is looking for the following environment variables BATCH_FILE_TYPE and BATCH_FILE_S3_URL. If you run fetch_and_run.sh, with no environment variables, you get the following usage message:
- BATCH_FILE_TYPE not set, unable to determine type (zip/script) of
Usage:
export BATCH_FILE_TYPE="script"

export BATCH_FILE_S3_URL="s3://my-bucket/my-script"

fetch_and_run.sh script-from-s3 [ <script arguments> ]
– or –
export BATCH_FILE_TYPE="zip"

export BATCH_FILE_S3_URL="s3://my-bucket/my-zip"

fetch_and_run.sh script-from-zip [ <script arguments> ]
This shows that it supports two values for BATCH_FILE_TYPE, either “script” or “zip”. When you set “script”, it causes fetch_and_run.sh to download a single file and then execute it, in addition to passing in any further arguments to the script. If you set it to “zip”, this causes fetch_and_run.sh to download a zip file, then unpack it and execute the script name passed and any further arguments. You can use the “zip” option to pass more complex jobs with all the applications dependencies in one file.
Finally, the ENTRYPOINT parameter tells Docker to execute the /usr/local/bin/fetch_and_run.sh script when creating a container. In addition, it passes the contents of the COMMAND parameter as arguments to the script. This is what enables you to pass the script and arguments to be executed by the fetch_and_run image with the Command field in the SubmitJob API action call.
Summary
In this post, I detailed the steps to create and run a simple “fetch & run” job in AWS Batch. You can now easily use the same job definition to run as many jobs as you need by uploading a job script to Amazon S3 and calling SubmitJob with the appropriate environment variables.
If you have questions or suggestions, please comment below.