AWS Compute Blog
Disabling Intel Hyper-Threading Technology on Amazon EC2 Windows Instances
NOTE: In May of 2018, AWS announced Optimize CPUs for Amazon EC2 Instances. This feature allows customers to disable Hyper-Threading for workloads that perform well with single-threaded CPUs, like certain high-performance computing (HPC) applications. You can read more in the EC2 User Guide.
In a prior post, Disabling Intel Hyper-Threading on Amazon Linux, I investigated how the Linux kernel enumerates CPUs. I also discussed the options to disable Intel Hyper-Threading (HT Technology) in Amazon Linux running on Amazon EC2.
In this post, I do the same for Microsoft Windows Server 2016 running on EC2 instances. I begin with a quick review of HT Technology and the reasons you might want to disable it. I also recommend that you take a moment to review the prior post for a more thorough foundation.
HT Technology
HT Technology makes a single physical processor appear as multiple logical processors. Each core in an Intel Xeon processor has two threads of execution. Most of the time, these threads can progress independently; one thread executing while the other is waiting on a relatively slow operation (for example, reading from memory) to occur. However, the two threads do share resources and occasionally one thread is forced to wait while the other is executing.
There a few unique situations where disabling HT Technology can improve performance. One example is high performance computing (HPC) workloads that rely heavily on floating point operations. In these rare cases, it can be advantageous to disable HT Technology. However, these cases are rare, and for the overwhelming majority of workloads you should leave it enabled. I recommend that you test with and without HT Technology enabled, and only disable threads if you are sure it will improve performance.
Exploring HT Technology on Microsoft Windows
Here’s how Microsoft Windows enumerates CPUs. As before, I am running these examples on an m4.2xlarge. I also chose to run Windows Server 2016, but you can walk through these exercises on any version of Windows. Remember that the m4.2xlarge has eight vCPUs, and each vCPU is a thread of an Intel Xeon core. Therefore, the m4.2xlarge has four cores, each of which run two threads, resulting in eight vCPUs.
Windows does not have a built-in utility to examine CPU configuration, but you can download the Sysinternals coreinfo utility from Microsoft’s website. This utility provides useful information about the system CPU and memory topology. For this walkthrough, you enumerate the individual CPUs, which you can do by running coreinfo -c. For example:
C:\Users\Administrator >coreinfo -c

Coreinfo v3.31 - Dump information on system CPU and memory topology
Copyright (C) 2008-2014 Mark Russinovich
Sysinternals - www.sysinternals.com

Logical to Physical Processor Map:
**------ Physical Processor 0 (Hyperthreaded)
--**---- Physical Processor 1 (Hyperthreaded)
----**-- Physical Processor 2 (Hyperthreaded)
------** Physical Processor 3 (Hyperthreaded)
As you can see from the screenshot, the coreinfo utility displays a table where each row is a physical core and each column is a logical CPU. In other words, the two asterisks on the first line indicate that CPU 0 and CPU 1 are the two threads in the first physical core. Therefore, my m4.2xlarge has for four physical processors and each processor has two threads resulting in eight total CPUs, just as expected.
It is interesting to note that Windows Server 2016 enumerates CPUs in a different order than Linux. Remember from the prior post that Linux enumerated the first thread in each core, followed by the second thread in each core. You can see from the output earlier that Windows Server 2016, enumerates both threads in the first core, then both threads in the second core, and so on. The diagram below shows the relationship of CPUs to cores and threads in both operating systems.

In the Linux post, I disabled CPUs 4–6, leaving one thread per core, and effectively disabling HT Technology. You can see from the diagram that you must disable the odd-numbered threads (that is, 1, 3, 5, and 7) to achieve the same result in Windows. Here’s how to do that.
Disabling HT Technology on Microsoft Windows
In Linux, you can globally disable CPUs dynamically. In Windows, there is no direct equivalent that I could find, but there are a few alternatives.
First, you can disable CPUs using the msconfig.exe tool. If you choose Boot, Advanced Options, you have the option to set the number of processors. In the example below, I limit my m4.2xlarge to four CPUs. Restart for this change to take effect.

Unfortunately, Windows does not disable hyperthreaded CPUs first and then real cores, as Linux does. As you can see in the following output, coreinfo reports that my c4.2xlarge has two real cores and four hyperthreads, after rebooting. Msconfig.exe is useful for disabling cores, but it does not allow you to disable HT Technology.
Note: If you have been following along, you can re-enable all your CPUs by unselecting the Number of processors check box and rebooting your system.
C:\Users\Administrator >coreinfo -c

Coreinfo v3.31 - Dump information on system CPU and memory topology
Copyright (C) 2008-2014 Mark Russinovich
Sysinternals - www.sysinternals.com

Logical to Physical Processor Map:
**-- Physical Processor 0 (Hyperthreaded)
--** Physical Processor 1 (Hyperthreaded)
While you cannot disable HT Technology systemwide, Windows does allow you to associate a particular process with one or more CPUs. Microsoft calls this, “processor affinity”. To see an example, use the following steps.
- Launch an instance of Notepad.
- Open Windows Task Manager and choose Processes.
- Open the context (right click) menu on notepad.exe and choose Set Affinity….
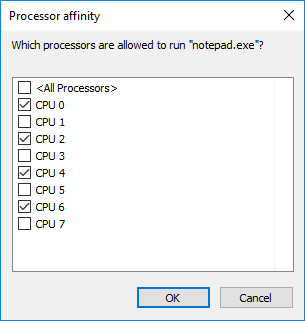
This brings up the Processor Affinity dialog box.

As you can see, all the CPUs are allowed to run this instance of notepad.exe. You can uncheck a few CPUs to exclude them. Windows is smart enough to allow any scheduled operations to continue to completion on disabled CPUs. It then saves its state at the next scheduling event, and resumes those operations on another CPU. To ensure that only one thread in each core is able to run a process, you uncheck every other core. This effectively disables HT Technology for this process. For example:
Of course, this can be tedious when you have a large number of cores. Remember that the x1.32xlarge has 128 CPUs. Luckily, you can set the affinity of a running process from PowerShell using the Get-Process cmdlet. For example:
PS C:\> (Get-Process -Name 'notepad').ProcessorAffinity = 0x55;The ProcessorAffinity attribute takes a bitmask in hexadecimal format. 0x55 in hex is equivalent to 01010101 in binary. Think of the binary encoding as 1=enabled and 0=disabled. This is slightly confusing, but we work left to right so that CPU 0 is the rightmost bit and CPU 7 is the leftmost bit. Therefore, 01010101 means that the first thread in each CPU is enabled just as it was in the diagram earlier.
The calculator built into Windows includes a “programmer view” that helps you convert from hexadecimal to binary. In addition, the ProcessorAffinity attribute is a 64-bit number. Therefore, you can only configure the processor affinity on systems up to 64 CPUs. At the moment, only the x1.32xlarge has more than 64 vCPUs.
In the preceding examples, you changed the processor affinity of a running process. Sometimes, you want to start a process with the affinity already configured. You can do this using the start command. The start command includes an affinity flag that takes a hexadecimal number like the PowerShell example earlier.
C:\Users\Administrator>start /affinity 55 notepad.exeIt is interesting to note that a child process inherits the affinity from its parent. For example, the following commands create a batch file that launches Notepad, and starts the batch file with the affinity set. If you examine the instance of Notepad launched by the batch file, you see that the affinity has been applied to as well.
C:\Users\Administrator>echo notepad.exe > test.bat
C:\Users\Administrator>start /affinity 55 test.bat
This means that you can set the affinity of your task scheduler and any tasks that the scheduler starts inherits the affinity. So, you can disable every other thread when you launch the scheduler and effectively disable HT Technology for all of the tasks as well. Be sure to test this point, however, as some schedulers override the normal inheritance behavior and explicitly set processor affinity when starting a child process.
Conclusion
While the Windows operating system does not allow you to disable logical CPUs, you can set processor affinity on individual processes. You also learned that Windows Server 2016 enumerates CPUs in a different order than Linux. Therefore, you can effectively disable HT Technology by restricting a process to every other CPU. Finally, you learned how to set affinity of both new and running processes using Task Manager, PowerShell, and the start command.
Note: this technical approach has nothing to do with control over software licensing, or licensing rights, which are sometimes linked to the number of “CPUs” or “cores.” For licensing purposes, those are legal terms, not technical terms. This post did not cover anything about software licensing or licensing rights.
If you have questions or suggestions, please comment below.