AWS Contact Center
Simplify contact center operations with Amazon Connect Data Tables
Introduction
Contact center operations teams often face delays when making routine changes, as traditional approaches require developer assistance and code modifications. Amazon Connect data tables addresses this challenge by enabling administrators to manage operational data through a no-code interface, improving agility and reducing time-to-implementation for common tasks.
In this blog post, readers will learn how to leverage Amazon Connect data tables to streamline their contact center operations. We will explore real-world use cases, provide a step-by-step guide on implementing the feature, and discuss the benefits of using data tables to enhance operational efficiency and customer satisfaction.
Overview of solution
Amazon Connect data tables enables contact center teams to create, manage, and reference operational data directly within their contact flows—without writing code. Administrators can store structured information such as holiday schedules, emergency routing flags, agent extension mappings, and location-specific prompts in customizable tables. Contact flows then access this data in real-time to drive dynamic routing decisions and personalized customer experiences.
This capability eliminates the traditional dependency on developers for routine operational updates. Users can manage data tables directly in the Amazon Connect UI and programmatically via APIs, providing flexibility for manual updates and automated workflows. Teams can modify agent extension mappings, emergency flags, toggle feature flags, or update routing parameters instantly, reducing change implementation time from days to minutes.
Walkthrough
To illustrate the benefits of data tables, let’s explore a few real-world use cases:
Use case 1: Direct phone number extension system
In a wealth management firm, efficiently directing high-net-worth clients to their personal financial advisors is crucial. Previously, this required firms to build custom code integrations with an external data source and lambda functions to provide such personalized service to their clients. With data tables, the firm can implement a direct phone number extension system with a no-code interface where clients simply enter their advisor’s extension number during the call flow. The system will:
- Store advisor-phone number extension mappings
- Allow immediate routing without code changes when advisor assignments change
Use case 2: Seasonal site closure flag
A retail company needs to update their site closure flag during the winter season and assign specialized agents to handle premium customer calls. Traditionally, this required IT team involvement, leading to delays. With Amazon Connect data tables, the contact center supervisor can now independently manage these changes through a no-code interface. The system will:
- Update the site closure flag automatically when the winter season begins
- Map specialized agents to handle premium customer calls
- Reduce response time from days to minutes
Use case 3: Seasonal vaccination campaigns
A healthcare insurance provider needs to promote seasonal vaccination campaigns through their contact center. The contact center manager wants to play customized vaccination reminder messages during fall months without disrupting normal call flows. Using data tables, the system will:
- Store seasonal prompts and configure date-based rules that automatically trigger these messages
- Allow the manager to update message content and activation dates without requiring IT assistance
Pre-requisites
- An AWS account
- An existing Amazon Connect instance
- Amazon Connect administrator access to configure Data tables, queues, agents, and contact flows etc.
Implementation Steps
The following sections guide you through implementing direct agent routing with phone number extensions using Amazon Connect data tables. The same solution can be extended to all other scenarios listed above.
Step 1: Enable Amazon Connect data tables
- Navigate to Amazon Connect in the AWS console
- Select your instance and login
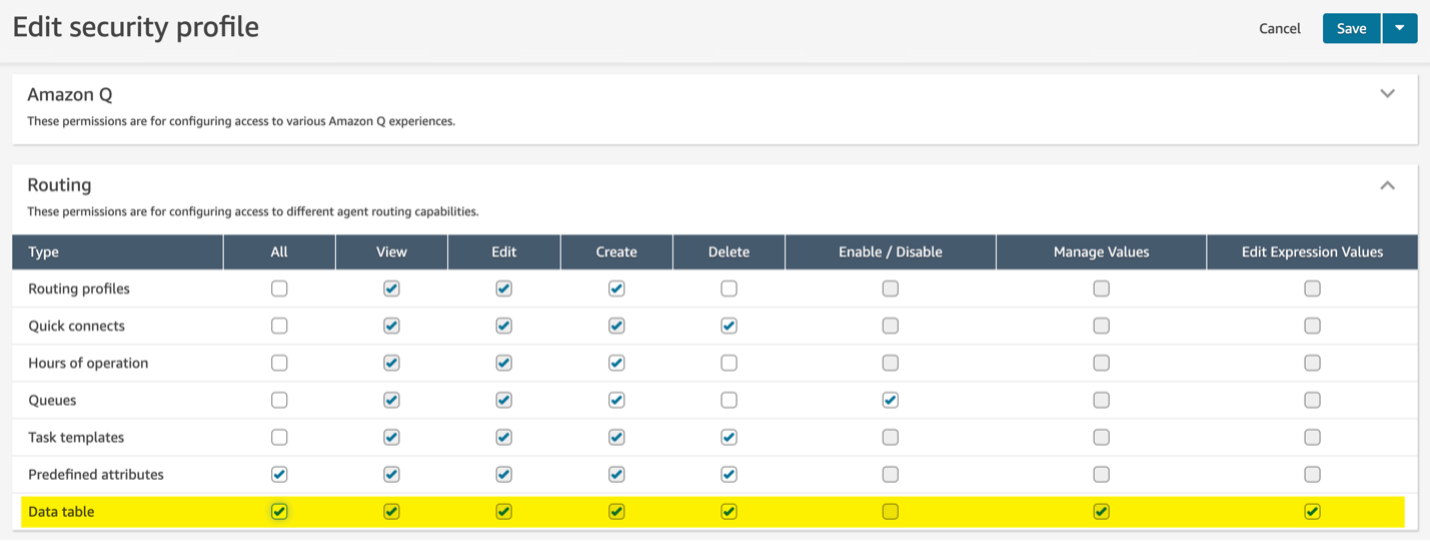
- Navigate to Security Profiles under“Users”
- Select the security profile to be updated
- In the Permissions section, ensure that Data tables access is enabled for the users in this security profile.
Step 2: Create data tables for all scenarios
Create a data table for every use case you plan to implement. Below we will walk through the creation of a data table for the agentextensions use case.
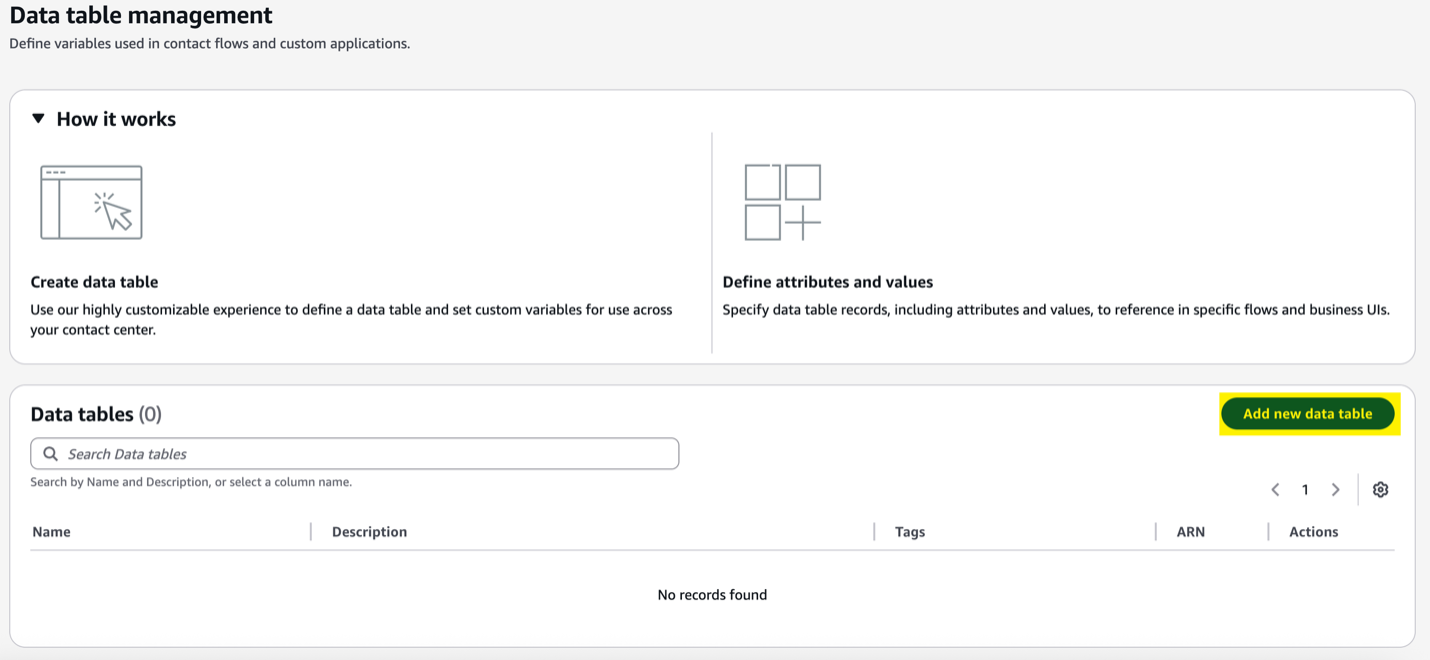
- Navigate to Data tables under Routing in the Amazon Connect admin UI
- Select Add new data table to create a new data table
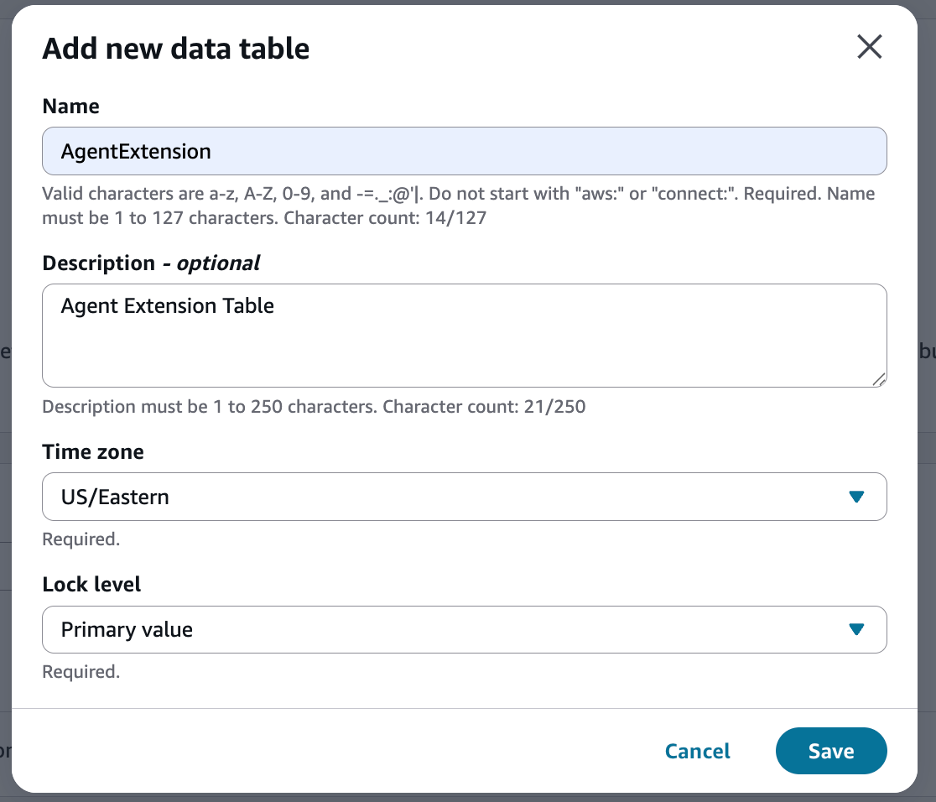
- Enter the name and an optional description
- Select the time zone e.g. US/Eastern
- Select the lock level e.g. Primary Value (Lock level controls concurrent record updates – “Primary Value” locks only the primary key field during modifications)
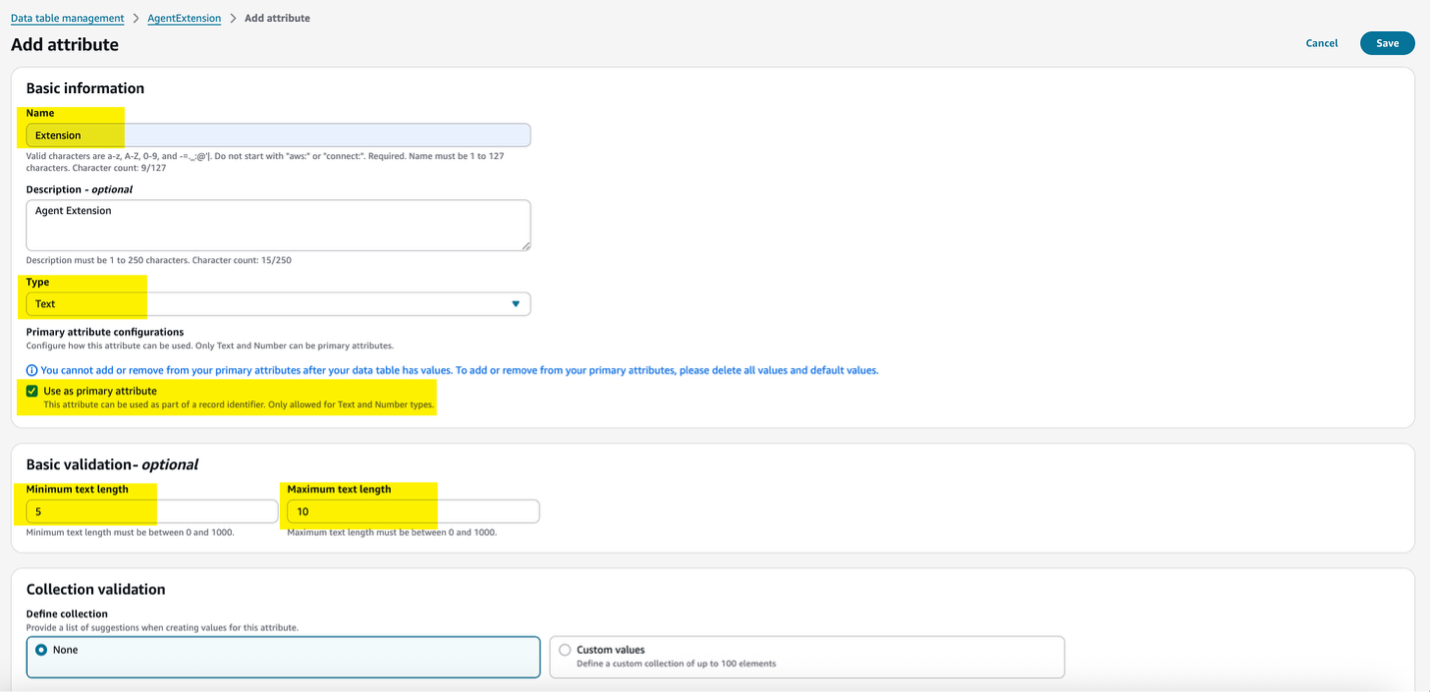
- Enter the column details, by selecting Add Attribute

- Enter the name of the column e.g. Extension, AgentName, AgentARN
- Select the column data type e.g. Text
- Select the checkbox for primary attribute as appropriate
- Enter the minimum and maximum text length if validation is required
- Define if any collection validation is required
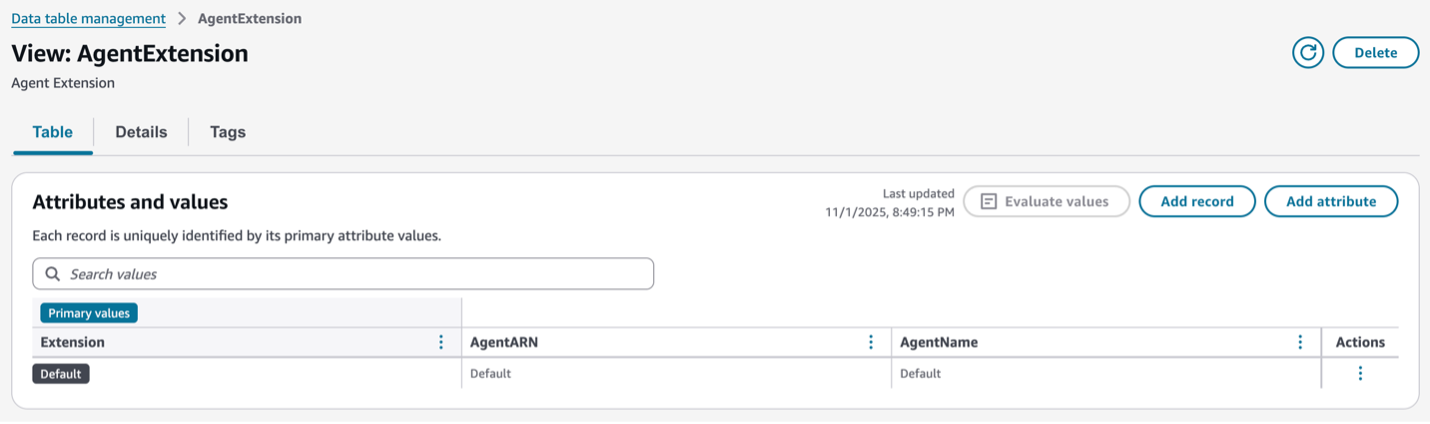
- After creating the attributes, you should see the empty table structure as illustrated below
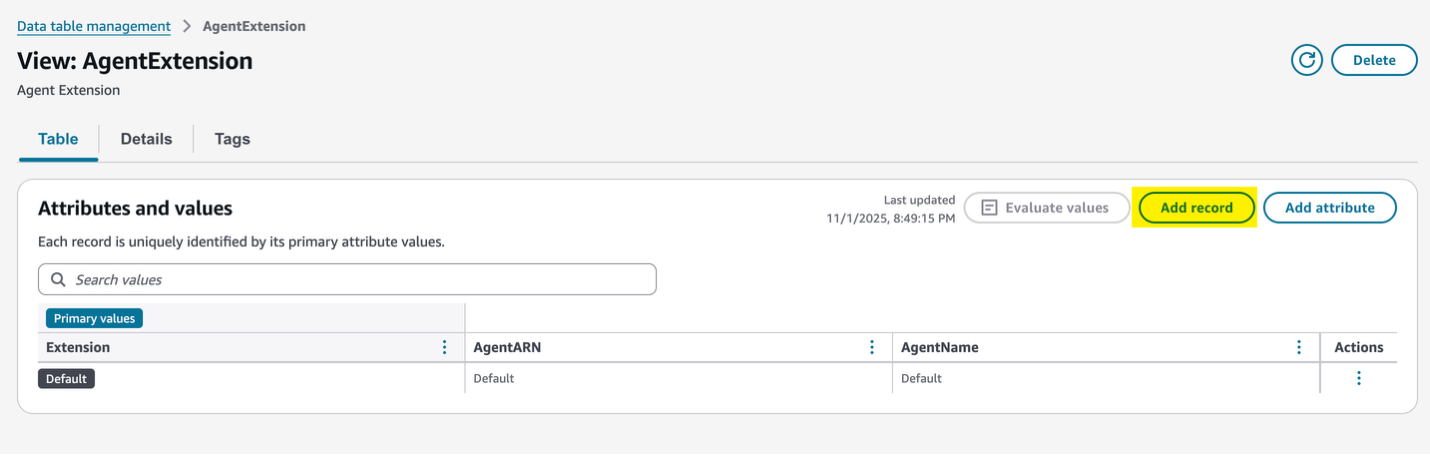
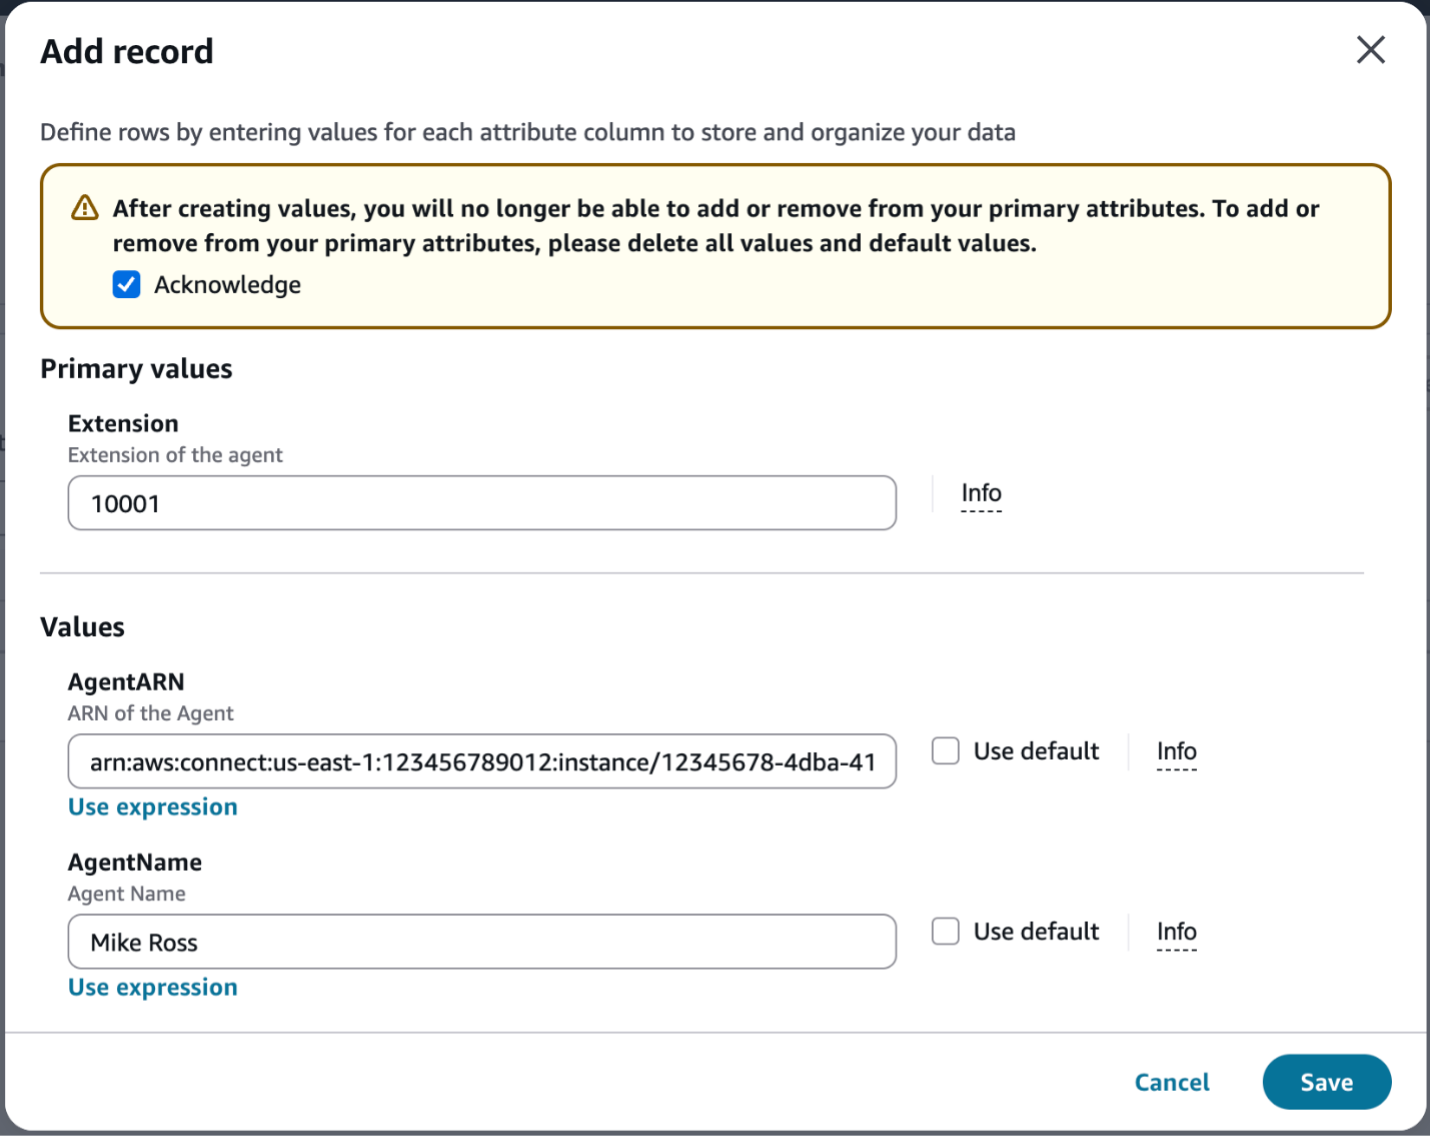
- Select Add record to populate the table with Agents and their extension mappings
- Enter agent details like Extension number, AgentARN, and AgentName
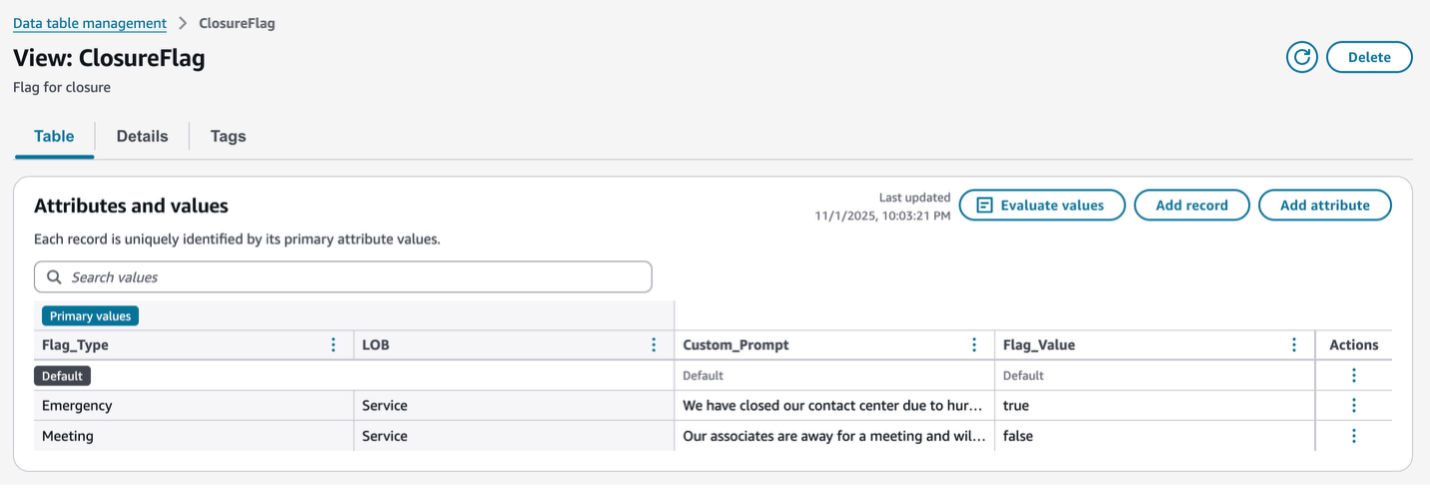
- Similarly, create the required new tables, columns and records for other scenarios (e.g. emergency closure flag, custom prompts etc.). A sample table structure for Closure Flags is shown below.
Step 3: Create contact flows for all scenarios
Create specialized contact flows to handle different scenarios
Agent extension routing contact flow
- In the Amazon Connect console, choose Routing → Flows → Create flow
- Create a new contact flow named “Agent Extension Routing“
- Add Set logging behavior and Set recording & analytics behavior block
- Add Store customer input block to capture the extension entry. When the end-customer places an inbound call and dials an extension, this is where the data entry will get captured
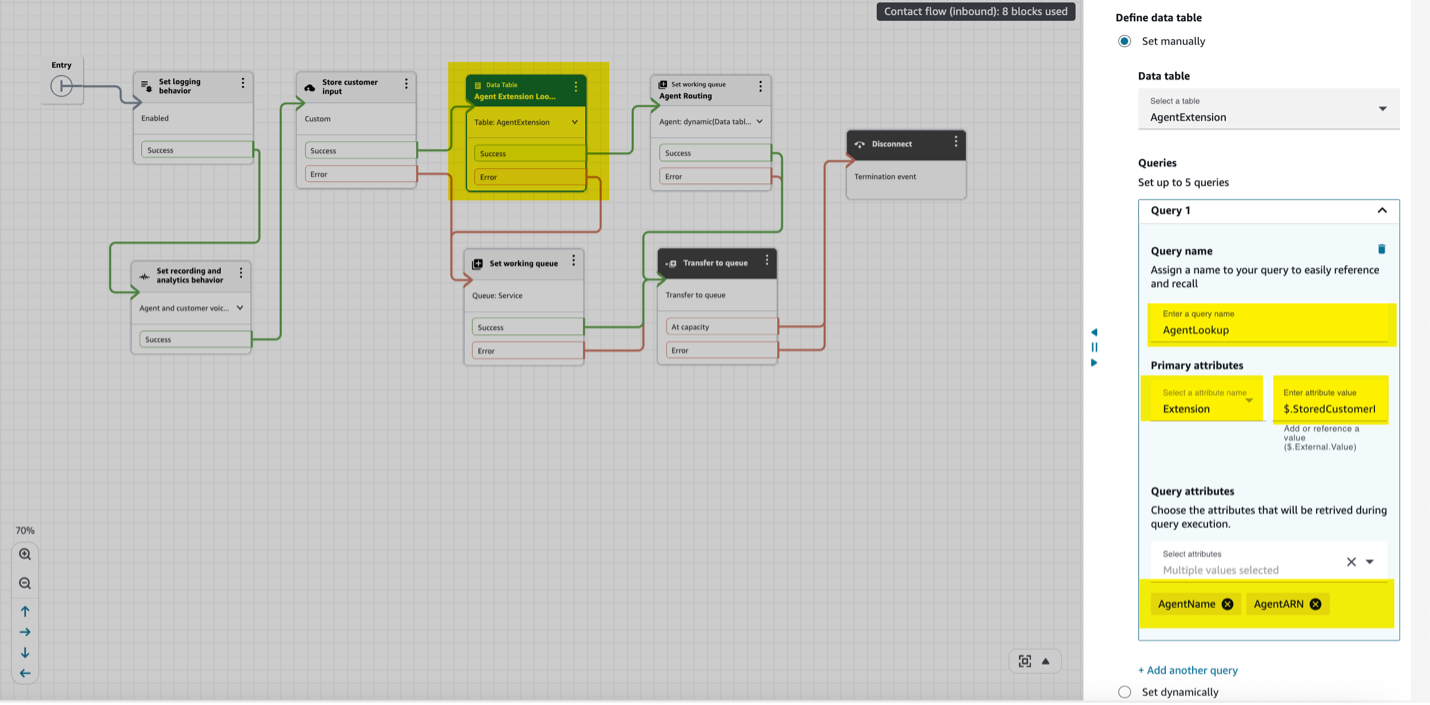
- Add the new Data Table block to the contact flow
- Define the query configuration in the Data Table block as per the below snapshot. The query configuration looks up the data table we created and fetches the required information
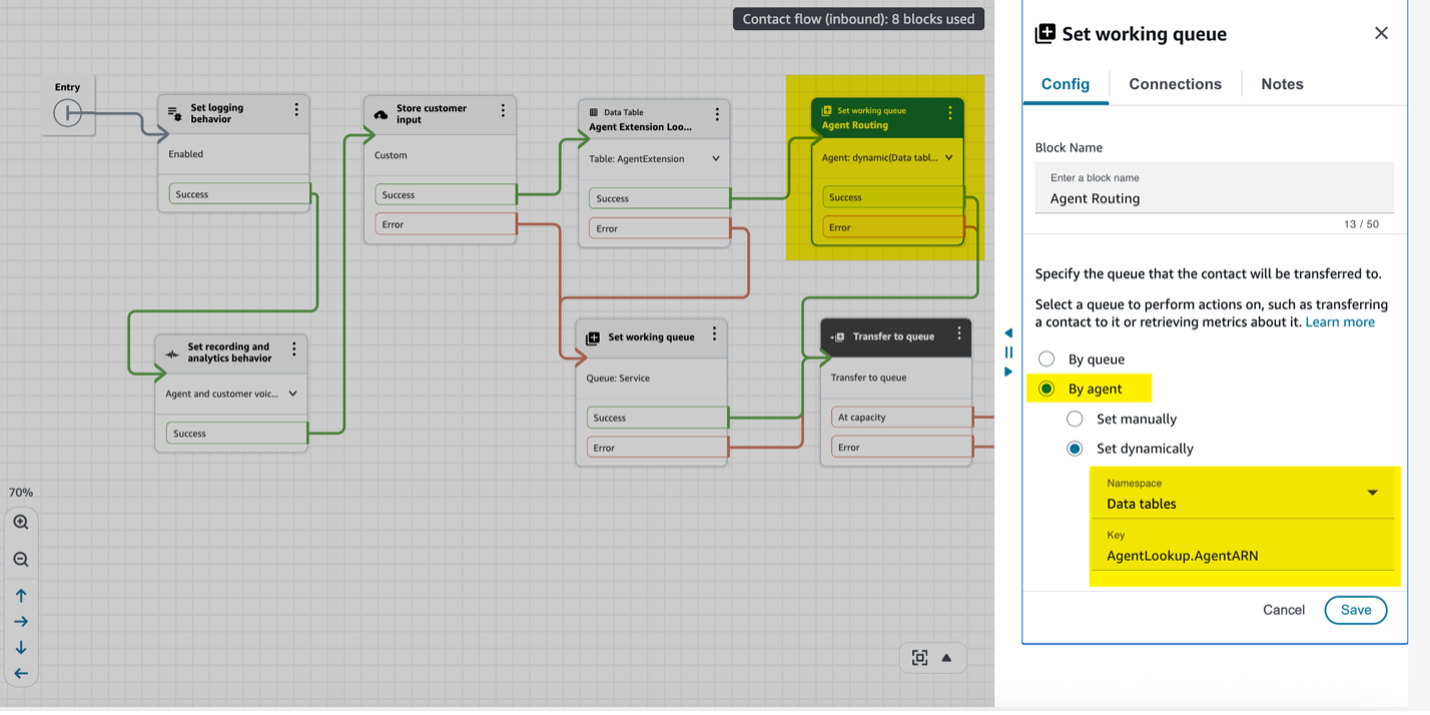
- Add Set working queue block for agent extension routing as per the below snapshot
- Add Set working queue block for non-extension routing
- Add Transfer to queue block
- Add a Disconnect block to the end
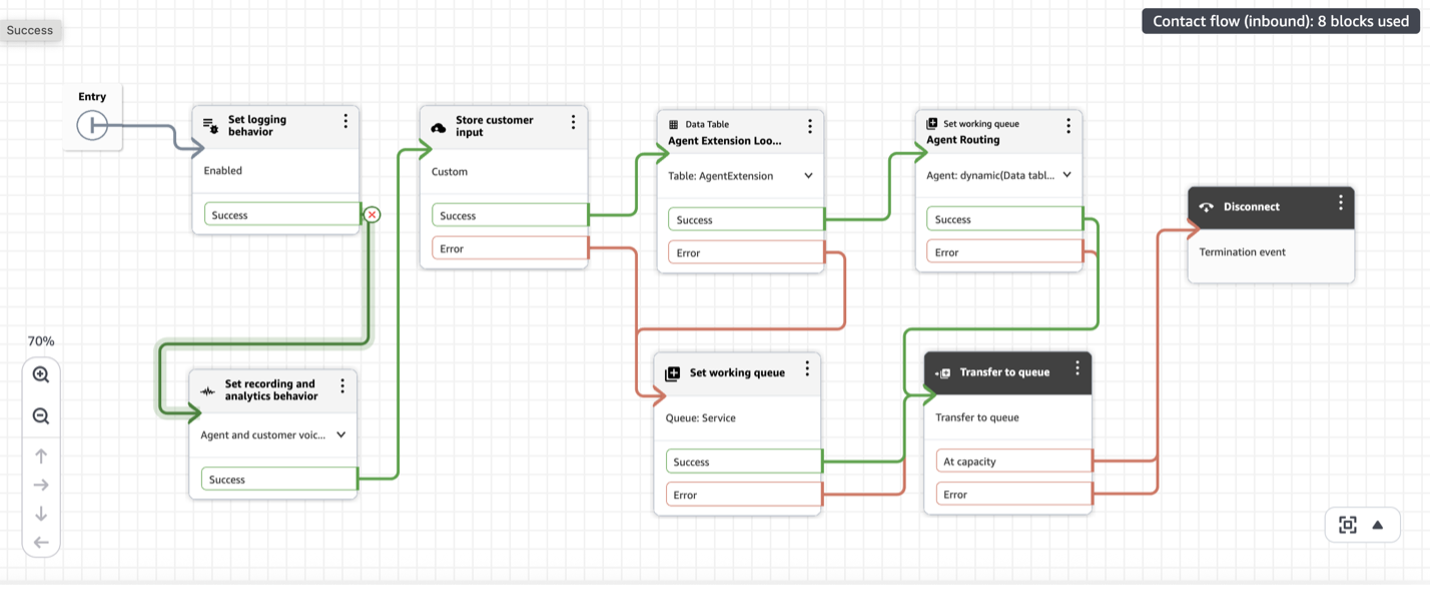
- Connect all blocks appropriately, then Save and Publish the contact flow (Contact flow should look like the below snapshot)
Emergency routing with custom messaging contact flow
- In the Amazon Connect console, choose Routing → Flows → Create flow
- Create a new contact flow named “Emergency Routing“
- Add Set logging behavior and Set recording & analytics behavior block
- Add Play prompt block to play a welcome message
- Add the new Data Table block to the contact flow
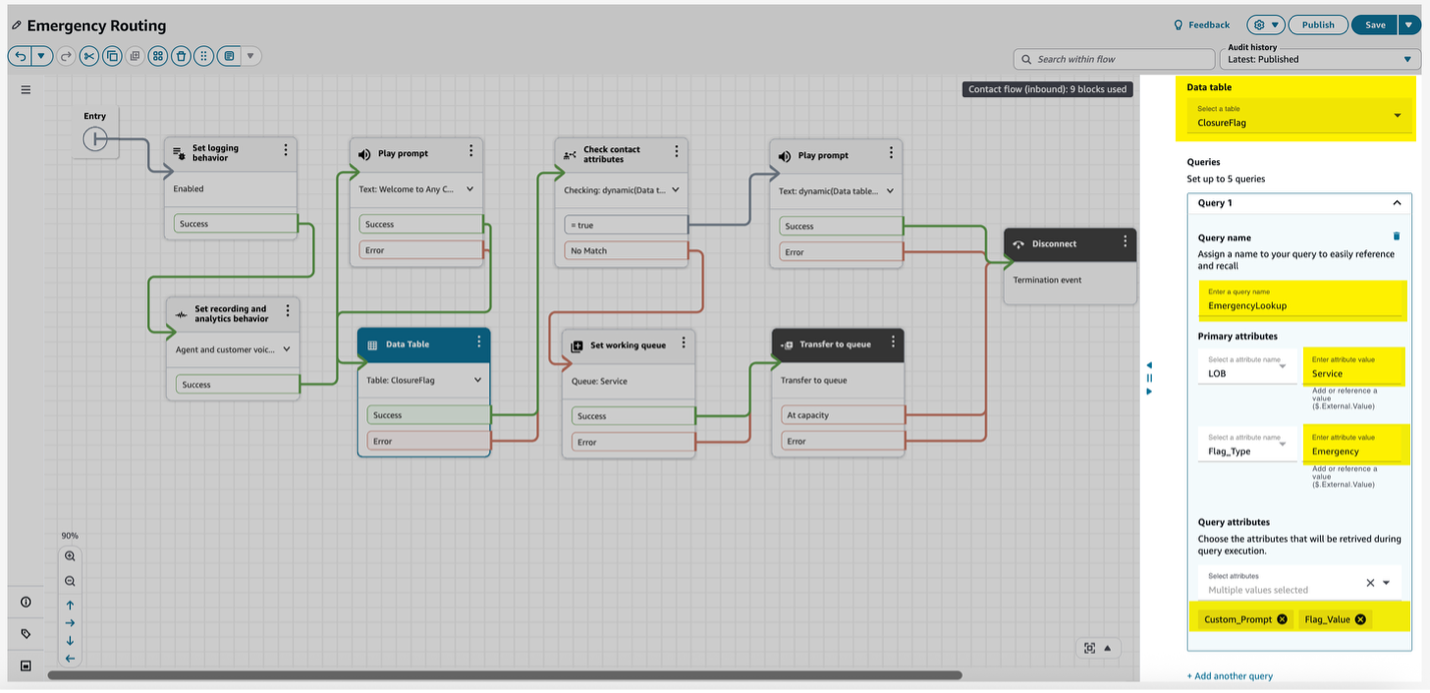
- Define the query configuration in the Data Table block as per the below snapshot
- Add Check contact attributes block to check if the emergency flag value is true
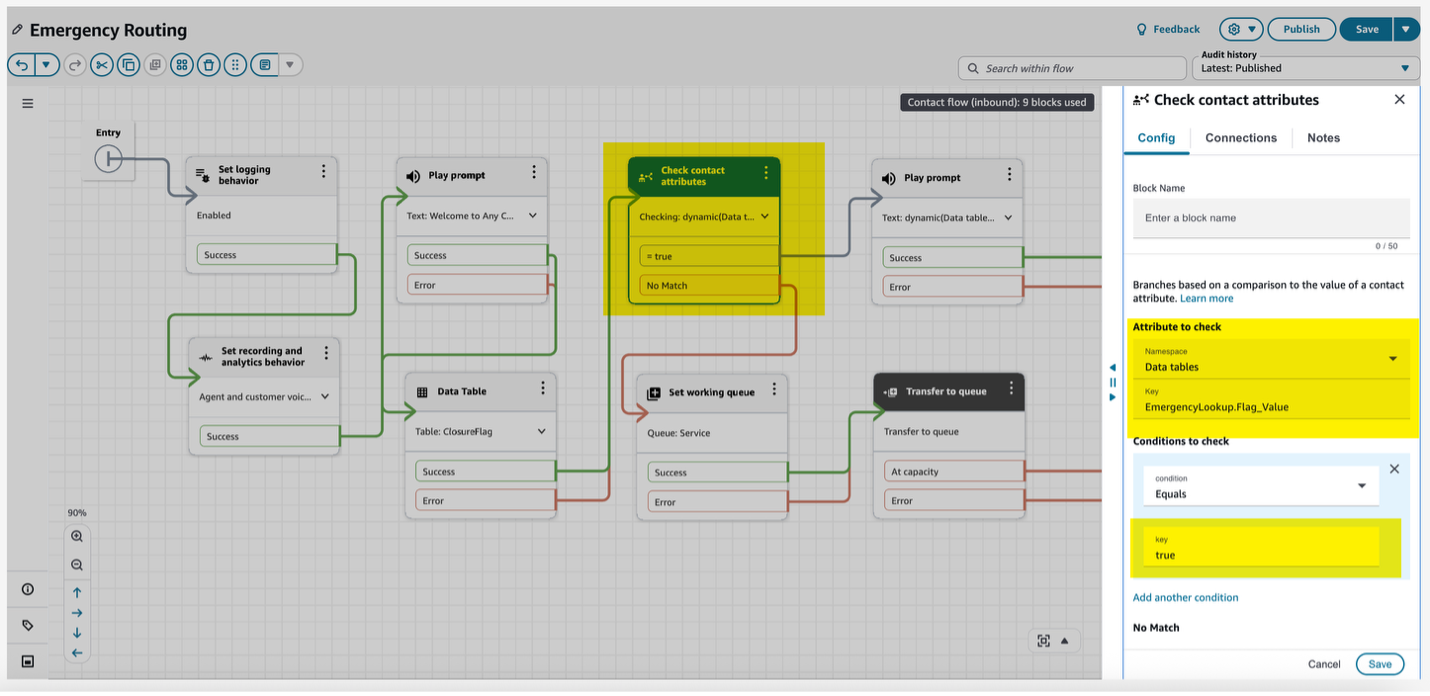
- Add Play prompt block to play the custom prompt for emergency closure if the flag value is true

- Add Set working queue block for non-emergency routing
- Add Transfer to queue block
- Add a Disconnect block to the end
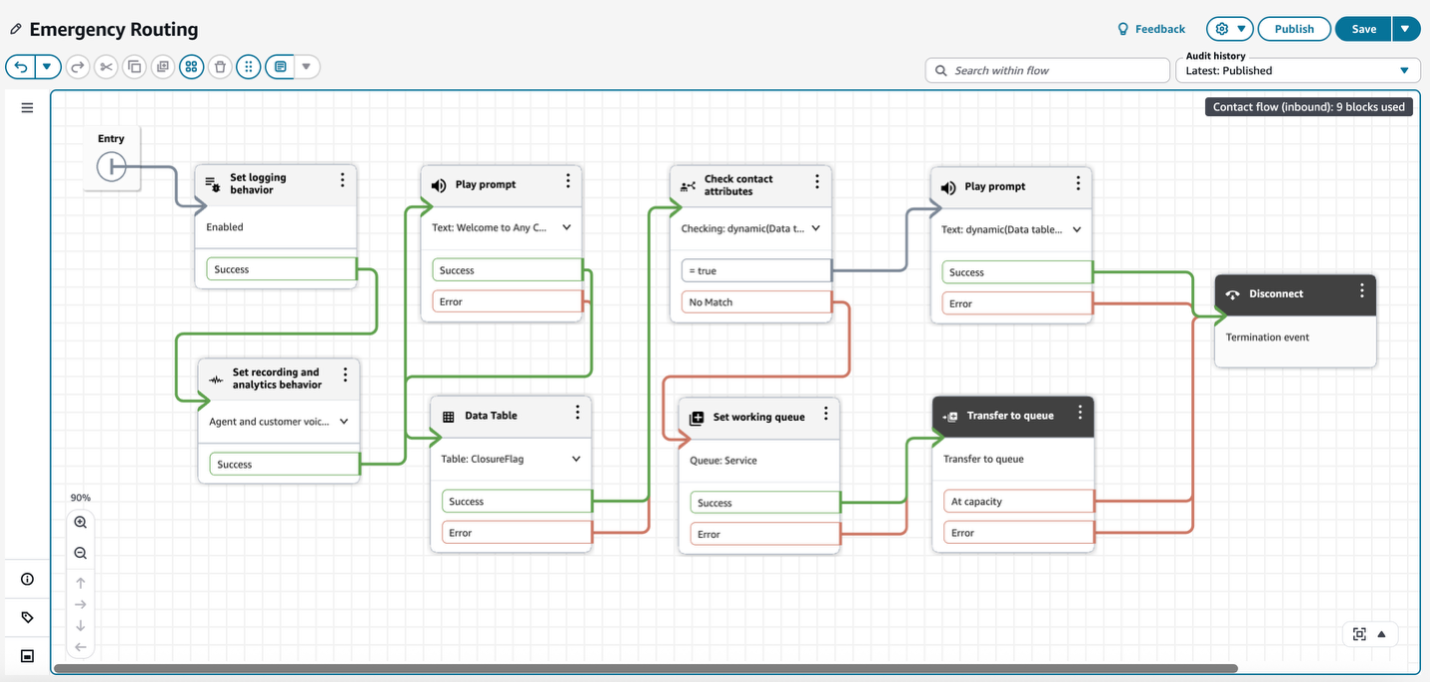
- Connect all blocks appropriately, then Save and Publish the contact flow (Contact flow should look like below snapshot)
Step 4: How to validate this solution
Agent extension routing validation:
- Claim a phone number and associate the phone number to the newly created contact flow
- Make a call to the claimed phone number and enter a valid extension mapped on the data table we created
- Call should be routed to the configured agent for the extension
Emergency flag routing with custom prompt validation:
- Claim a phone number and associate the phone number to the newly created contact flow
- Make a call to the claimed phone number and you will be able to hear the emergency message
Update the records in the data table with different values to validate the experience.
Clean Up
If you’re testing these features and want to clean up resources:
- Delete any sample or test data tables created as part of this blog.
- Archive Contact Flows
- Remove Queues
- Remove Routing Profiles and Users
Note: Always test cleanup procedures in a development environment first. Document all production resources to avoid accidental deletion.
Conclusion
In this post, we outlined Amazon Connect’s data tables feature and its no-code interface for managing operational data. We explained how contact center administrators can use this capability to streamline routine updates and demonstrated the implementation process through real-world use cases including agent extension routing, emergency
closure flags, and seasonal messaging. Click here to visit our admin guide and get started implementing data tables in your contact center.