Containers
Automate proxy injection for Amazon EKS on AWS Fargate using Kyverno
Automating proxy injection using Kyverno on Amazon Elastic Kubernetes Service (Amazon EKS) on AWS Fargate addresses a recurring source of friction for enterprises that run Amazon EKS in regulated environments. These organizations route all outbound traffic through a corporate HTTP/HTTPS proxy to meet egress security and compliance requirements. When they adopt Amazon EKS on AWS Fargate, they hit a wall. AWS manages Fargate nodes, which offer no surface for customers to apply node-level proxy configuration. Without proxy settings, Fargate pods may be unable to reach external endpoints. This can prevent traffic from following required egress controls and may affect third-party API calls.
This challenge is not unique to Fargate. Even on Amazon Elastic Compute Cloud (Amazon EC2) based nodes, node-level proxy configuration typically covers only host processes such as the kubelet and image pulls. User data scripts and /etc/environment are examples of this node-level configuration. Containers run in isolated environments and don’t inherit node-level environment variables. As a result, pod-level proxy injection requires an admission-time solution regardless of compute type. Fargate makes the gap unavoidable because the node layer is not exposed for customer configuration.
In this post, we demonstrate how to use Kyverno mutating admission policies to inject proxy environment variables into Fargate pods in labeled namespaces automatically. No proxy-related changes to application deployment manifests are required. A cluster operations team configures one policy, and workloads in the labeled namespaces inherit the correct proxy settings automatically.
This post covers these topics:
- Deploying Kyverno as a policy engine on Amazon EKS.
- Targeting Fargate-profiled namespaces with namespace label selectors.
- Writing a Kyverno
MutatingPolicythat injects proxy environment variables into all containers and init containers. - Validating injection and bypassing the proxy for the Fluent Bit log router and AWS endpoints.
After implementing this solution, you can:
- Replace per-workload proxy configuration with a single policy. One
MutatingPolicyof roughly 30 lines of YAML covers each pod in a labeled namespace, instead of three environment variables added by hand to each container in each deployment manifest. - Onboard a new application team by adding one namespace label, which reduces the need for proxy-related changes to their deployment manifests.
- Apply one centrally managed policy across labeled namespaces. The same configuration scales from a single test workload to large multi-namespace clusters without per-pod changes. Mutation runs once per pod, at admission time, so it does not affect pods after they are scheduled.
- Manage proxy settings as version-controlled, GitOps-compatible Kubernetes resources.
Solution overview
The solution has three building blocks that work together to inject proxy settings at pod admission time.
Component 1: Amazon EKS cluster with Fargate profiles
A Fargate profile maps one or more namespaces to Fargate compute. Because the node layer isn’t exposed for customer configuration, proxy settings must be present in the pod specification before the pod is scheduled.
Component 2: Kyverno policy engine
Kyverno is a Cloud Native Computing Foundation (CNCF) graduated policy engine for Kubernetes that runs as a mutating and validating admission webhook. Its policies are native Kubernetes YAML, deployed through the Helm chart and any GitOps pipeline. For this solution, Kyverno hosts a MutatingPolicy that rewrites incoming pod specifications.
Component 3: The proxy injection MutatingPolicy
A MutatingPolicy matches pods created in Fargate-profiled namespaces. It injects the HTTPS_PROXY, HTTP_PROXY, and NO_PROXY environment variables into every container and init container at admission time. The policy uses namespace label selectors so that only opted-in namespaces are affected.
With this architecture, application teams do not need to make proxy-related changes to their deployment manifests, and the cluster operations team manages a single source of truth for proxy settings.
Why Kyverno
Several approaches can inject pod-level configuration. We chose Kyverno for these reasons:
- Maturity. Kyverno is a CNCF graduated project.
- No new language. Policies are native Kubernetes YAML with built-in mutation support. They deploy through the standard Helm chart and GitOps pipelines. There’s no separate runtime to build or operate.
- Low operational effort. Container-level environment variable injection takes roughly 30 lines of YAML, which removes the need to build, secure, and maintain a custom admission webhook.
This table compares the common options for pod-level proxy injection on Fargate.
| Approach | Pros | Cons |
Kyverno MutatingPolicy |
No app manifest changes; centrally managed; GitOps-native; namespace-scoped | Adds an admission controller dependency; existing pods need a restart to pick up changes |
ConfigMap + envFrom in each workload |
Simple; no admission controller | Requires manual envFrom in every workload spec; not enforced |
| Bake proxy into container images | Works without cluster components | Couples proxy config to image builds; drift across teams; rebuilds on every change |
Scalability and availability considerations
Before you adopt this pattern at scale, consider these operational characteristics:
- Configuration effort. Without the policy, each container needs three proxy variables set by hand. One init container plus one app container means 6 entries, and 50 such workloads means 300 entries to keep in sync. The policy replaces all of it with one resource of roughly 30 lines.
- Latency. The policy is evaluated once per pod, during admission, and adds no overhead to the pod after it is running. Admission webhook evaluation completes within the configured webhook timeout, which defaults to 10 seconds.
- Scale. One cluster-scoped policy applies to every pod in every labeled namespace, with no per-namespace or per-pod setup. The cluster operations team manages it once, and operational effort stays flat as workloads grow.
- Fail-open behavior. Setting
failurePolicy: Ignoreensures that pod scheduling is not blocked if the webhook is temporarily unavailable.
Architecture and request workflow
This diagram shows how Kyverno injects proxy environment variables during pod admission and how the resulting Fargate pod reaches external endpoints through the corporate proxy.
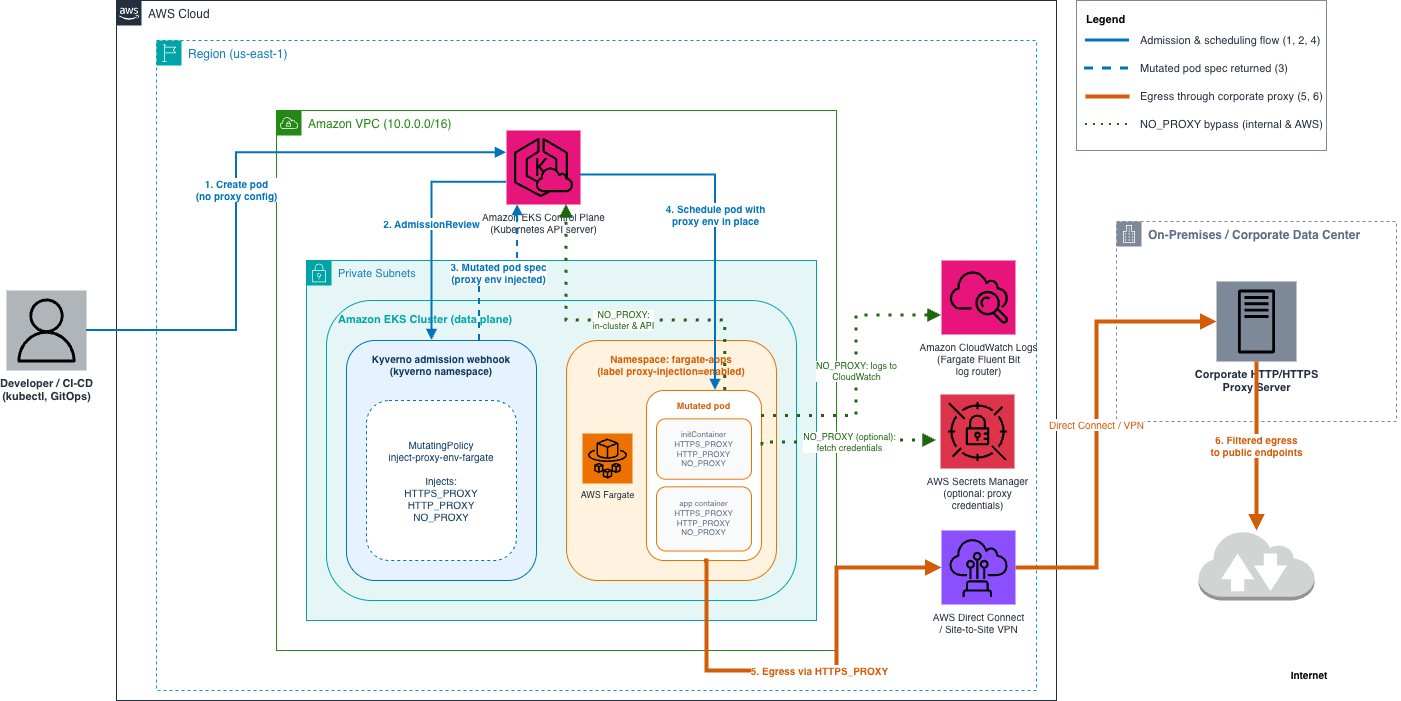
Figure 1: Automated proxy injection for Amazon EKS on AWS Fargate using a Kyverno MutatingPolicy
Three planes interact during pod creation: the control plane (the managed Amazon EKS API server, which calls admission webhooks), the policy plane (Kyverno, running as a cluster-wide mutating webhook that holds the MutatingPolicy), and the data plane (AWS Fargate, which runs the resulting pods). Pod traffic leaves through AWS Direct Connect or AWS Site-to-Site VPN to the on-premises proxy, while NO_PROXY destinations such as the API server, Amazon CloudWatch Logs, and AWS Secrets Manager are reached directly.
These planes interact in this request workflow:
- A client (
kubectl, a CI/CD pipeline, or a GitOps controller) submits a pod creation request to the Kubernetes API server. - The API server sends an
AdmissionReviewto the Kyverno mutating webhook before persisting the object. - Kyverno evaluates the pod against the
MutatingPolicy. If the pod’s namespace carries theproxy-injection: enabledlabel, Kyverno injects the proxy environment variables into every container and init container. Otherwise, the pod passes through unchanged. - The API server persists the mutated pod specification.
- Fargate schedules the pod, which now starts with proxy settings already in place, so applications that honor proxy environment variables route their first outbound call through the corporate proxy.
Because the mutation happens before the object is persisted, the proxy settings become a permanent part of the pod specification. This avoids the race condition where a container could make a network call before proxy configuration is applied.
Prerequisites
To follow this walkthrough, you need these prerequisites:
- An AWS account.
- An existing Amazon EKS cluster. On a Fargate-only cluster, you also need Fargate profiles for system and add-on components. CoreDNS, Kyverno, and any pod you schedule must each be matched by a profile, or they remain in the
Pendingstate. Refer to Prepare a Fargate-only cluster. - Network connectivity from your Fargate subnets to the AWS endpoints. Traffic that bypasses the proxy (for example, Amazon Simple Storage Service (Amazon S3) and Amazon CloudWatch Logs) needs a path such as a virtual private cloud (VPC) endpoint or a NAT gateway to reach those services.
- A workstation with these tools installed:
- The corporate proxy endpoint URL from your network or security team (for example,
http://proxy.example.corp:8080). - The list of destinations that must bypass the proxy, used to compose
NO_PROXY.
Compose the NO_PROXY list
Internal cluster traffic must bypass the proxy. We recommend including these entries in NO_PROXY:
localhostand127.0.0.1for loopback traffic.- The Kubernetes service CIDR (commonly
10.100.0.0/16or172.20.0.0/16) and thekubernetes.default.svcAPI service. - The cluster DNS suffix
.svc,.svc.cluster.local, and.cluster.local. - Your VPC CIDR ranges.
- Amazon EC2 instance metadata endpoint
169.254.169.254. - AWS service endpoints you reach over the VPC or through VPC endpoints, for example
.amazonaws.com(scope this to the Regions and services you use).
Note: CIDR ranges in NO_PROXY are honored by some clients, such as the AWS SDK for Go, but not by curl and libcurl, which match host names and domain suffixes only. For destinations you reach with curl or similar tools, rely on the DNS-suffix entries (.svc, .svc.cluster.local, and .cluster.local). Address in-cluster services by name rather than by ClusterIP, so the suffix match applies.
Prepare a Fargate-only cluster
If your cluster has no managed node groups, complete these steps before you deploy. Fargate runs a pod only when a Fargate profile matches it, so system components and add-ons stay Pending until you create profiles for them. Skip the Prepare a Fargate-only cluster section if your cluster has EC2-based nodes that can host these components.
Run CoreDNS on Fargate. Without CoreDNS, no pod can resolve DNS names, including the AWS endpoints in your NO_PROXY list. Create a Fargate profile scoped to the CoreDNS pods:
Trigger a rollout of the coredns deployment. Fargate profiles match pods only at creation time, so the existing CoreDNS pods are not rescheduled onto Fargate until they are recreated:
Confirm the CoreDNS pods reach 1/1 Running before you continue:
Provide a path to AWS endpoints. Fargate subnets need a route to AWS services. In a private subnet with no NAT gateway, add VPC endpoints.
Deploy the solution
This walkthrough deploys Kyverno, targets a Fargate namespace, applies the proxy injection policy, and validates the result.
Step 1: Install Kyverno using Helm
On a Fargate-only cluster, create a Fargate profile for the kyverno namespace before you install the chart, so the controllers schedule as soon as they are created. Skip the Fargate profile creation if your cluster has EC2-based nodes that can host the controllers.
First, check whether a profile already covers the kyverno namespace:
If none matches, create one and wait for it to become ACTIVE:
With the profile in place, add the Kyverno Helm repository and install the chart into the kyverno namespace. This example pins a chart version that ships Kyverno 1.18 or later, where MutatingPolicy is stable. Confirm the latest version on the Kyverno Helm charts page before you deploy.
Verify that all four Kyverno controllers are running:
If you manage infrastructure with Terraform, you can deploy the same chart through the aws-ia/eks-blueprints-addon module instead of the Helm CLI, which keeps the Kyverno release version-controlled alongside the rest of your cluster definition.
Step 2: Label the Fargate-profiled namespace
The policy in the next step only acts on namespaces that carry the proxy-injection: enabled label. This is what keeps proxy injection scoped to Fargate workloads and away from EC2-based workloads in a mixed cluster.
How the namespace selector targets workloads. Kyverno matches pods using the matchConstraints.namespaceSelector field in the policy (shown in Step 3).
This label-driven model is what makes the solution opt-in and safe for mixed clusters:
- Choosing the label. Use a label key that describes intent rather than implementation, so the policy reads clearly and does not collide with labels set by other tools.
- Opting a namespace in or out. Adding the label opts a namespace in. Removing it (
kubectl label namespace <name> proxy-injection-) opts it out. No policy change is required for either action.
Confirm a Fargate profile covers the namespace, and create one if needed:
Create the namespace and apply the label:
Step 3: Create the proxy injection MutatingPolicy
This MutatingPolicy matches pod creation requests in labeled namespaces and injects the proxy environment variables into every container. It uses a Common Expression Language (CEL) ApplyConfiguration patch with the map() function to iterate over all containers. Replace the proxy URL and NO_PROXY value with the values for your environment.
Apply the manifest:
Step 4: Handle init containers and sidecar containers
Init containers run before application containers and frequently need the proxy to pull dependencies or reach external services during startup. Init containers are not part of spec.containers, so add a second mutation that targets spec.initContainers. Guard it with has() because most pods do not define init containers.
Add this entry under spec.mutations, after the first mutation:
Apply the updated policy so both mutations take effect:
Kyverno reconciles the change automatically, so you do not need to restart it. The new mutation applies to pods created after this point. Restart existing workloads (for example, kubectl rollout restart deployment <name> -n fargate-apps) if you want them to pick up the injected variables.
Sidecar containers need no separate mutation. The two mutations you have already added cover them. Which one applies depends on how the sidecar is injected:
Native sidecars (init containers with restartPolicy: Always, available in Kubernetes 1.29+) are part of spec.initContainers, so the init container mutation you just added covers them.
Webhook-injected sidecars (for example, from a service mesh) are covered by the first mutation if they appear in spec.containers at admission time. Because admission webhook ordering is not guaranteed, a mesh injector that runs after Kyverno adds its sidecar after this mutation has already run, so that container does not receive the proxy variables. Where you need deterministic coverage, prefer native sidecars (init containers with restartPolicy: Always, Kubernetes 1.29+), which are part of spec.initContainers before scheduling.
Step 5: Bypass the proxy for the Fluent Bit log router
Amazon EKS on Fargate uses a built-in Fluent Bit log router to ship container logs to destinations such as Amazon CloudWatch Logs. Fluent Bit talks to AWS endpoints, so it must bypass the corporate proxy. You configure the log router by creating a ConfigMap named aws-logging in the dedicated aws-observability namespace. Verify that the AWS endpoints it uses are covered by your NO_PROXY list (the .amazonaws.com entry does this).
Apply the manifest:
Verify:
If the aws-observability namespace already exists, kubectl apply does not always reconcile the label onto it. Set it explicitly in that case:
The Fargate log router also needs permission to write to Amazon CloudWatch Logs. Attach a policy to your Fargate pod execution role that allows logs:CreateLogGroup, logs:CreateLogStream, logs:DescribeLogStreams, and logs:PutLogEvents.
Note: Do not add the
proxy-injection: enabledlabel to theaws-observabilitynamespace. The log router should reach AWS endpoints directly, and theNO_PROXYentries keep AWS traffic off the proxy for your application pods.
Two mechanisms work together to keep the log router off the proxy:
- The router is out of the policy’s scope. The Fargate log router runs as managed infrastructure and lives in the unlabeled
aws-observabilitynamespace. Because thenamespaceSelectormatches only labeled namespaces, the policy does not inject proxy variables into the router. - NO_PROXY covers the destination. Even for your application pods, which do receive the injected variables, the
.amazonaws.comentry inNO_PROXYroutes Amazon CloudWatch Logs and other AWS endpoint traffic directly rather than through the corporate proxy. This is why composingNO_PROXYcorrectly (covered earlier) matters for traffic destined for AWS endpoints.
Step 6: Validate the injection
Deploy a test pod into the labeled namespace and confirm that the environment variables were injected. This walkthrough uses an Amazon Linux 2023 image because it includes curl, which the egress validation in Step 7 relies on. A minimal image such as busybox does not include curl.
Inspect the resulting pod specification:
You should see the three proxy variables in the output:
To confirm that the policy correctly ignores non-targeted namespaces, repeat the test in a namespace without the proxy-injection: enabled label and verify that no proxy variables are present.
Step 7: Validate the proxy bypass for AWS endpoints and the log router
You also need to confirm that the Fluent Bit log router delivers logs without the proxy in the path.
Confirm that NO_PROXY is honored for AWS endpoints. Most AWS SDKs and CLIs honor the NO_PROXY variable. Run an AWS API call from inside the test pod and inspect which destination the client connects to. This example uses curl in verbose mode against an Amazon S3 regional endpoint (an .amazonaws.com host, which NO_PROXY covers):
Because .amazonaws.com is in NO_PROXY, the client connects directly to the S3 endpoint IP. The output shows Connected to s3.us-east-1.amazonaws.com rather than Connected to proxy.example.corp. For comparison, run the same command against a public endpoint that is not in NO_PROXY and confirm the client connects to the proxy host instead:
This pair of commands demonstrates the split: in-scope AWS traffic bypasses the proxy, and general internet traffic routes through it.
This check validates suffix-based bypass only: curl matches the .amazonaws.com suffix, so it connects directly. The service-CIDR entry (10.100.0.0/16) is honored by Go clients such as the AWS SDK for Go when they connect to a ClusterIP. However, curl and libcurl don’t honor CIDR ranges. Reach in-cluster services by their DNS names so the .svc.cluster.local suffix applies rather than relying on the CIDR entry.
Confirm that the Fluent Bit log router bypasses the proxy. Verify that logs are arriving in Amazon CloudWatch Logs, which confirms the router reached the AWS endpoint successfully:
A populated list of log streams confirms that Fluent Bit delivered logs to Amazon CloudWatch Logs directly. If the log group is empty, check that the aws-observability namespace exists, is unlabeled for proxy injection, and that the Fargate pod execution role grants logs:CreateLogStream and logs:PutLogEvents.
Cleanup
To remove the resources created in this walkthrough, run these commands:
Security considerations
When you run this solution in production, consider these security points:
- Choose the right failure policy. This walkthrough uses
failurePolicy: Ignoreso that a webhook outage doesn’t block pod scheduling. - Protect proxy credentials. If your proxy requires authentication, store the credentials in AWS Secrets Manager and mount them with the AWS Secrets and Configuration Provider.
- Restrict who can change the policy. A
MutatingPolicyis cluster-scoped and affects every targeted pod. Limit create, update, and delete permissions onmutatingpolicies.policies.kyverno.ioto the cluster operations team through Kubernetes role-based access control (RBAC). - Audit injected configuration. Turn on Kyverno policy reports and forward Kyverno controller logs to Amazon CloudWatch Logs so you can audit which pods were mutated and detect unexpected changes.
Conclusion
In this post, we showed how to use a Kyverno MutatingPolicy to automatically inject corporate proxy environment variables into Amazon EKS on AWS Fargate pods at admission time. This closes the Fargate proxy gap without modifying application manifests and replaces per-deployment manual configuration with a single centrally managed policy.
Solution benefits:
- No proxy-related changes to application deployment manifests.
- Namespace-scoped targeting that avoids conflicts in mixed Fargate and EC2 clusters.
- GitOps-compatible policies, with consistent egress configuration across every labeled namespace.
Limitations to keep in mind:
- Image-pull proxying is out of scope. On Fargate, the AWS-managed agent layer performs image pulls and doesn’t read pod environment variables. Make sure that your registries are reachable independently, for example through Amazon Elastic Container Registry (Amazon ECR) VPC endpoints, an Amazon ECR pull-through cache, or private registry connectivity.
- Kyverno injects proxy settings at pod admission time. If the proxy URL changes, you must restart existing pods to pick up the new value.
- Kyverno must be running before Fargate pods are created, so cluster bootstrap order matters. Install Kyverno before you deploy workloads into proxy-injected namespaces. Confirm its webhook is ready first.
To get started, install Kyverno on your Amazon EKS on AWS Fargate cluster and apply the MutatingPolicy from this post to a labeled namespace. For more information, see the Kyverno MutatingPolicy documentation and Amazon EKS on AWS Fargate.
Reference:
- Amazon EKS on AWS Fargate
- Kyverno MutatingPolicy documentation
- Start AWS Fargate logging for your cluster
- Access AWS services through AWS PrivateLink (interface VPC endpoints)