Containers

Back up and restore your Amazon EKS cluster resources using Velero

When you accidentally delete a production namespace or a cluster upgrade fails, rebuilding your Amazon Elastic Kubernetes Service (Amazon EKS) cluster resources means recreating every deployment, service, and persistent volume manually. With Velero, a backup and restore tool for Kubernetes, you capture resource definitions to Amazon Simple Storage Service (Amazon S3) and persistent volume data as Amazon Elastic Block Store (Amazon EBS) snapshots. Velero supports cross-cluster restores, namespace-level granularity, and portability across Kubernetes distributions. If you need centralized, fully managed backup scheduling instead, AWS Backup for Amazon EKS handles that for you.

In this post, you’ll learn to back up and restore Amazon EKS cluster resources and persistent volume data using Velero. You’ll deploy a sample stateful application, back it up, and restore it to a different namespace within the same cluster. Along the way, you’ll configure least-privilege AWS Identity and Access Management (AWS IAM) roles using Amazon EKS Pod Identity and scope Velero’s Kubernetes permissions with a custom ClusterRole. A ClusterRole is a Kubernetes resource that defines cluster-wide permissions.

Prerequisites

You’ll spend 45 to 60 minutes on this tutorial and incur costs for Amazon S3 storage (based on data stored), Amazon EBS snapshots (based on snapshot storage), and Amazon EKS cluster usage (based on cluster runtime). For detailed pricing information, see Amazon S3 Pricing, Amazon EBS Pricing, and Amazon EKS Pricing. Clean up instructions at the end help you remove all billable resources. To complete this tutorial, make sure you have the following:

  • An active AWS account with permissions to create Amazon S3 buckets, IAM policies and roles, and Amazon EKS resources
  • An Amazon EKS cluster running Kubernetes 1.35 or later with Amazon EKS Auto Mode enabled. Auto Mode automates networking, node provisioning and scaling. You can use eksctl to create this cluster – Refer steps here
  • AWS CLI v2, Helm v3.x, and kubectl installed and configured
  • Experience with Kubernetes concepts such as pods, deployments, and persistent volumes, and with IAM roles

The default Velero installation uses cluster-admin, which grants broad access to cluster resources. This tutorial replaces it with a least-privilege ClusterRole. Follow those steps for non-demo environments.

Velero overview

Velero is an open-source tool that backs up and restores Kubernetes cluster resources and persistent volumes. Unlike traditional backup solutions that require direct access to storage systems, Velero works through the Kubernetes API to discover and back up resources. This API-driven approach provides several advantages:

  • Kubernetes-native: Velero understands Kubernetes resources and their relationships
  • Flexible filtering: You can scope backups by namespace, resource type, or label
  • Cloud-agnostic: The same backup can be restored to different Kubernetes distributions
  • Snapshot integration: Velero integrates with cloud provider snapshot APIs for persistent volume backups

An application-level backup in Amazon EKS targets two components:

  • Kubernetes objects and configurations stored in the EKS control plane
  • Application data stored in persistent volumes

Refer to the Velero documentation for details on resource filtering.

Backup and Restore Workflow

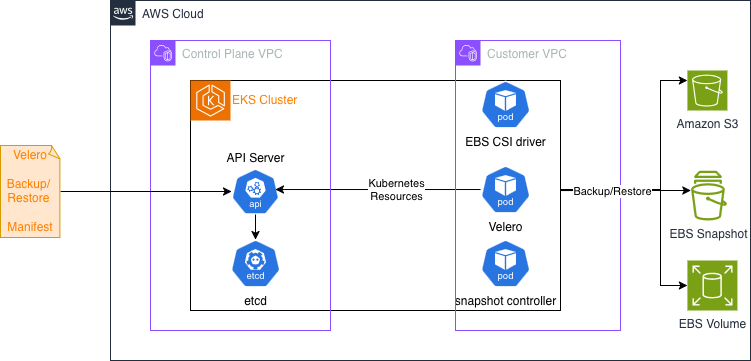
Velero uses a controller deployed as a Kubernetes Deployment to perform backup and restore tasks. A user submits a Backup manifest or Restore manifest (Custom Resource) to EKS, for the Velero controller to perform Backup or Restore. Velero documentation provides details on how they work here.

Tutorial

This tutorial uses Amazon EKS Auto Mode to simplify cluster management. Velero does not require Auto Mode and works on any Amazon EKS cluster. The walkthrough backs up an application in namespace myprimary and restores it to another namespace myrestore in the same cluster.

Set up environment variables

Substitute your cluster name and Region in the following exports. The tutorial references these variables in every subsequent step.

export CLUSTER_NAME=<<Cluster Name>>
export AWS_REGION=<<AWS region>>
export AWS_ACCOUNT_ID=$(aws sts get-caller-identity --query Account --output text --no-cli-pager)
export BUCKET_NAME=velero-backups-$(date +%s)
export POLICY_NAME=VeleroBackupPolicy
export ROLE_NAME=VeleroBackupRole
export AWS_PAGER=""

Configure Amazon S3 and IAM

First, provision the Amazon S3 bucket where Velero stores backup data.

aws s3 mb s3://${BUCKET_NAME} --region ${AWS_REGION}

Next, define an IAM policy granting Velero read/write access to the bucket and Amazon EBS snapshot permissions.

cat > velero-s3-policy.json <<EOF
{
  "Version": "2012-10-17",
  "Statement": [
    {
      "Effect": "Allow",
      "Action": ["s3:GetObject","s3:PutObject","s3:DeleteObject","s3:ListBucket","s3:GetBucketLocation","s3:GetBucketVersioning","s3:AbortMultipartUpload", "s3:ListMultipartUploadParts"],
      "Resource": ["arn:aws:s3:::${BUCKET_NAME}","arn:aws:s3:::${BUCKET_NAME}/*"]
    },
    {
      "Effect": "Allow",
      "Action": ["ec2:CreateSnapshot","ec2:DeleteSnapshot","ec2:DescribeSnapshots","ec2:DescribeVolumes","ec2:DescribeVolumeAttribute","ec2:DescribeVolumesModifications","ec2:DescribeVolumeStatus","ec2:CreateTags","ec2:DescribeTags"],
      "Resource": "*"
    }
  ]
}
EOF
aws iam create-policy --policy-name ${POLICY_NAME} --policy-document file://velero-s3-policy.json

The following commands capture the policy ARN, set up an IAM role with EKS Pod Identity trust, and attach the policy. Using EKS Pod Identity, your Kubernetes pods can assume IAM roles without managing credentials.

export POLICY_ARN=$(aws iam list-policies --query "Policies[?PolicyName=='${POLICY_NAME}'].Arn" --output text --no-cli-pager)
cat > velero-trust-policy.json <<EOF
{
  "Version": "2012-10-17",
  "Statement": [{
    "Effect": "Allow",
    "Principal": {"Service": "pods.eks.amazonaws.com"},
    "Action": ["sts:AssumeRole","sts:TagSession"],
    "Condition": {"StringEquals": {"aws:RequestTag/kubernetes-namespace": "velero","aws:RequestTag/kubernetes-service-account": "velero"}}
  }]
}
EOF
aws iam create-role --role-name ${ROLE_NAME} --assume-role-policy-document file://velero-trust-policy.json
aws iam attach-role-policy --role-name ${ROLE_NAME} --policy-arn ${POLICY_ARN}

With the role created, capture its ARN and associate the Velero service account through Pod Identity.

export ROLE_ARN=$(aws iam get-role --role-name ${ROLE_NAME} --query Role.Arn --output text)
aws eks create-pod-identity-association --cluster-name ${CLUSTER_NAME} --namespace velero --service-account velero --role-arn ${ROLE_ARN} --region ${AWS_REGION}

Install Velero

Velero uses Amazon EBS snapshots to take backup of Volumes. This requires the snapshot controller add-on to be installed on you EKS cluster. Connect to your cluster and install it first.

aws eks update-kubeconfig --name ${CLUSTER_NAME}
aws eks create-addon --cluster-name ${CLUSTER_NAME} --addon-name snapshot-controller --region ${AWS_REGION}

Generate the Helm values file for Velero chart install. This configures Velero to use your Amazon S3 bucket for backup storage, your Region for Amazon EBS snapshots, and Pod Identity for authentication.

cat > velero-values.yaml <<EOF
configuration:
  backupStorageLocation:
  - name: default
    provider: aws
    bucket: ${BUCKET_NAME}
    config:
      region: ${AWS_REGION}
  volumeSnapshotLocation:
  - name: default
    provider: aws
    config:
      region: ${AWS_REGION}
  features: EnableCSI
credentials:
  useSecret: false
serviceAccount:
  server:
    create: true
    name: velero
initContainers:
- name: velero-plugin-for-aws
  image: velero/velero-plugin-for-aws:v1.10.0
  volumeMounts:
  - mountPath: /target
    name: plugins
upgradeCRDs: false
cleanUpCRDs: false
EOF

Install Velero with Helm and verify the pod is running.

helm repo add vmware-tanzu https://vmware-tanzu.github.io/helm-charts
helm repo update
helm install velero vmware-tanzu/velero --version 11.4.0 --namespace velero --create-namespace --values velero-values.yaml
kubectl get pods -n velero

The default Velero installation binds to cluster-admin, granting broader permissions than necessary. Replace it with a least-privilege ClusterRole that scopes permissions to only what Velero needs.

cat > velero-cluster-role.yaml <<EOF
apiVersion: rbac.authorization.k8s.io/v1
kind: ClusterRole
metadata:
  name: velero-restricted
rules:
- apiGroups: [""]
  resources: [namespaces,persistentvolumes,persistentvolumeclaims,pods,services,configmaps,secrets]
  verbs: ["get","list","watch","create","update","patch","delete"]
- apiGroups: ["apps"]
  resources: [deployments,replicasets]
  verbs: ["get","list","watch","create","update","patch","delete"]
- apiGroups: ["rbac.authorization.k8s.io"]
  resources: [clusterrolebindings]
  verbs: ["get","list"]
- apiGroups: ["storage.k8s.io"]
  resources: [storageclasses]
  verbs: ["get","list","watch"]
- apiGroups: ["snapshot.storage.k8s.io"]
  resources: [volumesnapshots,volumesnapshotcontents,volumesnapshotclasses]
  verbs: ["get","list","watch","create","update","patch","delete"]
- apiGroups: ["velero.io"]
  resources: [backups,backups/status,restores,restores/status,schedules,schedules/status,backupstoragelocations,backupstoragelocations/status,volumesnapshotlocations,volumesnapshotlocations/status,podvolumebackups,podvolumebackups/status,podvolumerestores,podvolumerestores/status,backuprepositories,backuprepositories/status]
  verbs: ["get","list","watch","create","update","patch","delete"]
EOF
kubectl apply -f velero-cluster-role.yaml
kubectl delete clusterrolebinding velero-server
kubectl create clusterrolebinding velero-restricted-binding --clusterrole=velero-restricted --serviceaccount=velero:velero

Now define a VolumeSnapshotClass. This Kubernetes resource specifies the Container Storage Interface (CSI) driver for Amazon EBS snapshots. See the Kubernetes VolumeSnapshotClass documentation for options.

cat > snapshot-class.yaml <<EOF
apiVersion: snapshot.storage.k8s.io/v1
kind: VolumeSnapshotClass
metadata:
  name: ebs-csi-snapclass
  labels:
    velero.io/csi-volumesnapshot-class: "true"
  annotations:
    snapshot.storage.kubernetes.io/is-default-class: "true"
driver: ebs.csi.eks.amazonaws.com
deletionPolicy: Delete
EOF
kubectl apply -f snapshot-class.yaml

Restart Velero and verify storage locations are available.

kubectl rollout restart deployment/velero -n velero
kubectl get backupstoragelocation -n velero
# Expected: PHASE=Available

Back up an application

Deploy a sample application that mounts a PersistentVolumeClaim (PVC). A PVC is a Kubernetes request for storage that provisions an Amazon EBS volume. The application writes timestamped messages to a file that you use to verify the restore. The following manifest deploys the application in the myprimary namespace. It creates the namespace, a StorageClass for encrypted gp3 Amazon EBS volumes, a PVC, and a Deployment that writes to the persistent volume.

cat > deployment-demo-app.yaml <<EOF
---
apiVersion: v1
kind: Namespace
metadata:
  name: myprimary
---
apiVersion: storage.k8s.io/v1
kind: StorageClass
metadata:
  name: auto-ebs-sc
provisioner: ebs.csi.eks.amazonaws.com
volumeBindingMode: WaitForFirstConsumer
parameters:
  type: gp3
  encrypted: "true"
---
apiVersion: v1
kind: PersistentVolumeClaim
metadata:
  name: auto-ebs-claim
  namespace: myprimary
spec:
  accessModes: [ReadWriteOnce]
  storageClassName: auto-ebs-sc
  resources:
    requests:
      storage: 8Gi
---
apiVersion: apps/v1
kind: Deployment
metadata:
  name: demo-stateful-app
  namespace: myprimary
spec:
  replicas: 1
  selector:
    matchLabels:
      app: demo-stateful-app
  template:
    metadata:
      labels:
        app: demo-stateful-app
    spec:
      terminationGracePeriodSeconds: 0
      nodeSelector:
        eks.amazonaws.com/compute-type: auto
      containers:
      - name: bash
        image: public.ecr.aws/docker/library/bash:4.4
        command: ["/usr/local/bin/bash"]
        args: ["-c", "while true; do echo \"Message from \$POD_NAMESPACE - \$(date -u)\" >> /data/out.txt; sleep 15; done"]
        env:
        - name: POD_NAMESPACE
          valueFrom:
            fieldRef:
              fieldPath: metadata.namespace
        resources:
          requests:
            cpu: "100m"
        volumeMounts:
        - name: persistent-storage
          mountPath: /data
      volumes:
      - name: persistent-storage
        persistentVolumeClaim:
          claimName: auto-ebs-claim
EOF
kubectl apply -f deployment-demo-app.yaml

Verify the pod is running. Node provisioning by Amazon EKS might take a couple of minutes.

kubectl get po -n myprimary
kubectl exec -n myprimary "$(kubectl get pods -n myprimary -l app=demo-stateful-app -o=jsonpath='{.items[0].metadata.name}')" -- cat /data/out.txt

Define a Velero Backup custom resource for the myprimary namespace. This YAML scopes the backup to specific resource types and triggers Amazon EBS snapshots for persistent volumes. See the Velero Backup API documentation for filtering options.

cat > myprimary-backup.yaml <<EOF
apiVersion: velero.io/v1
kind: Backup
metadata:
  name: backup-myprimary
  namespace: velero
spec:
  includedNamespaces: [myprimary]
  includedResources: [deployments,pods,persistentvolumeclaims,persistentvolumes,services,configmaps,secrets]
  snapshotVolumes: true
  defaultVolumesToFsBackup: false
  ttl: 720h0m0s
EOF
kubectl apply -f myprimary-backup.yaml

After a couple of minutes, confirm the backup completed.

kubectl describe backup backup-myprimary -n velero
# Look for Phase: Completed

Restore an application

Restore the backup to a new namespace called myrestore. Velero’s namespace mapping redirects resources from myprimary to myrestore. Apply the Restore custom resource. This YAML specifies which backup to restore and how to map namespaces.

cat > myprimary-restore.yaml <<EOF
apiVersion: velero.io/v1
kind: Restore
metadata:
  name: myprimary-restore
  namespace: velero
spec:
  backupName: backup-myprimary
  namespaceMapping:
    myprimary: myrestore
  preserveNodePorts: true
  restorePVs: true
EOF
kubectl apply -f myprimary-restore.yaml

Confirm the restore completed.

kubectl describe restore myprimary-restore -n velero
# Look for Phase: Completed

Check the data file on the restored pod.

kubectl exec -n myrestore "$(kubectl get pods -n myrestore -l app=demo-stateful-app -o=jsonpath='{.items[0].metadata.name}')" -- cat /data/out.txt

The output shows messages from myprimary, confirming that Velero restored the persistent volume data from the Amazon EBS snapshot.

Clean up

Remove the resources you provisioned to stop incurring charges for Amazon S3 storage, Amazon EBS snapshots, and Amazon EKS compute.

kubectl delete -f deployment-demo-app.yaml
kubectl delete namespace myrestore
helm uninstall velero -n velero
kubectl delete namespace velero
kubectl delete clusterrolebinding velero-restricted-binding
kubectl delete clusterrole velero-restricted
aws eks delete-addon --cluster-name ${CLUSTER_NAME} --addon-name snapshot-controller --region ${AWS_REGION}
aws s3 rb s3://$BUCKET_NAME --force
aws iam detach-role-policy --role-name VeleroBackupRole --policy-arn ${POLICY_ARN}
aws iam delete-role --role-name VeleroBackupRole
aws iam delete-policy --policy-arn ${POLICY_ARN}

Also check the Amazon EBS console for remaining snapshots or volumes and delete them manually.

Conclusion

You configured Velero on Amazon EKS to back up and restore Kubernetes cluster resources and persistent volume data with least-privilege AWS IAM roles and a scoped ClusterRole. To build on what you’ve learned, try these next steps:

Share your experiences in the AWS containers community forum.

For reference, see the following resources:


About the authors

Sapeksh Madan

Sapeksh Madan

Sapeksh is an AWS DevOps architect based in New York City, where he helps customers solve complex EKS deployments and accelerate their CI/CD and platform engineering initiatives. Sapeksh is a builder at heart, with a passion for DevOps practices. In his spare time, he enjoys running and biking.

Shalabh Srivastava

Shalabh Srivastava

Shalabh is a Principal at Amazon Web Services, specializing in Kubernetes and Applied AI. He helps customers design and operate resilient, scalable cloud-native architectures on AWS, turning complex operational challenges into reusable patterns that enable teams to move faster. In his free time, Shalabh enjoys reading about emerging technologies, traveling to new places, and unwinding over a good cup of chai.