Containers
Continuous Deployment and GitOps delivery with Amazon EKS Blueprints and ArgoCD
Introduction
Kubernetes platform teams want to automate their Amazon EKS environments configurations using an automated pipeline. Users also need a prescriptive way for managing and setting up GitOps-based delivery for the organization’s applications teams. Customers need the freedom and flexibility for their application teams to deploy and configure their applications, once they have been onboarded into the cluster.
Recently, we announced a new open source solution called EKS Blueprints that helps you operate Amazon Elastic Kubernetes Service (Amazon EKS) more easily. EKS Blueprints is a set of Infrastructure as Code (IaC) modules that help you to deploy and configure Amazon EKS clusters with a wide range of add-ons, across accounts and Regions. As part of the EKS Blueprints project, we also provide a EKS Blueprints Patterns repository that contains a collection of patterns that can be used as specific reference architectures.
In this post we show you how to use multi-environment GitOps pipeline pattern and achieve the following:
- Git-based delivery for Amazon EKS cluster configurations across multiple environments.
- Onboarding of new applications to the cluster, while setting the relevant permissions for team members.
- GitOps delivery for applications deployed into the cluster using ArgoCD.
This pattern is a ready-to-use starting point for customers that manage multiple clusters across environments with GitOps based delivery for applications.
The pattern includes cluster configurations, compute capacity configuration, Kubernetes add-ons, and an application teams’ permission management. For the applications part, we demonstrate how to structure your Git repositories in a way that provides freedom for application teams to control their application configuration, once the application onboarded to the cluster.
Solution overview
Let’s start by defining the key components of the solution.
Application
To demonstrate how multiple applications can be managed by multiple teams with their own deployment lifecycle and configurations using GitOps, we use the applications that are commonly used in the eksworkshop.com and ecsworkshop.com which are: ecsdemo-frontend, ecsdemo-nodejs, and ecsdemo-crystal.
Teams
EKS Blueprints supports two types of teams: a Platform team whose members are clusters administrators and an Application team that manage workloads running in the cluster. You can find more details in the official documentation.
We create four teams in this solution: three application teams ecsdemo-frontend, ecsdemo-backend, and ecsdemo-nodejs and one platform team.
EKS Blueprints provides a way for multiple application teams to share an Amazon EKS cluster, isolated by namespaces. Each application team gets its own Kubernetes namespace with quotas defining resources that applications deployed in these namespaces are allowed to consume.
Repositories
There are five GitHub repositories participating in this solution:
- First, there is a repository containing the EKS Blueprints itself, which contains all the configuration for our sample and is managed by the platform team. It’s forked from the patterns repository.
- Second, there is a GitOps repository called EKS Blueprints Workloads, which includes all applications onboarded into a specific environment. This repository is also managed by the Platform team. You don’t need to clone this repository; however, if you’d like to experiment with it, then you can fork it. In this case, make sure to update every reference to it in the EKS Blueprints pattern and in the repository itself (i.e., you have to change the organization from
aws-samplesto your own GitHub user and organization). - Third, there are three repositories that belong to the applications as described in the previous Application section. Each of those belongs to a different application team.
Infrastructure pipeline
This pattern is using the AWS CDK Pipeline module, which is needed for setting up an automated continuous delivery pipeline that’s responsible for deploying and updating the Amazon EKS cluster and configurations.
Walkthrough
Deployment architecture
The following diagram shows the high-level architecture of the deployment:
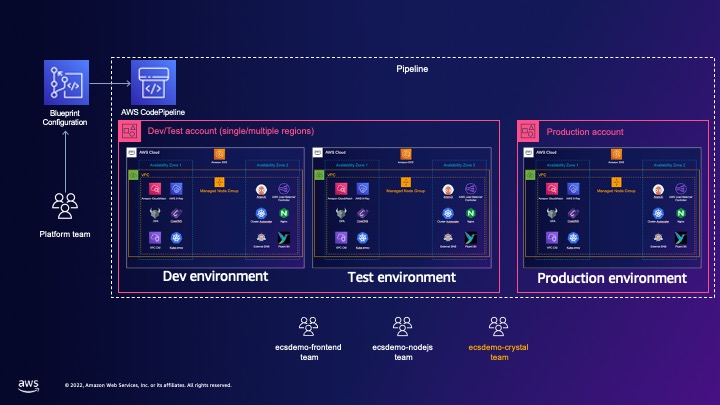
We provision the three Amazon EKS clusters. Each is deployed to its own environment called: dev, test, and prod. The clusters are configured with EKS Blueprints, and are automatically deployed using the Git repository, which is a triggered-based pipeline that’s created using the blueprint.
GitOps application architecture
The following diagram shows the ArgoCD workloads configurations, and the relations between the teams that owns the applications, the git repository, the ArgoCD configuration of an application, and the target namespace for the deployment of the application within the cluster.

For the GitOps based delivery, each cluster is deployed with the ArgoCD add-on that bootstraps itself to use another repository that holds the ArgoCD configuration. This configuration uses the ArgoCD App of Apps pattern.
This pattern is a basic helm chart, which instead of deploying actual applications manifests (Kubernetes Service, Deployment, ConfigMap, etc.), deploys a custom ArgoCD resource called Application. This resource is a Custom Resource Definition (CRD) created as part of the ArgoCD add-on deployment. The Application object specifies the target repository that holds the application configuration, as well as other deployment configurations, such as the path of the Helm chart within the repository, custom Helm values files, target revision, and more. For more information, please refer to ArgoCD documentation that describe the Application CRD. You can think of this pattern as a collection of pointers to the applications deployed into the cluster.
Code details
If you want to deploy the solution immediately, then you can skip this section and go directly to the Deployment Walkthrough section.
Let’s open the lib/pipeline-multi-env-gitops/index.ts file and look closer at the code of the pattern.
Cluster blueprint
The cluster blueprint is the basic object that describes the cluster configuration. It contains the following:
- Cluster specific configurations such as: Kubernetes version, and control plane logging
- Compute capacity for the cluster
- Add-ons being deployed to the cluster and their configurations
In the file that you’ve just opened, you can find the blueprint definition with all the configurations above using the blueprints.EksBlueprint.builder() method:
Pipeline definition
We want to create a continuous deployment pipeline for updating the Amazon EKS infrastructure upon push into GitHub repository. For that we have the following code block from in the same file. Replace the gitOwner variable value with your GitHub username.
Deploying Blueprint to multiple environments
The blueprint object can now be used to provision clusters across multiple environments. To achieve that we need to instantiate the cluster blueprint within the pipeline that deploys the blueprint into multiple environments. Since we are using AWS Cloud Development Kit (Amazon CDK), an environment in AWS CDK is the combination of an AWS Account and an AWS Region.
The EKS Blueprints solutions uses the CDK Pipelines module that creates a self-mutating AWS CodePipeline pipeline that updates itself according to the configuration in the Git repository that the pipeline is configured to (i.e., your fork of the cdk-eks-blueprints-patterns repository in our example). That means that you only have to create the pipeline once via cdk deploy command, and then the pipeline is automatically triggered by every commit to the Git repository that holds the configuration.
Before deploying the Blueprint, you need to modify the pattern configuration. The reason is that the Blueprint uses the CDK Pipelines construct that creates automatic Code Pipeline that deploys your Amazon EKS Clusters. The pipeline is triggered upon every commit to the repository that holds the configuration. Therefore, you need to modify the pipeline configuration to use your GitHub account.
Managing teams
Next, we show how teams are being managed. Open one of the team’s code configurations file (we are using ./lib/teams/pipeline-multi-env-gitops/team-backend-frontend.ts as an example).
As you can see, the FrontendTeam inherits from an ApplicationTeam. The ApplicationTeam class is responsible for some of the following configurations:
- Creating a
namespacefor the applications of the configured team, which the name is configured with the name argument (e.g., theecsdemo-frontendin our example). - Creating an Identity and Access Management (IAM) role is automatically configured in the aws-auth ConfigMap for cluster access, alongside with specific Role-base access control (RBAC) configuration for the specific namespace. The IAM role that the blueprints create can be assumed only by users (
frontend-userin our sample) or role defined in theuserRoleArn - Apply specific Kubernetes manifest from a folder (optional).
- Creating
namespacequotas limit (optional) in case you want to limit the resources that applications deployed in the namespace can consume.
This sample creates multiple teams per environment and injects them to the right environment in the pipeline. Because teams’ names must be unique across all of the AWS CloudFormation stacks that are been generated by AWS CDKstacks, we create each team’s name and concatenate to it the environment name (frontend-${environment}). This ensure that all team names are unique across all environments.
This samples uses the following IAM users that should be defined in the target AWS accounts: frontend-user, nodejs-user, crystal-user, and platform-user. Those users can assume the different IAM roles that the blueprint creates. The Deployment Walkthrough section, has a step to create those IAM users.
GitOps: Configuring ArgoCD
This sample also provides a proposed configuration for the ArgoCD add-on deployed in the cluster. The configuration can be found in the ./lib/pipeline-multi-env-gitops/index.ts file. The function called createArgoAddonConfig is used in order boilerplate repeatable code, which allows for easy onboarding of new teams and applications. Inside that function, there are two major code blocks:
The first code block creates an Argo AppProject per application. Argo AppProject definition is used here in order to restrict:
- The
sourceReposconfiguration: Ensure that applications that belong to a project can use specific GitHub source repositories to get the deployment configuration (e.g., helm, manifests, etc.). - The
destinationsconfiguration: Ensure that applications can only be deployed to specific namespace(s). The reason to use this configuration is even though the team individuals can only access the team specific namespace mentioned above, they can still define in their manifests and helm with a different target namespace. This configuration prevents the deployment of the applications to unauthorised namespaces.
The second code block is the one that configures the ArgoCD addon. It consists of three configurations:
- Repository configuration that ArgoCD is configured to pull configuration from. It includes the repository of the repository that holds the ArgoCD App of Apps configuration, the branch, the credentials to be used (this relies on AWS Secrets Manager and the Secrets Store addon must be included in the blueprint), and the credential type. More on how to set up the credential type can be found in the ArgoCD documentation.
- The second one is called
bootstrapValues. These are values for the bootstrap App of Apps applications. These may contain values, such as domain named provisioned by other addons, certificates, and other parameters to pass to the applications. - The third one is the values. These are values that are passed as-is to the ArgoCD Helm chart as additional Helm values. In our case, this is where we define the projects that we discussed previously, to enforce deployment from specific repositories, and to specific namespace. Any other Helm value for the ArgoCD Helm chart can be passed in this configuration.
GitOps: Configuring app of apps bootstrap applications
In the previous section, we covered how the EKS Blueprints is used to bootstrap the ArgoCD add-on. The bootstrapRepo field points to a Git repository that holds the App of Apps configuration per environment. This repository is another sample repository by the EKS Blueprints solution called EKS Blueprints Workload. This repository is managed by the platform team, as it includes all services that onboard into a specific environment using the App of App pattern.
The ./multi-repo/argo-app-of-apps folder contain three folders: one per environment. This enables the platform team to gradually onboard applications between environments. Each folder holds a configuration in the form of a Helm chart that represents pointers to all of the applications that installed on the environment. Looking at the values.yaml file, you can see it holds parameters values for the templates that represent ArgoCD Application. The ArgoCD Application holds the source repository from which ArgoCD pulls the configuration, as well as other configurations such as syncPolicy, project, and more parameters documented in the ArgoCD Application spec.
Deployment walkthrough
Prerequisites
Deploying the EKS Blueprints pattern
1. Provide administrative permissions through a standard AWS credentials provider chain. You can do it by attaching an IAM role with a corresponding policy or configuring an IAM user through aws configure By default, the Region and account of the user or role defined here will be used as a target account and region for deployment for all three environments. If you would like to deploy any of the three environments to another account or Region, then you can edit the Region and account environment properties in ./bin/main.ts file. If you would like to deploy less environments because of cost, service quotas, or any other reason, then you can comment out the test environment in the previous file.
2. Fork the patterns repository on GitHub and clone it.
3. Open the lib/pipeline-multi-env-gitops/index.ts file and modify the gitOwner const to be your GitHub user name as part of the CodePipelineStack.builder() method:
4. Commit and push your changes.
5. Create Personal Access token on GitHub with these scopes:
repoadmin:repo_hook
6. Store the value of the Personal Access token in a new secret as plain text with name github-token (lowercase) in AWS Secrets Manager. The secret should be defined in one main Region, and replicated to all target regions you are planning to deploy to. This token is used by AWS CodePipeline in a web-hook authentication for its source repository.
7. Create and upload an SSH key to GitHub (follow instructions on sections Generating a new SSH Key, and Adding your SSH key to the ssh-agent, and finally Adding a new SSH key to your GitHub account). The SSH key is used by ArgoCD as an authentication mechanism to GitHub private repositories. For more information, please refer to the EKS Blueprints documentation.
8. Store a new secret with name github-ssh-key in AWS Secrets Manager and replicate it on all Regions where you plan to deploy your clusters. The default configuration of this sample deploys all clusters in the same Region. If you are not changing those defaults, then you can store the secret in a single Region. The secret should contain two Key names of sshPrivateKey and url. For convenience, we created a script that generates a JSON structure output for the SSH private key. The script can be found here. You need to set the PEM_FILE (full path to the ssh private key file) and URL_TEMPLATE (part of the URL for credentials template) variables inside the script. After running the script, copy the entire JSON output as plaintext to AWS Secrets Manager, and it handles it as JSON object. The expected output of this script should look like this:
9. Install dependencies from the cloned folder.
10. Run the following command to bootstrap the AWS CDK after replacing Account ID and Region.
✅ Environment aws://111122223333/eu-west-1 bootstrapped (no changes)).
Note: The main file of the pattern repository contains multiple patterns that can be used independently. If you’re seeing errors relates to other patterns (e.g., Error:
datadog-api-keysecret must be setup for theDatadogConstructpattern to work), you can safely ignore them, if the bootstrap was successful with an output similar to:
cdk bootstrap aws://<ACCOUNT_ID>/<REGION>
11. Create the relevant users for the different teams, as described in the previous section Managing Teams:
Testing the solution
Once the blueprint deployed, you can look at the progress of your deployment called eks-blueprint-pipeline in the AWS CodePipeline Console.
Note: The pipeline fails when running on the first time, because of the missing permissions you’ve added in the previous Steps 13–14. Please retry running the pipeline again after attaching the policy to the IAM role as described in the previous section.

The pipeline includes the following steps:
- Source: This step clones the Git repository that holds the pipeline configuration (i.e., the patterns repository you forked).
- Build: This step builds the specific pattern used in this sample using the
CDK Synthcommand. - UpdatePipeline: This step identifies if the pipeline itself needs to be updated. An example for that can be adding a new environment to the EKS Blueprints
- Publish Assets: This stage prepares and publishes all file assets you are using in your EKS Blueprints, so that they can be used during the subsequent deployments.
- The
dev-teststage: This update in parallel the configurations of bothdevand test environments. - The
prodstage: this updates the configuration of the prod environment only if previous updates to thedev-testwere successful, and the manual approval step was approved.
You can test cluster access using the aws eks update-kubeconfig command that is in the output of every AWS CloudFormation stack of every environment. For example, open the outputs of the dev-eu-west-1-dev-eu-west-1-blueprint and copy the output that starts with deveuwest1blueprintConfigCommand. Run this command from your working station:
After running this command, you should be able to access the cluster.
First, test the frontend service by port-forward it to your local host with the following command:
Open your browser of choice at http://localhost:8080. The output of the application should look like this:

Next, we would like to explore the ArgoCD configuration we covered previously, by forwarding the ArgoCD service port to your local machine. First, get its initial admin password from the cluster by running the following:
Note: Documentation for setting admin password on AWS Secrets Manager can be found here.
Now run the following command:
Open your browser at http://localhost:8080, and log in with admin as username and the password returned from the above command. If you’re having issues accessing the ArgoCD console using kubectl port-forward, then you can edit the ArgoCD Kubernetes Service called blueprints-addon-argocd-server and modify the value of the type attribute from ClusterIP to LoadBalancer. Next, select the applications and select bootstrap-apps. Here you can see the App of Apps defining the deployed applications:

In the main Applications screen: In addition to the bootstrap-apps it contains the three applications that we deployed. Pushing a change to the corresponding repository will trigger a redeployment of that service.

We leave it to you to try modifying any part of the bootstrap-apps helm chart. This is where you can do any of the following:
- Fork the workloads repository that contains the App of Apps helm charts, and modify your forked blueprint pattern to point to your forked workload repository.
- Add new application to the App of Apps helm chart in your forked workload repository.
- Modify your forked EKS Blueprints pattern to deploy your production Amazon EKS cluster to a different account and/or Region.
Clean up
- Delete all ArgoCD Applications from your clusters (you have to do this for dev, test, and prod clusters by running the aws eks update-kubeconfig command for every cluster. You have to do this because of a dependency violation between ArgoCD Application resource controller and AWS CloudFormation as described in our documentation):
- Detach the inline policy you created for the pipeline role in Step 14 in Deploying the Blueprint Pattern.
- Delete all three AWS CloudFormation stacks of the three environments
-
- dev-eu-west-1-dev-eu-west-1-blueprint
- test-eu-west-1-dev-eu-west-1-blueprint
- prod-eu-west-1-dev-eu-west-1-blueprint
- Delete the pipeline and it’s components either by deleting the AWS CloudFormation stack named eks-blueprint-pipeline-stack, or by running from the cloned forked pattern repository the following command:
- Delete the IAM users created for the EKS Blueprints sample:
Conclusion
In this post, we showed how you can use pipeline-multi-env-gitops pattern of the EKS Blueprints solution to support multi-team and multi-repositories configuration, with a continuous deployment pipeline for the Amazon EKS infrastructure, team management, application onboarding, and Gitops delivery pipeline for the applications.
This pattern is a ready-to-use starting point for Amazon EKS customers that manage multiple clusters across environments with GitOps based delivery for applications.