Containers
Dynamic Spark Scaling on Amazon EKS with Argo Workflows and Events
Introduction
Kubernetes has gained widespread adoption in the field of data processing because of its ability to package and deploy applications as containers with all required dependencies, as well as its support for running data frameworks. This makes it easy for developers to run their Data Analytics/Machine Learning (ML) applications within a Kubernetes cluster and allows them to run multiple versions of these apps within the same cluster. Additionally, Kubernetes offers strong scaling options for both nodes and pods, which enables users to easily scale batch jobs as needed, and a wide variety of tools for observability, logging, batch scheduling, and job orchestration, making it a popular choice for running data platforms.
Effective orchestration is essential for running batch jobs like Spark efficiently. For instance, generating a ready-to-consume golden dataset often requires the execution of multiple Spark jobs, either in parallel or sequentially. Without proper orchestration, managing and automating these jobs can be difficult and time-consuming because it requires coordinating the execution of multiple tasks and ensuring that they are executed in the correct order. One popular tool for managing workflows is Apache Airflow, and Amazon offers a managed version of this tool called Amazon Managed Workflows for Apache Airflow (Amazon MWAA), which allows users to orchestrate workflows without having to worry about managing the underlying infrastructure. Another orchestration tool is Argo Workflows, which is built on top of Kubernetes as a custom resource definition (CRD)-based workflow engine. It allows you to define the workflows where each step in the workflow is a container. Argo Workflows can be managed using kubectl and is natively integrated with other Kubernetes services such as volumes, secrets, and Role-Based Access Control (RBAC). Argo Workflows includes a feature called Argo Events, which allows users to trigger workflow execution based on external events such as the completion of another workflow or the arrival of new data. This can be especially useful for building dynamic and event-driven data pipelines. Argo Workflows is a powerful tool for managing and automating complex workflows within a Kubernetes cluster.
In this post, we demonstrate how to build and deploy a data processing platform on Amazon Elastic Kubernetes Service (Amazon EKS) with Data on EKS Blueprints. The platform includes all the necessary Kubernetes add-ons like Argo Workflows, Argo Events, Spark Operator for managing Spark jobs, Apache YuniKorn for Batch Scheduler, Fluent Bit for logging, and Prometheus for metrics. We demonstrate how to build data processing jobs and pipelines using Argo Workflows and Argo Events, and show how to trigger workflows on-demand by listening to Amazon Simple Queue Service (Amazon SQS).
Solution overview
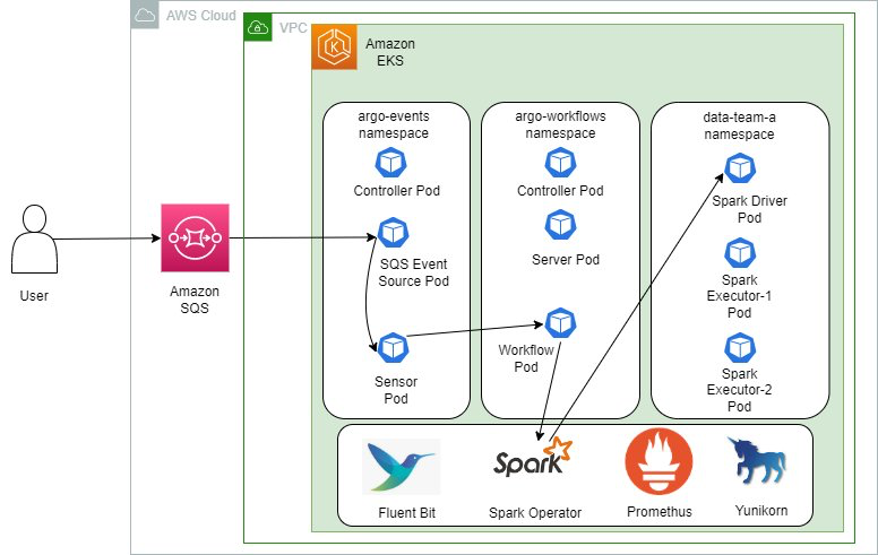
In this solution, we create an Amazon EKS cluster with one managed node group and install Argo Workflows and Argo Events in their own dedicated namespaces (argo-workflows and argo-events). An Amazon SQS queue is created to receive requests from users, and an SQS event source object in the Argo events namespace is set up to fetch messages from this external queue. When a new message is added to the queue, the sensor triggers the execution of the specified workflow. A sensor in Argo Workflow is a special type of workflow that continually runs and waits for a certain condition to be met before triggering the execution of another workflow. This workflow creates a Spark application with Spark Operator in the data-team-a namespace, consisting of one Spark driver pod and two executor pods.
The following diagram illustrates the high-level design of using Argo Events sources to trigger the execution of Spark jobs.

The following diagram shows the detailed design that will be implemented in this post.
Deploying the Solution
In this post, we provision the followings resources using terraform modules with Data on Amazon EKS (DoEKS) blueprints:
- A sample Virtual Private Cloud (VPC) with three Private Subnets and 3 Public Subnets.
- Internet gateway for Public Subnets and Network Address Translation (NAT) Gateway for Private Subnets, VPC endpoints for Amazon Elastic Container Registry (Amazon ECR), Amazon Elastic Compute Cloud (Amazon EC2), Security Token Service (STS), etc.
- Amazon EKS Cluster Control plane with one managed node group with one application team data-team-a.
- Amazon EKS Managed Add-ons: VPC_CNI, CoreDNS, Kube_Proxy, EBS_CSI_Driver
- K8S metrics server, cluster autoscaler, yunikorn scheduler, Spark operator, Fluent Bit, Prometheus, and Argo workflows.
- K8s and Amazon Identity and Access Management (AWS IAM) roles and rolebindings for Argo Workflows and Argo Events.
In addition, we deploy Argo Events and Event Bus using kubectl commands and create Amazon SQS queue using AWS CLI.
Prerequisites
Ensure that you have the following tools installed locally:
Deploy infrastructure
Let’s start by cloning the code repo to your local machine.
You need to setup your AWS credentials profile locally before running Terraform or AWS CLI commands. Update the region and execute the following commands to deploy the blueprint.
Verify the resources
This process may roughly take 20 minutes. Once done, you’ll see the output similar to the following. You need to modify your deployment yaml files with those output values in the following steps.

The following command will update the kubeconfig on your local machine and allow you to interact with your Amazon EKS Cluster using kubectl to validate the deployment.
List the nodes and the namespaces in Amazon EKS cluster.
Deploy Argo Events and EventBus
Let’s install the Argo Events with yaml files which is recommended by the Argo Events project (i.e., the helm chart installation is possible but maintained solely by the community). The installation includes two steps. First step is to install Argo Events controller-manager and events-webhook.
And the second step is to set up the EventBus. EventBus is a Kubernetes Custom Resource that’s used for event transmission from EventSources to Sensors. Currently, EventBus is backed by (Networked Approach To Technology Services) NATS, including both their NATS Streaming service and their newer Jetstream service. NATS is a high-performance messaging system that’s designed to be simple, lightweight, and easy to use. It’s often used as a messaging system for microservices architectures, and it’s well-suited for use in cloud-native environments. In the yaml file below, you will create a NATS service with three replicas.
File Location: argo-events/eventbus.yaml.

Let’s apply the manifest to deploy the EventBus.
You should get the following resources in namespace argo-events so far.
Set up Amazon SQS Queue as eventsource
The Argo Events system requires an eventsource object to monitor external events and initiate subsequent operations. As an example, we will configure an Amazon SQS eventsource in Argo Events and connect it to an external Amazon SQS queue. The following image shows the SQS event source config yaml.
File location: argo-events/eventsource-sqs.yaml.

Let’s run the following command to create the Amazon SQS event source.
For this example, we have set up an eventsource to monitor the test1 Amazon SQS queue in the us-east-1 Region. It’s important to note that the eventsource is capable of monitoring events across regions, so the Amazon EKS cluster and Amazon SQS queue don’t need to be located in the same Region.
Now, let’s create that queue in your account and capture the QueueUrl output for the next steps.
In order to enable the eventsource to retrieve messages from the Amazon SQS queue, we need to update the argo-events/sqs-accesspolicy.json file by replacing both <QueueArn> and <your_event_irsa_arn> (which can be found in the Terraform output values). After making these replacements, run the following command, making sure to first replace <QueueUrl> in the command with the URL of your queue. This updates the access policy of the Amazon SQS queue to allow the eventsource to fetch messages from it.
To confirm that the necessary permissions have been granted, you can go to the AWS Console, navigate to the test1 SQS queue in the us-east-1 Region, and then go to the Access Policy tab. Here, you should see that the queue has been granted access permissions to IAM Roles for Service Accounts (IRSA) in your Amazon EKS cluster.

Create an Argo workflow for running Spark application
The last step is to create a sensor object (of Kind: Sensor) to trigger a workflow that runs a spark application. This sensor object is run by a service account called operate-workflow-sa (defined in sensor-rbac.yaml) with the permission to run the workflow in argo-workflows namespace. The workflow creates a Spark application by submitting a SparkApplication Object to the Spark Operator. The following image shows the sample code yaml code snippet for creating Argo Workflow for running multiple Jobs.
File location: argo-events/sensor-sqs-sparkjobs.yaml

Let’s run the following commands to deploy Argo Worklfow and the RBAC permissions.
Trigger the data pipeline
To test the data pipeline, we trigger it by inserting a message into the Amazon SQS queue. To do this, open the Amazon SQS console, navigate to the Queues page, and then select the test1 queue that you created. From the Actions menu, Select the queue then select Send and receive messages, enter the message in JSON format{“message”: “hello”} in the Message body, and select Send message.

Go back to the Terminal and execute the following command to verify the new Argo workflow.
Run the command below to check spark application driver pods and executor pods under data-team-a namespace.
Access Argo Workflows web user interface
To monitor the progress of an Argo Workflow job, you can use the web interface provided by Argo Workflows. This graphical user interface (GUI) allows you to submit workflows and view their status and logs. To access the web UI, follow these steps. Alternatively, you can also manage workflows using the Argo Workflows CLI.
Execute the following command to extract the bearer token.
Let’s run port-forward command to access the Argo Workflow Web UI from localhost.
Open browser and enter http://localhost:2746/ and paste the token (whole text including Bearer) into the yellow circle as shown in the following details.

To view the entire data pipeline, click the Event Flow button on the left panel, as illustrated below. This displays the data pipeline visually.

In the image below, you can see that the jobs helloworld-job1 and helloworld-jobs2 are executed sequentially, while helloworld-jobs2 and spark-operator-job are executed in parallel. When a job is successful, it’s indicated by a green circle with a tick, indicating that the job is complete. To view the detailed steps within a job, click on the green circle. This is shown in the following image.

Cleaning up
To clean up the resources created in the post, you can follow these steps:
Conclusion
In this post, we explored the use of Argo Workflows and Argo Events for managing and scaling Spark applications on Amazon EKS. These tools offer a number of benefits, including the ability to define and automate complex pipelines with Argo Workflows and the ability to trigger actions in response to events with Argo Events. By utilizing these features, it’s possible to optimize the performance of Spark applications and ensure that they are running at optimal capacity. Additionally, we looked at the benefits of using Data on EKS blueprints to quickly deploy a full infrastructure using Terraform. If you would like to learn more, you can visit the Data on EKS GitHub repository to collaborate with others and access additional resources.