Containers
Manage Amazon EKS with Okta SSO
Amazon Elastic Kubernetes Service (Amazon EKS) makes it easy to deploy, manage, and scale containerized applications using Kubernetes. Okta is an API service that allows developers to create, edit, and securely store user accounts and user account data and connect them with one or multiple applications. Okta helps you provide access to the AWS Management Console or AWS CLI for your organization in a scalable and secure fashion. With Okta, you can use Active Directory or LDAP credentials to use AWS Services.
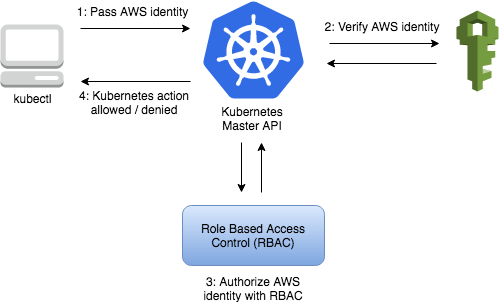
I will show you how to authenticate to an Amazon EKS cluster using Okta provided identity. Amazon EKS uses IAM to provide authentication to your Kubernetes cluster, but it still relies on native Kubernetes Role-Based Access Control (RBAC) for authorization. This means that IAM is only used for authentication of valid IAM entities. All permissions for interacting with your Amazon EKS cluster’s Kubernetes API is managed through the native Kubernetes RBAC system.
When you create an EKS cluster, the IAM entity (User or Role) that creates the cluster becomes the RBAC administrator (with the system: master permissions). Initially, only that IAM Identity can make calls to the Kubernetes API server using kubectl. Once the cluster has been created, you can give access to the other members in your organization.
Solution Overview
In section 1, I will create an Okta account, then I will create an IAM identity provider. This will allow me to manage users in my Okta account but they will be able to assume an IAM role.
In section 2, I will create an IAM user, Okta will use this user’s access credentials to list IAM Roles so that when a human Okta user logs in, Okta can show her a list of Roles she can assume. I will also create a role that will be assumed by users that want to administer EKS cluster.
In section 3 and 4, I will finalize Okta IdP setup and use Okta user to login to AWS Management Console and use AWS CLI.
Finally in section 5 and 6, I will create an EKS cluster and another role that only has permissions to make changes in one of the namespaces in my Kubernetes cluster. Let’s get started!
Section 1: Configure SAML 2.0 for AWS Account
I will start with creating an Okta account, if you don’t already have one, you can sign up for a free account at developer.okta.com. The first thing I will do after creating my Okta account is create a new AWS Account Federation application.
Step 1: Create the Okta App
In Okta Developer Console, switch to Classic UI or the screenshots in this post may not match.
- Click on <<Developer Console>> and then click on <<Classic UI>>

- Click on <<Applications>>

- In the next screen, click on <<Add Application>>, this starts the Add application wizard.

- In the Add Application screen Search for AWS Account Federation
- Click on <<Add>>

- Change the application label to what you want
- You can leave rest of the values as default
- Click <<Next>>

Before proceeding further with my Okta application, I have to download the metadata.xml, IAM need this metadata document to create an identity provider.
- Click on link <<Identity Provider metadata>>
- Save this XML file as metadata.xml
- Leave this browser window open and open another window for the next step.

Step 2: Create IDP using the AWS Management Console
In another browser tab I will go to the AWS IAM Console and create an identity provider.
I will navigate to the IAM console.
- Click on <<Identity Providers>>
- Click on <<Create Provider>>

- I will select SAML for <<Provider Type>> and use Okta as the <<Provider Name>>
- Upload metadata.xml for <<Metadata Document>> that I saved in the previous step

- Click on <<Next Step>> and verify the details and click <<Create>>
- Next screen shows the created Okta provider

- I will click the newly created <<Okta>> identity provider
- Copy the <<Provider ARN>>

Step 3: Finalize the creation of the Okta AWS Account Federation App.
I will go back to the Okta Admin Console and finish creating the Okta AWS Account Federation App.
- On the <<Sign on Options>> screen, I will scroll down to <<ADVANCED SIGN-ON SETTINGS>>
- Paste the Provider ARN copied in the last step to <<Identity Provider ARN>>
- Click on <<Done>>

Section 2: Create IAM Role and User for Okta integration
Now I will create an IAM Role called OktaEKSRole, this role will be assumed by users in my organization that need permissions to create EKS clusters. You will notice that I have refrained from giving advice on the specific permissions you need for this role. That’s because in real world the permissions required will vary. It is unlikely that you will need a role for your users specifically to administer EKS clusters, roles should map to user’s specific responsibilities.
Step 1: Create OktaEKSRole for Okta SSO
- Login into AWS Management Console and navigate to IAM
- Click on <<Create Role>>
- In the next screen, select <<SAML 2.0 federation>>
- For SAML provider pick <<Okta>>, created in the last step.
- Plus select the radio button for <<Allow programmatic and AWS Management Console access>>
- Click <<Next Permissions>>

In the next screen I will select a policy to be assigned to the role. The end-user, which in case will be a user that has permissions to administer EKS clusters, will assume this role. Then click <<Next>>.
For simplicity, in this blog I am going to give this role Administrator Access which is not suitable for production usage. In real world the policy will depend on your use case and the principle of least privilege access should be used. For more information please see Identity and access management for Amazon EKS.
- I’ll search for the policy I want my end-users to inherit
- Click on <<Next Tags>>
- Add any tags then click on <<Next: Review>>
- Next screen will prompt me for Role name, I’ll call it OktaEKSRole as I will reference it in the next steps
- Click on <<Create Role>>

Step 2: Create OktaMasterAccountPolicy
I will create an IAM Policy called OktaMasterAccountPolicy which I will attach to the IAM User OktaUserForSSO that I will create in the next step. I will download the Access Key and Secret Access Key of this IAM user and use it to configure Okta App in a later step.
- In the IAM Console I’ll click on <<Policies>> in the left hand menu
- Click on <<Create Policy>>
- In the Create Policy screen, click on <<JSON>> tab and enter the following policy
- Click on <<Review Policy>>
{
        "Version": "2012-10-17",
        "Statement": [
            {
                "Effect": "Allow",
                "Action": [
                    "iam:ListRoles",
                    "iam:ListAccountAliases"
                 ],
                "Resource": "*"
            }
        ]
}- In the next screen, I’ll name this policy <<OktaMasterAccountPolicy>>
- Click <<Create Policy>>

Step 3: Create IAM OktaUserForSSO
Now I will create an IAM User called OktaUserForSSO. This IAM Okta user is used to download IAM Roles details and the list of available roles are presented to the end-user. I will attach OktaMasterAccountPolicy to it.
I will navigate to the IAM console, click on <<Users>> → Add User in the IAM Screen.

- Enter <<OktaUserForSSO>> for the User name and select Access Type → <<Programmatic Access>>
- Click <<Next Permissions>>

- Click on <<Attach existing policies directly>>
- Search for <<OktaMasterAccountPolicy>> and select it
- Click <<Next Tags>>
- Add any required tags and click <<Next: Review>>
- In the next screen review the information and click <<Create User>>

- I will <<Download .csv>> which contains the Access key which will be used to configure Okta App in next steps.
Section 3: Configure Okta AWS Account Federation App
In this section, I will finalize the creation of the Okta AWS Account Federation App, which I started in Section 1.
Step 1: Configure Okta API Integration
- I’ll navigate back to Okta Admin Console and click on <<Applications>>
- Click on <<AWS Account Federation>> app
- Click on <<Provisioning>> tab
- Click on <<Configure API Integration>> toward the bottom of the screen.

- Select <<Enable API Integration>> check box
- Enter OktaUserForSSO’s <<Access Key ID>> and <<Secret Access Key>> (they are in the CSV file that I downloaded in the previous step)
- Click <<Save>>

- In the <<Provisioning>> tab click on <<Edit>>
- Select <<Create Users>> check box
- Select << Update User Attributes>> check box
- Click <<Save>>

Step 2: Assign Okta Users to AWS Account Federation App
- I’ll click on <<Applications>>
- Click on <<More>> → Refresh Application Data, this fetches the new IAM Role
- Assign a user to this application by clicking on the <<Assignments>>
- Click on <<Assign>> dropdown menu
- Select <<Assign to People>>

- Next to the username, click on <<Assign>>

- Pick <<OktaEKSRole>> for <<Role>> value
- Scroll down to <<SAML User Roles>>
- Select checkbox next to <<OktaEKSRole>> for <<SAML User Roles>> value
- Click <<Save and Go Back>>

Step 3: Login to the AWS console using SSO
- In the Okta Admin Console I’ll click on <<My Apps>>, located in the top right corner of the screen.

- Click on <<AWS Account Federation>> App
- This will sign me into the AWS Management Console.

If you are presented with a Role selection screen, select <<OktaEKSRole>> radio button. and click on <<Sign In>>. This happens when a user has multiple roles.

I single-signed-on into my AWS Management Console. In the next section, I will configure Okta single-signon with AWS CLI.
Section 4: Set up Okta AWS CLI Assume Role tool
In this section, I will use the same Okta user for AWS CLI access and kubectl. I will use the Okta AWS CLI assume Role tool to configure Okta AWS CLI SSO. The current version of the tool requires JDK 11 or higher. Instead of installing the tool and JDK on my laptop, I am going to run this tool as a Docker container, so you will also need to install Docker runtime if you choose to not install the tools locally. The following steps have been tested on Cloud9 running Amazon Linux 2 and MacOs.
Step 1: Build the Okta EKS Image
I have created a Github repository with all my code. I will create a Docker image with Okta AWS CLI assume role tool and its dependencies.
Clone the GitHub repository.
mkdir ~/environment
cd ~/environment
git clone https://github.com/aws-samples/eks-rbac-sso
Build the okta-eks-image image.
cd ~/environment/eks-rbac-sso
docker build -t okta-eks-image.
This image contains these tools and supporting frameworks:
- eksctl
- kubectl
- okta-aws-cli-assume-role tool
Image build takes roughly 15 minutes, once finished, the output looks like this:
Successfully built 8eec5f670e31
Successfully tagged okta-eks-image:latest
Step 2: Edit Okta Properties file
In the okta_eks_role.properties file I need to replace values of OKTA_ORG, OKTA_AWS_APP_URL, OKTA_USERNAME, and OKTA_AWS_ROLE_TO_ASSUME placeholders.
cd ~/environment/eks-rbac-sso
vi okta_eks_role.properties
I will replace the value of OKTA_USERNAME with my Okta user name.
Configure values of OKTA_ORG and OKTA_AWS_APP_URL
The values of Okta Org and App URL can be found in my AWS Account Federation application
- I will navigate to Okta Admin Console and click on <<Applications>>
- Click on <<Settings Icon>> to the right of AWS Account Federation app
- Click on <<Copy embed link>>

- I’ll replace the value of OKTA_AWS_APP_URL in okta_eks_role.properties with this copied App URL
- The OKTA_ORG is part of OKTA_AWS_APP_URL copied URL xxxx.okta.com. I have highlighted it in the text below.
https://xxxx.okta.com/home/amazon_aws/xxxxx/xxxxConfigure value of OKTA_AWS_ROLE_TO_ASSUME
- Log in to AWS Management Console and navigate to IAM
- Click on Roles in the left menu
- Search for OktaEKSRole and copy its ARN similar to
- Replace value of OKTA_AWS_ROLE_TO_ASSUME with OktaEKSRole Arn in okta_eks_role.properties
arn:aws:iam::xxxxxx:role/OktaEKSRoleReview and finalize the okta_eks_role.properties file
cd ~/environment/eks-rbac-sso
cat okta_eks_role.properties
Confirm you don’t see any placeholders values in the file
OKTA_ORG=dev-111111.okta.com
OKTA_AWS_APP_URL=https://dev-111111.okta.com/home/amazon_aws/1111aaa111/111
OKTA_USERNAME=111@111.com
OKTA_AWS_ROLE_TO_ASSUME=arn:aws:iam::11111:role/OktaEKSRole
OKTA_AWS_REGION=us-west-2
OKTA_PROFILE=default
Step 3: Run the container
I will create a Docker container from the image I created in the previous step
docker run -v \
 ~/environment/eks-rbac-sso/okta_eks_role.properties:/root/.okta/config.properties \
 -v /var/run/docker.sock:/var/run/docker.sock \
 -v ~/environment/eks-rbac-sso/aftifacts/:/root/artifacts/ \
 -it okta-eks-image /bin/bash
This command starts the container and drops me in to the container’s shell
bash-4.2# Verify okta-aws-cli-assume-role setup
The okta-eks-image has the okta-aws-cli-assume-role installed and configured. This is an open-source tool and it creates a shell function called okta-aws. This function supports bash and fish, and it can run AWS CLI commands with Okta SSO. Let’s verify it is set up by getting the current AWS identity.
okta-aws default sts get-caller-identityThe function prompts me for my Okta password, the username is already filled with the value I provided in the okta_eks_role.properties file. The output looks like this:
    "Account": "xxxxx",
    "UserId": "AAAXXXX:xxxxx@xxxx.com",
    "Arn": "arn:aws:sts::xxxxxxx:assumed-role/OktaEKSRole/xxxxx@xxxx.com"
Section 5: Create an EKS cluster
All tools (kubectl, eksctl, and other dependencies) are already installed and configured in the docker okta-eks-image you have created.
Step 1: Copy the config files for the blog
I will export the Account ARN and AWS Region environment variables and run init.sh which copies the following config files to the Docker container’s ~/okta-blog-config folder, and replaces AWS Account ARN, and AWS Region placeholders in the following files in the okta-blog-config folder.
- assume-role-policy-document.json
- aws-auth-okta-prodadmin-role.yaml
- iam-role-policy.json
- okta-kubectl-blog-cluster.yaml
- role-binding-production-admin.yaml
- role-production-admin.yaml
cd ~/artifacts
chmod +x init.sh
./init.sh
The output looks like this:
AWS_REGION: us-west-2
ACCOUNT_ID: 111111111?Note: If you encounter the following error, refresh your credentials by running okta-aws default sts get-caller-identity.
An error occurred (ExpiredToken) when calling the GetCallerIdentity operation:
The security token included in the request is expired
Step 2: Create an EKS cluster and validate
I’ll create an EKS cluster using okta-kubectl-blog-cluster.yml. Make sure that the value for the AWS Region is not blank in okta-kubectl-blog-cluster.yaml.
cat ~/okta-blog-config/okta-kubectl-blog-cluster.yamlNext, create the EKS cluster.
eksctl create cluster -f ~/okta-blog-config/okta-kubectl-blog-cluster.yaml?Note: Launching EKS and all the dependencies, takes around 15 minutes.
Once completed, the output looks like this:
EKS cluster "okta-kubectl-blog-eksctl" in "us-west-2" region is readyI can see that kubectl works. Kubectl will use OktaEKSRole permission.
kubectl get nodes
#You see three nodes
Section 6: Configure EKS cluster to use OktaProdAdminRole
OktaEKSRole has administrative level access on the entire EKS Cluster, anyone with this role can do anything. But what if I needed a role that is limited in scope. What if I need to create a role that has limited permissions within the production namespace only? How do I do that?
I can create another IAM Role for users that don’t need permissions on the entire cluster and configure permissions in RBAC.
Step 1: Create IAM Role OktaProdAdminRole
I will create an IAM Role called OktaProdAdminRole. The assume-role-policy-document.json configures Okta as SAML 2.0 trusted entity, and this allows Okta users that are federated with SAML 2.0 to assume this OktaProdAdminRole to perform actions in the production namespace in my cluster. I can view this file with this command.
cat ~/okta-blog-config/assume-role-policy-document.jsonThe following command creates OktaProdAdminRole.
aws iam create-role --role-name OktaProdAdminRole \
 --assume-role-policy-document file://~/okta-blog-config/assume-role-policy-document.json \
 --output text --query 'Role.Arn'
The output of the command displays the ARN of OktaProdAdminRole.
arn:aws:iam::1111111:role/OktaProdAdminRoleI will then attach an IAM security policy to OktaProdAdminRole. This policy gives end-users full access on EKS service. The security policy is in the iam-role-policy.json file.
aws iam put-role-policy --role-name OktaProdAdminRole \
 --policy-name eks-full-access-policy \
 --policy-document file://~/okta-blog-config/iam-role-policy.json
Step 2: Assign IAM Role OktaProdAdminRole to Okta User
Assign the OktaProdAdminRole role to an Okta user. Follow these steps to assign it using Okta Admin Console.
- Navigate to Okta Admin Console
- Click on <<Applications>>
- Click on <<More>> → Refresh Application Data, this fetches the new IAM Role
- Click on <<AWS Account Federation>> app
- Click on the <<Pen Icon>> on besides the Okta user name of the user I want give administrator access on
productionnamespace in my cluster - Select the checkbox next <<
OktaProdAdminRole>> - Click <<Save>>
Step 3: Create a Kubernetes Role and Role binding
I have created an IAM role and assigned it to Okta User. Now let’s map OktaProdAdminRole to Kubernetes role.
In Kubernetes there are two kinds of roles, Role and ClusterRole. Role is used to grant permissions within a namespace, it is limited to a particular namespace. Whereas ClusterRole can be applied to grant access to resources across the entire cluster.
I am going to map OktaProdAdminRole to a Kubernetes role named production-admin and only give it access within the production namespace. RBAC Production Admin Role access is in this file role-production-admin.yaml.
cat ~/okta-blog-config/role-production-admin.yamlCreate production namespace
kubectl create namespace production
Create a Kubernetes Role
kubectl apply -f role-production-admin.yamlCreate a Kubernetes Role binding
Let’s bind the production-admin role to a Kubernetes user production-user-admin. I will map this user to the IAM Role OktaProdAdminRole in the next steps.
cat ~/okta-blog-config/role-binding-production-admin.yamlTo create the RBAC Role binding, run the following command.
kubectl apply -f ~/okta-blog-config/role-binding-production-admin.yaml? You can read more about Roles and RoleBinding here.
Step 4: Edit aws-auth Configmap and map OktaProdAdminRole
Now that I have created a Kubernetes role named production-admin and bound it to production-user-admin, I can map the IAM Role OktaProdAdminRole to RBAC User production-user-admin. The end-user assuming this role will have production-admin role permissions.
Please make sure the account ID is correctly setup in the manifest
cat ~/okta-blog-config/aws-auth-okta-prodadmin-role.yamlValidate OktaProdAdminRole ARN
apiVersion: v1
kind: ConfigMap
metadata:
  name: aws-auth
  namespace: kube-system
data:
  mapRoles: |
    - rolearn: arn:aws:iam::{ACCOUNT_ID}:role/OktaProdAdminRole
      username: production-admin-user
      groups:
        - prod-admin-group
IMPORTANT! If you are doing this on an existing cluster, please edit the existing configmap instead of overwriting it.
Next, apply the ConfigMap to apply this mapping to the system:
kubectl apply -f ~/okta-blog-config/aws-auth-okta-prodadmin-role.yamlVerify OktaProdAdminRole is configured
Execute the following command to view the changes to the Configmap.
kubectl -n kube-system get configmap/aws-auth -o yamlYou see the OktaProdAdmin has been added to the Configmap.
apiVersion: v1
data:
  mapRoles: |
    - *rolearn**: arn:aws:iam::xxxxxxx:role/OktaProdAdminRole
      username: production-admin-user
      groups:
        - prod-amdin-group*
      rolearn: arn:aws:iam::xxxxxx:role/eksctl-eksworkshop-eksctl-nodegro-NodeInstanceRole-1QJK5GGFM27K4
      username: system:node:{{EC2PrivateDNSName}}
kind: ConfigMap
metadata:
....?Tip: You can edit the aws-auth ConfigMap manually, you can run: kubectl edit -n kube-system configmap/aws-auth
Section 7: Switch Role to OktaProdAdminRole
So far I have been executing kubectl commands with OktaEKSRole, which has permissions to perform any action (get, delete, update, etc.) in the cluster. We create another container using the okta-eks-image and use OktaProdAdminRole for AWS access.
Step1: Copy okta_eks_role.properties
Open another terminal window. Let’s copy the okta_eks_role.properties file and create another file named okta_prod-admin_role.properties, and change OktaEKSRole to OktaProdAdminRole or execute the following command, it creates the file and changes the Role name for you.
cd ~/environment/eks-rbac-sso
./create-okta-prod-admin-properties.sh
Step 2: Start the container as OktaProdAdminRole
Open another terminal window, and let’s start up a container using okta-kubectl-image as OktaProdAdminRole.
docker run -v \
 ~/environment/eks-rbac-sso/okta_prod_admin_role.properties:/root/.okta/config.properties \
 -v /var/run/docker.sock:/var/run/docker.sock \
 -v ~/environment/eks-rbac-sso/aftifacts/:/root/artifacts/ \
 -it okta-eks-image /bin/bash
I can verify my current IAM role:
okta-aws default sts get-caller-identityIt will prompt me to enter my Okta password.
 { "Account": "11111", "UserId": "xxxxxxx", "Arn":
    "arn:aws:sts::1111:assumed-role/*OktaProdAdminRole*/xxxxx" }
I’ll set up the account and region environment variables.
cd ~/artifacts
./init.sh
Update KubeConfig to connect as OktaProdAdminRole
Replace the EKS cluster name and AWS region in the following command and execute it.
okta-aws default eks --region us-west-2 \
 update-kubeconfig --name okta-kubectl-blog-eksctl
The response looks like this:
Added new context arn:aws:eks:us-west-2:111111:cluster/okta-kubectl-blog-eksctl
        in /root/.kube/config
Step 3: Validate and deploy a pod as OktaProdAdminRole
Now all my actions outside of the production namespace will get denied. So if I try to run:
kubectl get pods I will receive an permission denied message
Error from server (Forbidden): pods is forbidden: User "production-admin-user"
cannot list resource "pods" in API group "" in the namespace "default"
Since the role OktaProdAdmin can only access production namespace, I will have to specify production namespace in my request.
kubectl get pods -n productionThis time I don’t receive any errors.
No resources found.I can test creating a pod.
kubectl create deployment nginx --image=nginx -n productionThe output is:
deployment.apps/nginx createdYou can read more about managing EKS cluster authentication here. You can create different AWS Roles and bind them to Kubernetes Roles.
Conclusion
I showed you how you can use Okta to provide secure access to AWS services and simplify access management. With this approach, you don’t need to create IAM users for each member of your organization. Okta makes it easy to maintain user access/credentials as users join and leave your company. You can also use Active Directory or LDAP credentials to access AWS Services.
Further reading:
How to Configure SAML 2.0 for AWS Account Federation
Identity Providers and Federation
Integrating Third-Party SAML Solution Providers with AWS
Troubleshooting SAML 2.0 Federation with AWS