AWS Developer Tools Blog
AWS Serverless Applications in Visual Studio
In the last post, I talked about the AWS Lambda Project template. The other new project template we added to Visual Studio is the AWS Serverless Application. This is our AWS Toolkit for Visual Studio implementation of the new AWS Serverless Application Model. Using this project type, you can develop a collection of AWS Lambda functions and deploy them with any necessary AWS resources as a whole application, using AWS CloudFormation to orchestrate the deployment.
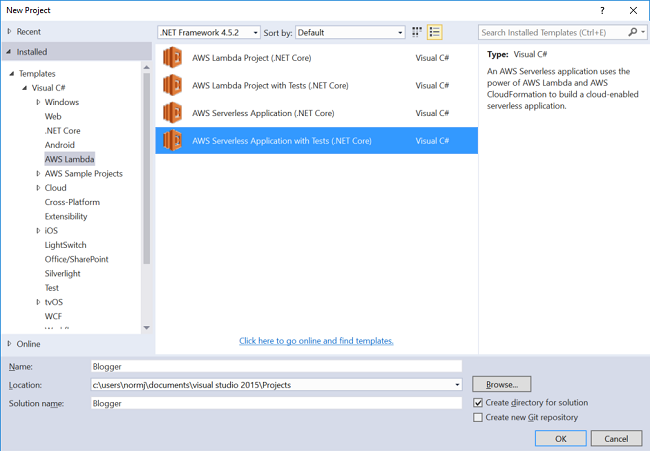
To demonstrate this, let’s create a new AWS Serverless Application and name it Blogger.
As in the AWS Lambda Project, we can then choose a blueprint to help get started. For this post, we’re going to use the Blog API using DynamoDB blueprint.
The Project Files
Now let’s take a look at the files in our serverless application.
Blog.cs
This is a simple class used to represent the blog items that are stored in Amazon DynamoDB.
Functions.cs
This file defines all the C# functions we want to expose as Lambda functions. There are four functions defined to manage a blog platform:
- GetBlogsAsync – gets a list of all the blogs.
- GetBlogAsync – gets a single blog identified by either the query parameter Id or the ID added to the URL resource path.
- AddBlogAsync – adds a blog to DynamoDB table.
- RemoveBlogAsync – removes a blog from the DynamoDB table.
Each of these functions accepts an APIGatewayProxyRequest object and returns an APIGatewayProxyResponse. That is because these Lambda functions will be exposed as an HTTP API using Amazon API Gateway. The APIGatewayProxyRequest contains all the information representing the HTTP request. In the GetBlogAsync operation, you can see how we can find the ID of the blog from the resource path or query string.
public async Task GetBlogAsync(APIGatewayProxyRequest request, ILambdaContext context)
{
    string blogId = null;
    if (request.PathParameters != null && request.PathParameters.ContainsKey(ID_QUERY_STRING_NAME))
        blogId = request.PathParameters[ID_QUERY_STRING_NAME];
    else if (request.QueryStringParameters != null && request.QueryStringParameters.ContainsKey(ID_QUERY_STRING_NAME))
        blogId = request?.QueryStringParameters[ID_QUERY_STRING_NAME];

    ...
}
In the default constructor for this class, we can also see how the name of the DynamoDB table storing our blogs is passed in as an environment variable. This environment variable is set when Lambda deploys our function.
public Functions()
{
    // Check to see if a table name was passed in through environment variables and, if so,
    // add the table mapping
    var tableName = System.Environment.GetEnvironmentVariable(TABLENAME_ENVIRONMENT_VARIABLE_LOOKUP);
    if(!string.IsNullOrEmpty(tableName))
    {
        AWSConfigsDynamoDB.Context.TypeMappings[typeof(Blog)] = new Amazon.Util.TypeMapping(typeof(Blog), tableName);
    }

    var config = new DynamoDBContextConfig { Conversion = DynamoDBEntryConversion.V2 };
    this.DDBContext = new DynamoDBContext(new AmazonDynamoDBClient(), config);
}
serverless.template
This file is the AWS CloudFormation template used to deploy the four functions. The parameters for the template enable us to set the name of the DynamoDB table, and choose whether we want CloudFormation to create the table or to assume the table is already created.
The template defines four resources of type AWS::Serverless::Function. This is a special meta resource defined as part of the AWS Serverless Application Model specification. The specification is a transform that is applied to the template as part of the CloudFormation deployment. The transform expands the meta resource type into the more concrete resources, like AWS::Lambda::Function and AWS::IAM::Role. The transform is declared at the top of the template file, as follows.
{
  "AWSTemplateFormatVersion" : "2010-09-09",
  "Transform" : "AWS::Serverless-2016-10-31",

  ...

 }
Now let’s take a look at the GetBlogs declaration in the template, which is very similar to the other function declarations.
"GetBlogs" : {
  "Type" : "AWS::Serverless::Function",
  "Properties": {
    "Handler": "Blogger::Blogger.Functions::GetBlogsAsync",
    "Runtime": "dotnetcore1.0",
    "CodeUri": "",
    "Description": "Function to get a list of blogs",
    "MemorySize": 256,
    "Timeout": 30,
    "Role": null,
    "Policies": [ "AWSLambdaFullAccess" ],
    "Environment" : {
      "Variables" : {
        "BlogTable" : { "Fn::If" : ["CreateBlogTable", {"Ref":"BlogTable"}, { "Ref" : "BlogTableName" } ] }
      }
    },
    "Events": {
      "PutResource": {
        "Type": "Api",
        "Properties": {
          "Path": "/",
          "Method": "GET"
        }
      }
    }
  }
}
You can see a lot of the fields here are very similar to what we saw when we did a Lambda project deployment. In the Environment property, notice how the name of the DynamoDB table is being passed in as an environment variable. The CodeUri property tells CloudFormation where in Amazon S3 your application bundle is stored. Leave this property blank because the toolkit will fill it in during deployment, after it uploads the application bundle to S3 (it won’t change the template file on disk when it does so).
The Events section is where we can define the HTTP bindings for our Lambda function. This takes care of all the API Gateway setup we need to do for our function. You can also set up other types of event sources in this section.
One of the great benefits of using CloudFormation to manage the deployment is we can also add and configure any other AWS resources necessary for our application in the template, and let CloudFormation take care of creating and deleting the resources.
Deploying
We deploy our serverless application in the same way we deployed the Lamba project previously: right-click the project and choose Publish to AWS Lambda.
This launches the deployment wizard, but this time it’s quite a bit simpler. Because all the Lambda configuration was done in the serverless.template file, all we need to supply are the following:
- The name of our CloudFormation stack, which will be the container for all the resources declared in the template.
- The S3 bucket to upload our application bundle to.
These should exist in the same AWS Region.
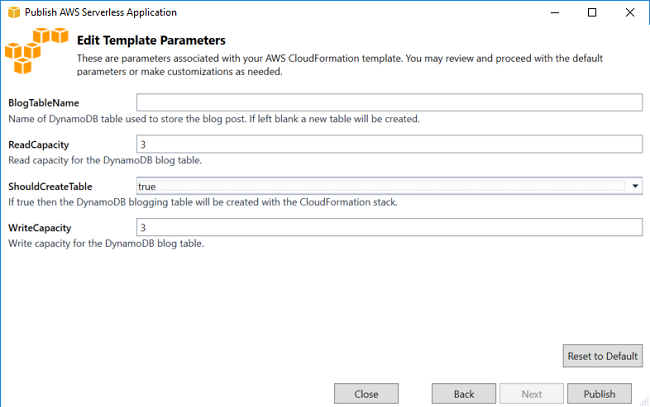
Because the serverless template has parameters, an additional page is displayed in the wizard where we specify the values for the parameters. We can leave the BlogTableName property blank and let CloudFormation generate a unique name for the table. We do need to set ShouldCreateTable to true so that CloudFormation will create the table. To use an existing table, enter the table name and set the ShouldCreateTable parameter to false. We can leave the other fields at their default values and choose Publish.
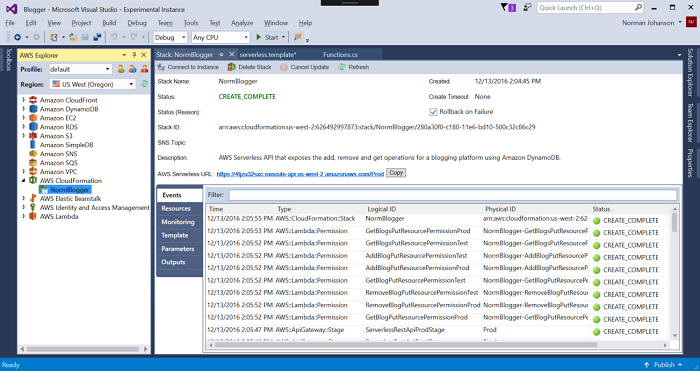
Once the publish step is complete, the CloudFormation stack view is displayed in AWS Explorer. This view shows the progress of the creation of all the resources declared in our serverless template.
When the stack creation is complete, the root URL for the API Gateway is displayed on the page. If we click that link, it returns an empty JSON array because we haven’t added any blogs to our table. To get blogs in our table, we need to make an HTTP PUT method to this URL, passing in a JSON document that represents the blog. We can do that in code or in any number of tools. I’ll use the Postman tool, which is a Chrome browser extension, but you can use any tool you like. In this tool, I’ll set the URL and change the method to be PUT. In the Body tab, I’ll put in some sample content. When we make the HTTP call, you can see that we get back the blog ID.
Now if we go back to the browser with the link to our AWS Serverless URL, you can see we are getting back the blog we just posted.
Conclusion
Using the AWS Serverless Application template, you can manage a collection of Lambda functions and the application’s other AWS resources. Also, with the new AWS Serverless Application Model specification, we can use a simplified syntax to declare our serverless application in the CloudFormation template. If you have any questions or suggestions for blueprints, feel free to reach out to us on our .NET Lambda GitHub repository.


