Front-End Web & Mobile
Getting started with Android testing on AWS Device Farm using Espresso – Part 2: Setting up Espresso and taking screenshots
AWS Device Farm is a service that allows you to test your Android, Fire OS, and iOS apps on real devices (not emulators or simulators) in the AWS Cloud. You can upload your apps to the cloud and run Fuzz tests to simulate random activity or leverage the built-in app explorer, which crawls your app and captures screenshots as well as performance metrics and logs. To take further advantage of the service you’ll need to leverage one of the supported test automation frameworks. That’s where this series of blog posts comes in.
In Part One of this series you created a basic application. Now, in Part Two, you will create test cases in Espresso to validate functionality and take screenshots before uploading to the AWS Cloud. In Part Three you will run your app and tests in the AWS Cloud with AWS Device Farm. Let’s get started.
Gradle
Open the build.gradle for the app in the main navigation bar.

Replace the text with the following:
apply plugin: 'com.android.application'

android {
    compileSdkVersion 22
    buildToolsVersion "22.0.1"

    defaultConfig {
        applicationId "com.example.simpledemoapp"
        minSdkVersion 19
        targetSdkVersion 22
        versionCode 1
        versionName "1.0"
        testInstrumentationRunner "android.support.test.runner.AndroidJUnitRunner"
    }
    buildTypes {
        release {
            minifyEnabled false
            proguardFiles getDefaultProguardFile('proguard-android.txt'), 'proguard-rules.pro'
        }
    }
    packagingOptions{
        exclude 'LICENSE.txt'
    }
}

dependencies {
    compile fileTree(dir: 'libs', include: ['*.jar'])
    compile 'com.android.support:appcompat-v7:22.1.1'
    androidTestCompile 'com.android.support.test.espresso:espresso-core:2.0'
}
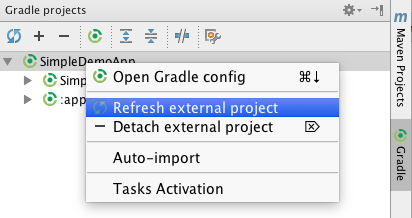
Save your changed file. On the right hand side of Android Studio you will see a tab called “Gradle.” Click it and then right-click the root item and select “Refresh external project.”
Expand SimpleDemoApp/SimpleDemoApp/Tasks/build and double-click “assembleAndroidTest.”

Next, switch to the “Tests” view in the Project navigator.

Expand app/app/src/androidTest/java until you get to the com/example/simpledemoapp package structure.

Right-click the package and select New->Java Class. Type “EspressoTest” for the name and click OK.
Replace the contents of the file with the below code:
package com.example.simpledemoapp;

import android.test.ActivityInstrumentationTestCase2;

import static android.support.test.espresso.Espresso.onView;
import static android.support.test.espresso.action.ViewActions.click;
import static android.support.test.espresso.action.ViewActions.typeText;
import static android.support.test.espresso.assertion.ViewAssertions.matches;
import static android.support.test.espresso.matcher.ViewMatchers.withId;
import static android.support.test.espresso.matcher.ViewMatchers.withText;

public class EspressoTest extends ActivityInstrumentationTestCase2 {

    public EspressoTest() {super(SimpleDemoActivity.class);}

    @Override
    public void setUp() throws Exception {
        super.setUp();
        getActivity();
    }

    public void testEspresso(){
        onView(withId(R.id.editText)).perform(typeText("Testing with AWS Device Farm
        onView(withId(R.id.buttonUpdate)).perform(click());
        onView(withId(R.id.updatedText)).check(matches(withText("Testing with AWS Device Farm")));
    }
}
Save the file.
In the top navigation bar select Run->Edit Configurations.

Click the plus (+) sign to add an Android Test configuration node. Click on that node and press plus again to add a new configuration for EspressoTest. Ensure that the Class matches and the Instrumentation Runner is android.support.test.runner.AndroidJUnitRunner.

Now Right-Click the EspressoTest class in the navigation pane->Run->EspressoTest.

If everything runs successfully you will see the test run in the emulator. You might need to click fast to bring it in focus.

Also you should see “Done 1 of 1” in the Run section of the console for successful test execution with Espresso.

IMPORTANT: If you created a test in your Class and your output doesn’t match the above screenshot, or you get a message such as “No test events received,” it may be due to how you named the test. Tests must start with the name “test” such as “testEspresso()” in the above example or the test runner will not recognize them.
Screenshots
At this point we have a very basic application that technically can be uploaded and tested in Device Farm. However, according to the documentation we need to save screenshots to the SD Card in order for them to be seen after a Run. If the Espresso .check() call fails we would like to see a screenshot of what the screen looked like in order to troubleshoot.
To accomplish this task we’ll create a utility class that will save PNG files to /sdcard/test-screenshots/ as per the Device Farm documentation. The class will take an input of the Activity and a string identifier for the file name.
Select File->New->Java Class and when prompted name it “ScreenShot.” IMPORTANT: This name must be precise including capitalization so use a capital “S.”

Paste in the following code:
package com.example.simpledemoapp;

import android.app.Activity;
import android.graphics.Bitmap;
import android.os.Environment;
import android.util.Log;
import android.view.View;

import java.io.File;
import java.io.FileNotFoundException;
import java.io.FileOutputStream;
import java.io.IOException;
import java.io.OutputStream;

public class ScreenShot {
    private static final String TAG = "SCREENSHOT_TAG";

    public static void take(Activity activity, String name) {
        final String dir = Environment.getExternalStorageDirectory().getAbsolutePath() + "/test-screenshots/";
        final String path = dir + name;

        File filePath = new File(dir);     // Create directory if not present
        if (!filePath.isDirectory()) {
            Log.i(TAG, "Creating directory " + filePath);
            filePath.mkdirs();
        }

        Log.i(TAG, "Saving to path: " +  path);

        View phoneView = activity.getWindow().getDecorView().getRootView();
        phoneView.setDrawingCacheEnabled(true);
        Bitmap bitmap = Bitmap.createBitmap(phoneView.getDrawingCache());
        phoneView.setDrawingCacheEnabled(false);

        OutputStream out = null;

        File imageFile = new File(path);

        try {
            out = new FileOutputStream(imageFile);
            bitmap.compress(Bitmap.CompressFormat.PNG, 100, out);
            out.flush();
        }
        catch (FileNotFoundException e) {
            Log.e(TAG, e.toString());
        }
        catch (IOException e) {
            Log.e(TAG, e.toString());
        }

        finally {
            try {
                if (out != null) {
                    out.close();
                }
            } catch (IOException e) {
                Log.e(TAG, e.toString());
            }
        }
    }
}
Now modify testEspresso()in the EspressoTest.java class to make a call to the newly created ScreenShot class:
public void testEspresso() throws IOException {

    Log.i("TESTESPRESSO", "Starting the Espresso Test");
    onView(withId(R.id.editText)).perform(typeText("Testing with AWS Device Farm
    onView(withId(R.id.buttonUpdate)).perform(click());
    onView(withId(R.id.updatedText)).check(matches(withText("Testing with AWS Device Farm")));

    // Take the screenshot
    ScreenShot.take(getActivity(),"Homepage");

}
You will also need to modify the AndroidManifest.xml file so that your application has permission to write and read from the SD card. In the Project Navigator expand app/src/main and double-click AndroidManifest.xml. Add in the “uses-permission” entries as in the example XML below.
<?xml version="1.0" encoding="utf-8"?>
<manifest xmlns:android="http://schemas.android.com/apk/res/android"
    package="com.example.simpledemoapp" >

    <uses-permission android:name="android.permission.WRITE_EXTERNAL_STORAGE"/>
    <uses-permission android:name="android.permission.READ_EXTERNAL_STORAGE" />

    <application
        android:allowBackup="true"
        android:icon="@mipmap/ic_launcher"
        android:label="@string/app_name"
        android:theme="@style/AppTheme" >
        <activity
            android:name=".SimpleDemoActivity"
            android:label="@string/app_name" >
            <intent-filter>
                <action android:name="android.intent.action.MAIN" />

                <category android:name="android.intent.category.LAUNCHER" />
            </intent-filter>
        </activity>
    </application>

</manifest>
Run the test again in the emulator but this time after it finishes open the Android Device Monitor from the Android Studio task bar.

In the Android Device Monitor you will find a tab called “File Explorer.” Select this and navigate to /storage/sdcard/test-screenshots. If you see a file called “Homepage” then you have run everything successfully. If you wish you can click on the file and download the image for viewing.

Conclusion
That’s it for Part Two! Now join us for Part Three of this series where you will upload your application to AWS Device Farm and see your tests run across multiple devices in the AWS Cloud. If you have questions please join us in the comment section below.