AWS Cloud Operations Blog
How to configure AWS X-Ray tracing for your AWS Batch jobs
Many customers implement business processes as batch workloads. End-to-end visibility into those workloads can help you identify bottlenecks in the batch jobs. In this blog post, I will show how to configure AWS X-Ray for your AWS Batch workloads in an automated way and present a sample application to visualize the collected X-Ray traces.
AWS Batch is a powerful cloud-native batch scheduler. In a managed compute environment, you submit jobs (containerized applications that can be executed at scale) to a queue while AWS handles the job scheduling and lifecycle for you. You define the container image, application code, and the required parameters and AWS Batch will schedule the job, deploy, and execute the task for you.
This blog post is divided into two sections. The first section explains how to set up the AWS Batch compute environment and instrument AWS Batch jobs using the AWS X-Ray SDK. The second section provides a walkthrough to deploy a sample AWS Batch job using X-Ray. All the steps in the setup section of the post are automated in the sample application.
The following diagram shows the architecture components.
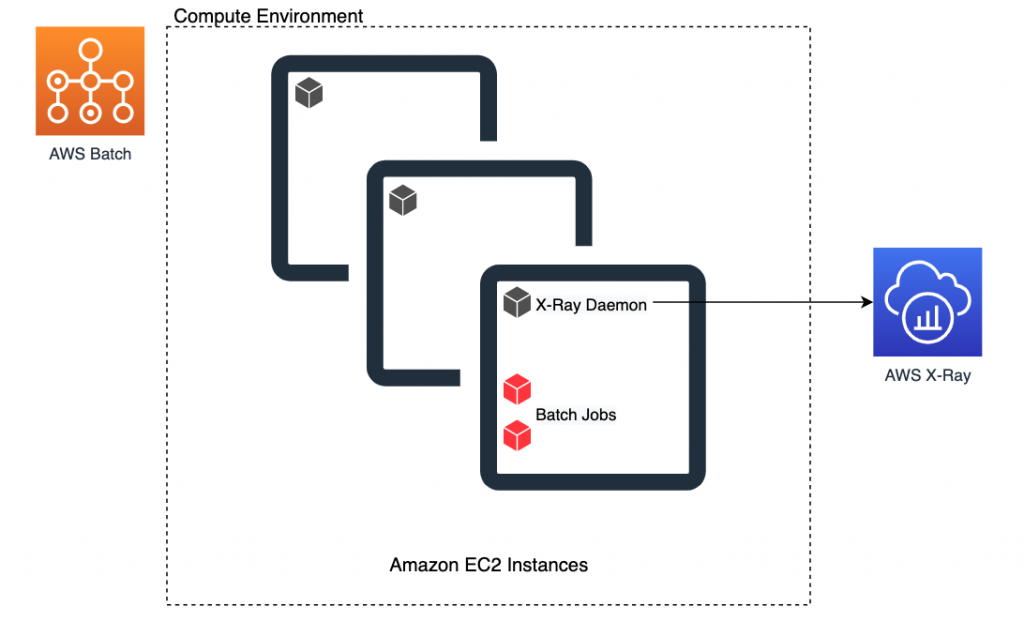
Figure 1 – AWS Batch compute environment configured with X-Ray daemon
Setup
Follow these steps to configure X-Ray in an AWS Batch managed compute environment:
1. Install the X-Ray daemon on instances in the compute environment.
To successfully use AWS X-Ray, the application must send JSON segment documents to a daemon process that listens for UDP traffic. The X-Ray daemon buffers segments in a queue and uploads them to X-Ray. On Batch, the daemon must be installed on the EC2 instances used to run jobs. AWS Batch supports launch templates, so the user data can perform custom configuration consistently across a compute environment.
Although Batch uses your user data to configure the instances, any additional configuration must be formatted in the MIME multi-part archive. That way, the configuration can be merged with the user data that is required to configure your compute resources.
The following user data installs the X-Ray daemon:
Note: AWS Batch executes jobs using Amazon Elastic Container Service (Amazon ECS) container instances and tasks. In an ECS cluster, the X-Ray daemon is executed as a container that runs alongside your application. However, Batch takes care of creating an ECS task definition, so an additional container cannot be defined in the Batch job definition.
2. Add permissions for the instances to call the X-Ray API.
The instance role requires permissions to send the captured traces to AWS X-Ray. The IAM policy, AWSXRayDaemonWriteAccess, gives the X-Ray daemon permission to upload trace data.
Attach this policy to ecsInstanceRole. If you choose to create an instance role for your compute environment, be sure to add the AWSXRayDaemonWriteAccess policy to it. For more information about IAM permissions required by the Batch instance role, see Amazon ECS Instance Role.
3. Instrument the Batch job application code.
AWS Batch is not integrated with X-Ray by default. For this reason, the application code must be manually instrumented using the X-Ray SDK for your programming language. (In this blog post, I use Python.)
To instrument libraries, you must patch them with the X-Ray SDK. In the sample application, the boto3 library is used to interact with AWS services and requests is used to perform HTTP requests to internet resources.
import boto3
import requests
from aws_xray_sdk.core import xray_recorder
from aws_xray_sdk.core import patch

libraries = (['boto3','requests'])
patch(libraries)
Whenever the X-Ray SDK is used with an integrated service, such as AWS Elastic Beanstalk, the root segment is configured by the SDK automatically. However, in the Batch job, there is no active segment, so you must start and end the tracing context in the code:
# Start a segment if no segment exist
segment = xray_recorder.begin_segment('BatchJob')
# Do stuff
if xray_recorder.is_sampled():
        # For sampled traces, the job_id is added as an annotation
        xray_recorder.put_annotation('job_id', os.getenv('AWS_BATCH_JOB_ID'))
# Do more stuff and end tracing segment
xray_recorder.end_segment()
Note: The method for starting a segment with the X-Ray SDK is different for each programming language. For example, on Node.js applications, you can use the following syntax to start the segment and tracing context manually:
// Instrumenting all AWS SDK client with X-Ray
var AWSXRay = require('aws-xray-sdk');
var AWS = AWSXRay.captureAWS(require('aws-sdk'));

// Starting segment
var segment = new AWSXRay.Segment(name);
var ns = AWSXRay.getNamespace();

ns.run(function () {
  AWSXRay.setSegment(segment);

  // Requests using AWS SDK, HTTP calls, SQL queries...

  segment.close();
});
For information about the supported programming languages, see the AWS X-Ray Developer Guide. For SDK configuration for your programming language, use the official GitHub repositories: Python, Node.Js, Go, Java, Ruby, and .NET.
Sample application
In the following sections, I show you how I configured a Batch compute environment with X-Ray. I ran a simple Batch job that interacts with Amazon S3 and sends HTTP requests to internet resources. To simplify the deployment of this sample implementation, I used the AWS Cloud Development Kit (AWS CDK).
Prerequisites
To launch the sample application and underlying infrastructure, you need the following:
- npm and Docker installed on your machine.
- The AWS CLI. For more information, see Installing, updating, and uninstalling the AWS CLI.
Setup process
Here is the setup process:
- Prepare the environment for AWS CDK.
- Deploy AWS CDK application.
- Submit Batch jobs.
- Visualize X-Ray Traces.
Prepare environment for AWS CDK
The AWS CDK is an open-source software development framework to define cloud infrastructure in familiar programming languages and provision it through AWS CloudFormation. AWS CDK works by creating assets to deploy its application. Assets are files, directories, or Docker images that need to be stored on the AWS Cloud. By bootstrapping the environment, the AWS CDK creates the required resources to store assets. In this blog post, an S3 bucket is required to store AWS CloudFormation templates. For more information about AWS CDK bootstrapped resources, see Bootstrap resources on GitHub.
Before you bootstrap your environment, download the source code from this Github repository, and then navigate to the directory with package.json file to install the dependencies:
$ git clone https://github.com/aws-samples/aws-batch-xray.git

$ cd aws-batch-xray

$ npm install
To create the resources required by the AWS CDK, run the following command in the directory where cdk.json exists. Be sure to replace ACCOUNT-ID and REGION with your AWS account ID and the AWS Region where the stack will be created:
cdk bootstrap aws://ACCOUNT-ID/REGION
Deploy the AWS CDK application
After the AWS environment has been bootstrapped, you are now ready to deploy the sample application. To deploy the AWS CDK stack, run the following command in the directory where cdk.json exists:
$ cdk deploy BatchXrayStack
The deployment of the stack will take a few minutes. You can follow the deployment status from the command line you used to execute the cdk deploy command or you can use the AWS CloudFormation console to check the status of the stack named BatchXrayStack.
Submit your Batch jobs
Finally, it’s time to submit Batch jobs and see X-Ray traces being generated. The following sample CLI commands will submit one job to Batch. For information about how to submit Batch jobs from the console, see Submitting a job.
# Be sure to export the desired region name
$ export AWS_DEFAULT_REGION=eu-west-1
$ JOB_DEFINITION=$(aws cloudformation describe-stacks --stack-name BatchXrayStack --query "Stacks[*].Outputs[?ExportName=='JobDefinitionArn'].OutputValue" --output text)
$ JOB_QUEUE=$(aws cloudformation describe-stacks --stack-name BatchXrayStack --query "Stacks[*].Outputs[?ExportName=='JobQueueArn'].OutputValue" --output text)
$ JOB_ID=$(aws batch submit-job --job-name batch-x-ray --job-queue $JOB_QUEUE  --job-definition $JOB_DEFINITION –query 'jobId' –output text)
The preceding command assigns the Batch job ID to the variable JOB_ID. To see its value:
$ echo JOB_ID
Now that the Batch job has been SUBMITTED, it will take a few moments for the Batch scheduler to provision the job. After the job reaches a RUNNABLE state, the scheduler will send the job to an instance. For more information, see Job States.
To check the job state, run the following command:
$ aws batch describe-jobs --jobs $JOB_ID --query 'jobs[*].status'
After the command returns SUCCEEDED in the output, you can see the generated trace. It includes detailed information about the Batch job execution.
Visualize X-Ray traces
Open the AWS X-Ray console and, using the same JOB_ID from the previous section, use the search bar at the top of the page. Use the following filter expression:
annotation.job_id = "JOB_ID"
After the trace is found, click the link for the ID. You should see a trace map similar to the following:
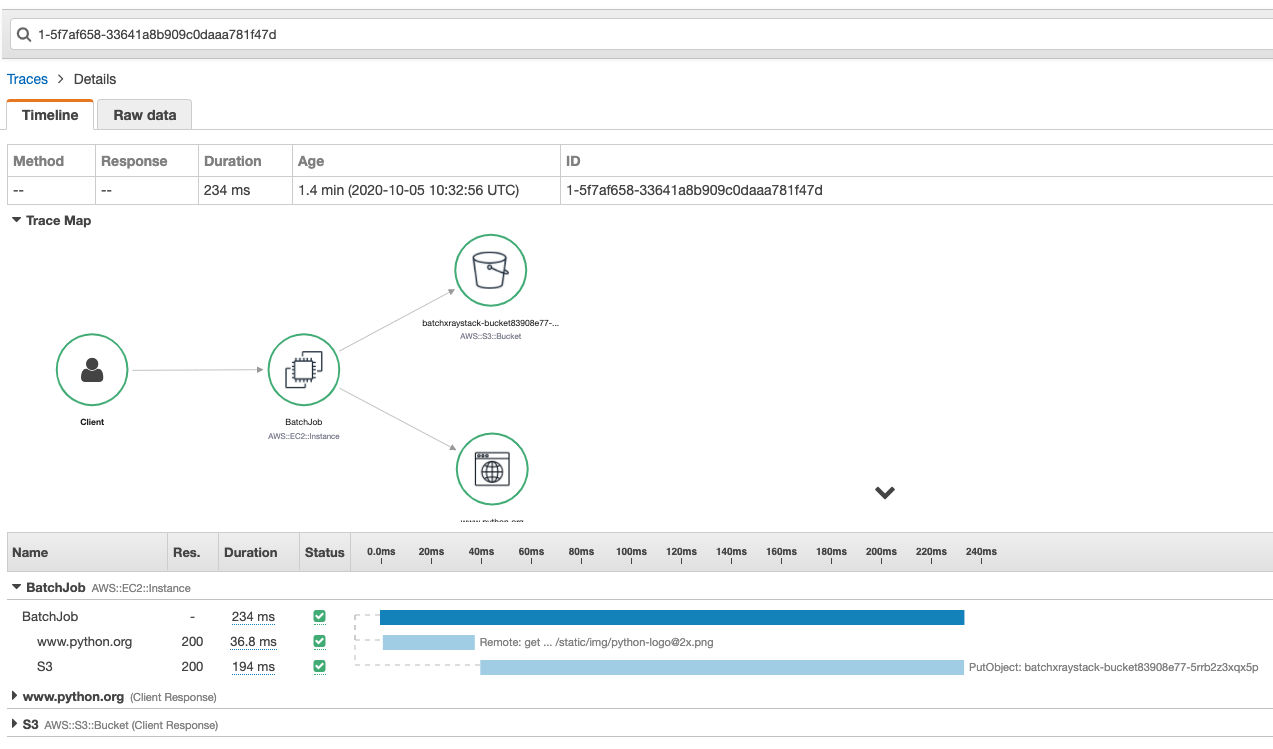
Figure 2 – Sample application trace in the AWS X-Ray console
Cleanup
To delete the CloudFormation stacks created through the AWS CDK, run the following commands.
BUCKET=$(aws cloudformation describe-stacks --stack-name BatchXrayStack --query "Stacks[*].Outputs[?ExportName=='BucketForBatchJob'].OutputValue" --output text)
# Empty bucket with images uploaded by Batch Job
aws s3 rm s3://$BUCKET --recursive
# Delete CDK stack
cdk destroy BatchXrayStack
# Delete CDK bootstrap stack
aws cloudformation delete-stack --stack-name CDKToolkit
Conclusion
In this blog post, I showed you how you can set up AWS X-Ray tracing on your AWS Batch jobs. AWS provides a powerful suite of observability tools, including X-Ray, CloudWatch ServiceLens, CloudWatch Container Insights, CloudWatch Lambda Insights, and X-Ray insights. For more information, see Getting started with Amazon CloudWatch and the One Observability Demo Workshop.
Authors

Thales von Sperling is a Cloud Support Engineer on Deployment services team, focused on helping customers on their DevOps journey. He likes implementing infrastructure with AWS CloudFormation and enjoy finding new ways to automate workflows using AWS Lambda. On his free time, Thales enjoys riding his mountain bike.
 Imaya is a Senior Solution Architect focused on Amazon CloudWatch and AWS X-Ray. He is passionate about Monitoring and Observability and has a strong application development and architecture background. He likes working on distributed systems and is excited to talk about micro-service architecture design. He loves programming on C#, working with Containers and Serverless technologies.