AWS Security Blog
Authorizing access to data with RAG implementations
Organizations are increasingly using large language models (LLMs) to provide new types of customer interactions through generative AI-powered chatbots, virtual assistants, and intelligent search capabilities. To enhance these interactions, organizations are using Retrieval-Augmented Generation (RAG) to incorporate proprietary data, industry-specific knowledge, and internal documentation to provide more accurate, contextual responses. With RAG, LLMs use an external knowledge base that uses a vector store to incorporate specific knowledge data before generating responses.
Our customers have told us that they’re concerned adding additional context to prompts will lead to leakage of sensitive information to principals (persons or applications) that might exist in some of these tools or to unstructured data within the knowledge base. As mentioned in previous posts (Part 1, Part 2), LLMs should be considered untrusted entities because they do not implement authorization as part of a response. A good mental model for organizations is to assume that any data passed to an LLM as part of a prompt could be returned to the principal. With tools (APIs that an LLM can invoke to interact with external resources), you can pass the identity tokens of the principal to the tool to determine what the principal is permitted to access and actions that are allowed. Capabilities across different vector databases—including metadata filters and syncing identity information between the data source and the knowledge base—support providing better results from the knowledge base and provide a baseline filtering capability. This does not provide for strong authorization capabilities using the data source as the source of truth, which some customers are looking for.
In this blog post, I show you an architecture pattern for providing strong authorization for results returned from knowledge bases with a walkthrough example of this using Amazon S3 Access Grants with Amazon Bedrock Knowledge Bases. I also provide an outline of considerations when implementing similar architecture patterns with other data sources.
RAG usage overview
RAG architectures share similarities with search engines but have key differences. While both use indexed data sources to find relevant information, their approaches to data access differ. Search engines provide links to information sources, requiring users to access the original data source directly based on their permissions. This flow is shown in Figure 1.
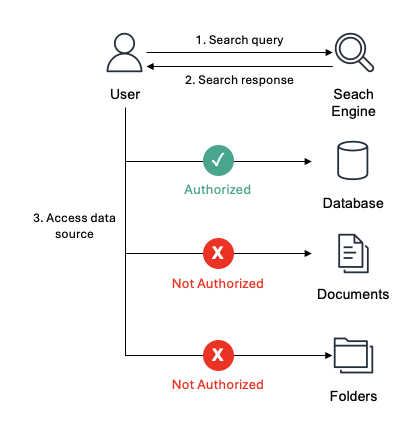
Figure 1: A principal, User in this example, accessing a data source after the search engine returns results
Unlike search engines, RAG implementations return vector database results directly from the LLM, bypassing permission checks at the original data source. While metadata filtering can help control access, it presents two key challenges. First, vector databases only sync periodically, meaning permission changes in the source data aren’t immediately reflected. Second, complex identity permissions—where principals might belong to hundreds of groups—make it difficult to accurately filter results. This makes metadata filtering insufficient for organizations that require stronger authorization controls. This flow is shown in Figure 2.

Figure 2: An application accessing data in a vector database
To implement robust authorization for knowledge base data access, verify permissions directly at the data source rather than relying on intermediate systems. When using the search engine example, access verification occurs when retrieving the actual result from the data source, not during the initial search. For vector databases, the generative AI application validates access rights by sending an authorization request to the data source before retrieving the data. This helps make sure that the data source that maintains the authoritative access control rules determines whether the principal has permission to access specific objects. This real-time authorization check means permission changes are immediately reflected when accessing the data source. This authorization pattern is similar to how AWS Lake Formation manages access to structured data. Lake Formation evaluates permissions when a principal requests access to databases or tables, granting or denying access based on the principal’s defined permissions. You can implement comparable authorization controls for vector database results before providing that context to large language models.
Let’s look at a solution using S3 Access Grants with Amazon Bedrock Knowledge Bases as an example use case.
Solution overview: S3 Access Grants with Bedrock Knowledge Bases
In the following example, you have an ACME organization that wants to create a generative AI chatbot for their employees. There are multiple teams within the organization (Marketing, Sales, HR, and IT) that work on projects throughout the organization. You have five users (the principals accessing the application) with the following group permissions:
- Alice: Marketing Team
- Bob: Sales Team, Project A Team
- Carol: HR Team, Project B Team
- Dave: IT Support, Project C Team
- Eve: Marketing Team
Each principal will have access to their respective project (for example /projects/projectA) or department folders (for example departments/marketing/). Marketing also will have access to everything in the projects folder (/projects/*) unless they are considered highly confidential files. To mark Project B files as highly confidential, you will include a metadata tag for objects within the Project C prefix with classification = ‘highly confidential’. Figure 3 shows the relationship between the principals and access to the different folders within the data source. As an example, only Carol has access to highly confidential data in the Project B folder.

Figure 3: Group permissions for the organization
To authorize access for each principal to the objects within the knowledge base, you will use Amazon S3 Access Grants. You can learn how to set up S3 Access Grants in Part 1 or Part 2 of the blog series.
Within AWS IAM Identity Center, you will add each user to their respective groups. Bob will be added to both the Sales Team group and Project A Team group, similar to what is shown in Figure 3.
Each prefix (projectA/, marketing/) will have a single file that provides a status for the team. In addition, for Project B, you will also add a status.txt.metadata.json file to tag the object as highly confidential, because it’s a HR project. For example, for Project B, the status.txt file looks like the following:
And the metadata.json file is as follows:
After the knowledge base and S3 access grants are configured, you can now test the authorization of knowledge base chunks. The application flow is the following, as shown in Figure 4:
- The user uses their identity provider (IdP) to sign in to the generative AI application (steps 1a, 1b, and 1c).
- The generative AI application exchanges a token with IAM Identity Center and assumes the role on behalf of the user (step 2).
- The generative AI application calls S3 Access Grants to get a list of the grants the user is authorized to access (step 3).
- The user sends a query to the generative AI application (step 4).
- The generative AI application sends a query to knowledge base (step 5).
- The generative AI application reviews chunks from the knowledge base against the scopes the user is authorized to access (step 6).
- Only scopes the user is authorized to will be passed to the LLM for a response (step 7).
- The generative AI application will continue steps 5–7 until you want to get a new list of authorized scopes (repeat step 4) or the token expires (repeat steps 3 and 4).
Figure 4: Application flow to authorize data from knowledge bases
The grant scopes are shown in the following table:
| Grant scope | Grant ID |
| s3:// amzn-s3-demo-bucket/departments/sales/* | edbd7575-0ba8-4837-8df1-07fe5d89f973 (sales group) |
| s3:// amzn-s3-demo-bucket/departments/it/* | a8f1d390-10d1-7037-7b27-c9fcf0b04441 (it group) |
| s3:// amzn-s3-demo-bucket/departments/marketing/* | 28f1e3c0-8081-70fe-6b4f-531ae370e7fd (marketing group |
| s3:// amzn-s3-demo-bucket/departments/hr/* | 38f11380-d011-70fb-261b-aa50d7edc1d5 (hr group) |
| s3:// amzn-s3-demo-bucket/projects/projectA/* | c84173b0-b071-70c5-3207-dadc1e6f76a9 (project A group) |
| s3:// amzn-s3-demo-bucket/projects/projectB/* | 2871d3c0-6001-7073-baaf-62717f56b8d0 (project B group) |
| s3:// amzn-s3-demo-bucket/projects/projectC/* | f8a183b0-f001-707b-aa8e-1826ca04595e (project C group) |
| s3:// amzn-s3-demo-bucket/projects/* | 28f1e3c0-8081-70fe-6b4f-531ae370e7fd (marketing group) |
For this example, you can use Bob’s role to demonstrate how chunk authorization works. When you call the knowledge base without performing any data authorization, you receive the following back when asking “What is the status of my project.” With each object within the data source, you also include meta data, in the form of *.metadata.json, which is used by the knowledge base to assign specific key/value pairs to each object. This is where you add the classification for Projects A and C as confidential and Project B as highly confidential, as mentioned previously. You pass this filter as part of the Bedrock knowledge base request, using a RetrievalFilter within the retrievalConfiguration. The following code shows the response from the Bedrock knowledge base:
The data from Project B isn’t included in the output because it’s tagged as highly confidential. Data from Project C is included, which Bob shouldn’t have access to, so let’s step through how to authorize Bob to the correct data.In the following steps and using the provided sample Python code, I will walk through calling each one of the functions shown in the following code block. You can use this code as part of your application to validate permissions for data returned from the Bedrock knowledge base.
Step 1: User uses the IdP to sign in to the generative AI application
When Bob first accesses the generative AI application, the application will redirect him using a single sign-on flow for him to authenticate with their IdP. Bob will receive a signed identity token from the IdP that will validate who Bob is from an identity perspective. An example identity token for Bob is shown in the following example:
Step 2: Token exchange with IAM Identity Center
After Bob is authenticated and passes his token to the generative AI application, the application will exchange the identity token from the IdP with the IAM Identity Center identity token and retrieve temporary credentials on behalf of Bob. You will create a function called assume_role in Python that passes multiple different variables used to allow Bob to assume a role inside AWS:
- client_id: The unique identifier string for the client or application. This value is an application Amazon Resource Name (ARN) that has OAuth grants configured.
- grant_type: OAuth grant type, which for our example will be JWT Bearer.
- role_arn: The ARN of the role to assume.
- role_session_name: An identifier for the assumed role session.
- provider_arn: The context provider ARN from which the trusted context assertion was generated.
- client_assertion: This value specifies the JSON Web Token (JWT) issued by a trusted token issuer.
In the sample Python function, shown in the following example code, you will perform the following steps:
- You open both a boto3 client for
sso-oidc(to create a token with IAM) andsts(to assume the temporary role for Bob). - Next, you will use the
client_id,grant_type, andclient_assertionto callcreate_token_with_iamto create an IAM Identity Center token that is passed back to thetoken_responsevariable. - Within the
token_response, there is ansts:identity_contextthat is needed to assume the role for Bob. - With the
identity_context, you pass the identity context toassume_rolewith therole_arn,role_session_name, andprovider_arnto retrieve temporary credentials for Bob. - Lastly, you return to the application a boto3 client for
s3-controlthat uses Bob’s temporary credentials to validate his authorization with S3 access grants.
Step 3: Retrieve the caller grant scopes
Next, you need to retrieve what Bob is allowed to access in the data source by using S3 Access Grants. In our example, you need to validate the data Bob is authorized to access with the data source, not the S3 object itself. To obtain the prefixes Bob is authorized to access, you will need to do the following in the get_caller_grant_scopes function.
- First, you will pass the
s3controlclient that was returned fromassume_role. in addition to the account for the S3 access grants. - With the temporary role for Bob, you will call
list_caller_access_grants. This will return a list of caller access grants available to Bob. So, for example, when you call this for Bob, you would receive the following response fromlist_caller_access_grants, where you can see he has access to thesalesprefix andprojectAprefix. This is shown in the following example code.
- You add the scopes to an array and return the array back to the application. The code example for this follows. Note: you remove the
*from the access grant, because thechunkURI is the full path, not just the prefix.
At this point, you have a list of the grant scopes that Bob is authorized to access in the data source. This information can now be used to check against chunks that are returned from the knowledge base to authorize access to the data before passing the final prompt with additional context to the LLM.
Step 4: Check caller grant scopes
The last step is to check chunks returned by the knowledge base against the list of the grants Bob has access to. For this, you define check_grant_scopes and pass both the chunks and the scopes Bob is authorized to access. The variable chunks is an array of dictionaries that you will parse, validating it against the list of scopes, shown in the following code example.
- You first loop through each chunk that was passed to the function.
- For each
chunk, you will check to see if the chunk location starts with a given prefix that is in the S3 access grant. - If a match is found, you add it to the chunk, along with the scope found in the S3 access grant, to the list of
echunks. If a match is not found in the scopes, then you add it to thenot_authorizedchunks.
The function will return both the list of authorized chunks and not_authorized chunks to provide visibility into the different chunks Bob was denied access to.
When running the preceding function for Bob and the chunks returned from the knowledge base, you get the following authorized chunks and not authorized chunks as shown in the following example. The authorized chunks are added to the query, which is then passed to the LLM, returning a response.
Solution considerations
When implementing this authorization architecture for RAG implementations, it’s important to understand several key considerations that impact security, performance, and scalability. These considerations help make sure your implementation maintains strong security controls, while optimizing system performance and providing flexibility for different data sources. The following points outline important aspects to evaluate when designing and implementing this authorization pattern:
- For this example, you used S3 Access Grants as the example of how to check for authorization. However, this architecture can be used with your choice of data source, if the URI for the data source is returned from the knowledge base and there is an API that can be called to validate what a principal is authorized to access, like the
get_caller_grant_scopesfunction described previously. - The use of S3 Access Grants provides authorization for a principal to access the data source. Additional access control policies could be applied to each bucket by adding a key/value tag or data source if desired. By doing this, the principal would be denied access to the bucket even though S3 Access Grants provides authorization. To support this functionality, you can add metadata for the vector database to ingest and filter on the query to the knowledge base, as shown in the preceding example.
- Similar to stale data until resync of the knowledge base, the list of authorized scopes can also become stale. It’s up to you to decide how often you refresh the list of authorized scopes (step 3 in Figure 4) and the duration of the
assume roleof the principal (step 2 in Figure 4). - Depending on the chunks the principal is authorized to access and what the knowledge base returns, chunks could be dropped before sending to the LLM. From a security point of view, this is preferred so principals will not get access to chunks they aren’t authorized to. From an architecture point of view, you should optimize the knowledge base query and add additional metadata tags to limit the number of non-authorized chunks returned from the knowledge base. This is one reason to include a
not_authorizedlist as part of thecheck_grant_scopesfunction.
Conclusion
In this post, I showed you an architecture pattern to provide strong authorization for results returned from knowledge bases. You walked through the importance of strong authorization with knowledge bases and how to implement authorization with Amazon S3 Access Grants. Lastly, you walked through code examples of how this would work in practice using Amazon Bedrock Knowledge Bases with S3 Access Grants.
For additional information on generative AI security, take a look at other posts in the AWS Security Blog and AWS blog posts covering generative AI.
If you have feedback about this post, submit comments in the Comments section below. If you have questions about this post, contact AWS Support.