AWS Security Blog
Using AWS Secrets Manager Agent with Amazon EKS
AWS Secrets Manager is a service that you can use to manage, retrieve, and rotate database credentials, application credentials, API keys, and other secrets throughout their lifecycles. You can also use Secrets Manager to replace hard-coded credentials in application source code with runtime calls to retrieve credentials dynamically when needed.
Managing secrets in Amazon Elastic Kubernetes Service (Amazon EKS) environments creates three main challenges: dependency on language-specific AWS SDKs, network dependencies from direct API calls, and complex secret rotation across multiple pods.
The AWS Secrets Manager Agent addresses these challenges by providing a language-agnostic HTTP interface that runs locally within your compute environment. In this post, we show you how to deploy the Secrets Manager Agent as a sidecar container in Amazon EKS to retrieve secrets through HTTP calls.
New approach: Secrets Manager Agent
The Secrets Manager Agent is a client-side agent that you can use to standardize consumption of secrets from Secrets Manager across your AWS compute environments. The agent pulls and caches secrets in your compute environment and allows your applications to consume secrets directly from the in-memory cache through a local HTTP endpoint (localhost:2773).
Instead of making network calls to Secrets Manager, you fetch secret values from the local agent, improving application availability while reducing API calls. Because the Secrets Manager Agent is language agnostic, you can use it across different programming languages without requiring AWS SDK dependencies.
Post-quantum cryptography protection
The Secrets Manager Agent implements ML-KEM (Machine Learning-based Key Encapsulation Mechanism) key exchange, which provides additional cryptographic protection for secret retrieval operations. This feature is enabled by default and requires no additional configuration.
Authentication and access control
This solution uses Amazon EKS Pod Identity for secure authentication to AWS services. Pod Identity provides a simplified way to associate AWS Identity and Access Management (IAM) roles with Kubernetes service accounts, avoiding the need for OpenID Connect (OIDC) provider configuration. IAM principals need GetSecretValue and DescribeSecret permissions to retrieve secrets through the agent.
The Secrets Manager Agent offers protection against server-side request forgery (SSRF). When you install the agent, it generates a random SSRF token and stores it in /var/run/awssmatoken. The agent actively blocks requests that don’t include this token in the X-Aws-Parameters-Secrets-Token header.
Solution overview
In this solution, you deploy the Secrets Manager Agent as a sidecar container in an Amazon EKS pod alongside an NGINX application. The sidecar pattern helps make sure that each pod has its own agent instance, providing isolation and fine-grained security boundaries.
This post demonstrates the Secrets Manager Agent sidecar approach, complementing the AWS Secrets and Configuration Provider (ASCP) guidance covered in Announcing ASCP integration with Pod Identity.
Amazon EKS supports multiple patterns for consuming Secrets Manager secrets. The ASCP for the Kubernetes Secrets Store CSI Driver works well when you want secrets mounted as files and prefer Kubernetes-native secret management. Use the Secrets Manager Agent when you need HTTP-based secret access, want to avoid pod restarts during secret rotation, or need granular refresh control via the refreshNow parameter.
Choosing between Secrets Manager Agent and CSI Driver:
|
Approach |
Access method |
Best for |
|
Secrets Manager Agent |
HTTP API calls to localhost:2773 |
Applications needing runtime secret access, dynamic refresh, and language-agnostic HTTP interface |
|
ASCP and CSI Driver (blog post) |
Secrets mounted as files |
Kubernetes-native secret management and file-based secret consumption |
Each secret management approach has specific advantages for different use cases. The Secrets Manager Agent works well for applications requiring HTTP-based access and dynamic secret updates, while the ASCP with CSI Driver is ideal for applications that need file-based secret mounting. Consider your application’s specific requirements, operational patterns, and security needs when choosing between these approaches.
To deploy the solution, you build the agent binary, containerize it, and deploy it to Amazon EKS using Kubernetes manifests with Amazon EKS Pod Identity for secure access to Secrets Manager.
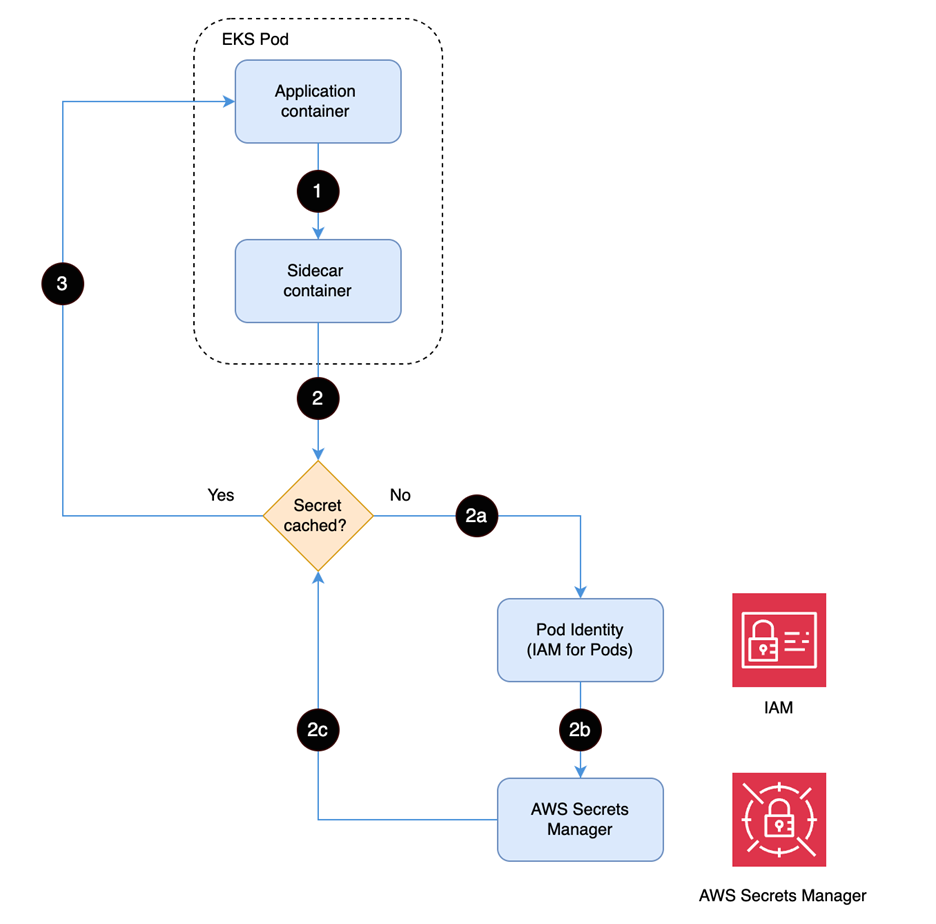
Figure 1: Solution workflow
The workflow of the solution is shown in Figure 1 and includes the following steps:
- The application container sends
GET /secretsmanager/get (localhost:2773)to retrieve secret - Secrets Manager Agent checks the local cache to determine if the secret is already stored in memory
- If not cached, authenticate using Pod Identity to establish secure access to AWS Secrets Manager
- Assume the IAM role to retrieve the secret from AWS Secrets Manager
- Return the secret to the sidecar container for caching
- Return the secret to the application container to fulfill the original request
Prerequisites
To build the solution in this post, you must have the following:
- An AWS account
- An Amazon EKS cluster (1.32) in the us-west-2 AWS Region
- Please note, the AWS Secrets Manager Agent supports the versions of Amazon EKS and Kubernetes available since its initial launch, providing universal compatibility for secure secrets management across cluster versions.
- Amazon EKS Pod Identity Agent installed on your cluster
- A Linux-based virtual machine (VM) or and Amazon Elastic Compute Cloud (Amazon EC2) instance to build the agent.
- AWS Command Line Interface (AWS CLI) version 2
- kubectl installed and configured
- Docker installed
Install the Secrets Manager Agent
In this section, you install the Secrets Manager Agent. With the agent installed, you then create the Pod Identity association, Secrets Manager binary image, push the binary image to Amazon Elastic Container Registry (Amazon ECR), and create a secret in Secrets Manager.
- Verify the Pod Identity Agent installation:
- Create the Pod Identity association using the following commands:
- Create a file named
installand add the following content: - Build the agent binary on a Linux based instance using the following commands:
- Create a file named
startup.shfor the entry point and add the following content: - Create a file named
Docker-eksand add the following content: - Build and publish the image using the following commands:
kubectl get daemonset eks-pod-identity-agent -n kube-system
When successful, your private Amazon ECR repo will display the published image.
Create the secret
With the image successfully published, you’re ready to create the secret.
- Create a secret in Secrets Manager by using the AWS CLI to enter the following command in a terminal.
- You should see an output like the following:
- Record the secret Amazon Resource Name (ARN) to use in the next section.
Create the IAM role
The Amazon EKS application needs an IAM role that grants permission to retrieve the secret you just created.
To create the IAM role:
1. Using an editor, create a file named eks_iam_policy.json with the following content:
2. Enter the following command in a terminal to create the IAM role:
aws iam create-role --role-name eks-secrets-manager-role\
--assume-role-policy-document file://eks_iam_policy.json
3. Create a file named iam_permission.json with the following content, replacing <SECRET_ARN> with the secret ARN you noted earlier:
4. Enter the following command to create a policy:
aws iam create-policy \
--policy-name get-secret-policy \
--policy-document file://iam_permission.json
5. Record the policy ARN to use in the next step.
6. Enter the following command to add this policy to the IAM role, replacing <POLICY_ARN> with the value you just noted:
aws iam attach-role-policy \
--role-name eks-secrets-manager-role \
--policy-arn <POLICY_ARN>
Configure the application and deploy Secrets Manager Agent to Amazon EKS
Here is the sample Kubernetes deployment YAML for installing the Secrets Manager Agent as a sidecar container along with an application container. Replace <ACCOUNT_ID> with your AWS account number and run the code to deploy the NGINX application to the Amazon EKS cluster.
If successful, the pod will run with two active containers.
Retrieve the secret
Now you can run the following command to use the local web server to retrieve the agent. kubectl exec into the app container to retrieve the secret with a REST API call from the web server.
kubectl exec -it nginx-with-secrets-c7945f8dc-7hrzr -c nginx -- sh
curl -v -H “X-Aws-Parameters-Secrets-Token: $(cat
/var/run/awssmatoken)”
‘http://localhost:2773/secretsmanager/get?secretId=<SecretID>'
You should see a Success 200 message and the secret value if IAM permissions are configured correctly.
Clean up
Run the following cleanup script to delete the resources created for the solution:
bash
chmod +x cleanup.sh
./cleanup.sh
When done, you can check the file named cleanup.sh in the repo to verify that the cleanup was successful:
Conclusion
In this post, we showed you how to deploy the AWS Secrets Manager Agent as a sidecar container in Amazon EKS. This approach provides a language-agnostic way to retrieve secrets through HTTP calls, reducing SDK dependencies while maintaining security through SSRF protection and IAM-based access controls.
The Secrets Manager Agent can be deployed as either a sidecar container or DaemonSet. Use sidecar deployment for isolated secrets and fine-grained security boundaries and use DaemonSet deployment for shared secrets across multiple applications with optimized resource utilization.
This approach complements existing secret management patterns and provides teams with HTTP-based secret access, immediate refresh control, and consistent interfaces across AWS compute environments.
To learn more, visit the AWS Secrets Manager documentation.
If you have feedback about this post, submit comments in the Comments section below. If you have questions about this post, contact AWS Support.