1.基本介绍
什么是 Notifications API?Notifications API 是亚马逊 SP-API 中基于事件驱动,依托于 Amazon 的 SQS 服务(Simple Queue Service),基于 MQ 实现的通知 API 接口。使用 Notifications API,您可以创建接收通知、订阅通知、删除通知订阅等操作。当事件触发您订阅的通知时,您的应用程序可以直接从 Amazon 接收信息,而不再需要进行轮询,这样做可有效减少 SP-API 各个接口的轮询次数, 并拥有更高的实时性。
截止目前,SP-API 中提供的 Notification Type (消息类型)如下:
| Notification Type |
Description |
| ACCOUNT_STATUS_CHANGED |
每当开发人员订阅的Marketplace对应的Seller帐户状态发生变化时发送。每当商家的帐户状态在 NORMAL、AT_RISK 和 DEACTIVATED 之间变化时,都会发布通知。 |
| ANY_OFFER_CHANGED |
每当前 20 个报价中的任何一个发生变化时发送,按条件(新的或旧的),或者如果卖家列出的商品的外部价格(来自其他零售商的价格)发生变化。 |
| B2B_ANY_OFFER_CHANGED |
每当前 20 名 B2B 报价发生变化时发送,以卖方列出的商品的任何价格变化(单件或数量折扣等级价格)的形式发送。 |
| FBA_OUTBOUND_SHIPMENT_STATUS |
每当亚马逊为卖家创建或取消亚马逊物流货件时发送。 |
| FEE_PROMOTION |
当促销活动开始时发送。 |
| FEED_PROCESSING_FINISHED |
每当使用 Selling Partner API for Feeds 提交的任何 Feed 达到 DONE、CANCELLED 或 FATAL 的 Feed 处理状态时发送。 |
| FULFILLMENT_ORDER_STATUS |
多渠道配送订单状态发生变化时发送。 |
| MFN_ORDER_STATUS_CHANGE |
MFN 订单可用性状态发生变化时发送。 |
| ORDER_STATUS_CHANGE |
每当订单可用性状态发生变化时发送。 |
| REPORT_PROCESSING_FINISHED |
每当您使用 Selling Partner API for Reports 请求的任何报告达到 DONE、CANCELLED 或 FATAL 的报告处理状态时发送。 |
| PRICING_HEALTH |
每当卖家的报价因为没有竞争力而失去资格成为Buy Box时发送。 |
Reference:
https://developer-docs.amazon.com/sp-api/docs/notifications-api-v1-use-case-guide#notificationtype
2. 使用教程详解
接下来,我们带给大家 Notifications API 与 SQS 结合使用的详细教程。
Step 1 创建 SQS
登录亚马逊控制台,进入 Amazon SQS 服务页面
1.1 创建队列

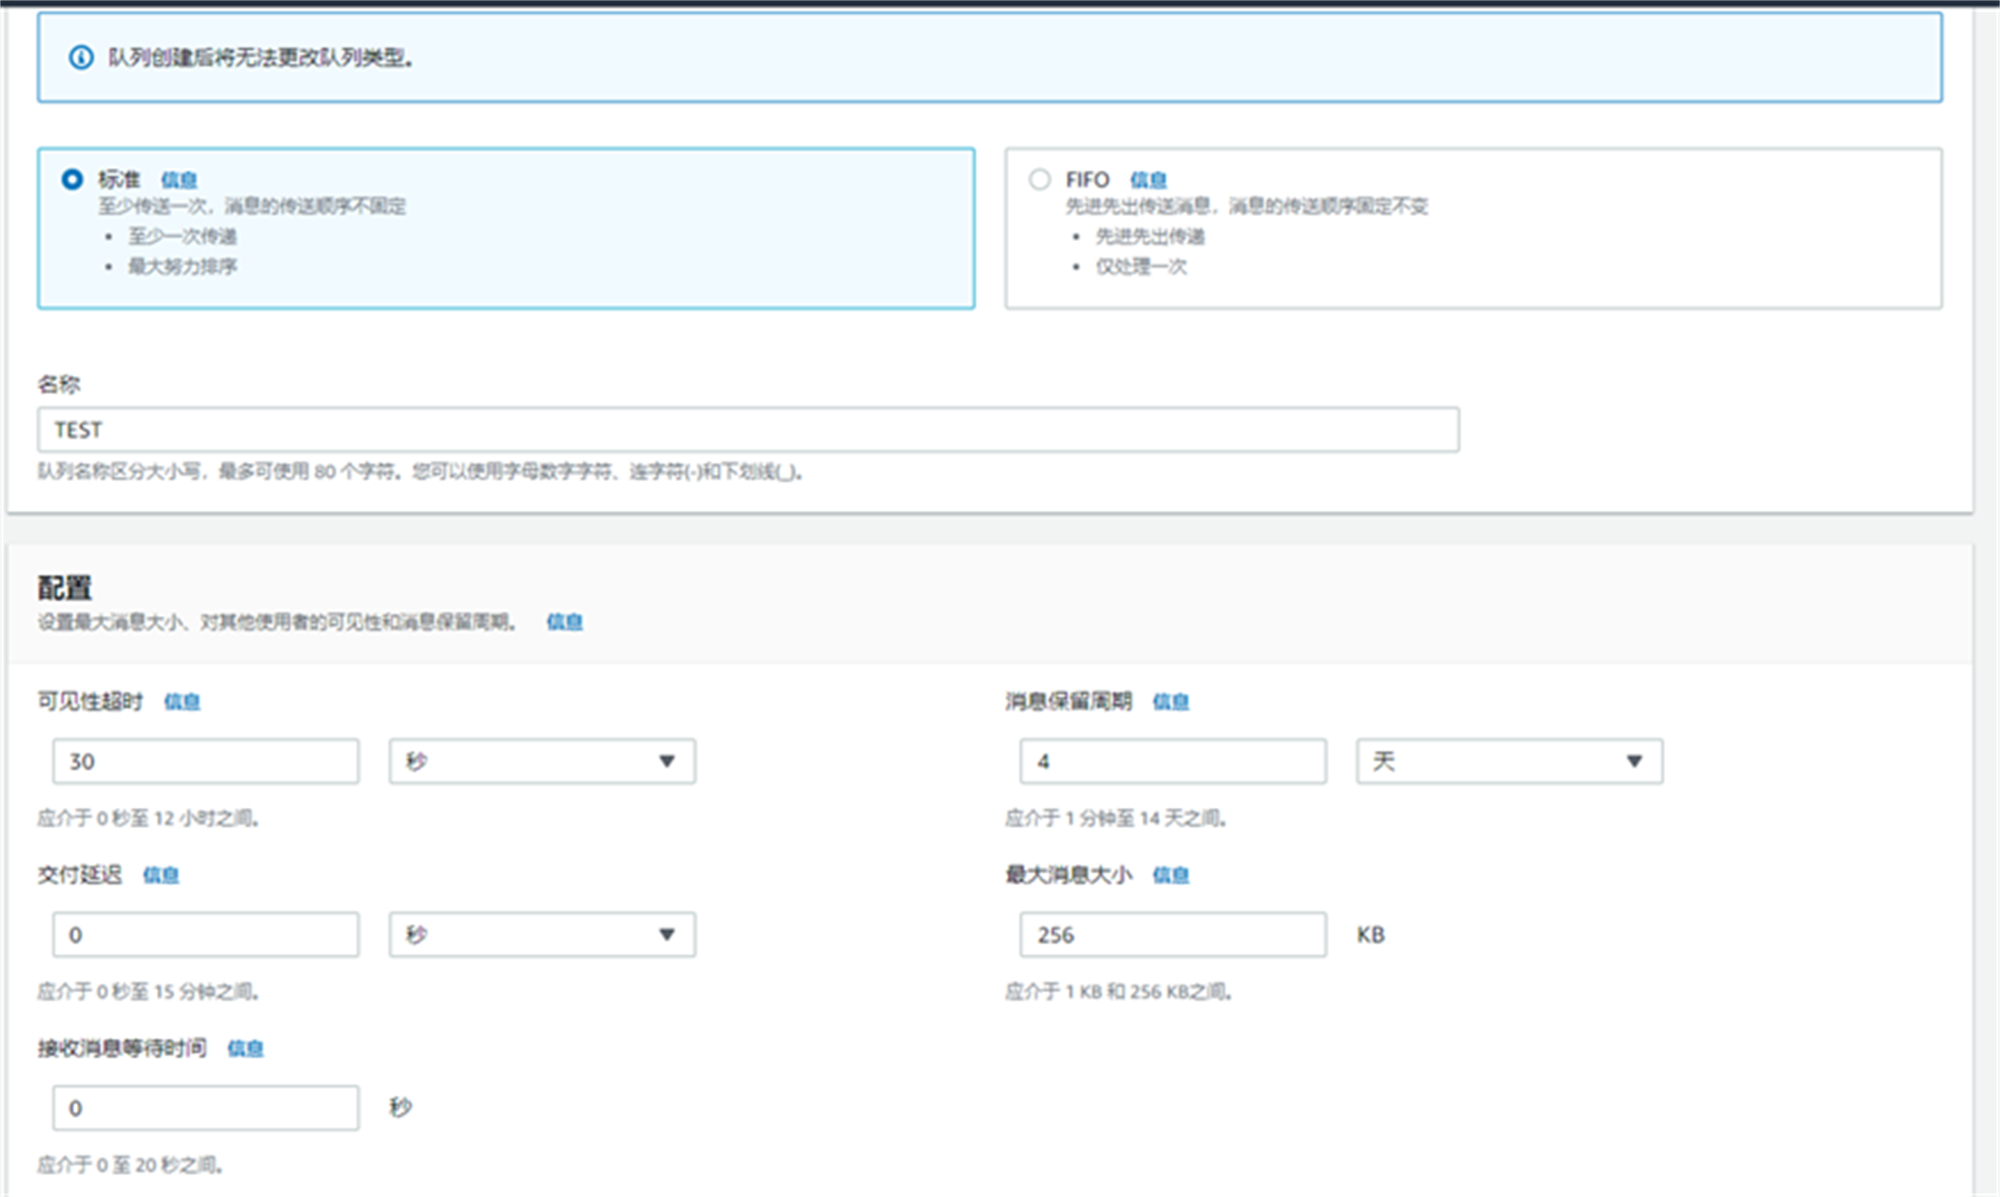
1.2 设置队列的基本属性
根据需求配置队列属性

1.3 设置队列的默认访问策略
访问策略选择默认,创建结束后再修改

STEP 2 配置 SQS (允许 Amazon 发送消息)
2.1 编辑队列
在队列创建完成后,记录 arn,并点击编辑

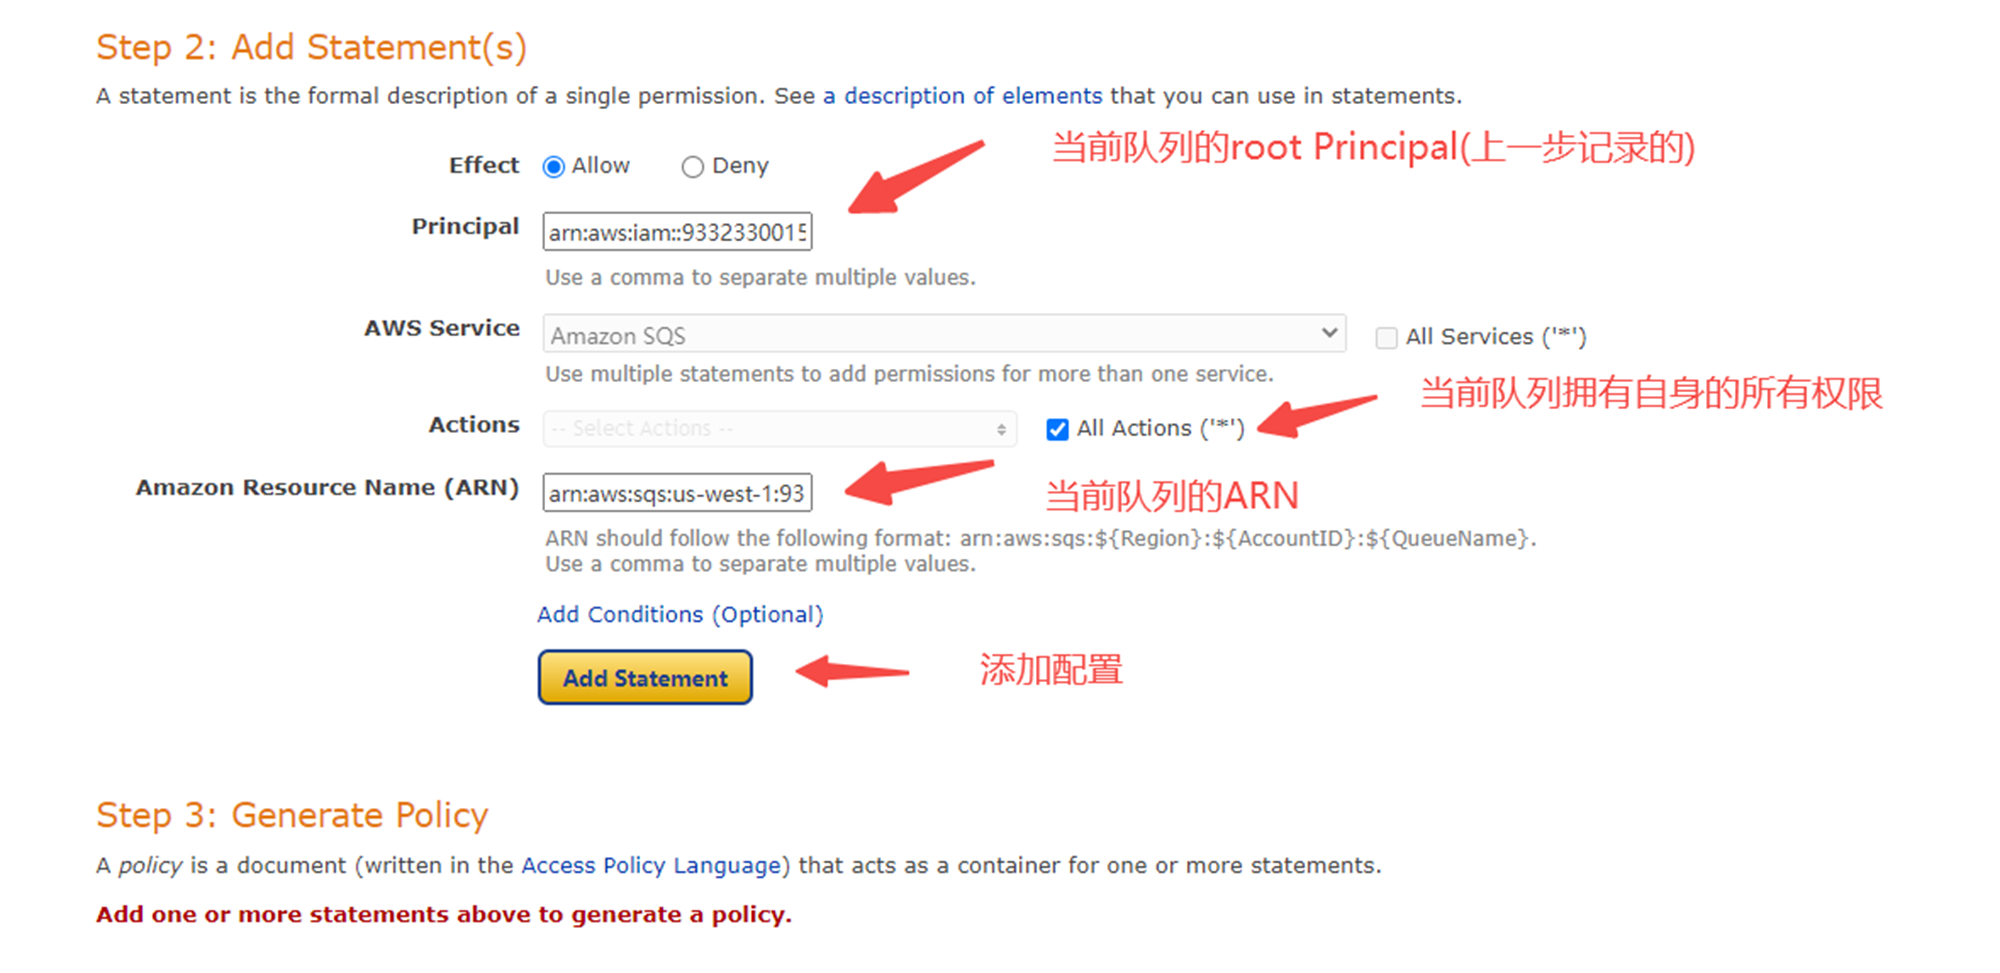
2.2 修改策略
记录当前队列的 root Principal,点击策略生成器(此时,我们已经拿到了自身的 ARN,和自身的 Principal)

2.3 自身拥有队列的所有权限

2.4 Amazon 拥有 GetQueueAttributes 和 SendMessage 权限
Amazon 的为 Principal (固定的): arn:aws:iam::437568002678:root

具体操作如下:

2.5 生成配置

2.6 复制配置 JSON

2.7 替换配置 JSON

2.8 点击保存
至此,我们拥有了一个队列,并且,该队列允许亚马逊发送消息,开发者账号拥有该队列所有权限。
STEP 3 监听队列
如果您是 Java 开发者,这里可以依赖 Spring boot,使用 JMS 监听队列。
3.1 POM 依赖
<dependency>
   <groupId>org.springframework</groupId>
   <artifactId>spring-jms</artifactId>
</dependency>
<dependency>
   <groupId>com.amazonaws</groupId>
   <artifactId>amazon-sqs-java-messaging-lib</artifactId>
   <version>1.0.0</version>
   <type>jar</type>
</dependency>
<dependency>
   <groupId>com.amazonaws</groupId>
   <artifactId>aws-java-sdk-sqs</artifactId>
   <version>1.11.943</version>
</dependency>
3.2 监听代码
@Component
@Slf4j
public class SqsConsumer {
    @JmsListener(destination = "SQS名称", containerFactory = "listenerContainerFactory")
    public void consumer(SQSTextMessage sqsTestMessage) throws Exception {
        String text = sqsTestMessage.getText();
        log.info("接收到SQS通知:{}", text);
  }
}
3.3 listenerContainerFactory
@Bean
public SQSConnectionFactory connectionFactory() {
  SQSConnectionFactory sqsConnectionFactory = SQSConnectionFactory.builder()
    // amazonPropertiesConfig 为 AWSCredentialsProvider的实现类实例, 提供 AWSCredentials 即可
    .withAWSCredentialsProvider(amazonPropertiesConfig)
    // sqs所在地区 在endpoint中可以找到,如: us-west-1
    .withRegionName(amazonPropertiesConfig.getSqsRegion())
    // sqs地址 配置页中的地址 https://sqs.us-west-1.amazonaws.com/xxxxxxxx/TEST
    .withEndpoint(amazonPropertiesConfig.getSqsEndpoint())
    .build();
  return sqsConnectionFactory;
}
@Bean
public DefaultJmsListenerContainerFactory listenerContainerFactory(SQSConnectionFactory connectionFactory) {
  DefaultJmsListenerContainerFactory factory = new DefaultJmsListenerContainerFactory();
  factory.setConnectionFactory(connectionFactory);
  factory.setDestinationResolver(new DynamicDestinationResolver());
  //开启多少线程
  factory.setConcurrency("10-20");
  //开启自动确认
  factory.setSessionAcknowledgeMode(Session.CLIENT_ACKNOWLEDGE);
  return factory;
}
STEP 4 订阅消息
4.1 创建 createDestination
注意:
在请求参数中: resourceSpecification下的 SQS 和 EventBridge 只能二选一,并且必须选一个,在 SQS 中,我们填写 SQS 即可。
createDesition 是一种无授权操作,与卖家身份无关,调用 createDestination 时,可以不用显式地获得 Selling Partner 的授权。由于 Destination 是开发者的内容,与卖家没有关系,因此,在 Client 对象的创建上,不用 refresh token 的方式,而是使用 scope 模式,scope = “sellingpartnerapi::notifications”
LWAClientScopes lwaClientScopes = new LWAClientScopes(new HashSet<>());
  lwaClientScopes.getScopes().add("sellingpartnerapi::notifications");
  LWAAuthorizationCredentials lwaAuthorizationCredentials = LWAAuthorizationCredentials.builder()
    .clientId(clientId())
    .clientSecret(clientSecret())
    .scopes(lwaClientScopes)
    .endpoint(authUrl())
    .build();
createDestination 示例代码:
public CreateDestinationResponse createDestination(String marketplaceId, CreateDestinationDTO createDestinationDTO) throws ApiException {
  NotificationsApi notificationsApi = getNotificationsApi(marketplaceId);
  DestinationResourceSpecification destinationResourceSpecification = new DestinationResourceSpecification();
  SqsResource sqsResource = new SqsResource();
  sqsResource.setArn(createDestinationDTO.getArn());
  destinationResourceSpecification.setSqs(sqsResource);
  CreateDestinationRequest body = new CreateDestinationRequest();
  body.setResourceSpecification(destinationResourceSpecification);
  body.setName(createDestinationDTO.getDestinationName());
  return notificationsApi.createDestination(body);
}
@Data
public class CreateDestinationDTO {
    //sqs详情页中可以找到改值
    private String arn;
    private String destinationName;
    //sqs详情页中可以找到改值
    private String sqsName;
}
请求体参数示例:
{
  "resourceSpecification": {
    "sqs": {
      "arn": "arn:aws:sqs:us-west-1:xxxxxxxx:TEST"
    }
  },
  "name": "testDestination"
}
返回值示例:
{
  "payload": {
    "name": "testDestination",
    "destinationId": "2d6eee67-23e9-40fe-destinationId",
    "resource": {
      "sqs": {
        "arn": "arn:aws:sqs:us-west-1:xxxxxxxx:TEST"
      }
    }
  }
}
需要记录下返回结果中的: destinationId
4.2 根据 Destination 创建订阅
注意:
一个卖家的一种消息类型,只能订阅一个 Destination
在 SP-API 的权限设计中此时,操作与卖家有关,需要使用卖家的授权进行访问。
LWAAuthorizationCredentials lwaAuthorizationCredentials = LWAAuthorizationCredentials.builder()
    .clientId(clientId)
    .clientSecret(clientSecret)
    .refreshToken(spAuthToken)
    .endpoint(authUrl)
    .build();
createSubscription 示例代码:
public CreateSubscriptionResponse createSubscription(String destinationId, NotificationTypeEnum notificationType,String spAuthToken) throws ApiException {
   NotificationsApi notificationsApi = getNotificationsApi(spAuthToken);
   CreateSubscriptionRequest request = new CreateSubscriptionRequest();
   request.setDestinationId(destinationId);
   request.setPayloadVersion("1.0");
   return notificationsApi.createSubscription(request, notificationType.name());
}
请求参数示例:
url:
 /notifications/v1/subscriptions/REPORT_PROCESSING_FINISHED
body:
{
  "payloadVersion": "1.0",
  "destinationId": "2d6eee67-23e9-40fe-destinationId"
}
返回值示例:
{
  "payload": {
    "subscriptionId":"7ca3572b-2130-41eb-subscriptionId",
    "payloadVersion":"1.0",
    "destinationId": "2d6eee67-23e9-40fe-destinationId",
  }
}
至此,已经完成了所有准备工作,耐心等待Amazon 触发相关类型的消息即可。
STEP 5 监听消息
5.1 接收通知数据
SP-API的返回通知数据结构采用 JSON 格式。每个通知都包含一个 Payload 对象,其中包含通知的可操作数据。Notification Type 与 PayloadVersion 一起确定 Payload 对象的结构。
REPORT_PROCESSING_FINISHED notification 示例:
{
  "notificationVersion": "2020-09-04",
  "notificationType": "REPORT_PROCESSING_FINISHED",
  "payloadVersion": "1.0",
  "eventTime": "2022-02-10T03:05:00.197Z",
  "payload": {
    "reportProcessingFinishedNotification": {
      "sellerId": "A2BAZU3******",
      "reportId": "34997*********",
      "reportType": "GET_FLAT_FILE_VAT_INVOICE_DATA_REPORT",
      "processingStatus": "DONE",
      "reportDocumentId": "amzn1.tortuga.********************************************"
    }
  },
  "notificationMetadata": {
    "applicationId": "amzn1.sellerapps.app.********************",
    "subscriptionId": "36df6577-33c7-********************",
    "publishTime": "2022-02-18T03:05:00.230Z",
    "notificationId": "0cbae32d-222f-********************"
  }
}
FEED_PROCESSING_FINISHED notification 示例:
{
  "notificationVersion": "2020-09-04",
  "notificationType": "FEED_PROCESSING_FINISHED",
  "payloadVersion": "1.0",
  "eventTime": "2022-02-11T08:46:38.498Z",
  "payload": {
    "feedProcessingFinishedNotification": {
      "sellerId": "A2EW6******",
      "feedId": "625004******",
      "feedType": "POST_ORDER_FULFILLMENT_DATA",
      "processingStatus": "DONE",
      "resultFeedDocumentId": "amzn1.tortuga.********************************************"
    }
  },
  "notificationMetadata": {
    "applicationId": "amzn1.sellerapps.app.**************************",
    "subscriptionId": "4d5b53b4-66ad-4ee0-***************",
    "publishTime": "2022-02-18T08:46:39.950Z",
    "notificationId": "188fea65-74da-4fce-***************"
  }
}
ORDER_STATUS_CHANGE notification 示例:
{
  "NotificationVersion": "1.0",
  "NotificationType": "ORDER_STATUS_CHANGE",
  "PayloadVersion": "1.0",
  "EventTime": "2022-01-13T19:42:04.284Z",
  "Payload":
  {
    "OrderNotification":
    {
      "SellerId": "A2EW6******",
      "AmazonOrderId": "333-7777777-7777777",
      "PurchaseDate": 1595882000633,
      "OrderStatus": "PROCESSED",
      "DestinationPostalCode": "48110",
      "SupplySourceId": "SSID39485",
      "OrderItemId": "OIID34853450",
      "SellerSKU": "SellerSKUID1",
      "Quantity": 45
    }
  },
  "NotificationMetadata":
  {
    "ApplicationId": "app-id-d0e9e693-c3ad-4373-979f-ed4ec98dd746",
    "SubscriptionId": "subscription-id-d0e9e693-c3ad-4373-979f-ed4ec98dd746",
    "PublishTime": "2022-01-13T19:42:04.284Z",
    "NotificationId": "d0e9e693-c3ad-4373-979f-ed4ec98dd746"
  }
}
其他通知类型的数据接口请参考 reference:
https://developer-docs.amazon.com/sp-api/docs/notifications-api-v1-use-case-guide#notification-structure
5.2 处理队列中的消息
为了正确处理通知,您需要了解 Amazon SQS 队列的几个重要属性:
- SP-API 不支持分发到 FIFO 队列。您必须使用 Amazon SQS 标准队列来接收通知。
- SP-API 标准队列不保证将按照发送顺序接收通知。标准队列提供尽力而为的排序,这意味着通知通常以与发送时相同的顺序传递。但是,有时多份通知的副本可能会乱序传送。因此,您需要将您的应用程序设计为以任何顺序接受通知。
- Amazon SQS 标准队列通知可能会发送多次。Amazon SQS 将通知副本存储在多台服务器上,以实现冗余和高可用性。在极少数情况下,当您收到或删除通知时,其中一个存储通知副本的服务器可能不可用。如果发生这种情况,通知副本不会在该不可用服务器上删除,并且您可能会在收到通知时再次获得该通知副本。因此,您需要将您的应用程序设计为接受任何给定通知的多个副本。
您可以通过查看通知的属性来确定通知是否与您已收到的通知重复。您可以在通知的对象中找到该属性例如:notificationId,NotificationMetaData。
本系列文章
如何对接亚马逊电商Selling Partner API
创建 SP-API 第三方登录应用并完成 API Call
SP-API 中 Notifications API 结合 Amazon EventBridge 使用的详细教程
本篇作者