AWS Compute Blog
Building a Multi-region Serverless Application with Amazon API Gateway and AWS Lambda
Solution overview
Currently, the default API endpoint type in API Gateway is the edge-optimized API endpoint, which enables clients to access an API through an Amazon CloudFront distribution. This typically improves connection time for geographically diverse clients. By default, a custom domain name is globally unique and the edge-optimized API endpoint would invoke a Lambda function in a single region in the case of Lambda integration. You can’t use this type of endpoint with a Route 53 active-active setup and fail-over.
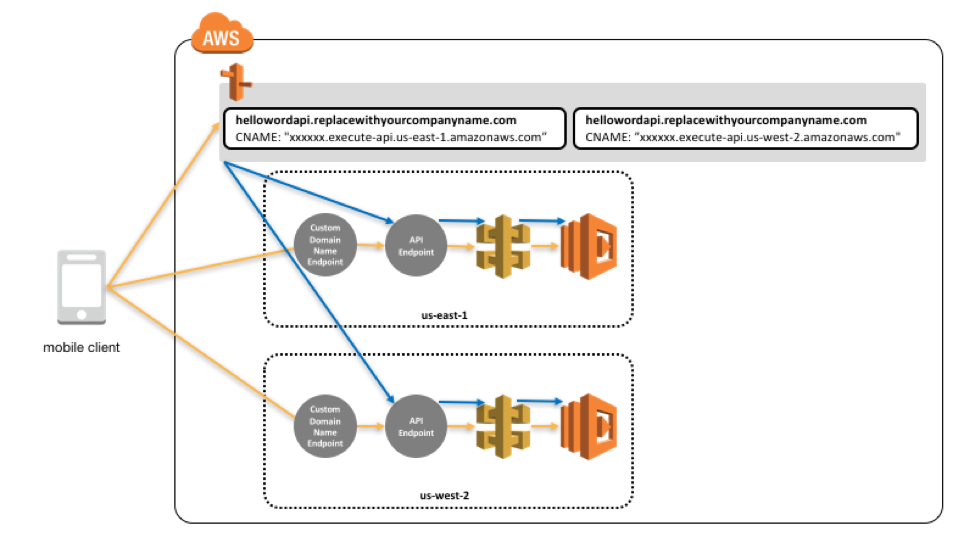
The new regional API endpoint in API Gateway moves the API endpoint into the region and the custom domain name is unique per region. This makes it possible to run a full copy of an API in each region and then use Route 53 to use an active-active setup and failover. The following diagram shows how you do this:

- Deploy your Rest API stack, consisting of API Gateway and Lambda, in two regions, such as us-east-1 and us-west-2.
- Choose the regional API endpoint type for your API.
- Create a custom domain name and choose the regional API endpoint type for that one as well. In both regions, you are configuring the custom domain name to be the same, for example, helloworldapi.replacewithyourcompanyname.com
- Use the host name of the custom domain names from each region, for example, xxxxxx.execute-api.us-east-1.amazonaws.com and xxxxxx.execute-api.us-west-2.amazonaws.com, to configure record sets in Route 53 for your client-facing domain name, for example, helloworldapi.replacewithyourcompanyname.com
The above solution provides an active-active setup for your API across the two regions, but you are not doing failover yet. For that to work, set up a health check in Route 53:
A Route 53 health check must have an endpoint to call to check the health of a service. You could do a simple ping of your actual Rest API methods, but instead provide a specific method on your Rest API that does a deep ping. That is, it is a Lambda function that checks the status of all the dependencies.
In the case of the Hello World API, you don’t have any other dependencies. In a real-world scenario, you could check on dependencies as databases, other APIs, and external dependencies. Route 53 health checks themselves cannot use your custom domain name endpoint’s DNS address, so you are going to directly call the API endpoints via their region unique endpoint’s DNS address.
Walkthrough
The following sections describe how to set up this solution. You can find the complete solution at the blog-multi-region-serverless-service GitHub repo. Clone or download the repository locally to be able to do the setup as described.
Prerequisites
You need the following resources to set up the solution described in this post:
- AWS CLI
- An S3 bucket in each region in which to deploy the solution, which can be used by the AWS Serverless Application Model (SAM). You can use the following CloudFormation templates to create buckets in us-east-1 and us-west-2:
- us-east-1:

- us-west-2:
- us-east-1:
- A hosted zone registered in Amazon Route 53. This is used for defining the domain name of your API endpoint, for example, helloworldapi.replacewithyourcompanyname.com. You can use a third-party domain name registrar and then configure the DNS in Amazon Route 53, or you can purchase a domain directly from Amazon Route 53.
Deploy API with health checks in two regions
Start by creating a small “Hello World” Lambda function that sends back a message in the region in which it has been deployed.
"""Return message."""
import logging

logging.basicConfig()
logger = logging.getLogger()
logger.setLevel(logging.INFO)

def lambda_handler(event, context):
    """Lambda handler for getting the hello world message."""

    region = context.invoked_function_arn.split(':')[3]

    logger.info("message: " + "Hello from " + region)

    return {
		"message": "Hello from " + region
    }
Also create a Lambda function for doing a health check that returns a value based on another environment variable (either “ok” or “fail”) to allow for ease of testing:
"""Return health."""
import logging
import os

logging.basicConfig()
logger = logging.getLogger()
logger.setLevel(logging.INFO)

def lambda_handler(event, context):
    """Lambda handler for getting the health."""

    logger.info("status: " + os.environ['STATUS'])

    return {
		"status": os.environ['STATUS']
    }
Deploy both of these using an AWS Serverless Application Model (SAM) template. SAM is a CloudFormation extension that is optimized for serverless, and provides a standard way to create a complete serverless application. You can find the full helloworld-sam.yaml template in the blog-multi-region-serverless-service GitHub repo.
A few things to highlight:
- You are using inline Swagger to define your API so you can substitute the current region in the x-amazon-apigateway-integration section.
- Most of the Swagger template covers CORS to allow you to test this from a browser.
- You are also using substitution to populate the environment variable used by the “Hello World” method with the region into which it is being deployed.
The Swagger allows you to use the same SAM template in both regions.
You can only use SAM from the AWS CLI, so do the following from the command prompt. First, deploy the SAM template in us-east-1 with the following commands, replacing “<your bucket in us-east-1>” with a bucket in your account:
> cd helloworld-api
> aws cloudformation package --template-file helloworld-sam.yaml --output-template-file /tmp/cf-helloworld-sam.yaml --s3-bucket <your bucket in us-east-1> --region us-east-1
> aws cloudformation deploy --template-file /tmp/cf-helloworld-sam.yaml --stack-name multiregionhelloworld --capabilities CAPABILITY_IAM --region us-east-1
Second, do the same in us-west-2:
> aws cloudformation package --template-file helloworld-sam.yaml --output-template-file /tmp/cf-helloworld-sam.yaml --s3-bucket <your bucket in us-west-2> --region us-west-2
> aws cloudformation deploy --template-file /tmp/cf-helloworld-sam.yaml --stack-name multiregionhelloworld --capabilities CAPABILITY_IAM --region us-west-2
The API was created with the default endpoint type of Edge Optimized. Switch it to Regional. In the Amazon API Gateway console, select the API that you just created and choose the wheel-icon to edit it.

In the edit screen, select the Regional endpoint type and save the API. Do the same in both regions.
Grab the URL for the API in the console by navigating to the method in the prod stage.

You can now test this with curl:
> curl https://2wkt1cxxxx.execute-api.us-west-2.amazonaws.com/prod/helloworld
{"message": "Hello from us-west-2"}
Write down the domain name for the URL in each region (for example, 2wkt1cxxxx.execute-api.us-west-2.amazonaws.com), as you need that later when you deploy the Route 53 setup.
Create the custom domain name
Next, create an Amazon API Gateway custom domain name endpoint. As part of using this feature, you must have a hosted zone and domain available to use in Route 53 as well as an SSL certificate that you use with your specific domain name.
You can create the SSL certificate by using AWS Certificate Manager. In the ACM console, choose Get started (if you have no existing certificates) or Request a certificate. Fill out the form with the domain name to use for the custom domain name endpoint, which is the same across the two regions:

Go through the remaining steps and validate the certificate for each region before moving on.
You are now ready to create the endpoints. In the Amazon API Gateway console, choose Custom Domain Names, Create Custom Domain Name.

A few things to highlight:
- The domain name is the same as what you requested earlier through ACM.
- The endpoint configuration should be regional.
- Select the ACM Certificate that you created earlier.
- You need to create a base path mapping that connects back to your earlier API Gateway endpoint. Set the base path to v1 so you can version your API, and then select the API and the prod stage.
Choose Save. You should see your newly created custom domain name:

Note the value for Target Domain Name as you need that for the next step. Do this for both regions.
Deploy Route 53 setup
Use the global Route 53 service to provide DNS lookup for the Rest API, distributing the traffic in an active-active setup based on latency. You can find the full CloudFormation template in the blog-multi-region-serverless-service GitHub repo.
The template sets up health checks, for example, for us-east-1:
HealthcheckRegion1:
  Type: "AWS::Route53::HealthCheck"
  Properties:
    HealthCheckConfig:
      Port: "443"
      Type: "HTTPS_STR_MATCH"
      SearchString: "ok"
      ResourcePath: "/prod/healthcheck"
      FullyQualifiedDomainName: !Ref Region1HealthEndpoint
      RequestInterval: "30"
      FailureThreshold: "2"
Use the health check when you set up the record set and the latency routing, for example, for us-east-1:
Region1EndpointRecord:
  Type: AWS::Route53::RecordSet
  Properties:
    Region: us-east-1
    HealthCheckId: !Ref HealthcheckRegion1
    SetIdentifier: "endpoint-region1"
    HostedZoneId: !Ref HostedZoneId
    Name: !Ref MultiregionEndpoint
    Type: CNAME
    TTL: 60
    ResourceRecords:
      - !Ref Region1Endpoint
You can create the stack by using the following link, copying in the domain names from the previous section, your existing hosted zone name, and the main domain name that is created (for example, hellowordapi.replacewithyourcompanyname.com):
The following screenshot shows what the parameters might look like:

Specifically, the domain names that you collected earlier would map according to following:
- The domain names from the API Gateway “prod”-stage go into Region1HealthEndpoint and Region2HealthEndpoint.
- The domain names from the custom domain name’s target domain name goes into Region1Endpoint and Region2Endpoint.
Using the Rest API from server-side applications
You are now ready to use your setup. First, demonstrate the use of the API from server-side clients. You can demonstrate this by using curl from the command line:
> curl https://hellowordapi.replacewithyourcompanyname.com/v1/helloworld/
{"message": "Hello from us-east-1"}
Testing failover of Rest API in browser
Here’s how you can use this from the browser and test the failover. Find all of the files for this test in the browser-client folder of the blog-multi-region-serverless-service GitHub repo.
Use this html file:
<!DOCTYPE HTML>
<html>
<head>
    <meta charset="utf-8"/>
    <meta http-equiv="X-UA-Compatible" content="IE=edge"/>
    <meta name="viewport" content="width=device-width, initial-scale=1"/>
    <title>Multi-Region Client</title>
</head>
<body>
<div>
   <h1>Test Client</h1>

    <p id="client_result">

    </p>

    <script src="https://ajax.googleapis.com/ajax/libs/jquery/1.11.3/jquery.min.js"></script>
    <script src="settings.js"></script>
    <script src="client.js"></script>
</body>
</html>
The html file uses this JavaScript file to repeatedly call the API and print the history of messages:
var messageHistory = "";

(function call_service() {

   $.ajax({
      url: helloworldMultiregionendpoint+'v1/helloworld/',
      dataType: "json",
      cache: false,
      success: function(data) {
         messageHistory+="<p>"+data['message']+"</p>";
         $('#client_result').html(messageHistory);
      },
      complete: function() {
         // Schedule the next request when the current one's complete
         setTimeout(call_service, 10000);
      },
      error: function(xhr, status, error) {
         $('#client_result').html('ERROR: '+status);
      }
   });

})();
Also, make sure to update the settings in settings.js to match with the API Gateway endpoints for the DNS-proxy and the multi-regional endpoint for the Hello World API: var helloworldMultiregionendpoint = "https://hellowordapi.replacewithyourcompanyname.com/";
You can now open the HTML file in the browser (you can do this directly from the file system) and you should see something like the following screenshot:

You can test failover by changing the environment variable in your health check Lambda function. In the Lambda console, select your health check function and scroll down to the Environment variables section. For the STATUS key, modify the value to fail.

You should see the region switch in the test client:

During an emulated failure like this, the browser might take some additional time to switch over due to connection keep-alive functionality. If you are using a browser like Chrome, you can kill all the connections to see a more immediate fail-over: chrome://net-internals/#sockets
Summary
You have implemented a simple way to do multi-regional serverless applications that fail over seamlessly between regions, either being accessed from the browser or from other applications/services. You achieved this by using the capabilities of Amazon Route 53 to do latency based routing and health checks for fail-over. You unlocked the use of these features in a serverless application by leveraging the new regional endpoint feature of Amazon API Gateway.
The setup was fully scripted using CloudFormation, the AWS Serverless Application Model (SAM), and the AWS CLI, and it can be integrated into deployment tools to push the code across the regions to make sure it is available in all the needed regions. For more information about cross-region deployments, see Building a Cross-Region/Cross-Account Code Deployment Solution on AWS on the AWS DevOps blog.