Module 5: Finalize Pipeline and Test
Introduction
Implementation
Create review stage in pipeline
Open the AWS CodePipeline console.
You should see the pipeline we created in Module 4, which was called Pipeline-DevOpsGettingStarted. Select this pipeline.
Choose the white Edit button near the top of the page.
Choose the white Add stage button between the Build and Deploy stages.
In the Stage name field, enter Review.
Choose the orange Add stage button.
In the Review stage, choose the white Add action group button.
Under Action name, enter Manual_Review.
From the Action provider dropdown, select Manual approval.
Confirm that the optional fields have been left blank.
Choose the orange Done button.
Choose the orange Save button at the top of the page.
Choose the orange Save button to confirm the changes. You will now see your pipeline with four stages: Source, Build, Review, and Deploy.
Push a new commit to your repo
In your favorite code editor, open the app.js file from Module 1.
Change the message in Line 5.
Save the file.
Open your preferred Git client.
Navigate to the folder created in Module 1.
Commit the change with the following commands:
git add app.js git commit -m "Full pipeline test"Push the local changes to the remote repo hosted on GitHub with the following command:
git push
Monitor the pipeline and manually approve the change
Navigate to the AWS CodePipeline console.
Select the pipeline named Pipeline-DevOpsGettingStarted. You should see the Source and Build stages switch from blue to green.
When the Review stage switches to blue, choose the white Review button.
Write an approval comment in the Comments textbox.
Choose the orange Approve button.
Wait for the Review and Deploy stages to switch to green.
Select the AWS Elastic Beanstalk link in the Deploy stage. A new tab listing your Elastic Beanstalk environments will open.
Select the URL in the Devopsgettingstarted-env row. You should see a webpage with a white background and the text you had in your most recent GitHub commit.
Congratulations!
You successfully built a continuous delivery pipeline on AWS! As a great next step, dive deeper into specific AWS technologies and take your application to the next level.
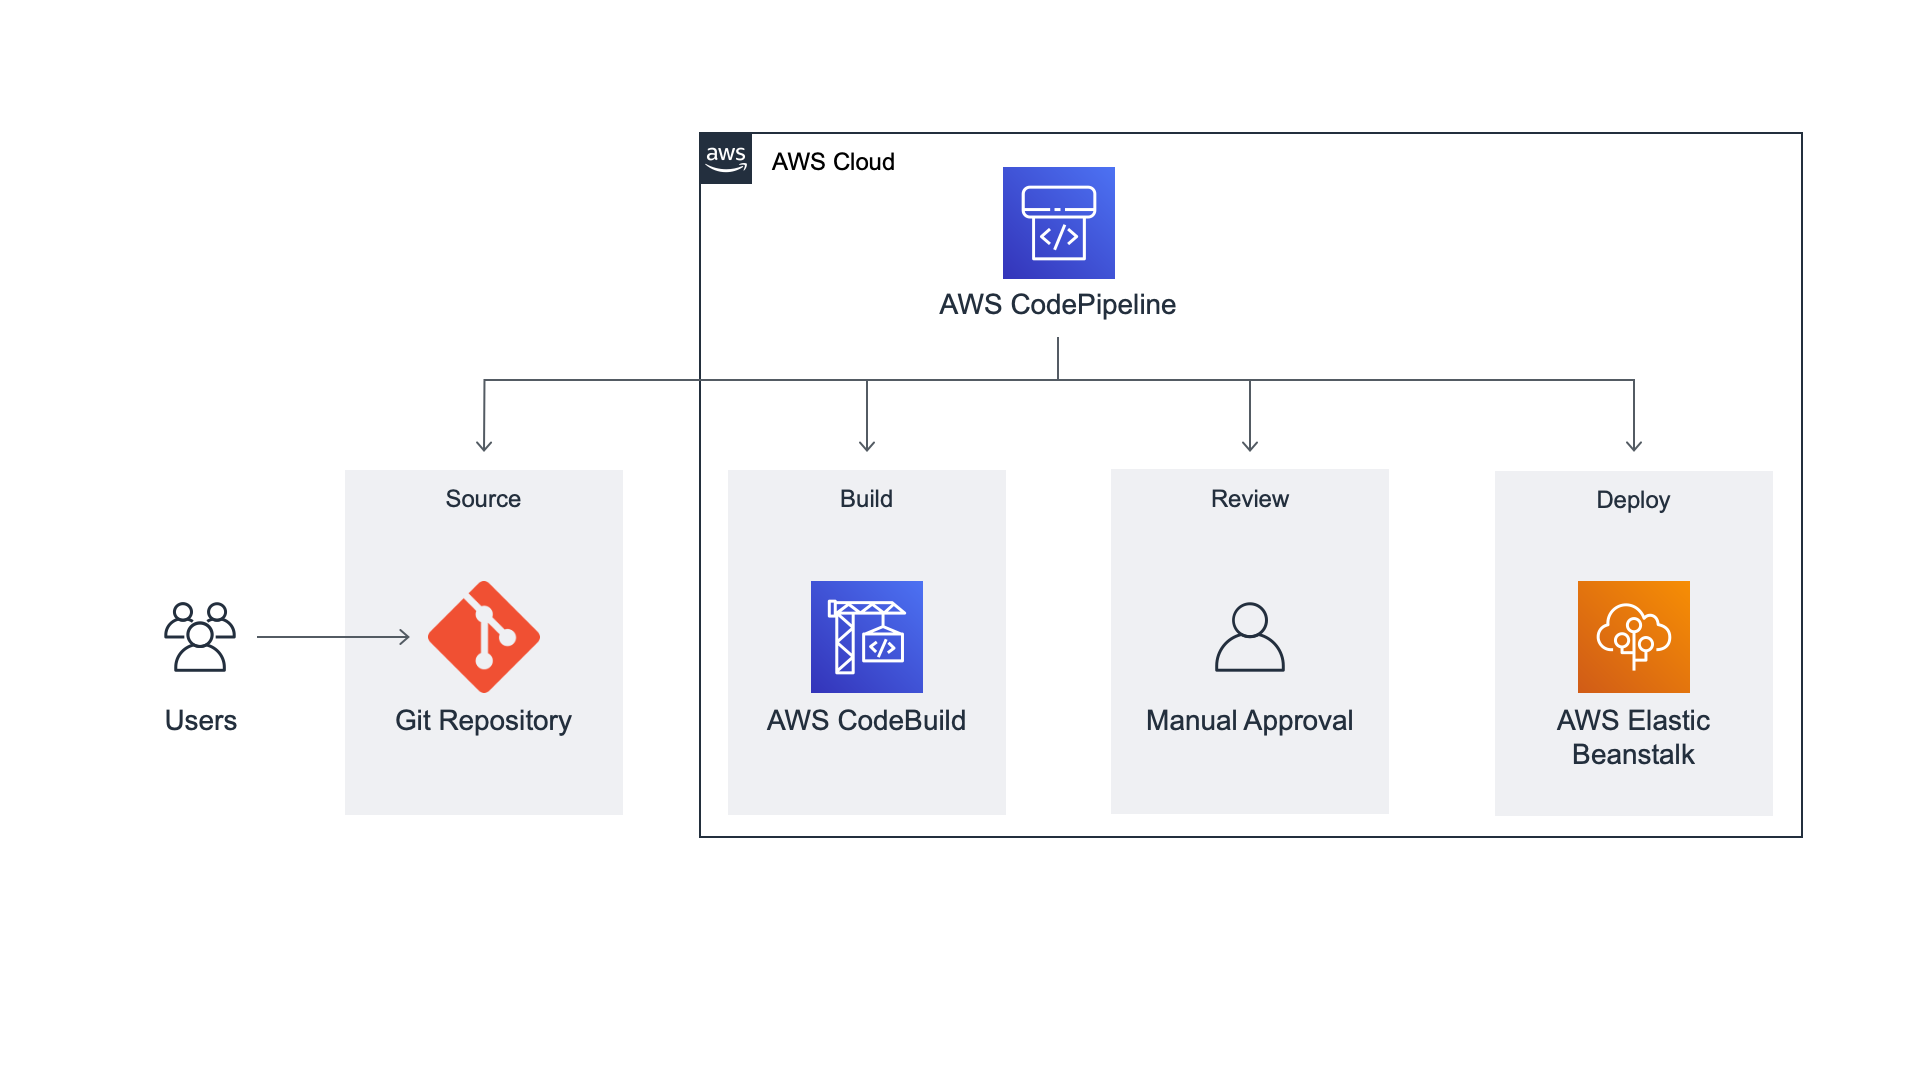
Application architecture
With all modules now completed, here is the architecture of what you built:
We have used AWS CodePipeline to add a review stage with manual approval to our continuous delivery pipeline. Now, our code changes will have to be reviewed and approved before they are deployed to AWS Elastic Beanstalk.
Clean up resources
(Optional) Delete AWS Elastic Beanstalk application
In a new browser window, open the AWS Elastic Beanstalk Console.
In the left navigation menu, click on Applications. You should see the DevOpsGettingStarted application listed under All applications.
Select the radio button next to DevOpsGettingStarted.
Click the Actions at the top of the page.
In the dropdown menu, select Delete application.
Type DevOpsGettingStarted in the text box to confirm deletion.
Click Delete.
(Optional) Delete pipeline in AWS CodePipeline
In a new browser window, open the AWS CodePipeline Console.
Select the radio button next to Pipeline-DevOpsGettingStarted.
Click Delete pipeline at the top of the page.
Type delete in the text box to confirm deletion.
Click Delete.
(Optional) Delete pipeline resources from Amazon S3 bucket
In a new browser window, open the Amazon S3 Console.
You should see a bucket named codepipeline-us-west-2 followed by your AWS account number. Click on this bucket. Inside this bucket, you should see a folder named Pipeline-DevOpsGettingStarted.
Select the checkbox next to the Pipeline-DevOpsGettingStarted folder.
Click Actions from the dropdown menu.
In the dropdown menu, select Delete.
Click Delete.
(Optional) Delete build project in AWS CodeBuild
In a new browser window, open the AWS CodeBuild Console.
In the left navigation, click Build projects under Build. You should see the Build-DevOpsGettingStarted build project listed under Build project.
Select the radio button next to Build-DevOpsGettingStarted.
Click Delete build project at the top of the page.
Type delete in the text box to confirm deletion.
Click Delete.
Did you find what you were looking for today?
Let us know so we can improve the quality of the content on our pages