AWS for SAP
Automating SAP migrations using CloudEndure Migration
Organizations migrating SAP workloads to AWS are looking for a lift-and-shift solution (rehost, without any OS or DB change). Previously, you used traditional SAP backup and restore for migration, or AWS-native tools such as AWS Server Migration Service, or partner tools to perform this type of migration. CloudEndure Migration is a new AWS-native migration tool for SAP customers.
Enterprises looking to rehost a large number of SAP systems to AWS can use CloudEndure Migration without worrying about compatibility, performance disruption, or long cutover windows. You can perform any re-architecture after your systems are running on AWS.
With CloudEndure Migration, you can also migrate SAP workloads from one AWS account to another. For example, you may deploy SAP workloads in an Amazon Internet Services Private Limited Account (AWS accounts for customers in India), and later decide to migrate to AWS. In that case, your migration efforts are similar to migrating from on-premises to AWS.
One option for this type of migration is to take AMIs in the source account, share them with the target account, and launch instances. However, if the Amazon EBS volumes have custom encryption keys, based on the number of EBS volumes and size, it becomes more difficult. As of publication time, there is not a direct way to share AMIs with encrypted volumes between accounts. This process is also difficult to manage for large workloads and doesn’t scale.
CloudEndure Migration simplifies, expedites, and reduces the cost of such migrations by offering a highly automated lift-and-shift solution. This post demonstrates how easy it is to set up CloudEndure Migration, and the steps involved in migrating SAP systems from one AWS account to another. You can use a similar approach for migrating from on-premises to AWS.
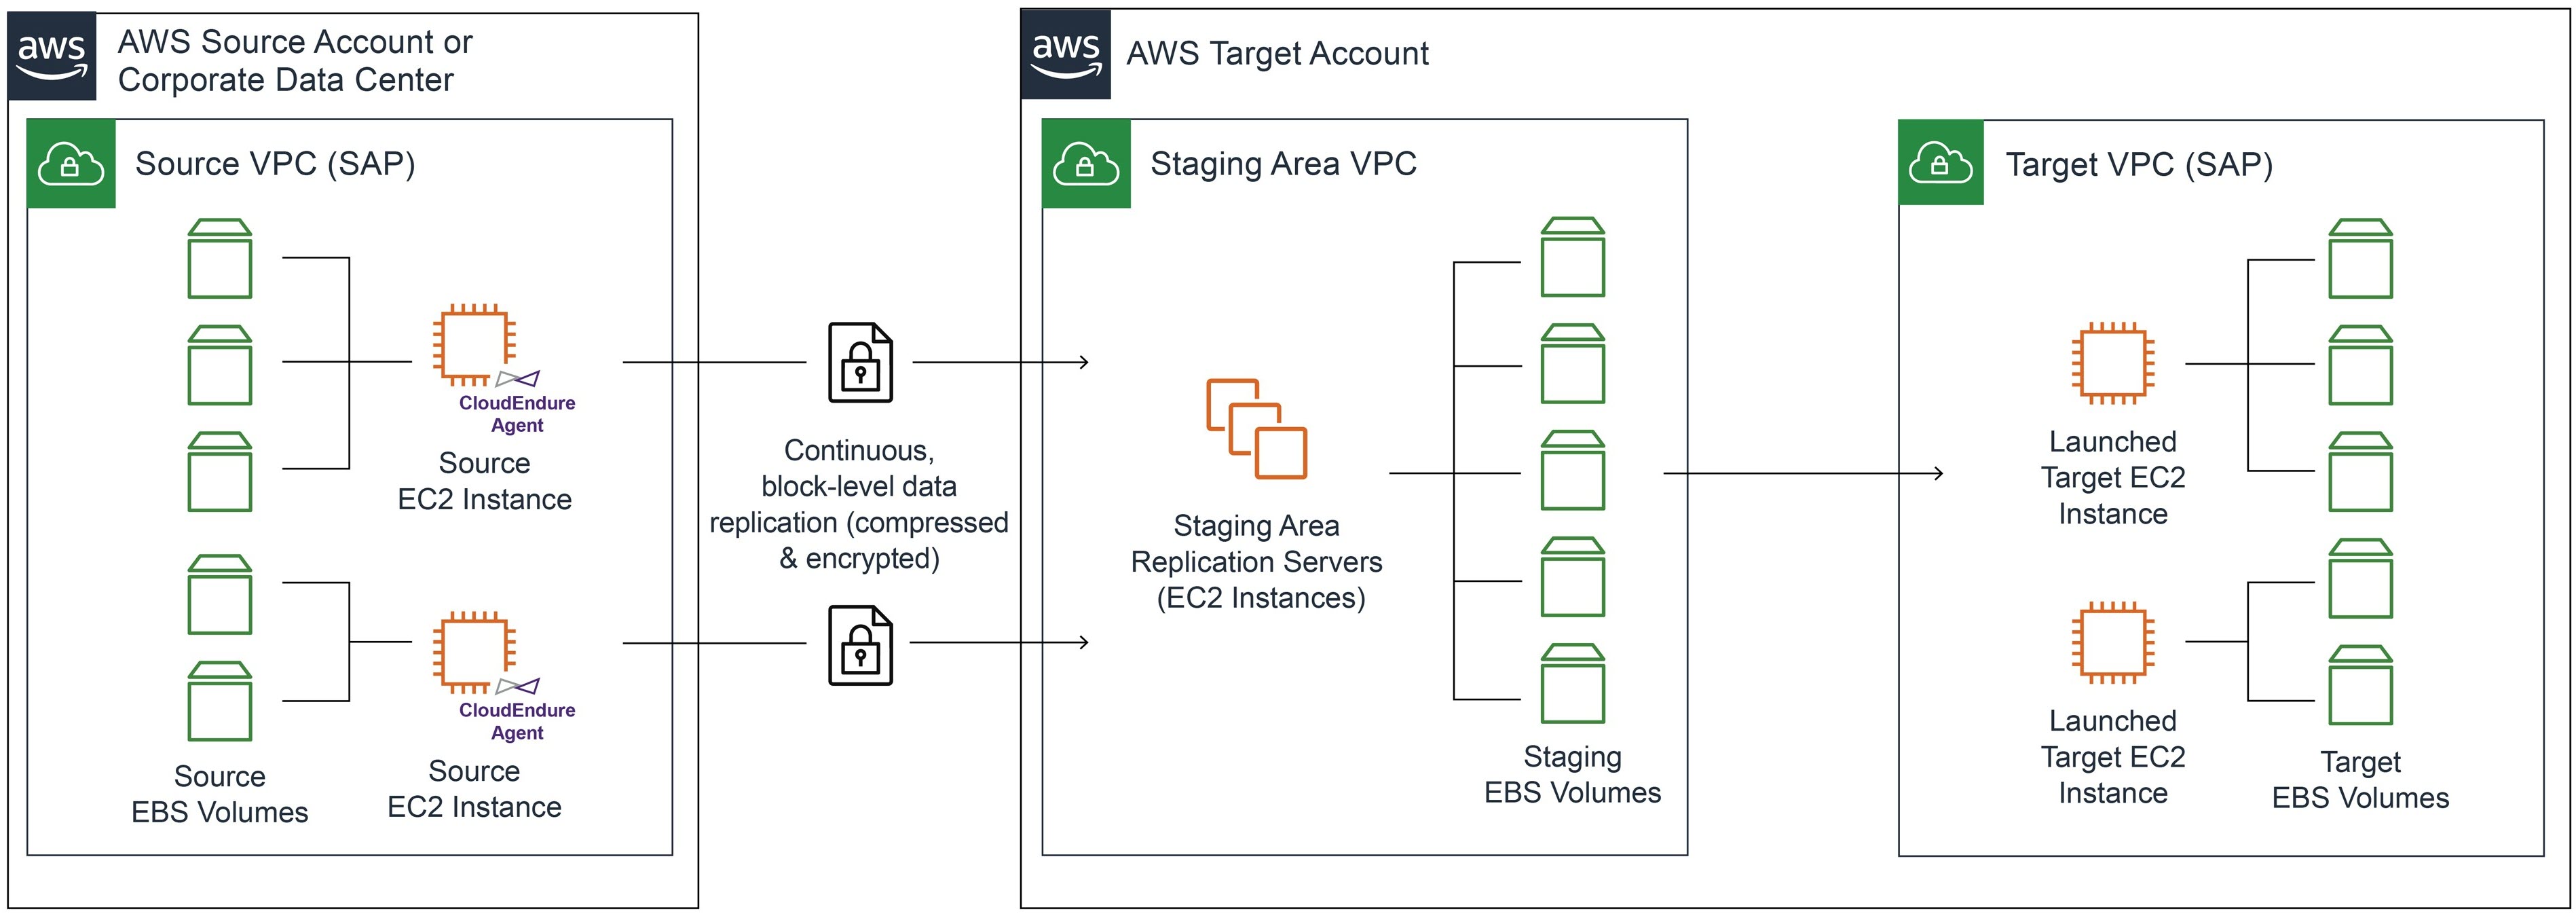
CloudEndure Migration architecture
The following diagram shows the CloudEndure Migration architecture for migrating SAP systems from one AWS account to another.
The steps for this migration are as follows:
- Register for a CloudEndure Migration account
- Set up a project and define replication settings.
- Install a CloudEndure agent on the source Amazon EC2 instances.
- Monitor replication and update blueprint.
- Launch test instances.
- Perform migration cutover.
- Perform SAP post-migration activities.
- Perform cleanup activities.
Prerequisites
To prepare your network for running CloudEndure Migration, set the following connectivity settings:
- Communication over TCP port 443:
- Between the source machines and the CloudEndure user console.
- Between the staging area and the CloudEndure user console.
- Communication over TCP port 1500:
- Between the source machines and the staging area.
The following diagram shows all of the required ports that you must open from the source and the staging area subnets:

Additionally, you have the following prerequisites:
- The CloudEndure Migration agent installation on the source machines has the following requirements:
- Root directory—Verify that you have at least 2 GB of free disk on the root directory (/) of your source machine.
/tmpdirectory (Linux)—You need at least 500 MB of free disk on the/tmpdirectory for the duration of the installation process.- Available RAM—Verify that the machine has at least 300 MB of free RAM to run the CloudEndure agent.
- Linux systems have the following requirements:
- Python—Use Python 2 (2.4 or above) or Python 3 (3.0 or above).
dhclient—Make sure to install thedhclientpackage.- Kernels—Verify that you have
kernel-devel/linux-headersinstalled that are the same version as the kernel you are running.
- For Windows systems, make sure that you are using .NET Framework version 4.5 or above on machines running Windows Server 2008 R2 or later. Use .NET Framework version 3.5 or above on machines running Windows Server 2008 or earlier.
- Use VPC peering between the source VPC and staging VPC. This is not mandatory, and only used in cases of cross-region or cross-account migration projects.
Registering for a CloudEndure Migration account
Register for a CloudEndure Migration account to begin using the solution. Account registration gives you access to free CloudEndure Migration licenses for your migration project.
The following screenshot shows the registration page. To register, complete the following steps.
- Enter your email address.
- Select the CAPTCHA box.
- Choose Continue.

This email address also serves as your CloudEndure Migration user name. After receiving an email confirming your registration, follow the additional instructions and activate your account.
When your CloudEndure Migration Account is active, sign into the CloudEndure user console to set up your solution.
Setting up the project and defining replication settings
CloudEndure Migration creates a default project when you activate your account. You can either use the default project or create a new project for your migration. To create a new project, complete the following steps.
- On the Setup & Info page, under AWS Credentials, provide the AWS access key ID and secret access key of the IAM user created in the target account.
- Choose Save.
For more information about the IAM permissions for the IAM user, see the JSON code.

Before using the CloudEndure Migration solution, define the replication settings for AWS. This section provides an overview for defining these replication settings, including defining your source infrastructure, target infrastructure, replication servers, and optional cloud-specific settings such as VPN and proxy usage.
- From Setup & Info, choose Replication Settings.
- Select your source and target environments.
- For the subnet, choose the subnet created for the staging environment in your staging VPC.
- Select a specific instance type for your replication server and the security group. This post uses the default instance type so that CloudEndure Migration creates a security group during the replication server launch in the staging area subnet.
- For Default disk type, choose Use fast SSD data disks. This speeds up the replication process by having CloudEndure choose GP2 volumes for disks that are larger than 500 GB. You can also select whether to use a public or private network for sending the replicated data from the source machines to the staging area.
- For the traffic to flow over a private connection, choose Use VPN or Direct Connect.
- For Staging Area Tags, enter a key and volume.
- For Network Bandwidth Throttling, deselect Disabled. This regulates traffic and minimize bandwidth congestion. Enable this option to control the transfer rate of data that the source machine sends to the staging area over TCP Port 1500.
- After defining all your settings, choose Save Replication Settings.
Installing your CloudEndure agent on source EC2 instances
The CloudEndure user console has installation steps on how to download the agent and install.
For Linux machines:
- Download the CloudEndure Agent Installer.
- Install the agent.
For Windows machines:
- Download the Agent Installer for Windows.
- Install the agent.
Monitoring replication and updating the blueprint
After installing the agent, the machine appears in the CloudEndure user console (no reboot required). You can log in to the CloudEndure user console to monitor the replication progress.
When the initial sync is complete, update the blueprint. Target machines launch based on the properties defined in the blueprint.
- Choose Blueprint.
- Select the desired machine.
- Add desired tags for the target instance.
- Select the disk type for your target disk.
- Choose Save Blueprint.
Launching test instances
Before you perform the cutover of your source machines into your target infrastructure, test your CloudEndure Migration solution. By testing your machines, you can verify that your source machines are working correctly in the target environment. Perform a test at least one week before the planned cutover, to allow time to fix any issues that may arise during testing.
- Select the machines to test.
- Choose Launch Machine, Test Mode.
- Choose Continue.
You can track the progress of this launch in the Job Progress dialog box.
Log in to AWS Management Console in your target account to track the EC2 instances launch.
Performing a migration cutover
After testing all of your machines, you are ready to transition your machines to the target.
- Choose Launch Target Machines, and select the desired machines.
- Choose Cutover Mode.
The CloudEndure user console gives you the option to perform cutovers of multiple machines at the same time. Before you proceed with this step, stop the SAP application on your source system, make sure that all the changes are replicated, and perform the cutover.
You can check the status of the cutover in the Job Progress dialog box. For an example, see the following screenshot.

Log in to the AWS Management Console in your target account to track the EC2 instances that launch. For an example, see the following screenshot.

Performing SAP post-migration activities
After your SAP migration, complete the following steps.
- Copy Amazon Elastic File System (Amazon EFS)/NFS file systems (if used for
/usr/sap/transand/sapmnt) from the old to the new SAP accounts and mount it on respective instances. You can either use rsync or AWS DataSync to move these files. - Because the hardware key has changed, request licenses from SAP and apply them to the target instances.
- Start the SAP database application on target instances and perform validation.
- Configure backup and snapshots in the new account, if applicable.
- Configure load balancers in the new account, if applicable.
- Complete all of the remaining account-level setup activities. This includes but is not limited to DNS, Active Directory, VPN/Direct Connect, security baselining, and setting up monitoring in the new AWS account similar to the source environment.
- Go live.
Performing cleanup activities
After validation, uninstall the agent by removing machines from the CloudEndure User Console.
- Choose Machine Actions.
- Choose Remove [n] Machines from This Console. It takes up to 60 minutes for CloudEndure Migration to clean up the instances and volumes in the staging area.
- When all of the agents are uninstalled, delete the VPC peering connection and staging VPC. This deletes all AWS resources that you created for replication.
- Terminate instances in the source VPC.
Conclusion
This post discussed how to use CloudEndure to migrate your SAP workloads from one AWS account to another. You can use similar approaches to migrate SAP workloads from on-premises data centers to AWS.
You can use CloudEndure Migration software to perform automated migration to AWS with no licensing charges. Each free CloudEndure Migration license allows for 90 days of use following agent installation. During this period, you can start the replication of your source machines, launch target machines, conduct unlimited tests, and perform a scheduled cutover to complete your migration. You can use AWS promotional credits to migrate your SAP systems to AWS. Contact us to find out how and to apply for credits.