AWS Thai Blog
AgentCore in Action Part1 : การ Host MCP Servers ด้วย AgentCore Runtime
AgentCore in Action Series
ซีรีส์นี้จะพาคุณไปทำความเข้าใจวิธีการรัน AI agents อย่างมีประสิทธิภาพด้วย Amazon Bedrock AgentCore โดยครอบคลุมตั้งแต่การ deploy, scale ไปจนถึงการรักษาความปลอดภัยตามมาตรฐาน enterprise โดยไม่ต้องกังวลเรื่อง infrastructure management
AgentCore in Action: การสร้างและจัดการ AI Agents จาก Deploy ถึง Scale
- Part 1: การ Host MCP Servers ด้วย AgentCore Runtime (บทความนี้)
- Part 2: การจัดการ MCP Servers หลายตัวด้วย AgentCore Gateway (Coming soon)
- Part 3: Authentication & Authorization ด้วย AgentCore Identity (Coming soon)
- Part 4: ควบคุมสิทธิ์การใช้งาน Tools ด้วย AgentCore Policy (Coming soon)
Part 1: การ Host MCP Servers ด้วย AgentCore Runtime
ในยุคของ AI agents คงปฏิเสธไม่ได้ว่า หลายๆคน คงมีการใช้งาน MCP Server (Model Context Protocol) อยู่เป็นประจำ ไม่ว่าจะเป็นสาย developer หรือ operation บางคนใช้ MCP หลายตัวพร้อมกันบนเครื่องของตัวเอง ซึ่งไม่เพียงแต่ทำให้เครื่องตัวเองช้าลง แต่ยังทำให้การจัดการและการแชร์ MCP servers ให้กับทีมเป็นเรื่องที่ยุ่งยาก
จะเป็นอย่างไรหากเราสามารถ host MCP servers บน cloud และแชร์ให้ทั้งทีมเข้าถึงได้ โดยไม่ต้องใช้ resources จากเครื่องของเราเลย?
Amazon Bedrock AgentCore เข้ามาตอบโจทย์นี้ได้อย่างตรงจุด ด้วยการทำให้กระบวนการสร้าง deploy และจัดการ AI agents รวมถึง MCP servers เป็นไปอย่างง่ายดายและรวดเร็ว
The Current Architecture
ก่อนหน้านี้ แนวทางทั่วไปในการ host MCP servers แบบ remote มักจะประกอบด้วยขั้นตอนดังนี้:
- Containerize MCP servers
- Deploy บน Amazon ECS หรือ Amazon EKS
- วางไว้หลัง Application Load Balancer
แม้ว่าวิธีนี้จะสามารถใช้งานได้ แต่ก็ยังคงมีงานที่ต้องจัดการอีกมาก เช่น Infrastructure provisioning, Scaling และ Patching ซึ่งเพิ่มความซับซ้อนและเวลาในการดูแลระบบ
การเปิดตัวของ Amazon Bedrock AgentCore เมื่อปลายปีที่แล้ว ได้เข้ามาเปลี่ยนแปลงวิธีการทำงานในรูปแบบปัจจุบัน โดย service นี้ ออกแบบมาเฉพาะสำหรับ AI workloads, ช่วยให้สามารถโฟกัสไปที่ agent logic และความสามารถของระบบได้โดยตรง ลดเวลาที่ต้องใช้ในการจัดการ infrastructure
AgentCore คืออะไร?
AgentCore เป็น managed service ที่ออกแบบมาเพื่อทำให้การสร้างและรัน AI agents แบบ scale ทำได้ง่ายขึ้น
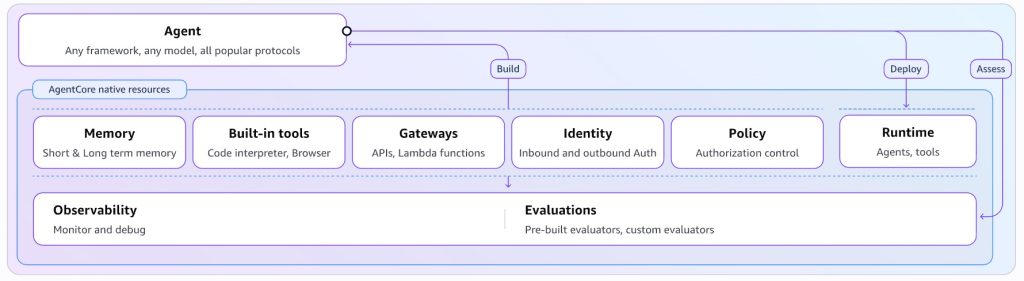
ส่วนประกอบหลักของ AgentCore
- Runtime – รัน agents และ MCP servers ใน managed environment
- Gateway – จัดการ routing requests และการเข้าถึง agents
- Identity – จัดการ authentication และ authorization
- Memory – เก็บข้อมูล agent state แบบถาวร
- Tools – เครื่องมือต่างๆ ที่สามารถนำมาใช้ได้ เช่น code interpretation และ web browsing
- Observability – ติดตามและบันทึก agent behavior
- Policy (new)- กำหนด policy ในการควบคุมการทำงานของ agent
- Evaluation (new) – วัดผลและประเมินการทำงานของ agent
หมายเหตุ: บทความนี้จะโฟกัสที่ AgentCore Runtime
ทำความเข้าใจ AgentCore Runtime
AgentCore Runtime คือ execution environment ที่ AI agents และ workloads ทำงานอยู่
สามารถมองว่าเป็น compute platform ที่ออกแบบมาเฉพาะสำหรับ AI applications คล้ายกับที่ AWS Lambda รัน functions หรือ Amazon ECS รัน containers แต่ถูก optimize มาสำหรับ agent workloads โดยเฉพาะ
ความสามารถหลักของ AgentCore Runtime
- Managed execution environment – AWS จัดการ infrastructure provisioning, scaling และ maintenance ให้ทั้งหมด
- รองรับหลาย framework – รัน agents ที่สร้างด้วย frameworks ยอดนิยม เช่น LangGraph, CrewAI, Strands และอื่นๆ
- Built-in observability – มี logging และ monitoring อัตโนมัติโดยไม่ต้อง configure เพิ่มเติม
- Secure by default – ทุก session ได้รับการปกป้องด้วย true session isolation ใน dedicated microVMs พร้อม built-in authentication (IAM SigV4, OAuth 2.0)
ทำไมต้องใช้ AgentCore Runtime สำหรับ MCP Servers?
แม้ว่า AgentCore Runtime จะออกแบบมาสำหรับรัน AI agents เป็นหลัก แต่ service นี้ก็รองรับการรัน MCP servers ด้วยเช่นกัน
Benefits
- Managed infrastructure – ไม่ต้อง configure ECS clusters, load balancers หรือ auto-scaling
- Built-in networking – AgentCore จัดการ HTTP endpoints และ networking configuration ให้อัตโนมัติ
- PAYG – จ่ายเฉพาะส่วนที่ใช้งาน คล้ายกับ serverless pricing model
ความสามารถในการรันทั้ง agents และ MCP servers คือสิ่งที่ทำให้ AgentCore Runtime เหมาะสำหรับการพัฒนา AI worklaod ที่ต้องการ scale และความปลอดภัยในระดับ enterprise
เมื่อเทียบกับการ host บน Amazon ECS หรือ EKS ที่ต้อง containerize, เขียน task definitions/Kubernetes manifests, configure authentication, scaling, networking, observability ทั้งหมดเองแล้ว
AgentCore Runtime ช่วยลดภาระการดูแลระบบ พร้อมทั้งมี features ที่ออกแบบมาเฉพาะสำหรับ AI workloads
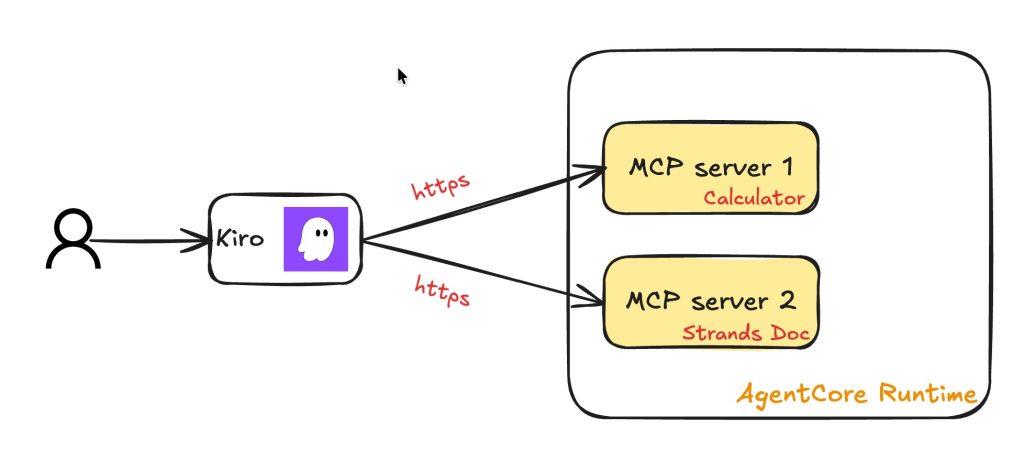
What We’ll Build
Blog นี้จะสาธิตการ deploy 2 HTTP-based MCP servers บน AgentCore Runtime และการเรียกใช้งานจาก Kiro IDE:
- Calculator MCP – สร้างใหม่ตั้งแต่ต้น (deploy แบบ zip)
- Strands Docs MCP – แปลงจาก local MCP ที่มีอยู่ (deploy แบบ container)
Prerequisites
ก่อนเริ่มต้น ควรตรวจสอบให้แน่ใจว่าคุณมีสิ่งเหล่านี้พร้อม:
- AgentCore Starter Toolkit (AgentCore CLI) ที่ติดตั้งเรียบร้อยแล้ว, https://github.com/aws/bedrock-agentcore-starter-toolkit
- Kiro IDE หรือ MCP client อื่นๆ สำหรับการทดสอบ MCP, https://kiro.dev/downloads/
หมายเหตุ: ในบทความนี้จะใช้
- AgentCore Toolkit เข้ามาช่วยให้ deployment สะดวกขึ้น อย่างไรก็ตาม คุณสามารถใช้ AWS SDK โดยตรงได้เช่นกัน
- Kiro IDE ในการทดสอบ โดย Kiro จะทำหน้าที่เหมือน AI agent ที่เรียกใช้งาน MCP servers อีกที
สร้าง MCP Server ตัวแรก: Calculator MCP
Step 1: สร้าง MCP Server
ส่วนนี้จะสาธิตการสร้าง MCP server แบบง่ายๆ ชื่อ calculator-mcp และ host บน AgentCore Runtime โดยเริ่มต้นด้วยความสามารถในการคำนวณสูตรพีทาโกรัส
ไฟล์ mcp_server.py
import math
from mcp.server.fastmcp import FastMCP

# Create MCP server with stateless HTTP support
# host="0.0.0.0" is required for AgentCore Runtime
# stateless_http=True is required for Runtime's session isolation
mcp = FastMCP("Calculator MCP", host="0.0.0.0", stateless_http=True)

@mcp.tool()
def calculate_pythagorean(a: float, b: float) -> float:
    """Calculate the hypotenuse using the Pythagorean theorem.

    Given two sides of a right triangle (a and b), returns the hypotenuse (c).
    Formula: c = √(a² + b²)

    Args:
        a: Length of first side
        b: Length of second side

    Returns:
        Length of the hypotenuse
    """
    if a <= 0 or b <= 0:
        raise ValueError("Both sides must be positive numbers")

    return math.sqrt(a**2 + b**2)

if __name__ == "__main__":
    # Run with streamable-http transport (required for Runtime)
    mcp.run(transport="streamable-http")
Key Points:
host="0.0.0.0"– required สำหรับ AgentCore Runtimestateless_http=True– required สำหรับ Runtime’s session isolationtransport="streamable-http"– required สำหรับ Runtime
Step 2: Configure Deployment ด้วย AgentCore CLI
AgentCore Runtime รองรับ deployment 2 แบบ:
1. Zip file approach: แพ็คเกจ code และ dependencies เป็น zip file 2. Custom Dockerfile approach: สร้างจาก container เหมาะกับกรณีที่ต้องการ customize container image
ในตัวอย่างแรกนี้ เราจะใช้ Zip approach สำหรับ Calculator MCP โดยใช้คำสั่ง agentcore configure ในการกำหนดค่า environment ต่างๆสำหรับ calculator mcp
agentcore configure \
  --entrypoint mcp_server.py \
  --protocol MCP \
  --deployment-type direct_code_deploy \
  --disable-memory \
  --non-interactive \
  --region ap-southeast-1 \
  --name calculator_mcp
Parameter Descriptions:
| Parameter | Description |
|---|---|
--entrypoint |
ไฟล์ที่ใช้ในการรัน MCP |
--protocol |
ระบุว่าเป็น MCP protocol |
--deployment-type |
ใช้วิธี zip code (direct_code_deploy) |
--disable-memory |
ไม่ใช้ memory feature |
--non-interactive |
ไม่ต้องตอบคำถามระหว่าง configuration |
--region |
AWS region ที่จะ deploy |
--name |
ชื่อของ MCP server |
หมายเหตุ:
- คำสั่งนี้จะสร้าง configuration file ชื่อ
bedrock_agentcore.yaml- ไฟล์นี้จะกำหนด deployment settings รวมถึง runtime environment, dependencies และ entry points
requirements.txtที่ระบุ packages ที่ต้องใช้จะต้องอยู่ใน folder เดียวกับmcp_server.py(หรือ entrypoint file ของคุณ)- การใช้งาน agentcore CLI นั้น ถ้ารันใน folder ที่ไฟล์ bedrock_agentcore.yaml อยู่, CLI จะไปดึง config มาจากไฟล์ yaml โดยอัตโนมัติ ทำให้ command ทราบว่ากำลังเรียกใช้ runtime ไหนอยู่ สามารถพิมพ์แค่
agentcore statusโดยไม่ต้องระบุข้อมูลเพิ่มเติม
Step 3: Deploy Calculator MCP ไปบน AgentCore Runtime
# Package & deploy MCP server
agentcore deploy
คำสั่ง agentcore deploy จะจัดการงานทั้งหมดให้ ตั้งแต่การแพ็คเกจ อัปโหลด ไปจนถึงการ provision MCP server บน AgentCore Runtime
Output ที่ได้
╭──────────── Deployment Success ────────────╮
│ Agent Details:                             │
│ Agent Name: calculator_mcp                 │
│ Agent ARN: arn:aws:bedrock-agentcore:ap-   │
│   southeast-1:012345678901:runtime/        │
│   calculator_mcp-XXXXXXX                   │
│ Deployment Type: Direct Code Deploy        │
│                                            │
│ Code package deployed to Bedrock           │
│    AgentCore                               │
│                                            │
│ Next Steps:                                │
│    agentcore status                        │
│    agentcore invoke '{"prompt": "Hello"}'  │
╰────────────────────────────────────────────╯
Step 4: ทดสอบการใช้งาน MCP
สามารถใช้ AgentCore CLI ทดสอบเรียก MCP ได้ทันทีโดยยังไม่ต้อง configure MCP client
ตรวจสอบ Status
agentcore status
Output:
╭──────────── Agent Status: calculator_mcp ────────────╮
│ Ready - Agent deployed and endpoint available        │
│                                                      │
│ Agent Details:                                       │
│ Agent Name: calculator_mcp                           │
│ Agent ARN:                                           │
│ arn:aws:bedrock-agentcore:ap-southeast-1:            │
│ 012345678901:runtime/calculator_mcp-XXXXXXXXXXX      │
│ Endpoint: DEFAULT (READY)                            │
│ Region: ap-southeast-1 | Account: 012345678901       │
│                                                      │
│ Network: Public                                      │
│                                                      │
│ Deployment Info:                                     │
│ Created: 2026-02-01 16:17:49.186408+00:00            │
│ Last Updated: 2026-02-01 16:17:57.496230+00:00       │
│                                                      │
│ Ready to invoke:                                     │
│    agentcore invoke '{"prompt": "Hello"}'            │
╰──────────────────────────────────────────────────────╯
List Tools ของ MCP
# ทดสอบ MCP server โดยการ list tools ที่มีให้ใช้งาน
agentcore invoke '{"jsonrpc": "2.0", "method": "tools/list", "id": 1}'
Output:
{
  "jsonrpc": "2.0",
  "id": 1,
  "result": {
    "tools": [
      {
        "name": "calculate_pythagorean",
        "description": "Calculate the hypotenuse using the Pythagorean theorem...",
        "inputSchema": {
          "properties": {
            "a": {"title": "A", "type": "number"},
            "b": {"title": "B", "type": "number"}
          },
          "required": ["a", "b"],
          "type": "object"
        }
      }
    ]
  }
}
Call Tool – ทดสอบคำนวณ
# ทดสอบ MCP server โดยการเรียกใช้ tool
agentcore invoke '{"jsonrpc": "2.0", "method": "tools/call", "params": {"name": "calculate_pythagorean", "arguments": {"a": 3, "b": 4}}, "id": 2}'
Output:
{
  "jsonrpc": "2.0",
  "id": 2,
  "result": {
    "content": [{"type": "text", "text": "5.0"}],
    "structuredContent": {"result": 5.0},
    "isError": false
  }
}
Result: √(3² + 4²) = √25 = 5.0
คำสั่ง agentcore invoke ช่วยให้:
- ไม่จำเป็นต้องใช้ URL ในการเรียกใช้งาน MCP
- สามารถทดสอบได้ก่อนที่จะเชื่อมต่อกับ MCP clients เช่น Kiro
ถึงขั้นตอนนี้ คุณได้ทำการ deploy MCP ตัวแรก (calculator-mcp) ไปบน AgentCore เรียบร้อยแล้ว ขั้นตอนถัดไปคือการ deploy MCP ตัวที่สอง
Convert Local MCP Servers ด้วย mcp-proxy
Local MCP Servers
หลายคนมี MCP servers ที่ใช้งานอยู่แล้วบนเครื่อง โดยส่วนใหญ่จะเป็น MCP สำเร็จรูปที่ดาวน์โหลดมาใช้งานผ่าน stdio แล้วถ้าเราอยากจะ deploy MCP พวกนี้ให้เข้าถึงผ่าน HTTP จะทำได้อย่างไร?
วิธีแก้คือใช้ mcp-proxy มาช่วยแปลง local MCP servers ให้เป็น HTTP-based servers แล้วค่อย host บน AgentCore Runtime
mcp-proxy: https://github.com/sparfenyuk/mcp-proxy
Example: Convert Strands MCP Server
ตัวอย่างนี้จะสาธิตการแปลง Strands MCP server ซึ่งเป็น local MCP ไปเป็น remote MCP
Strands MCP: https://github.com/strands-agents/mcp-server
หมายเหตุ:
- ตัวอย่างนี้จะใช้การ deploy แบบ container แทนแบบ zip code
- วิธีนี้จะช่วยให้สามารถ customize Dockerfile ได้
- มีหลาย tools ที่สามารถ convert ระหว่าง stdio กับ HTTP โดยตัวอย่างนี้จะเลือกใช้ mcp-proxy เนื่องจากใช้งานได้ค่อนข้างง่าย ไม่ต้องเขียน code เองและ รองรับ stdio → HTTP conversion โดยตรง
- AgentCore ต้องการ entrypoint file (เช่น mcp_server.py) แต่เนื่องจากในกรณีนี้เราใช้ prebuilt MCP server ที่มีอยู่แล้ว ไฟล์ entrypoint จึงเป็นเพียง wrapper script ที่เรียกใช้ mcp-proxy ไฟล์นี้จึงเป็นเพียง placeholder ที่ไม่มี code ใดๆ
Required Files
requirements.txt
mcp-proxy>=0.3.2
uv
mcp_server.py
# Placeholder file - required by AgentCore but not used
# The actual MCP server runs via uvx command in Dockerfile
Dockerfile
FROM public.ecr.aws/docker/library/python:3.11-slim

WORKDIR /app

# Install uv (Python package manager) for uvx command
RUN pip install --no-cache-dir uv

# Copy requirements and install dependencies
COPY requirements.txt .
RUN pip install --no-cache-dir -r requirements.txt

# Create non-root user
RUN useradd -m -u 1000 bedrock_agentcore
USER bedrock_agentcore

# Expose port 8000 (mcp-proxy default)
EXPOSE 8000

# Copy placeholder file
COPY mcp_server.py .

# Run mcp-proxy wrapping Strands MCP server on port 8000
CMD ["mcp-proxy", "--host", "0.0.0.0", "--port", "8000", "--stateless", "--pass-environment", "--", "uvx", "strands-agents-mcp-server"]
Dockerfile Breakdown:
- Base image: Python 3.11 slim
- Install uv: Python package manager สำหรับใช้คำสั่ง
uvx - Install dependencies: ติดตั้ง mcp-proxy และ uv
- Non-root user: สร้าง user
bedrock_agentcoreเพื่อความปลอดภัย - Port 8000: Port ที่ mcp-proxy ใช้งาน
- CMD: รัน mcp-proxy ที่ wrap Strands MCP server
Deploy โดยใช้ AgentCore CLI กับ Dockerfile
Step 1: Configure
agentcore configure \
  --entrypoint mcp_server.py \
  --protocol MCP \
  --deployment-type container \
  --disable-memory \
  --non-interactive \
  --region ap-southeast-1 \
  --name strands_docs_mcp
สังเกตว่าใช้ --deployment-type container แทน direct_code_deploy
Step 2: Deploy
agentcore deploy
คำสั่งนี้จะทำงานดังนี้:
- Build Docker image โดยอาศัย CodeBuild
- Push ไปยัง Amazon Elastic Container Registry (Amazon ECR)
- Deploy ไปยัง AgentCore Runtime
Output
╭───────────── Deployment Success ─────────────╮
│ Agent Name: strands_docs_mcp                 │
│ Agent ARN: arn:aws:bedrock-agentcore:ap-     │
│   southeast-1:012345678912:runtime/          │
│   strands_docs_mcp-XXXXXXXXXX                │
│ ECR URI: 012345678912.dkr.ecr.ap-southeast-  │
│   1.amazonaws.com/bedrock-agentcore-         │
│   strands_docs_mcp:2026xxxx-xxxxxx-xxx       │
│ CodeBuild ID: bedrock-agentcore-             │
│   strands_docs_mcp-                          │
╰──────────────────────────────────────────────╯
Test Strands MCP
List Tools
agentcore invoke '{"jsonrpc": "2.0", "method": "tools/list", "id": 1}'
Output:
{
  "jsonrpc": "2.0",
  "id": 1,
  "result": {
    "tools": [
      {
        "name": "search_docs",
        "description": "Search curated documentation and return ranked results with snippets..."
      },
      {
        "name": "fetch_doc",
        "description": "Fetch full document content by URL..."
      }
    ]
  }
}
Call Tool – search_docs
agentcore invoke '{"jsonrpc": "2.0", "method": "tools/call", "params": {"name": "search_docs", "arguments": {"query": "bedrock model provider", "k": 3}}, "id": 2}'
Output:
{
  "jsonrpc": "2.0",
  "id": 2,
  "result": {
    "content": [...],
    "structuredContent": {
      "result": [
        {
          "url": "https://strandsagents.com/.../deploy_to_bedrock_agentcore/index.md",
          "title": "TypeScript Agent Deployment to Amazon Bedrock AgentCore Runtime",
          "score": 153.527
        },
        {
          "url": "https://strandsagents.com/.../custom_model_provider/index.md",
          "title": "Custom Providers",
          "score": 116.024
        },
        {
          "url": "https://strandsagents.com/.../ledger_provider/index.md",
          "title": "Ledger Provider",
          "score": 40.167
        }
      ]
    },
    "isError": false
  }
}
Strands MCP พร้อมใช้งานบน AgentCore Runtime แล้ว
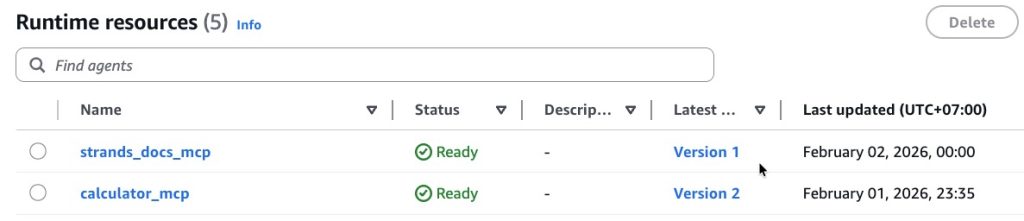
Result: MCP Servers 2 ตัวบน AgentCore Runtime
ตอนนี้คุณมี MCP servers สองตัวที่รันบน AgentCore Runtime:
| MCP Server | Deployment Method | Tools |
|---|---|---|
| 1. Calculator MCP | Zip (direct_code_deploy) | calculate_pythagorean |
| 2. Strands Docs MCP | Container (Dockerfile) | search_docs, fetch_doc |
ใน AWS Console จะเห็น runtime ทั้งสอง
Benefits
ทั้งสอง servers มีคุณสมบัติดังนี้:
- ได้รับการปกป้องด้วย IAM authentication พร้อม SigV4
- สามารถแชร์ให้ทีมได้ (ผู้ที่มี AWS credentials ที่เหมาะสมสามารถเข้าถึงได้)
- รันโดยไม่กินทรัพยากรเครื่อง local
- Managed infrastructure โดย AWS
Runtime Access & Client Integration
ก่อนที่จะนำ Kiro หรือ MCP Client มาเชื่อมต่อกับ MCP servers ทั้งสองตัว มี 2 เรื่องที่ต้องทำความเข้าใจก่อน
เรื่องที่ 1: Runtime Endpoint URL
ก่อนหน้านี้เราใช้ agentcore invoke ในการทดสอบโดยไม่จำเป็นต้องรู้ URL ของ MCP หรือ Runtime แต่เวลาใช้งานจริง การเรียก MCP จะเป็นผ่าน URL
คำถามคือ เราจะเรียก URL ในการใช้งาน?
โดยทั่วไป AgentCore Runtime จะสร้าง HTTP endpoint URL ให้เราเรียบร้อยแล้ว แค่ตอนใช้คำสั่ง agentcore invoke ไม่ได้แสดงออกมาเท่านั้น
รูปแบบ endpoint URL:
https://bedrock-agentcore.{region}.amazonaws.com/runtimes/{url-encoded-arn}/invocations?qualifier=DEFAULT
วิธีการหา Runtime Endpoint URL
Step 1: Get the ARN
cd mcp_servers/calculator_mcp
agentcore status
ตัวอย่าง ARN
arn:aws:bedrock-agentcore:ap-southeast-1:012345678901:runtime/calculator_mcp-XXXXXXXX
Step 2: URL-encode {url-encoded-arn}
- Replace : with %3A
- Replace / with %2F
- ระบุ region ที่ถูกต้อง
Step 3: Build the URL สำหรับ MCP Clients
https://bedrock-agentcore.ap-southeast-1.amazonaws.com/runtimes/arn%3Aaws%3Abedrock-agentcore%3Aap-southeast-1%3A012345678901%3Aruntime%2Fcalculator_mcp-XXXXXXX/invocations?qualifier=DEFAULT
หรือ สามารถใช้ one-liner command ข้างล่างเพื่อความรวดเร็ว
# Go to agent directory
cd mcp_servers/calculator_mcp

# Get invocation URL
REGION="ap-southeast-1" && ARN=$(agentcore status 2>/dev/null | grep -A 3 "Agent ARN:" | tr -d '\n │' | sed 's/.*arn:/arn:/' | sed 's/Endpoint.*//') && echo "https://bedrock-agentcore.$REGION.amazonaws.com/runtimes/$(echo $ARN | sed 's/:/%3A/g' | sed 's/\//%2F/g')/invocations?qualifier=DEFAULT"
Invocation URL นี้จะใช้สำหรับการเรียกใช้งาน MCP ผ่าน MCP Client
เรื่องที่ 2: Runtime Security & Authentication
AgentCore Runtime endpoints โดย default จะ authenticate ด้วย AWS Identity and Access Management (IAM) authentication พร้อม AWS Signature Version 4 (SigV4)
Security Details
- Inbound authentication – Clients ต้อง authenticate ด้วย IAM เพื่อเรียก Runtime endpoint
- ต้องใช้ AWS credentials – มีเฉพาะผู้ใช้ AWS ที่ได้รับอนุญาตเท่านั้นที่สามารถเข้าถึง MCP server ได้
- จัดการ credentials อัตโนมัติ – AgentCore CLI ใช้ AWS CLI credentials อัตโนมัติ
MCP Clients ส่วนใหญ่ (เช่น Kiro, Claude Desktop) ไม่รองรับ SigV4 signing โดยตรง
ถ้าหาก MCP client (เช่น Kiro) ไม่รองรับการทำ SigV4 signing เราจะมีวิธีการเรียกใช้ MCP อย่างไร?
ข่าวดีคือ ทาง AWS ได้มีการออก mcp-proxy-for-aws ที่รองรับ SigV4 มาให้ใช้ โดยผู้ใช้งานทำการเพิ่ม mcp-proxy-for-aws@latest เข้าใปใน mcp.json file ของ MCP client นั้นๆ
Announcement: https://aws.amazon.com/about-aws/whats-new/2025/10/model-context-protocol-proxy-available/
การทำงานของ mcp-proxy-for-aws
┌─────────┐         ┌──────────────────┐         ┌──────────────────┐
│  Kiro   │ ──────> │ mcp-proxy-for-aws│ ──────> │ AgentCore Runtime│
│   IDE   │  stdio  │  (SigV4 signing) │  HTTPS  │   (IAM auth)     │
└─────────┘         └──────────────────┘         └──────────────────┘
- ใช้ AWS credentials ที่มีอยู่ในเครื่อง local เพื่อ sign requests
- รันบนเครื่องคุณและแปลระหว่าง AI assistant กับ AWS services
- ไม่ต้องเขียน authentication logic เอง
ตัวอย่าง mcp.json
เราสามารถเพิ่ม calculator และ strands mcp ไปใน Kiro โดยใช้ Endpoint URL และใช้ mcp-proxy-for-aws เข้ามาเป็นตัวช่วยได้
สำหรับ Kiro : Edit file mcp.json ดังตัวอย่างข้างล่าง
{
  "mcpServers": {
    "calculator-runtime": {
      "command": "uvx",
      "args": [
        "mcp-proxy-for-aws@latest",
        "https://bedrock-agentcore.{region}.amazonaws.com/runtimes/{url-encoded-arn}/invocations?qualifier=DEFAULT"
      ],
      "env": {
        "AWS_PROFILE": "YOUR_PROFILE_HERE",
        "AWS_REGION": "ํYOUR REGION"
      }
    },
    "strands-docs-runtime": {
      "command": "uvx",
      "args": [
        "mcp-proxy-for-aws@latest",
        "https://bedrock-agentcore.{region}.amazonaws.com/runtimes/{url-encoded-arn-strands}/invocations?qualifier=DEFAULT"
      ],
      "env": {
        "AWS_PROFILE": "YOUR_PROFILE_HERE",
        "AWS_REGION": "YOUR REGION"
      }
    }
  }
}
Configuration Steps
- หา Endpoint URL
- ระบุ AWS_PROFILE ที่มีสิทธิ์เข้าถึง Runtime
- ระบุ AWS_REGION ที่ deploy Runtime ไว้
- Restart Kiro หรือ reload MCP configuration
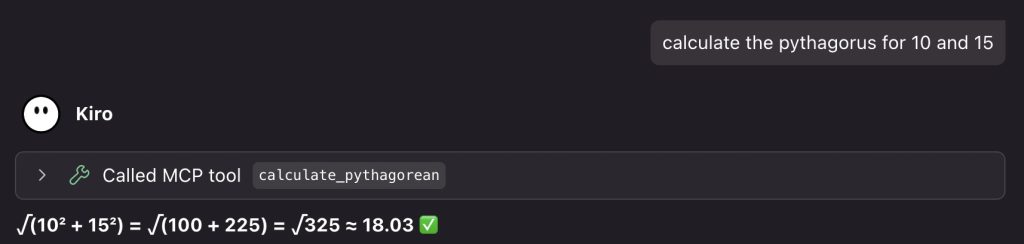
Test MCPs ทั้งสองบน Kiro
ถึงตอนนี้ MCP servers ทั้งสองตัวควรจะแสดงอยู่ใน Kiro MCP list แล้ว พร้อมให้เราทดสอบเรียกใช้งาน tools ต่างๆ

ลองเรียกใช้ Calculator MCP
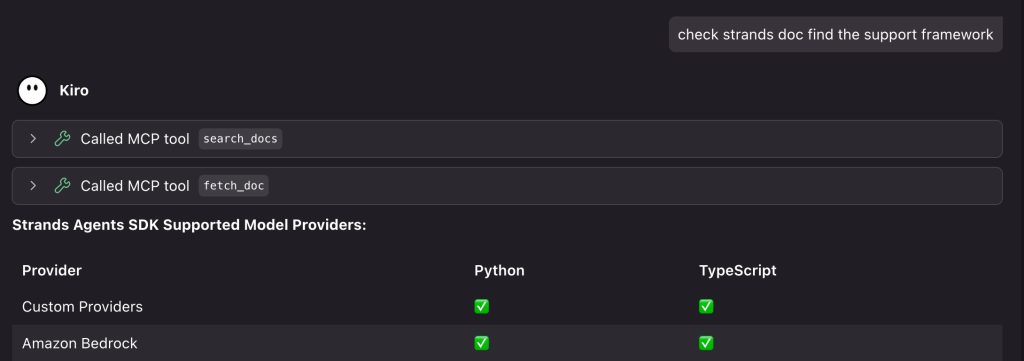
ลองเรียกใช้ Strands MCP
What’s Next
มาถึงตอนนี้เราใช้งาน MCP แค่ 2 ตัว 3 tools แต่ถ้ามี 5, 20 หรือแม้กระทั่ง 50 ตัว 100 tools เราจะบริหารจัดการ tools เหล่านี้ได้อย่างไร?
นั่นคือจุดที่ AgentCore Gateway เข้ามาช่วย ซึ่งหัวข้อนี้จะพูดถึงใน Part 2 ของซีรีส์นี้
Coming in Part 2: การจัดการ MCP Servers หลายตัวด้วย AgentCore Gateway
ถัดมา ถ้าสังเกตุจะเห็นได้ว่า MCP ทั้งสองที่เราสร้างขึ้นมา ไม่ว่าจะเป็น calculator หรือ strands document ไม่ได้มีความจำเป็นต้องไปเชื่อมต่อกับระบบอื่นๆ หลังบ้าน แต่ถ้าในกรณีที่ MCP จำเป็นต้องไปเชื่อมต่อระบบอื่น เช่น Database เป็นต้น เราจะจัดการ Authentication & Authorization ได้อย่างไร?
นั่นคือจุดที่ AgentCore Identity เข้ามาช่วย ซึ่งหัวข้อนี้จะพูดถึงใน Part 3 ของซีรีส์นี้
Coming in Part 3: Authentication & Authorization ด้วย AgentCore Identity
Appendix: Deployment Modes
ในบทความนี้ เราใช้ AgentCore Runtime ใน public mode ซึ่งหมายความว่า MCP servers สามารถเข้าถึงได้ผ่าน public endpoints (แม้ว่าจะยังได้รับการปกป้องด้วย IAM authentication)
อย่างไรก็ตาม AgentCore Runtime ยังรองรับ deployment modes อื่นๆ สำหรับ production use cases:
- VPC mode: Deploy MCP servers ใน Virtual Private Cloud (VPC) ของคุณเองเพื่อความปลอดภัยและการแยก network ที่ดีขึ้น
- AgentCore สร้าง Elastic Network Interfaces (ENIs) ใน VPC ของคุณ
- ควบคุม traffic ด้วย security groups และ network ACLs
- เข้าถึง private resources (databases, internal APIs) โดยตรง
- AWS PrivateLink: เชื่อมต่อกับ AgentCore endpoints แบบ private โดยไม่ต้อง expose ไปยัง internet
- ใช้ AWS internal network
- ลด latency และเพิ่ม security
สำหรับ production deployments โดยเฉพาะกับข้อมูลที่ sensitive ให้พิจารณาใช้ VPC mode หรือ PrivateLink เพื่อรักษาความปลอดภัยและการปฏิบัติตามข้อกำหนดขององค์กร
Summary
ในบทความนี้ เราได้แสดงวิธีการ host MCP servers โดยใช้ AWS AgentCore Runtime:
1. สร้าง MCP Server
- สร้าง Calculator MCP แบบง่ายๆ
- Deploy ด้วย zip approach (direct_code_deploy)
2. แปลง Local MCP Server
- ใช้ mcp-proxy แปลง Strands MCP จาก stdio เป็น HTTP
- Deploy ด้วย custom Dockerfile (container approach)
3. เชื่อมต่อกับ Kiro IDE เพื่อเรียกใช้งาน MCP server
- ใช้ mcp-proxy-for-aws เพื่อรองรับ SigV4 authentication
- Configure
mcp.jsonสำหรับ Kiro - เรียกใช้ MCP tools จาก IDE ได้สำเร็จ
การ host MCP servers บน AgentCore Runtime ช่วยแก้ปัญหาหลักๆ ได้ครบจบในที่เดียว เครื่องของคุณไม่ต้องรัน MCP หลายตัวพร้อมกันอีกต่อไป ทีมสามารถใช้ MCP servers เดียวกันได้โดยไม่ต้องติดตั้งบนเครื่องของแต่ละคน พร้อมระบบ authentication ที่ปลอดภัย และที่สำคัญคือ AWS จัดการ infrastructure, scaling และ maintenance ให้หมด คุณแค่โฟกัสที่การพัฒนา MCP servers