AWS Thai Blog
AgentCore in Action Part2 : การจัดการ MCP Servers หลายตัวด้วย AgentCore Gateway
AgentCore in Action Series
ซีรีส์นี้จะพาคุณไปทำความเข้าใจวิธีการรัน AI agents อย่างมีประสิทธิภาพด้วย Amazon Bedrock AgentCore โดยครอบคลุมตั้งแต่การ deploy, scale ไปจนถึงการรักษาความปลอดภัยตามมาตรฐาน enterprise โดยไม่ต้องกังวลเรื่อง infrastructure management
AgentCore in Action: การสร้างและจัดการ AI Agents จาก Deploy ถึง Scale
- Part 1: การ Host MCP Servers ด้วย AgentCore Runtime
- Part 2: การจัดการ MCP Servers หลายตัวด้วย AgentCore Gateway (บทความนี้)
- Part 3: Authentication & Authorization ด้วย AgentCore Identity (Coming soon)
- Part 4: ควบคุมสิทธิ์การใช้งาน Tools ด้วย AgentCore Policy (Coming soon)
Part 2: การจัดการ MCP Servers หลายตัวด้วย AgentCore Gateway
Part1 นั้นได้อธิบายการ host MCP servers บน AgentCore Runtime โดยได้ deploy remote MCP สองตัวได้แก่ Calculator MCP และ Strands Docs MCP
เมื่อ MCP เริ่มเยอะขึ้นเรื่อยๆ
ลองนึกภาพว่าทีมมี MCP ถึง 20 ตัว แต่ละตัวมี 3-5 tools รวมกันเกือบ 100 tools กระจายอยู่ใน 20 endpoints ที่แตกต่างกัน
ทุกครั้งที่เพิ่ม MCP server ใหม่ ทุกคนในทีมต้อง update/configure mcp แล้วถ้าต้องการหา tool สักตัว จะจำได้อย่างไรว่าtoolนั้นอยู่ใน MCP server ไหน?
ยิ่งไปกว่านั้น MCP Client ยังต้องรักษา HTTP connections ทั้ง 20 ตัวพร้อมกัน ซึ่งเป็น overhead ที่ไม่จำเป็น
AgentCore Gateway
นี่คือจุดที่ AWS AgentCore Gateway เข้ามาช่วยจัดการ แทนที่จะต้องจัดการหลาย MCP server endpoints, AgentCore Gateway จะให้ single endpoint ที่ route requests ไปยัง MCP servers ทั้งหมดโดยอัตโนมัติ
สามารถมองว่า Gateway เป็นเหมือน smart traffic controller สำหรับ MCP servers สามารถ route ไปยังจุดหมายที่ถูกต้องได้อย่างชาญฉลาด
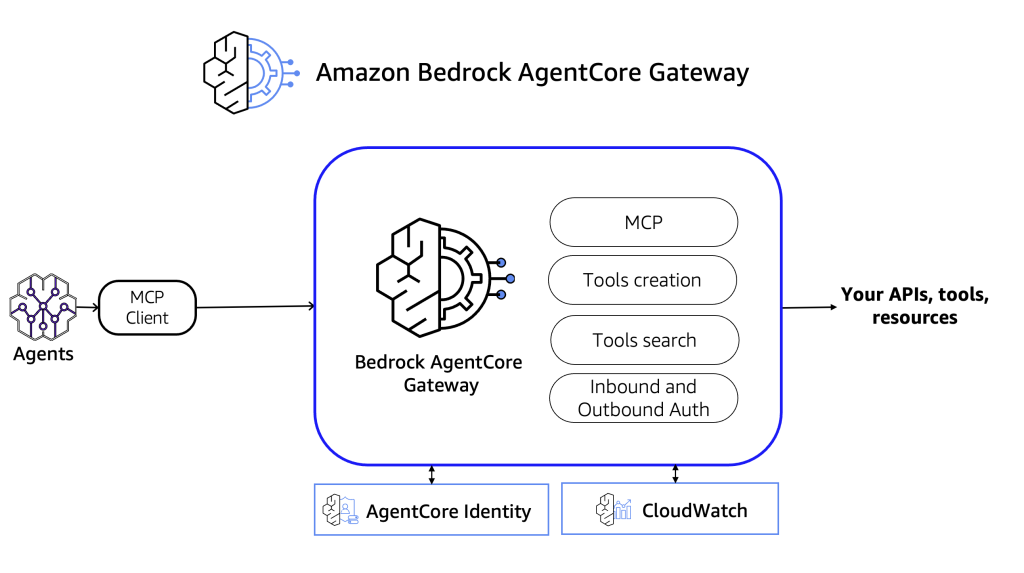
ความสามารถหลักของ AgentCore Gateway
- Unified endpoint – URL เดียวสำหรับเข้าถึง MCP servers ทั้งหมด
- Intelligent routing – Route tool calls ไปยัง backend target ที่ถูกต้องโดยอัตโนมัติ
- Tool discovery – มี built-in tool listing, syncing และ semantic search
- รองรับหลาย target types – Route ไปยัง backend หลายประเภท
- Centralized management – Configure และ monitor targets ทั้งหมดจากที่เดียว
Targets ที่รองรับ
สิ่งที่น่าสนใจคือ Gateway ไม่ได้ route ได้แค่ไปยัง MCP servers เท่านั้น แต่ยังรองรับ backend ได้หลายประเภท:
- MCP servers – ไม่ว่าจะ host บน AgentCore Runtime หรือ host ไว้ที่อื่น
- AWS Lambda – Serverless functions
- HTTP endpoints – External APIs และ OpenAPI-compliant
บทความนี้จะโฟกัสไปที่การ route ไปยัง MCP server ที่ deploy อยู่บน AgentCore Runtime (จาก Part1) และ AWS Lambda
What We’ll Build
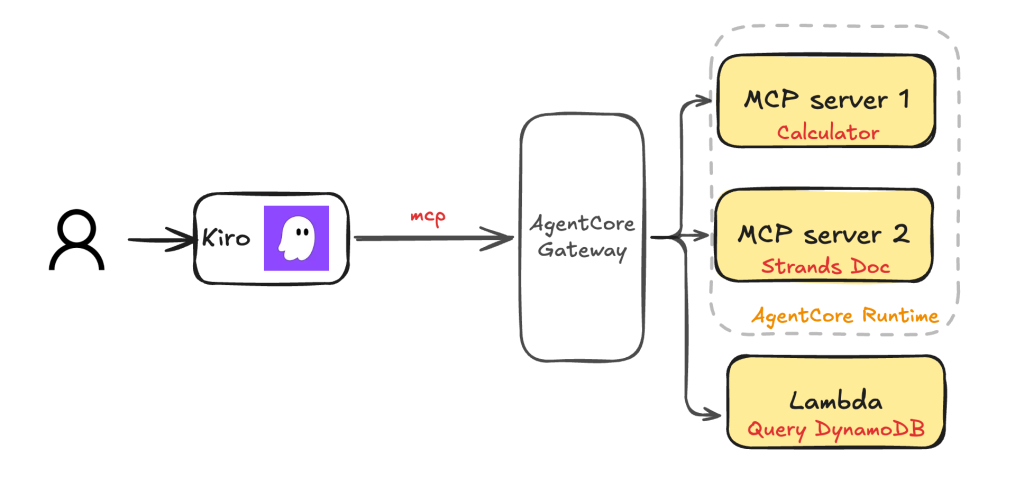
Gateway Targets:
- Calculator MCP (Runtime) – 1 tool:
calculate_pythagorean - Strands Docs MCP (Runtime) – 2 tools:
search_docs,fetch_doc - DynamoDB Reader (Lambda) – 2 tools:
get_item,list_items
Prerequisites
- รีวิว part1 หรือ มี remote MCP servers ที่พร้อมใช้งาน
- AWS credentials configured พร้อม IAM permissions ที่เหมาะสม
- Kiro IDE หรือ MCP client อื่นๆ สำหรับการทดสอบ
Step 1: เตรียม MCP Runtimes สำหรับ Gateway
Authentication Architecture
ก่อนที่จะสร้าง Gateway สิ่งแรกที่ต้องเข้าใจคือ authentication flow ระหว่าง Kiro, Gateway และ Runtime
Kiro → [SigV4/IAM] → Gateway → [OAuth/JWT] → Runtime (MCP)
         ↑                        ↑              ↑
    Inbound Auth            Outbound Auth   Inbound Auth
    (Gateway)               (Gateway)       (Runtime)
Authentication จะถูกแบ่งเป็น 3 ช่วง:
| Hop | Auth Type | Description |
|---|---|---|
| Kiro → Gateway | SigV4 (IAM) | Gateway ตรวจสอบ Identity จาก AWS |
| Gateway → Runtime(MCP) ( config เพิ่ม) | OAuth (JWT) | Gateway ขอ token แล้วส่งไปยัง Runtime |
| Runtime validates (config เพิ่ม) | JWT | Runtime ตรวจสอบ token |
Problem: Runtime ใน Part 1 ใช้ IAM Authentication
ใน Part 1 เมื่อเรา deploy Calculator และ Strands Docs MCP, Runtime จะใช้ IAM authentication เป็น default
แต่สำหรับ Gateway → Runtime (MCP targets) นั้น ต้องใช้ OAuth authentication เท่านั้น ยังไม่รองรับ IAM
จึงต้องทำการ reconfigure Runtime ทั้งสองตัวรวมไปถึง Gateway ให้ใช้ JWT authentication แทน
Solution: Reconfigure Runtimes เป็น JWT Authentication
Step 1.1: เตรียม Cognito User Pool สำหรับ OAuth
ในขั้นตอนนี้นั้นจะใช้ Amazon Cognito User Pool เพื่อเป็นตัวกลางในการทำ OAuth authentication ระหว่าง Gateway และ Runtime โดยจะใช้:
- User Pool – สำหรับจัดการ authentication
- App Client – สำหรับ M2M (machine-to-machine) authentication ด้วย client credentials flow
User Pool
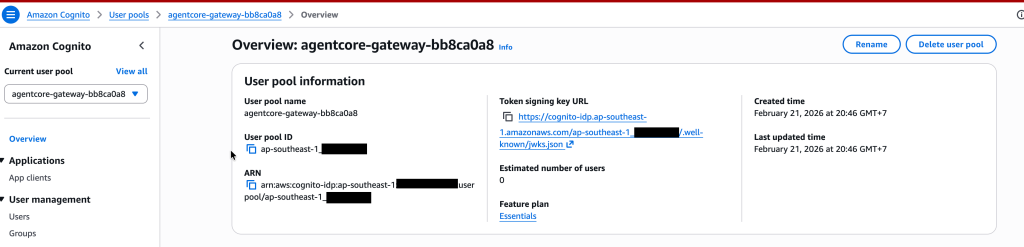
App Client
หมายเหตุ: บันทึก User Pool ID, Client ID และ Client Secret ไว้ สำหรับใช้ในขั้นตอนถัดไป
Step 1.2: Update Calculator MCP Configuration
ขั้นตอนถัดไปคือแก้ไขไฟล์ bedrock_agentcore.yaml ของทั้ง 2 MCP ที่เราสร้างไว้ เพื่อเพิ่ม JWT authorizer configuration:
agent_runtime_name: calculator_mcp
protocol: MCP
deployment_type: direct_code_deploy
entrypoint: mcp_server.py
disable_memory: true
region: ap-southeast-1
# เพิ่ม JWT authorizer configuration
authorizer_configuration:
customJWTAuthorizer:
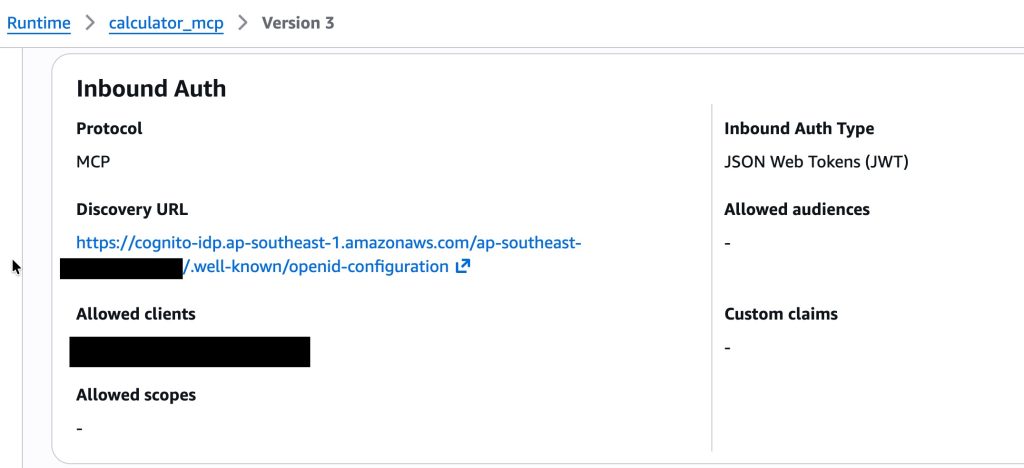
discoveryUrl: https://cognito-idp.ap-southeast-1.amazonaws.com/ap-southeast-1_XXXXXXX/.well-known/openid-configuration
allowedClients:
- xxxxxxxxxxxxxxxxxxxxx
Key Points:
discoveryUrl– Cognito OIDC discovery endpointallowedClients– Client IDs ที่ได้รับอนุญาตให้เรียก Runtime
Step 1.3: Redeploy Calculator MCP
cd mcp_servers/calculator_mcp
agentcore deploy
Output:
╭──────────── Deployment Success ────────────╮
│ Agent Name: calculator_mcp                 │
│ Agent ARN: arn:aws:bedrock-agentcore:ap-   │
│   southeast-1:012345678901:runtime/        │
│   calculator_mcp-ONDUk33Lpm                │
│                                            │
│ Configuration updated with JWT authorizer  │
╰────────────────────────────────────────────╯
Step 1.4: Update และ Redeploy Strands Docs MCP
ทำเช่นเดียวกันกับ Strands Docs MCP โดยเพิ่ม authorizer_configuration แบบเดียวกันลงใน bedrock_agentcore.yaml แล้ว redeploy:
cd mcp_servers/strands_docs_mcp
agentcore deploy
ถึงตรงนี้ Runtime ทั้งสองตัวพร้อมเชื่อมต่อกับ Gateway แล้ว โดยจะสังเกตุได้ว่า Inbound Auth Type ของ Runtime เปลี่ยนจาก IAM ไปเป็น JWT
Step 2: สร้าง AgentCore Gateway
Step 2.1: สร้าง OAuth Client (Outbound : Gateway –> Runtime (MCP)
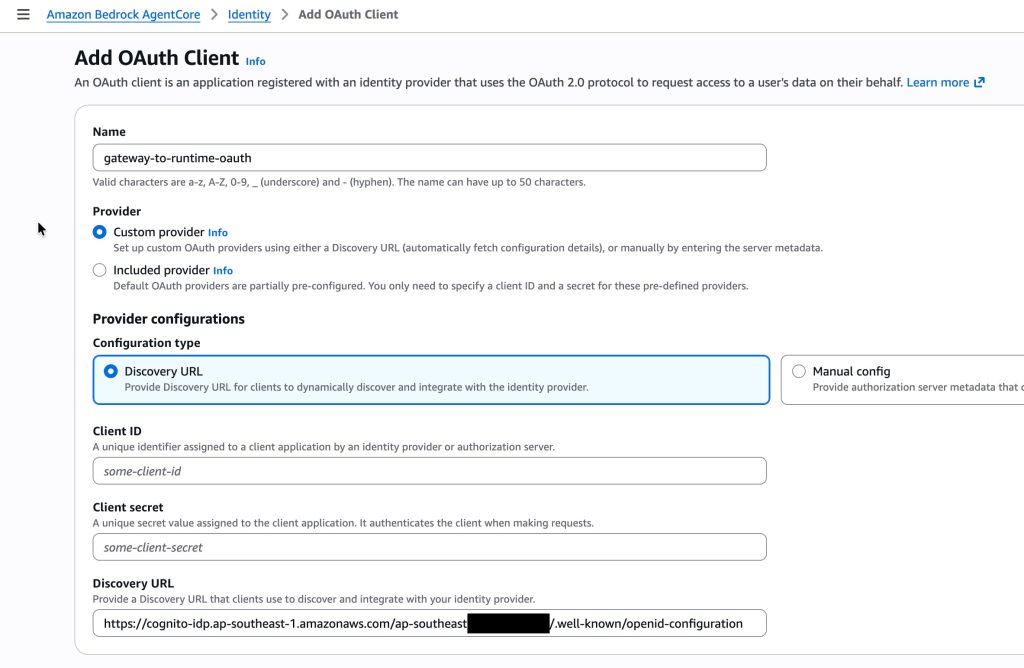
ก่อนสร้าง Gateway เราต้อง config OAuth Client สำหรับ Gateway เพื่อใช้ในการ authen กับ MCP เสียก่อน เมื่อ Gateway ต้องเรียก Runtime จะใช้ provider นี้ในการขอ OAuth tokens ซึ่งกระบวนการนี้จะอาศัย AgentCore Identity เข้ามาช่วย
Configuration:
- Name:
gateway-to-runtime-oauth - Provider type: Custom
- Client ID: จาก Cognito App Client
- Client secret: จาก Cognito App Client
- Discovery URL: จาก Cognito
หมายเหตุ:
- AgentCore Identity จะเก็บ OAuth credentials แบบ encrypted, Gateway จะใช้ provider นี้ในการขอ tokens โดยอัตโนมัติทุกครั้งที่ต้องเรียก Runtime
- สำหรับการทำงาน และ flow ของ Inbound และ Outbound Auth จะมีอธิบายเพิ่มใน Part3
Step 2.2: สร้าง Gateway
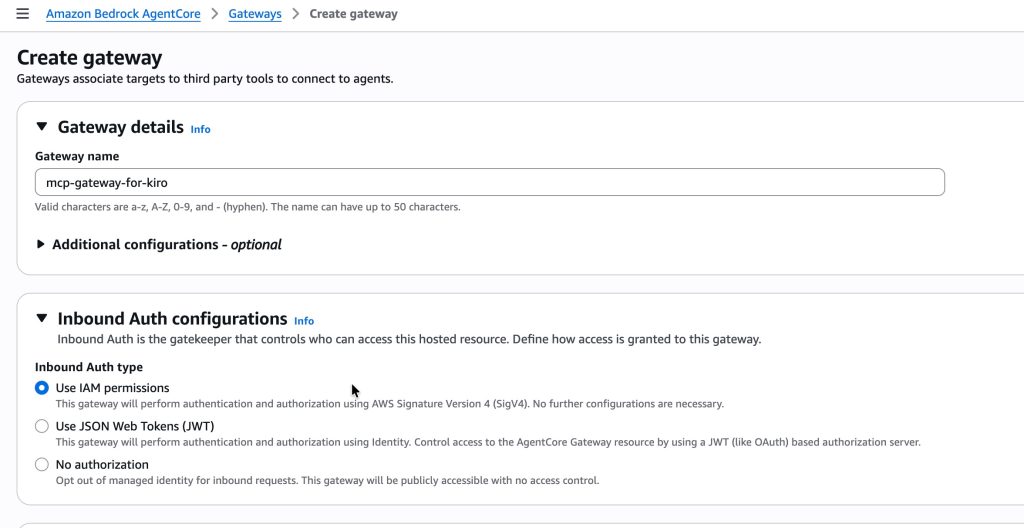
Configuration:
- Name:
mcp-gateway-for-kiro - Inbound authentication: AWS IAM (สำหรับ Kiro → Gateway)
หลังจากสร้างเสร็จ เราจะได้ Gateway URL มา:
https://mcp-gateway-for-kiro-xxxxxxxxxx.gateway.bedrock-agentcore.ap-southeast-1.amazonaws.com/mcp

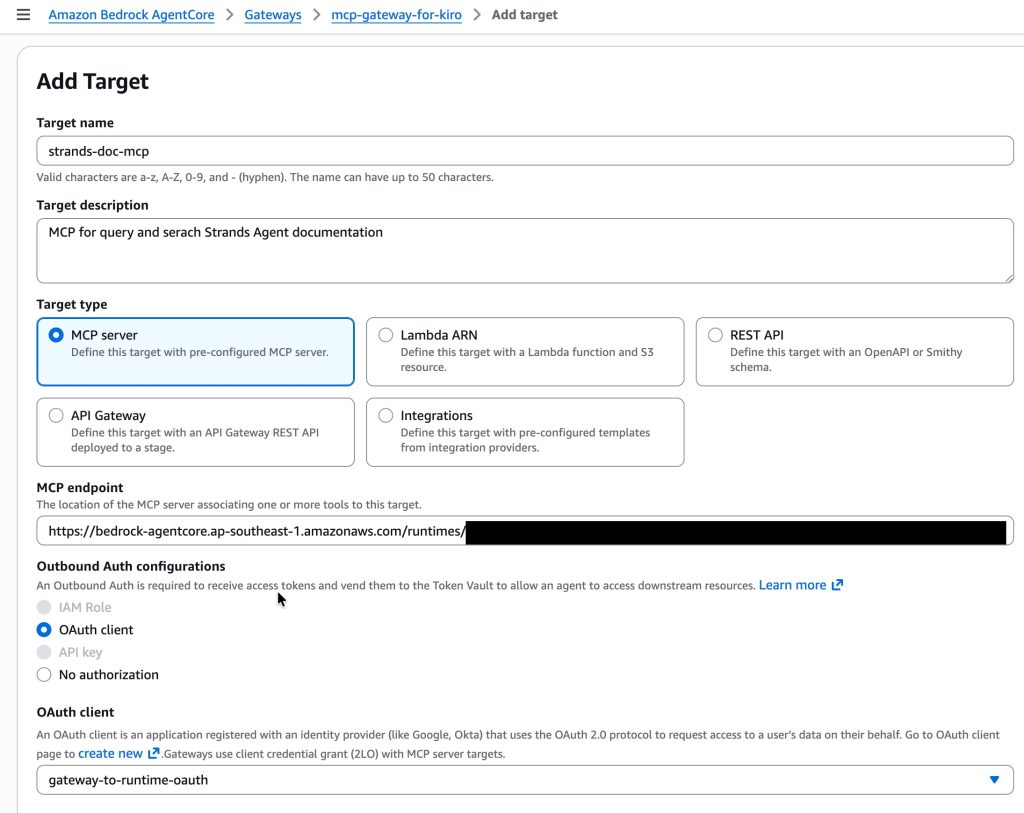
Step 2.3: เพิ่ม Calculator MCP เป็น Gateway Target
ขั้นตอนถัดไปคือเพิ่ม MCP servers เข้าไปเป็น targets ใน Gateway
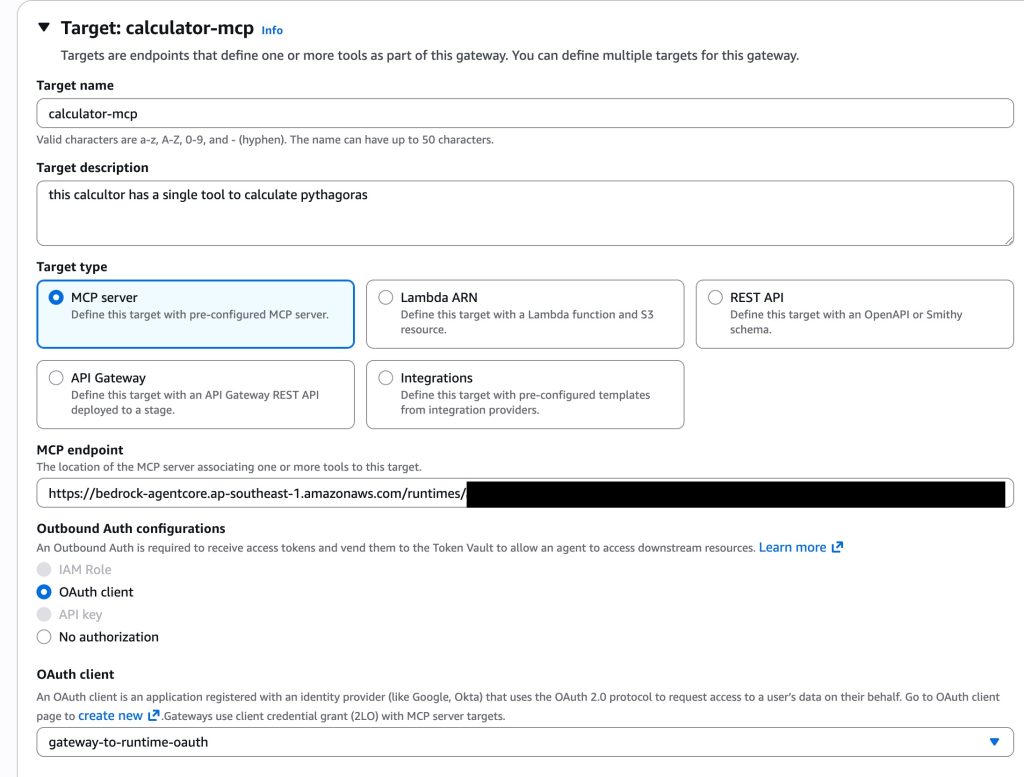
Configuration:
- Target name:
calculator-mcp-target - Target type: MCP server
- Endpoint URL: Calculator Runtime invocation URL
- Credential provider: OAuth
- OAuth provider:
gateway-to-runtime-oauth
Tip: Runtime invocation URL มีรูปแบบ:
https://bedrock-agentcore.{region}.amazonaws.com/runtimes/{url-encoded-arn}/invocations?qualifier=DEFAULT
ซึ่งเป็น URL เดียวกับที่เราใช้ใน Part 1 ตอนเชื่อมต่อ Kiro กับ Runtime โดยตรง
Step 2.4: เพิ่ม Strands Docs MCP เป็น Gateway Target
ทำซ้ำขั้นตอนเดียวกันสำหรับ Strands Docs MCP:
Step 3: เพิ่ม Lambda Function เป็น Gateway Target
นอกจาก MCP Server แล้ว Gateway ยังรองรับ AWS Lambda functions เป็น targets ได้ด้วย ซึ่งเหมาะสำหรับ tools ที่ต้องการเข้าถึง AWS services เช่น DynamoDB, S3 หรือ RDS
Step 3.1: เตรียม DynamoDB Tables และ Lambda Function
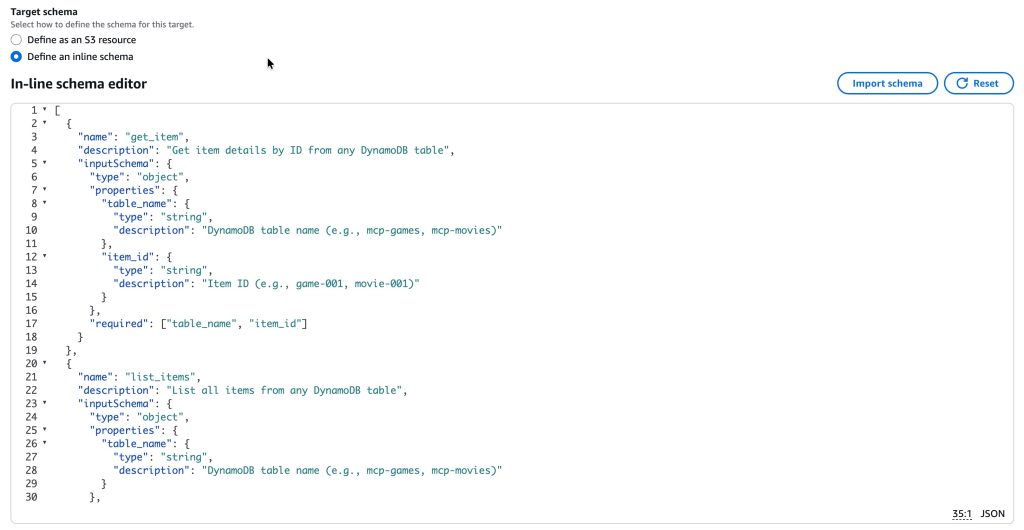
สำหรับตัวอย่างนี้ได้เตรียม DynamoDB table และ Lambda ไว้ล่วงหน้าดังนี้:
- DynamoDB Tables:
mcp-gamesและmcp-moviesพร้อม sample data - Lambda Function:
mcp-dynamodb-readerที่มี 2 tools
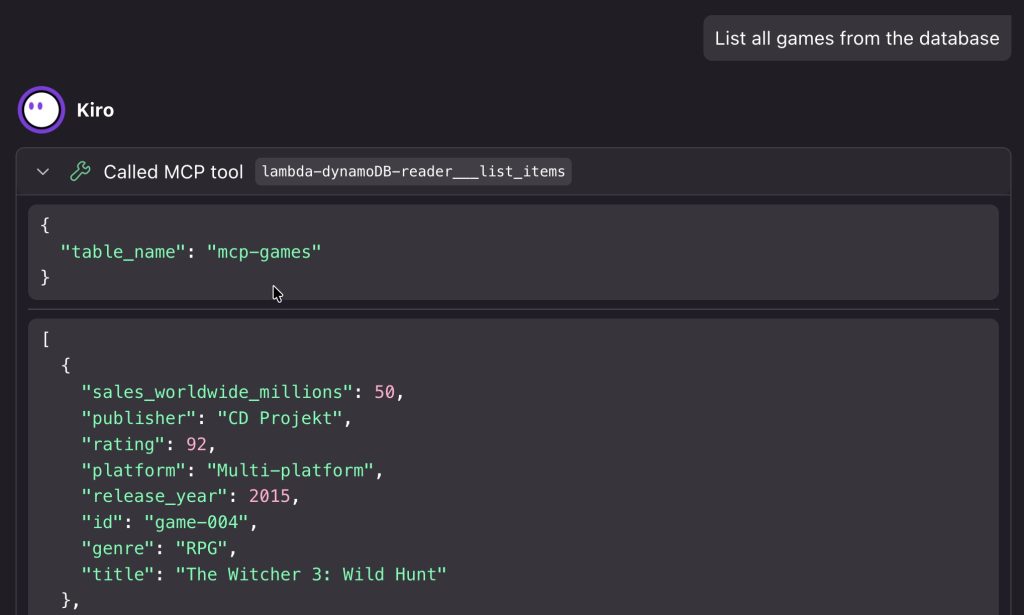
get_item(table_name, item_id)– ดึงข้อมูล item เดียวจาก tablelist_items(table_name)– ดึงข้อมูลทั้งหมดจาก table
สำหรับ Lambda targets นั้น Gateway จะจัดการแปลง MCP protocol ให้โดยอัตโนมัติ ตัว Lambda function จึงไม่จำเป็นต้อง implement MCP protocol เอง
หมายเหตุ: การสร้าง DynamoDB tables และ Lambda function อยู่นอกขอบเขตของบทความนี้
Step 3.2: เพิ่ม Lambda เป็น Gateway Target
ใน Gateway console ไปที่ Targets tab แล้วคลิก Add target:
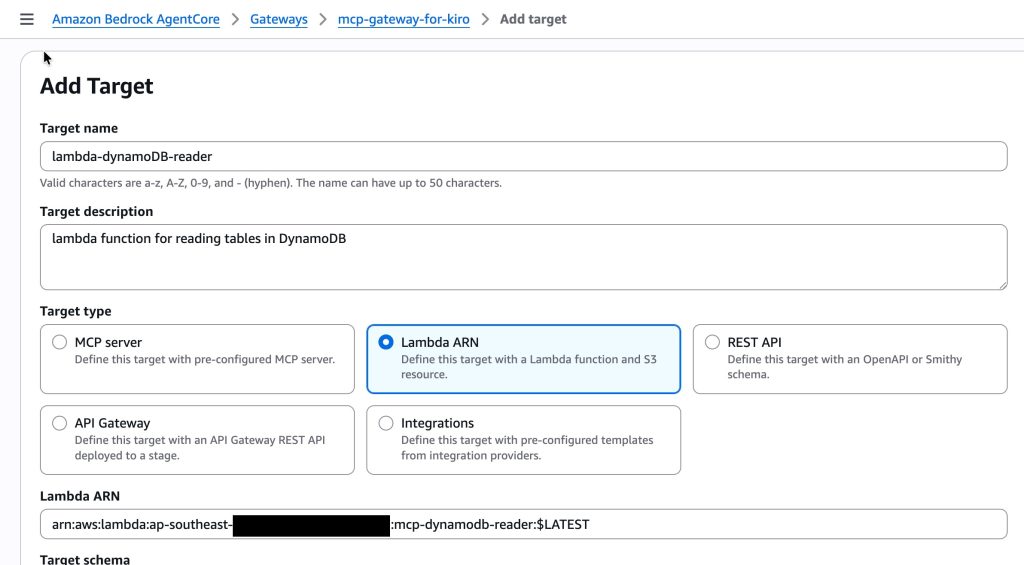
Configuration:
- Target name:
dynamodb-reader-target - Target type: Lambda function
- Lambda ARN:
arn:aws:lambda:ap-southeast-1:012345678901:function:mcp-dynamodb-reader:$LATEST - Outbound Auth : IAM role
สังเกตว่า Lambda targets ใช้ IAM Role แทน OAuth
Step 3.3: กำหนด Tool Schema
สำหรับ Lambda targets ก่อนใช้งานจำเป็นต้องระบุ tool schema เพื่อให้ Gateway ทราบว่ามี tools อะไรบ้าง ซึ่งต่างจาก MCP Runtime targets ที่ Gateway สามารถดึง schema จาก MCP server ได้โดยตรง
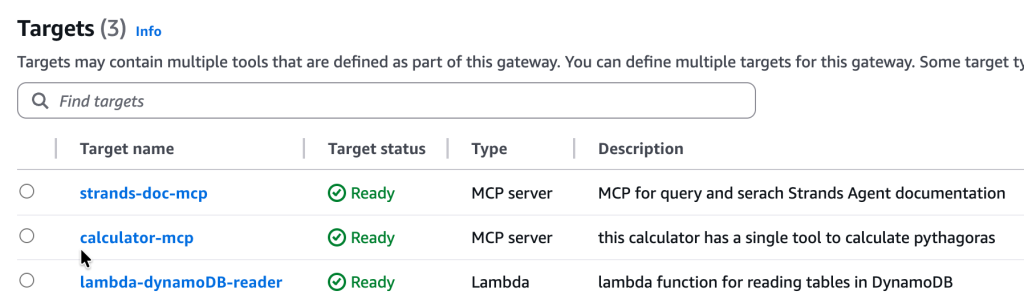
ทั้ง 3 MCP พร้อมใช้งานผ่านตัว Gateway แล้ว
Step 4: ทดสอบ Gateway จาก Kiro IDE
Configure Kiro IDE
ก่อนจะเรียกใช้งาน สิ่งที่ต้องทำคือแก้ไข mcp.json ใน Kiro โดยคราวนี้จะใช้แค่ URL เดียวจากตัว Gateway แทนที่จะต้อง configure หลาย endpoints:
{
  "mcpServers": {
    "mcp-gateway-for-kiro": {
      "command": "uvx",
      "args": [
        "mcp-proxy-for-aws@latest",
        "https://mcp-gateway-for-kiro-xxxxxxx.gateway.bedrock-agentcore.ap-southeast-1.amazonaws.com/mcp"
      ],
      "env": {
        "AWS_PROFILE": "YOUR_PROFILE_HERE",
        "AWS_REGION": "ap-southeast-1"
      },
      "disabled": false,
      "autoApprove": []
    }
  }
}
สังเกตว่าเราใช้ mcp-proxy-for-aws เหมือนเดิมเพื่อจัดการ SigV4 signing แต่คราวนี้ URL เดียวก็เข้าถึง tools ทั้งหมดได้ (3 targets, 5 tools)
ใน kiro จะขึ้นมาแค่ 1 MCP แต่มีหลาย tool ให้ใช้งาน
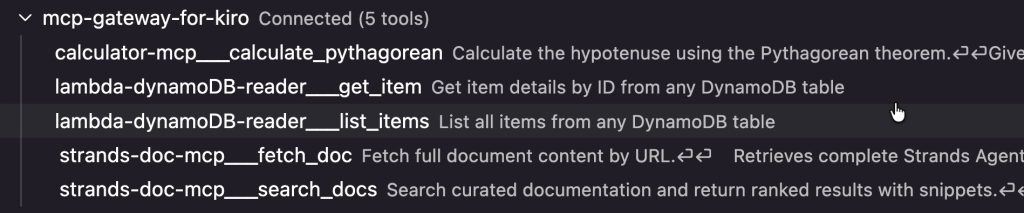
ทดสอบ Tools ทั้งหมด
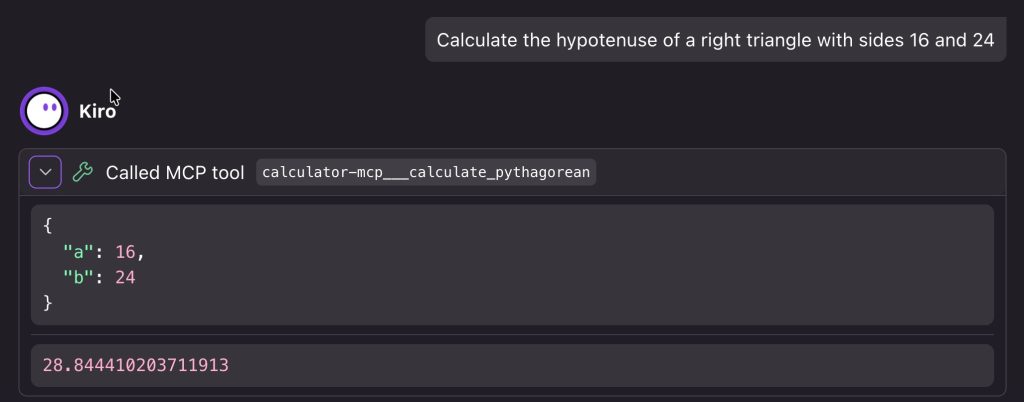
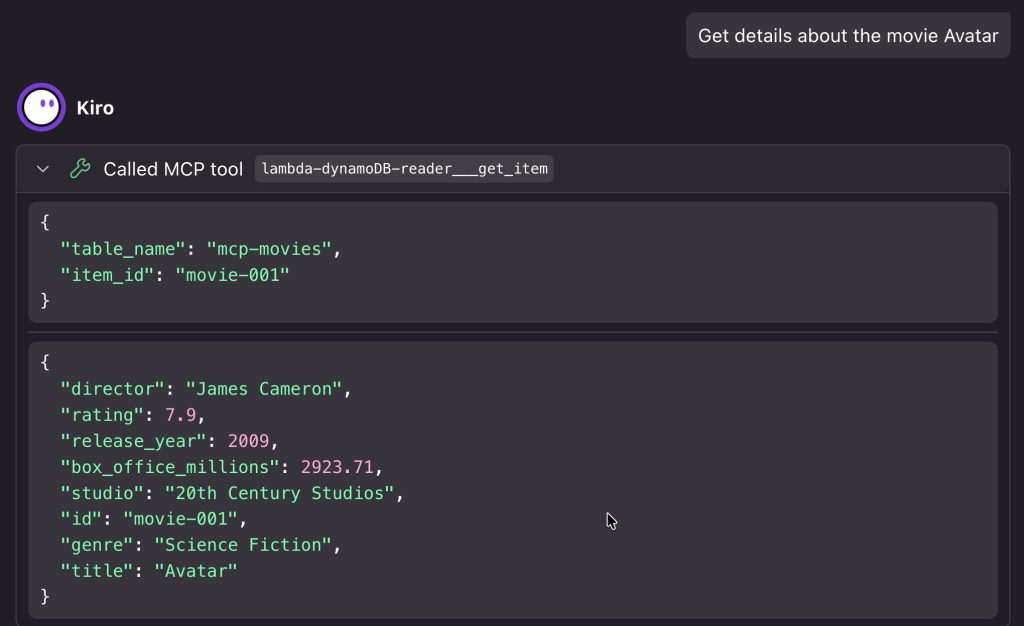
1. Calculator MCP – calculate_pythagorean
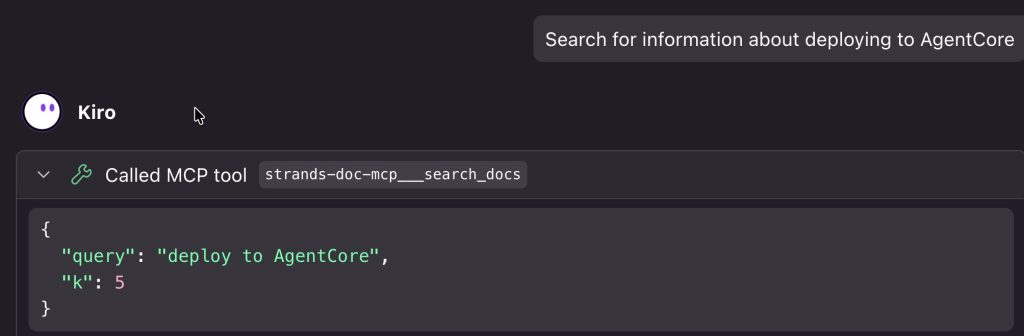
2. Strands Docs MCP – search_docs
3. Lambda Target – list_items
4. Lambda Target – get_item
ผลลัพธ์: configuration เดียว, ค้นหา tools ได้จากที่เดียว, URL เดียว, และที่สำคัญคือเพิ่ม targets ใหม่ได้โดยไม่ต้อง update Kiro
Semantic Search Support
นอกจาก list tool หรือ search tool, AgentCore Gateway ยังรองรับการทำ semantic search โดยแทนที่จะ list tools ทั้ง 100 ตัว เราสามารถ ใช้ Gateway ทำ semantic เพื่อ return เฉพาะ tools ที่เกี่ยวข้องที่สุดตัวอย่างเช่น ค้นหา “calculate numbers” จะ return calculate_pythagorean tool แม้ว่า query จะไม่ได้พูดถึง “pythagorean” หรือ “calculator” โดยตรง
What’s Next
ตลอดทั้งบทความนี้ได้มีการ implement authentication ไว้หลายจุด ทั้ง IAM/SigV4 สำหรับ inbound authentication ของ Runtime (Part 1) และ Gateway (Part 2) รวมถึง OAuth/JWT สำหรับ outbound authentication จาก Gateway ไปยัง Runtime
อย่างไรก็ตาม ทั้งหมดนี้เป็นเพียงการ “ใช้งาน” authentication โดยยังไม่ได้อธิบายรายละเอียดว่า AgentCore จัดการเรื่อง identity และ authentication อย่างไรเช่น Token Vault ทำงานอย่างไร? OAuth credential provider ที่สร้างไว้ถูกใช้ตรงไหนบ้าง? แล้ว Cognito ที่ setup ไว้เชื่อมกับ AgentCore อย่างไร?
Part 3 จะอธิบาย AgentCore Identity ซึ่งเป็น component ที่จัดการ authentication ทั้งหมดของ AgentCore ตั้งแต่การ authenticate ผู้ใช้ที่เข้ามาเรียก Runtime/Gateway ไปจนถึงการจัดการ credentials สำหรับ outbound connections
คำถามถัดมาคือ ปัจจุบัน user ที่ authenticated แล้วสามารถเรียก tool ใดก็ได้บน MCP server หากต้องการให้สมาชิกแต่ละคนในทีมเข้าถึง tools ที่แตกต่างกัน หรือจำกัดสิทธิ์ของ external users ให้เรียกได้เฉพาะบาง tools จะทำอย่างไร?
นั่นคือสิ่งที่ Part 4: AgentCore Policy จะเข้ามา โดยเพิ่ม fine-grained authorization ที่ควบคุมได้ว่าใครเรียก tool ไหนได้บ้าง
Coming in Part 3: Authentication & Authorization ด้วย AgentCore Identity
Coming in Part 4: ควบคุมสิทธิ์การใช้งาน Tools ด้วย AgentCore Policy
Summary
ในบทความนี้ เราได้แสดงวิธีการจัดการ MCP servers หลายตัวโดยใช้ AgentCore Gateway:
1. เตรียม MCP Runtimes
- Reconfigure Calculator และ Strands Docs MCP ให้ใช้ JWT authentication
- Redeploy Runtimes ด้วย configuration ใหม่
2. สร้าง AgentCore Gateway
- สร้าง OAuth credential provider ใน AgentCore Identity
- สร้าง AgentCore Gateway
- เพิ่ม Calculator และ Strands Docs MCP เป็น targets ด้วย OAuth
3. เพิ่ม Lambda Target
- ใช้ Lambda function ด้วย generic tools สำหรับอ่าน DynamoDB
- เพิ่ม Lambda เป็น Gateway target ด้วย IAM
4. ทดสอบจาก Kiro IDE
- Configure Kiro ด้วย Gateway URL เดียว
- ทดสอบ tools ทั้งหมด (5 tools จาก 3 targets)
Gateway เปลี่ยนประสบการณ์การจัดการ MCP servers หลายตัว จากหลายๆ MCP endpoints แยกกัน ให้เป็นlayer เดียวใช้ URL เดียว พร้อม automatic tool discovery และ semantic search capabilities ที่ scale ไปตามจำนวน targets ที่เพิ่มขึ้น
สำหรับข้อมูลเพิ่มเติมเกี่ยวกับ AgentCore Gateway สามารถเข้าไปอ่านเพิ่มเติมได้ที่ AWS AgentCore documentation