AWS Compute Blog
Refreshing an Amazon ECS Container Instance Cluster With a New AMI
This post contributed by Subhrangshu Kumar Sarkar, Sr. Technical Account Manager at AWS
The Amazon ECS–optimized Amazon Machine Image (AMI) comes prepackaged with the Amazon Elastic Container Service (ECS) container agent, Docker, and the ecs-init service. When updates to these components are released, try to integrate them as quickly as possible. Doing so helps you maintain a safe, secure, and reliable environment for running your containers.
Each release of the ECS–optimized AMI includes bug fixes and feature updates. AWS recommends refreshing your container instance fleet with the latest AMI whenever possible, rather than trying to patch instances in-place. Periodical replacement of your ECS instances aligns with the immutable infrastructure paradigm, which is less prone to human error. It’s also less susceptible to configuration drift because infrastructure is managed through code.
In this post, I show you how to manually refresh the container instances in an active ECS cluster with new container instances built from a newly released AMI. You also see how to refresh the ECS instance fleet when it is part of an Auto Scaling group, and when it is not.
Solution Overview
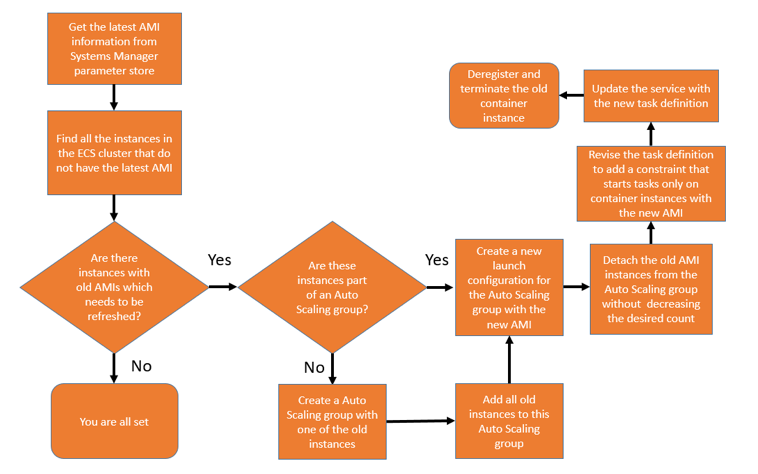
The following flow chart shows the strategy to be used in refreshing the cluster.
Prerequisites
- An AWS account with enough room to accommodate “ECS cluster instance count” number of more Amazon EC2 instances, in addition to the existing EC2 instances that you already have during the refresh period. If you have a total of 10 t2.medium instances in an AWS Region where an ECS cluster with four container instances is running, you should be able to spawn four more t2.medium instances. Your instance count comes down to 10 again, after your old instances are de-registered and terminated at the end of the refresh period.
- An existing ECS cluster (preferably with one or more container instances built with an old AMI), with or without a service running on it.
- A Linux system with the AWS CLI and JQ installed. This allows you to try the programmatic method of refreshing the cluster. You can SSH into an EC2 virtual machine if you do not have local access to a Linux system.
- An IAM user with permissions to view ECS resources, deregister and terminate the ECS instances, revise a task definition, and update a service.
- A specified AWS Region. In this post, the cluster is in us-east-1 and that is the region for all AWS CLI commands mentioned.
Use the following steps to test if you have all the resources and permissions to proceed.
Using the AWS CLI
Run the following command:
aws ecs list-clusters
Sample output:
Choose the cluster to refresh. In my case, the cluster name is workshop-app-cluster, with a service named “workshop-service” running on this cluster.
aws ecs describe-clusters --clusters <cluster name>
Sample output:
Using the AWS Console
- Open the Amazon ECS console.
- On the clusters page, select the cluster to refresh.
You should be able to see the details of the services, tasks, and the container instance on the respective tabs.

1. Retrieve the latest ECS–optimized AMI metadata
Previously, to make sure that you were using the latest ECS–optimized AMI, you had to either consult the ECS documentation or subscribe to the ECS AMI Amazon SNS topic.
Now, you can query the AWS Systems Manager Parameter Store API to get the latest AMI version ID or a list of available AMI IDs and their corresponding Docker runtime and ECS agent versions. You can query the Parameter Store API using the AWS CLI or any of the AWS SDKs. In fact, you can now use a Systems Manager parameter in AWS CloudFormation to launch EC2 instances with the latest ECS-optimized AMI.
Run the following command:
aws ssm get-parameters --names /aws/service/ecs/optimized-ami/amazon-linux/recommended --query "Parameters[].Value" --output text | jq .
Sample output:
The image_id is the image ID for the latest ECS–optimized AMI in the Region in which you are operating.
Note: At the time of publication, querying Parameter Store is not possible through the console.
2. Find all outdated container instances
Use the following steps to find all container instances not built with the latest ECS–optimized AMI, which should be refreshed.
Using the AWS CLI
Run the following command on your ECS cluster with the image_id value that you got from the ssm get-parameters command:
aws ecs list-container-instances --cluster <cluster name> --filter "attribute:ecs.ami-id != <image_id>"
Sample output:
Now, find the corresponding EC2 instance IDs for these container instances. The IDs are then used to find the corresponding Auto Scaling group from which to detach the instances.
aws ecs list-container-instances --cluster <cluster name> --filter "attribute:ecs.ami-id != <image_id>"| \
jq -c '.containerInstanceArns[]' | \
xargs aws ecs describe-container-instances --cluster <cluster name> --container-instances | \
jq '[.containerInstances[]|{(.containerInstanceArn) : .ec2InstanceId}]'
Sample output:
An ECS container instance is an EC2 instance that is running the ECS container agent and has been registered into a cluster. In the above sample output:
- 2db66342-5f69-4782-89a3-f9b707f979ab is the container instance ID
- i-08e8cfc073db135a9 is an EC2 instance ID
Using the AWS Console
- In the ECS console, choose Clusters, select the cluster, and choose ECS Instances.
- Select Filter by attributes and choose
ecs:ami-idas the attribute on which to filter. - Select an AMI ID that is not same as the latest AMI ID, in this case ami-aff65ad2.
For all resulting ECS instances, the container instance ID and the EC2 instance IDs are both visible.

3. List the instances that are part of an Auto Scaling group
If your cluster was created with the console first-run experience after November 24, 2015, then the Auto Scaling group associated with the AWS CloudFormation stack created for your cluster can be scaled up or down to add or remove container instances. You can perform this scaling operation from within the ECS console.
Use the following steps to list the outdated ECS instances that are part of an Auto Scaling group.
Using the AWS CLI
Run the following command:
aws autoscaling describe-auto-scaling-instances --instance-ids <instance id #1> <instance id #2>
Sample output:
The response shows that the instances are part of the EC2ContainerService-workshop-app-cluster-EcsInstanceAsg-1IVVUK4CR81X1 Auto Scaling group.
Using the AWS Console
If the ECS cluster was created from the console, you likely have an associated CloudFormation stack. By default, the stack name is EC2ContainerService-cluster_name.
- In the CloudFormation console, select the cluster, choose Outputs, and note the corresponding stack for your cluster.

- In the EC2 console, choose Auto Scaling groups.
- Select the group and check that the EC2 instance IDs for the ECS instance are registered.

4. Create a new Auto Scaling group
If the container instances are not part of any Auto Scaling group, create a new group from one of the existing container instances and then add all other container instances to it. A launch configuration is automatically created for the new Auto Scaling group.
Using the AWS CLI
Run the following command to create an Auto Scaling group using the EC2 instance ID for an existing container instance:
aws autoscaling create-auto-scaling-group --auto-scaling-group-name <auto-scaling-group-name> --instance-id <instance-id> --min-size 0 --max-size 3
Keep the min-size parameter to 0 and max-size to greater than the number of instances that you are going to add to this Auto Scaling group.
At this point, your Auto Scaling group does not contain any instances. Neither does it have any of the subnets or Availability Zones of any of the old instances, other than the instance from which you made the Auto Scaling group. To add all old instances (including the one from which the Auto Scaling group was created) to this Auto Scaling group, find the subnets and Availability Zones to which they are attached.
Run the following commands:
aws ec2 describe-instances --instance-id <instance-id> --query "Reservations[].Instances[].NetworkInterfaces[].SubnetId" --output text
aws ec2 describe-instances --instance-id <instance-id> --query "Reservations[].Instances[].Placement.AvailabilityZone" --output text
After you have all the Availability Zones and subnets to be added to the Auto Scaling group, run the following command to update the Auto Scaling group:
aws autoscaling update-auto-scaling-group --vpc-zone-identifier <subnet-1>,<subnet-2> --auto-scaling-group-name <auto-scaling-group-name> --availability-zones <availability-zone1> <availability-zone2>
You are now ready to add all the old instances to this Auto Scaling group. Run the following command:
aws autoscaling attach-instances --instance-ids <instance-id 1> <instance-id 2> --auto-scaling-group-name <auto-scaling-group-name>
Now, all existing container instances are part of an Auto Scaling group, which is attached to a launch configuration capable of launching instances with the old AMI.
When you attach instances, Auto Scaling increases the desired capacity of the group by the number of instances being attached.
Using the AWS Console
To create an Auto Scaling group from an existing container instance, do the following steps:
- In the ECS console, on the EC2 Instances tab, open the EC2 instance ID for the container instance.
- Select the instance and choose Actions, Instance Settings, and Attach to Auto Scaling Group.
- On the Attach to Auto Scaling Group page, select a new Auto Scaling group, enter a name for the group, and then choose Attach.
The new Auto Scaling group is created using a new launch configuration with the same name that you specified for the Auto Scaling group. The launch configuration gets its settings (for example, security group and IAM role) from the instance that you attached. The Auto Scaling group also gets settings (for example, Availability Zone and subnet) from the instance that you attached, and has a desired capacity and maximum size of 1.
Now that you have an Auto Scaling group and launch configuration ready, add the max value for the Auto Scaling group to the total number of exiting container instances in the ECS cluster.
To add other container instances of the ECS cluster to this Auto Scaling group:
- On the navigation pane, under Auto Scaling, choose Auto Scaling Groups, select the new Auto Scaling group, and choose Edit.
- Add subnets for other instances to the Subnet(s) section and save the configuration.
- For each of the other container instances of the cluster, open the EC2 instance ID, select the instance, and then choose Actions, Instance Settings, and Attach to Auto Scaling Group.
- On the Attach to Auto Scaling Group page, select an existing Auto Scaling group, select the Auto Scaling group that you just created, and then choose Attach.
- If the instance doesn’t meet the criteria (for example, if it’s not in the same Availability Zone as the Auto Scaling group), you get an error message with the details. Choose Close and try again with an instance that meets the criteria.
5. Create a new launch configuration
Create a new launch configuration for the Auto Scaling group. This launch configuration should be able to launch instances with the new ECS–optimized AMI. It should also put the user data in the instances to allow them to join the ECS cluster when they are created.
AWS CLI
First, run the following command to get the launch configuration for the Auto Scaling group:
Sample output:
EC2ContainerService-workshop-app-cluster-EcsInstanceLc-1LEL4X28KY4X
Now, create a new launch configuration with the new image ID from this existing launch configuration. Create a launch configuration called New-AMI-launch. Substitute the existing launch configuration name for launch-configuration-name and the image ID corresponding to the new AMI for image_id.
aws autoscaling describe-launch-configurations --launch-configuration-name \

 <launch-configuration-name> --query "LaunchConfigurations[0]" | \

 jq 'del(.LaunchConfigurationARN)' | jq 'del(.CreatedTime)' | \

 jq 'del(.KernelId)' | jq 'del(.RamdiskId)' | \

 jq '. += {"LaunchConfigurationName": "New-AMI-launch"}' | \

 jq '. += {"ImageId": "<image_id>"}' > new-launch-config.json
The new-launch-config.json file will be created in your local directory. The “UserData” section of the json will have the user data as base64 encoded. Let’s replace that with the user data in the plain text form
So if the user data of an instance which was launched by the original launch configuration in the cluster looks like
At this point, the New-AMI-launch launch configuration is ready. Update the Auto Scaling group with the new launch configuration:
To add block devices to the launch configuration, you can always override the block device mapping for the new launch configuration.
Using the AWS Console
- On the Auto Scaling groups page, choose Details in the bottom pane and note the launch configuration for your Auto Scaling group.
- On the Launch configurations page, select the launch configuration and choose Copy launch configuration.
- On the AMI details page, choose Edit AMI.
- In the search box, enter the latest AMI image ID (in this case, ami-aff65ad2) and choose Select.
- On the Configure details page, enter a new name for the launch configuration.
- Keep everything else the same and choose Create.
- On the Auto Scaling groups page, choose Edit.
- Select the newly created launch configuration and choose Save.
6. Detach the old ECS instances from the Auto Scaling group
Now that you have a new launch configuration with the Auto Scaling group, detach the old instances from the group.
For every old instance detached, add a new instance through the new launch configuration. This keeps the desired count for the Auto Scaling group unchanged.
Using the AWS CLI
Run the following command:
aws autoscaling detach-instances --instance-ids <instance id #1> <instance id #2> --auto-scaling-group-name <auto-scaling-group-name> --no-should-decrement-desired-capacity
When this is done, the following command should show a blank result:
aws autoscaling describe-auto-scaling-instances --instance-ids <instance id #1> <instance id #2>
The following command should show the new ECS instances, for every old instance detached from the Auto Scaling group:
aws ecs list-container-instances --cluster <cluster name>
The old container instances have been detached from the Auto Scaling group but they are still registered in the ECS cluster.
Using the AWS Console
- On the Auto Scaling groups page, select the group.
- On the instance tab, select the old container instances.
- In the bottom pane, choose Actions, Detach.
- In the Detach Instances dialog box, select the check box for Add new instances to the Auto Scaling group to balance the load and choose Detach instances.
7. Revise the task definition and update the service
Now revise the task definition in use to impose a constraint. Subsequent tasks spawned from this task definition are hosted only on ECS instances built with the new AMI.
Using the AWS CLI
Run the following command to get the task definition for the service running on the cluster:
aws ecs describe-services --cluster <cluster name> \
--services <service arn> \
--query "services[].deployments[].["taskDefinition"]" --output text
Sample output
arn:aws:ecs:us-east-1:012345678910:task-definition/workshop-task:9
Here, workshop-task is the family and 9 is the revision. Now, update the task definition with the constraint. Use the built-in attribute, ecs.ami-id, to impose the constraint. Replace the image_id value in the following command with the value found by querying Parameter Store.
aws ecs describe-task-definition --task-definition <task definition family:revision> --query taskDefinition | \
jq '. + {placementConstraints: [{"expression": "attribute:ecs.ami-id == <image_id>", "type": "memberOf"}]}' | \
jq 'del(.status)'| jq 'del(.revision)' | jq 'del(.requiresAttributes)' | \
jq '. + {containerDefinitions:[.containerDefinitions[] + {"memory":256, "memoryReservation": 128}]}'| \
jq 'del(.compatibilities)' | jq 'del(.taskDefinitionArn)' > new-task-def.json
s
Even if your original container definition doesn’t have a memory or memoryReservation key, you must provide one of those values while updating the task definition. For this post, I have used the task-level memory allocation value (256) and an arbitrary value (128) for those keys, respectively.
aws ecs register-task-definition --cli-input-json file://new-task-def.json
You should now have a new revised version of the task definition. In this example, it’s workshop-task:10.
8. Update the service with the revised task definition
Use the following steps to add the revised task definition to the service.
Using the AWS CLI
Run the following command to update the service with the revised task definition:
aws ecs update-service --cluster <cluster name> --service <service name> --task-definition <task definition family:revised version>
After the service is updated with the revised task definition, the new tasks constituting the service should come up on the new ECS instances, thanks to the constraint in the new task definition.
Use the command on the old container instances until there are no task ARNs in the output:
aws ecs list-tasks --cluster <cluster name> --container-instance <container-instance id #1> --container-instance <container-instance id #2>
Using the AWS Console
- In the ECS console, on the Task definitions page, select your task definition and choose Create new revision.
- On the Create new revision of task definition page, choose Add constraint.
- For Expression, add
attribute:ecs.ami-id == <AMI ID for new ECS optimized AMI>and choose Create. You see a new revision of the task definition being created. In this case, workshop-task:10 got created. - To update the service, on the Clusters page, select the service corresponding to the revised task definition.
- On the Configure service page, for Task definition, select the appropriate task definition version and choose Next step.
- Keep the remaining default values. On the Review page, choose Update service.
On the service page, on the Event tab, you see events corresponding to the old tasks getting stopped new tasks getting started on the new ECS instances.

Wait until no tasks are running on the old ECS instances and you see all tasks starting on the new ECS instances.


9. Deregister and terminate the old ECS instances
Using the AWS CLI
For each of the old container instances, run the following command:
aws ecs deregister-container-instance --cluster <cluster name> --container-instance <container instance id> --query containerInstance.ec2InstanceId
Sample output:
"i-02dd87a0b28e8575b"
Record the EC2 instance ID and then terminate the instance:
aws ec2 terminate-instances --instance-ids <instance-id>
Using the AWS Console
- In the ECS console, choose Clusters, ECS instances.
- Keep the EC2 instance ID displayed on the EC2 Instance column and keep the instance detail page open.
- Open the container instance ID for the ECS instance to deregister.
- On the container instance page, choose Deregister.
After the container instance is deregistered, terminate the instance detail page.

At this point, your ECS cluster has been refreshed with the EC2 instances built with the new ECS–optimized AMI.
Conclusion
In this post, I demonstrated how to refresh the container instances in an active ECS cluster with instances built from a newly released ECS–optimized AMI. You can either use the AWS Management Console or programmatically refresh your ECS cluster in some quick steps.
AWS Fargate is a service that’s designed to remove the need to do these types of operations by running and managing all the EC2 infrastructure necessary to support your containers for you. With Fargate, your containers are always started with the latest ECS agent and Docker version.
I welcome your comments and questions below.