AWS Contact Center
Automate case management workflows with Amazon Connect
Introduction
Many contact centers today struggle with manual case management processes that delay resolution, increase operational costs, and risk cases falling through the cracks—especially in regulated industries like insurance, where strict SLAs and compliance requirements apply. Customers now expect timely updates, proactive communication, and seamless escalations across their service journey, but traditional tools often fail to deliver that experience. Amazon Connect Cases addresses these challenges by providing an integrated, automated case management solution that streamlines workflows, ensures SLA adherence, and empowers agents with a unified view of customer interactions—enabling faster resolutions, higher compliance, and improved customer satisfaction.
In this post, we’ll show you how to leverage the combination of Amazon Connect cases, rules, and tasks to create intelligent automation workflows that reduce manual effort while improving customer experience. You’ll learn how to configure automated approval workflows, send proactive customer notifications, intelligently route cases, and handle complex scenarios like automated complaint intake and risk-based escalations.
Overview of solution
Amazon Connect Cases, Rules, and Tasks work together to create a comprehensive automation solution for case management. Here’s how these services complement each other:
- Amazon Connect Cases: Provides the foundational case management capabilities, storing case data, tracking status changes, and maintaining case history
- Amazon Connect Rules: Acts as the automation engine, monitoring case events and triggering actions based on predefined conditions
- Amazon Connect Tasks: Enables workflow automation by creating actionable items that can be routed through contact flows for processing
When integrated, these services enable six key automation scenarios:
- Approval workflows: Automatically route cases requiring approval to supervisors with all necessary context
- Customer communication: Send proactive updates to customers via SMS or email by routing tasks through specialized contact flows
- Intelligent case routing: Dynamically assign and route cases based on business rules and agent availability
- Automated complaint intake: Process incoming complaint emails and automatically create cases with AI-powered categorization
- Risk-based escalation: Automatically flag and escalate high-risk cases to supervisors based on predefined criteria
- SLA monitoring and alerts: Track case deadlines and send automated reminders to prevent SLA breaches
This integrated approach eliminates the need for custom business rules engines or external automation tools, providing a native solution within the Amazon Connect ecosystem.
Walkthrough
Let’s explore each automation scenario with practical examples that you can implement in your contact center.
Scenario 1: Automated approval workflow
Consider a scenario where high-value refund requests require supervisor approval. When an agent updates a case status to “Needs Approval,” the system should automatically:
- Create a task for the supervisor
- Include case context and details
- Route the task to the appropriate approval queue
- Open the case automatically when the supervisor accepts the task
Scenario 2: Proactive customer notifications
For cases involving service requests or issue resolution, customers appreciate proactive updates. Our automation will:
- Monitor case status changes
- Create tasks that are routed through notification contact flows
- Trigger SMS or email notifications through contact flow blocks
- Include case-specific information like case ID and status
Scenario 3: Dynamic case routing
When cases are assigned to specific agents or queues, the system should ensure proper notification and routing:
- Detect changes to case assignment fields
- Create tasks for newly assigned agents
- Send email notifications through contact flows
- Ensure cases are promptly addressed based on priority
Scenario 4: Automated complaint intake
For insurance companies handling regulatory complaints, the system can:
- Monitor complaint email inboxes automatically
- Extract key complaint details using AI/ML services
- Create cases with proper categorization and routing
- Generate draft responses based on complaint type
- Route to appropriate analysts based on jurisdiction and expertise
Scenario 5: Risk-based escalation
For high-risk cases that require immediate attention:
- Automatically detect risk indicators in case content
- Flag cases for supervisory review
- Create escalation tasks with appropriate priority
- Send notifications through multiple channels
Scenario 6: SLA monitoring and deadline alerts
To ensure regulatory compliance and service standards:
- Track case aging and approaching deadlines
- Send automated reminders to assigned agents
- Escalate overdue cases to supervisors
- Generate compliance reports
Prerequisites
Before implementing these automation workflows, ensure you have:
- An AWS account
- An existing Amazon Connect instance
- Amazon Connect access to create case fields and rules
Steps to implement the feature
Step 1: Enable Amazon Connect Cases
First, ensure Amazon Connect Cases is enabled in your instance:
- Navigate to the Amazon Connect in AWS console
- Select your instance and login
- On the left navigation menu, choose Cases under the Agent applications section. If you don’t see this option, it may not be available in your Region. For information about where Cases is available, see Cases availability by Region.
- Choose Enable cases to get started.
- On the Cases page, choose Add domain.
- On the Add domain page, enter a unique, friendly name that’s meaningful to you, such as your organization name.
- Choose Add domain. The domain is created.
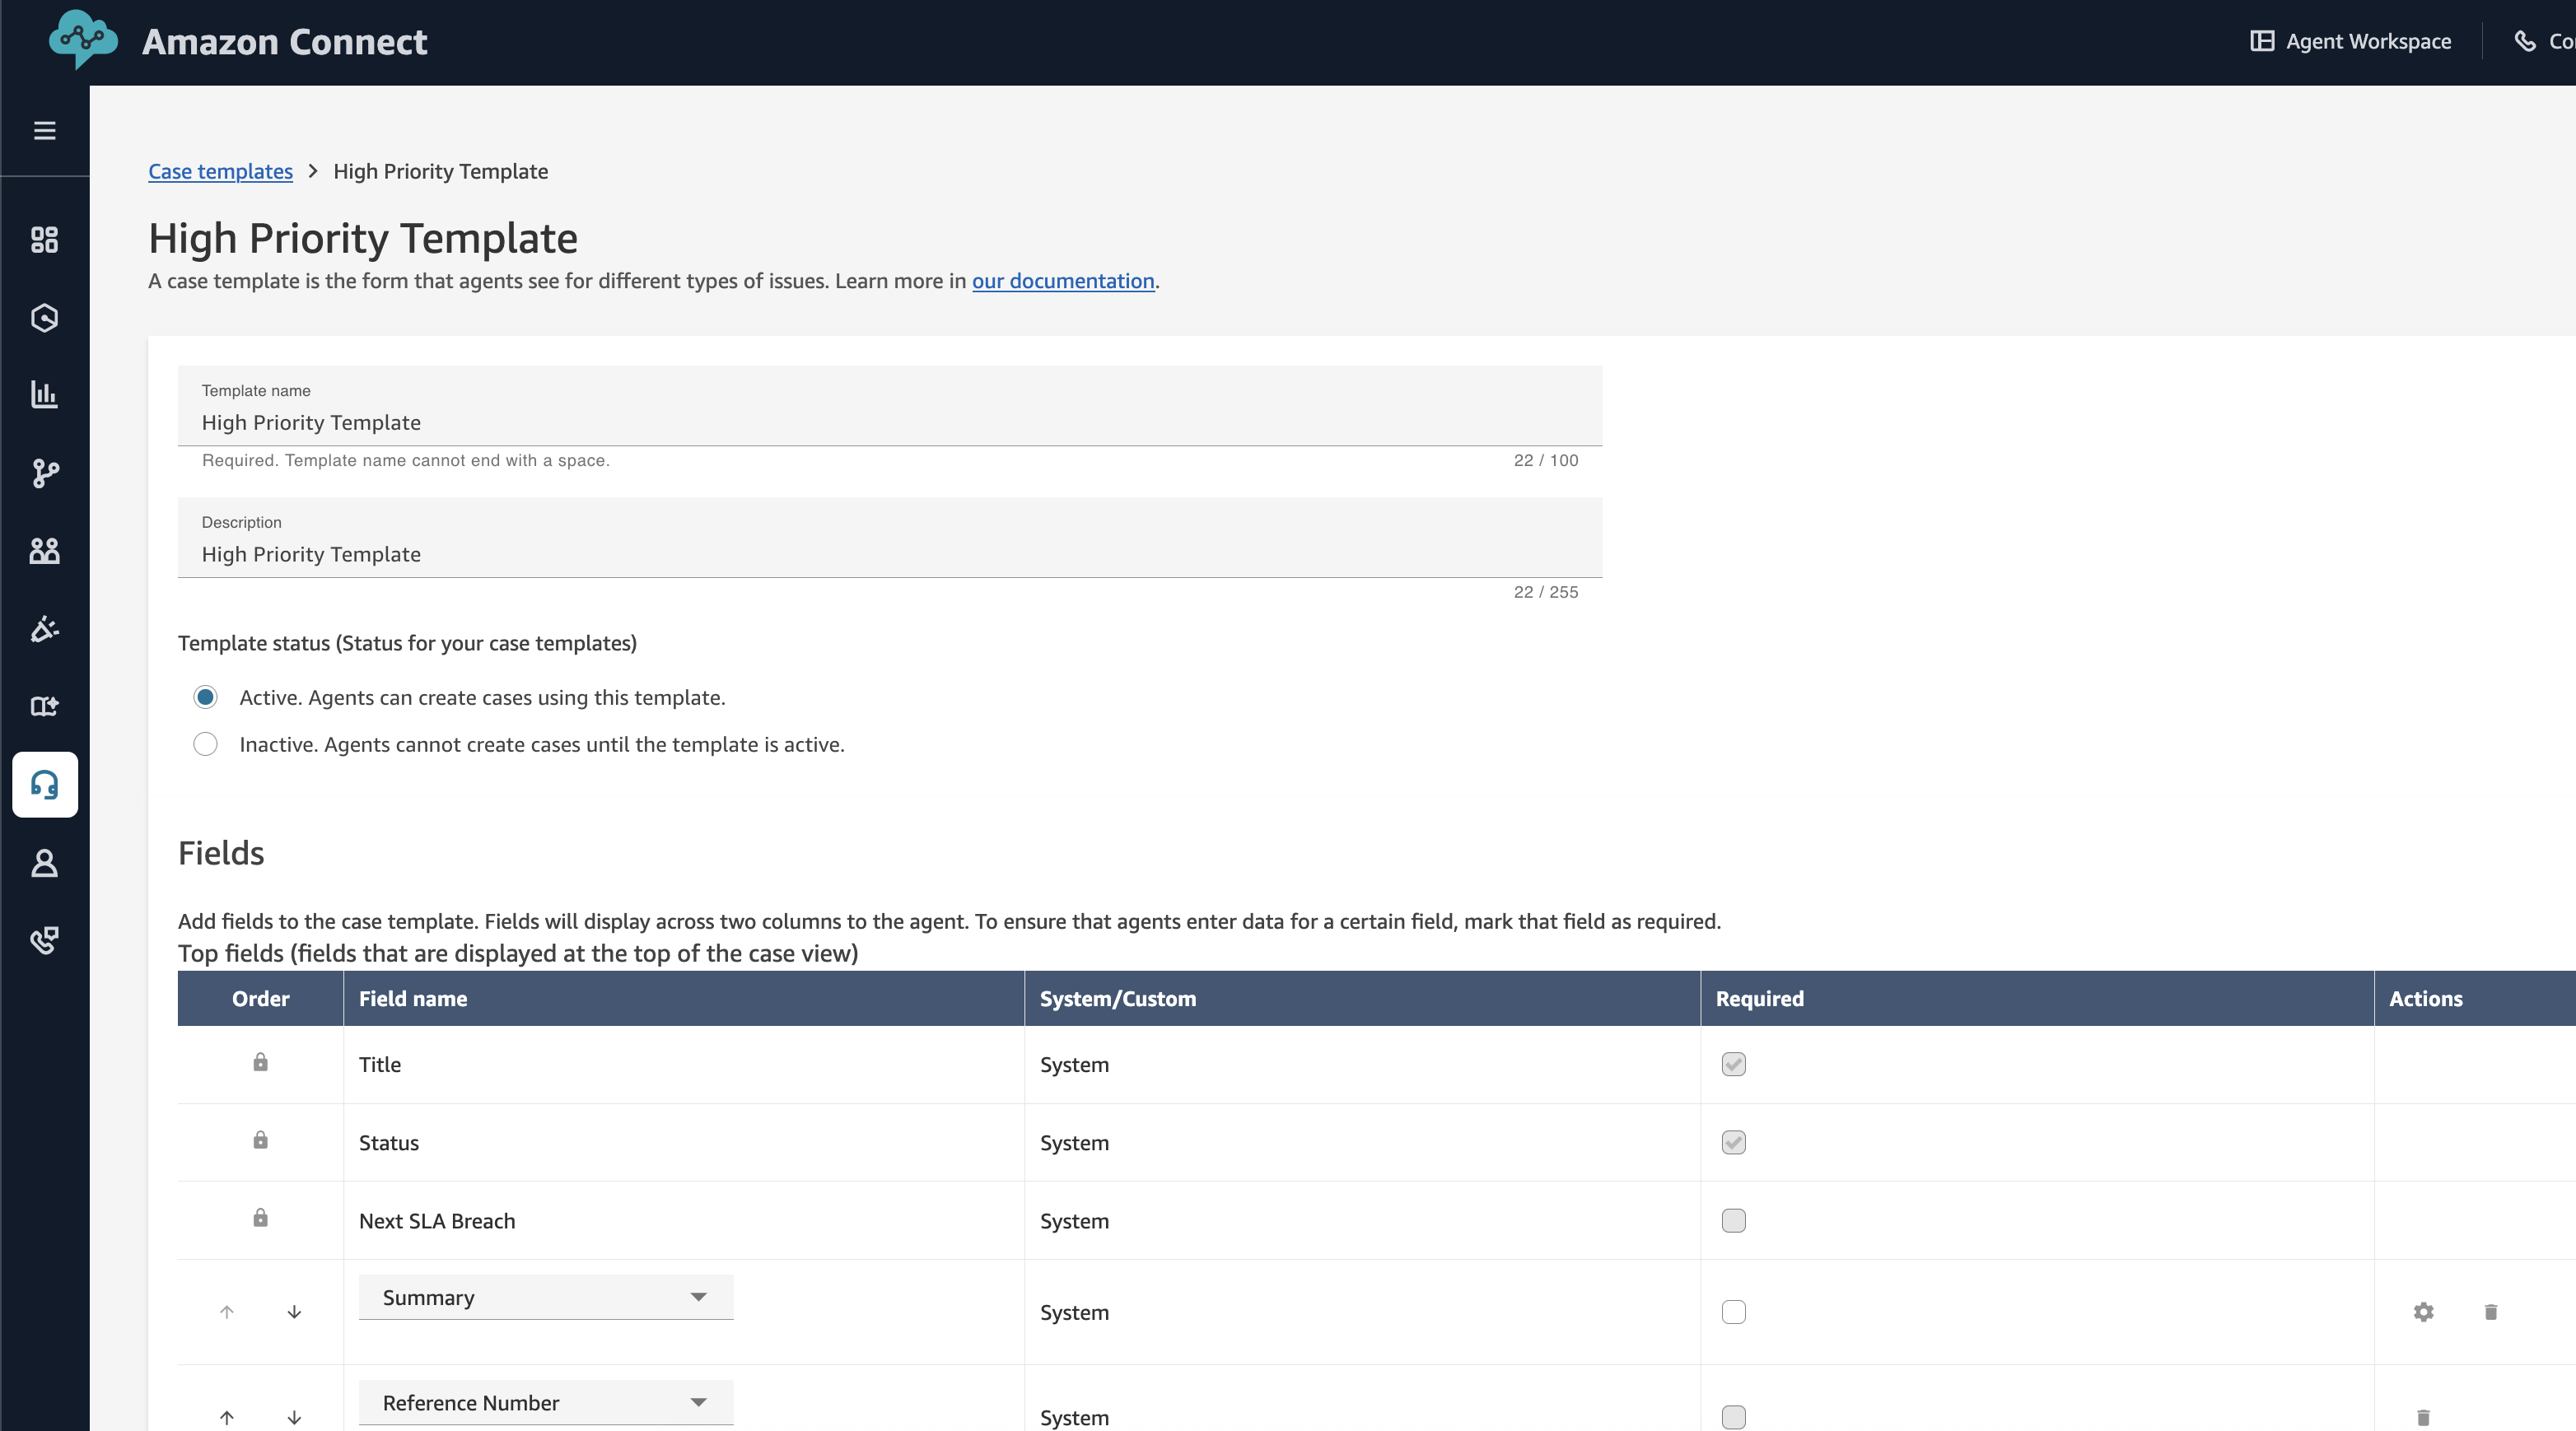
Step 2: Create case templates and fields
Set up the necessary case fields and templates for all use cases:
- In the Amazon Connect console, choose Cases fields under Agent applications
- Create custom fields for your use cases:
- Approval Status (Single select: Pending, Approved, Rejected)
- Customer Phone (Text field)
- Customer Email (Text field)
- Priority Level (Single select: Low, Medium, High, Critical)
- Risk Level (Single select: Low, Medium, High, Critical)
- Complaint Type (Single select: Billing, Claims, Service, Product, Other)
- Jurisdiction (Text field)
- Regulatory Deadline (Date field)
- Internal SLA (Date field)
- Complaint Source (Single select: Email, Phone, Web, Letter)
- In the Amazon Connect console, choose Cases templates under Agent applications
- Create case templates for different scenarios:
- General Case Template: Basic fields for standard cases
- Complaint Case Template: Includes all complaint-specific fields
- Complaint type
- Complaint Source
- Jurisdiction
- Regulatory Deadline

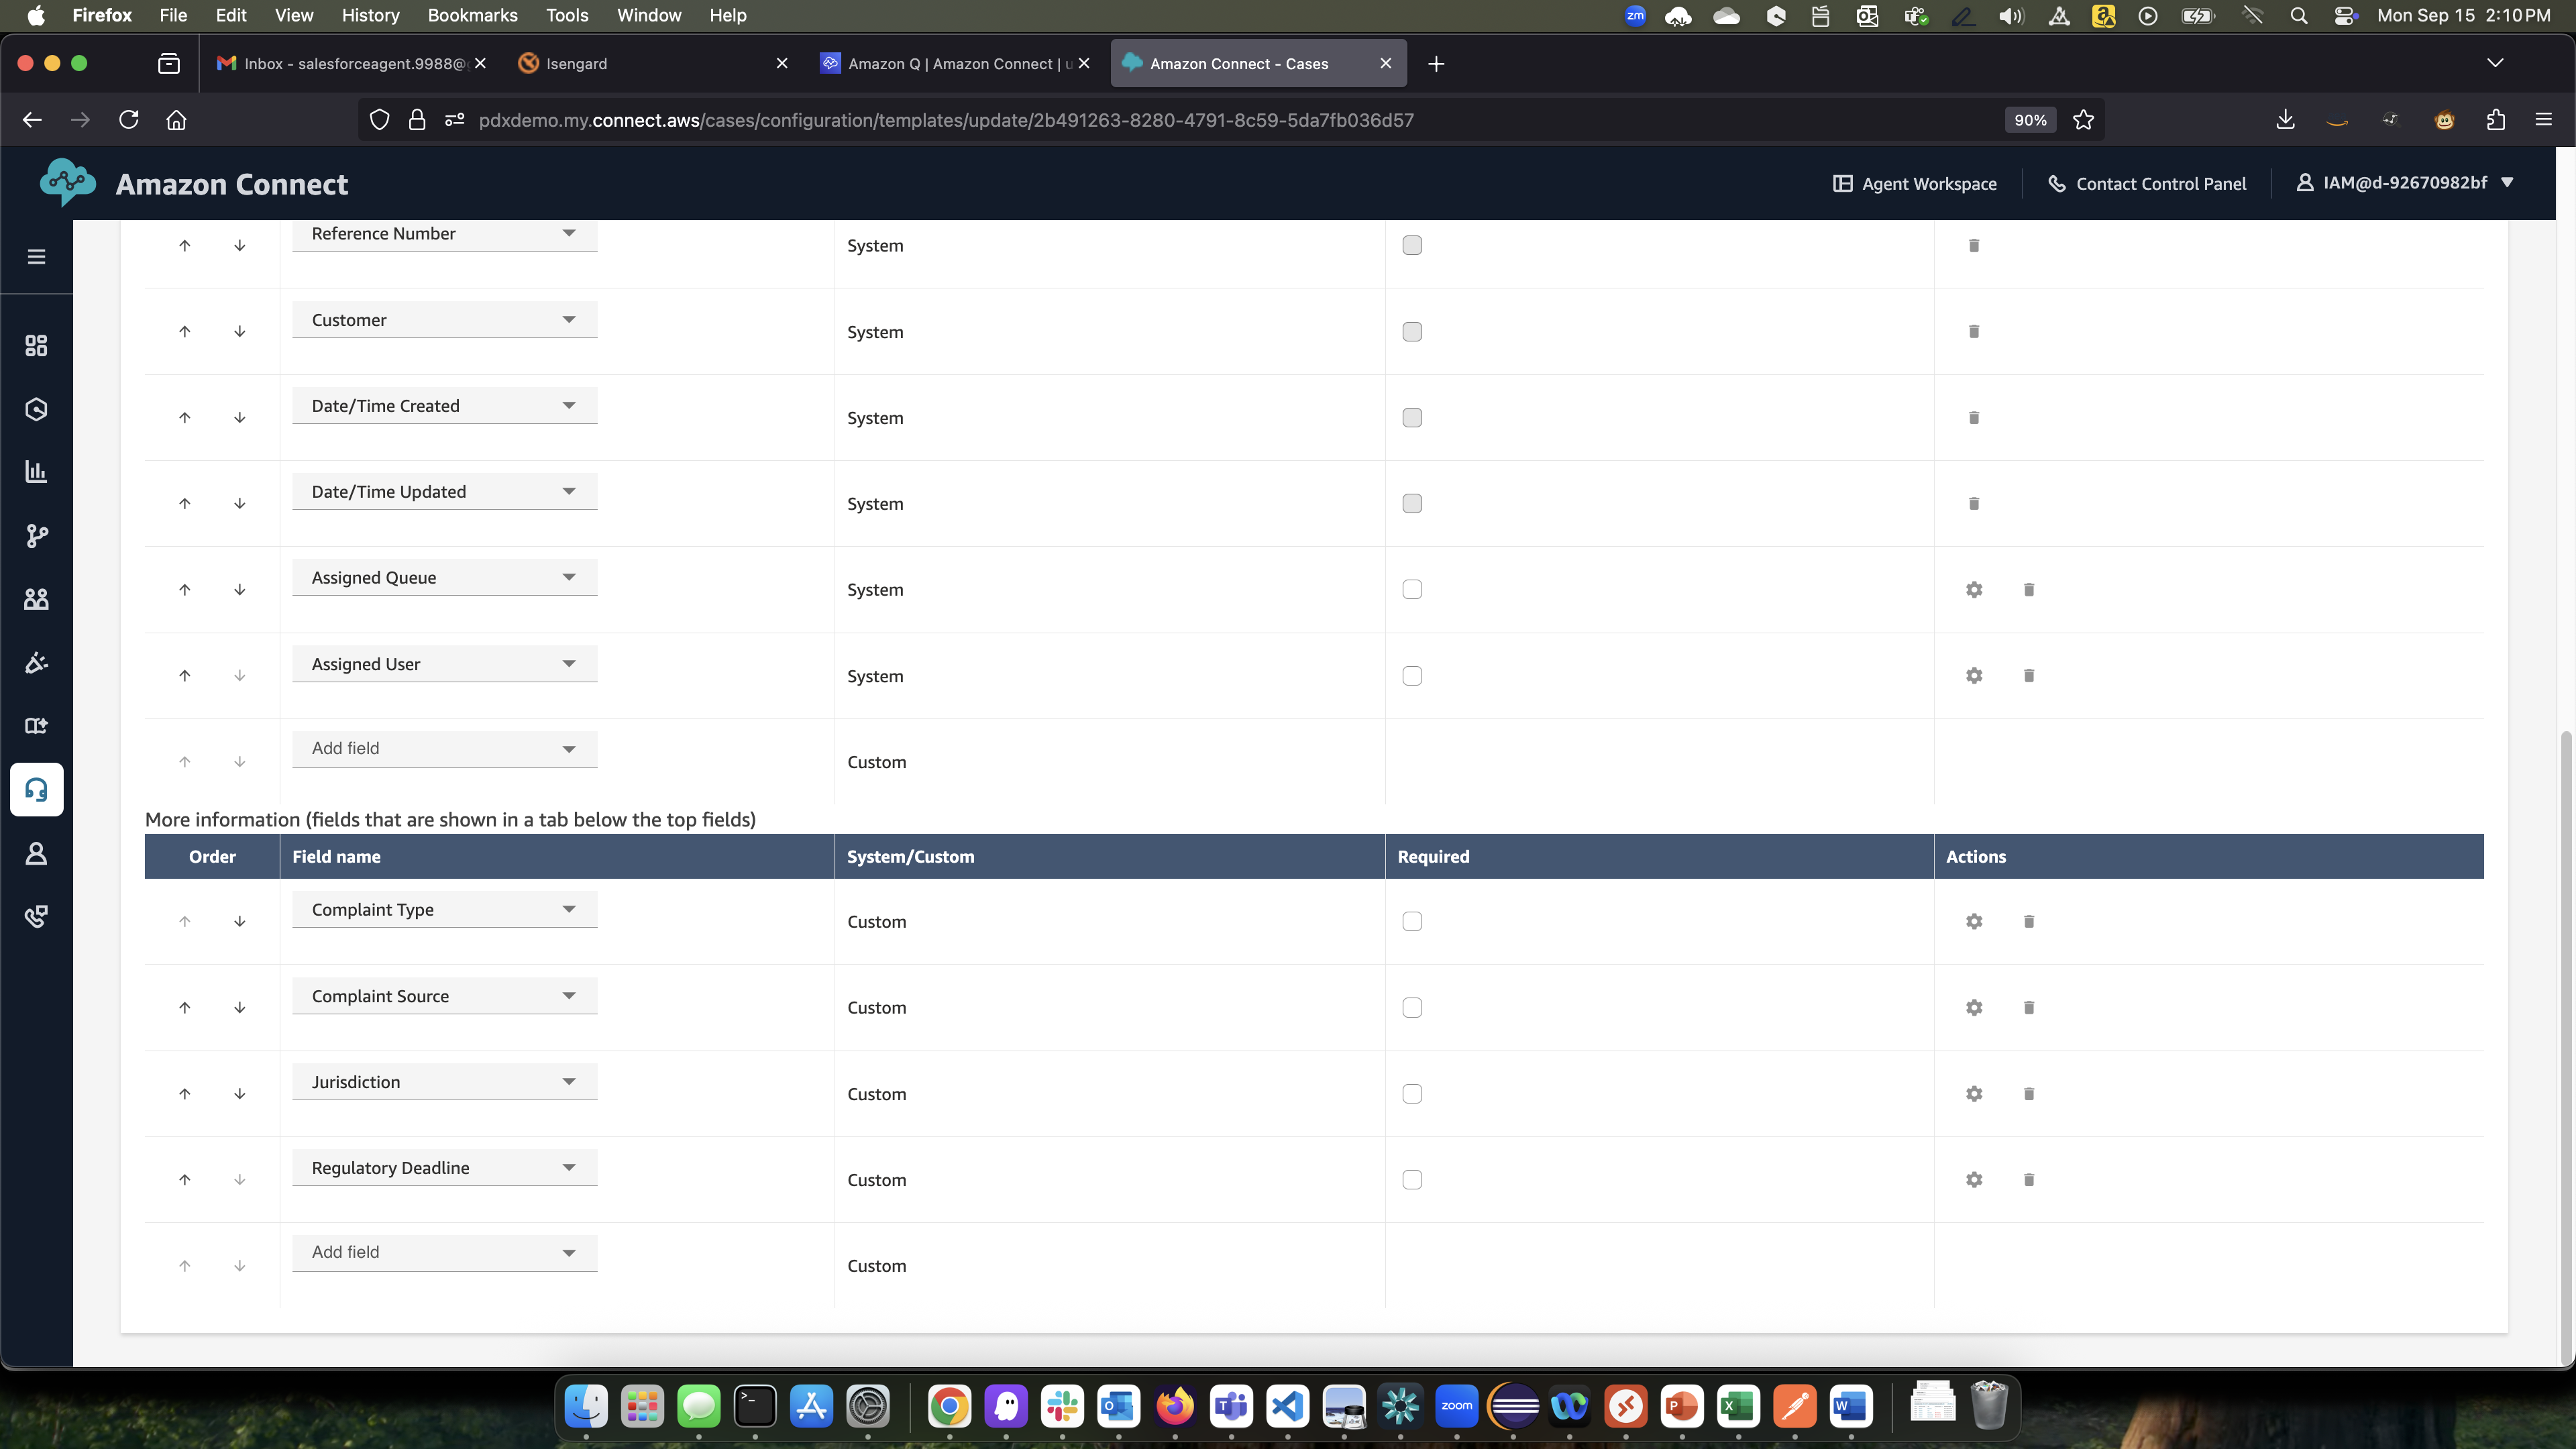
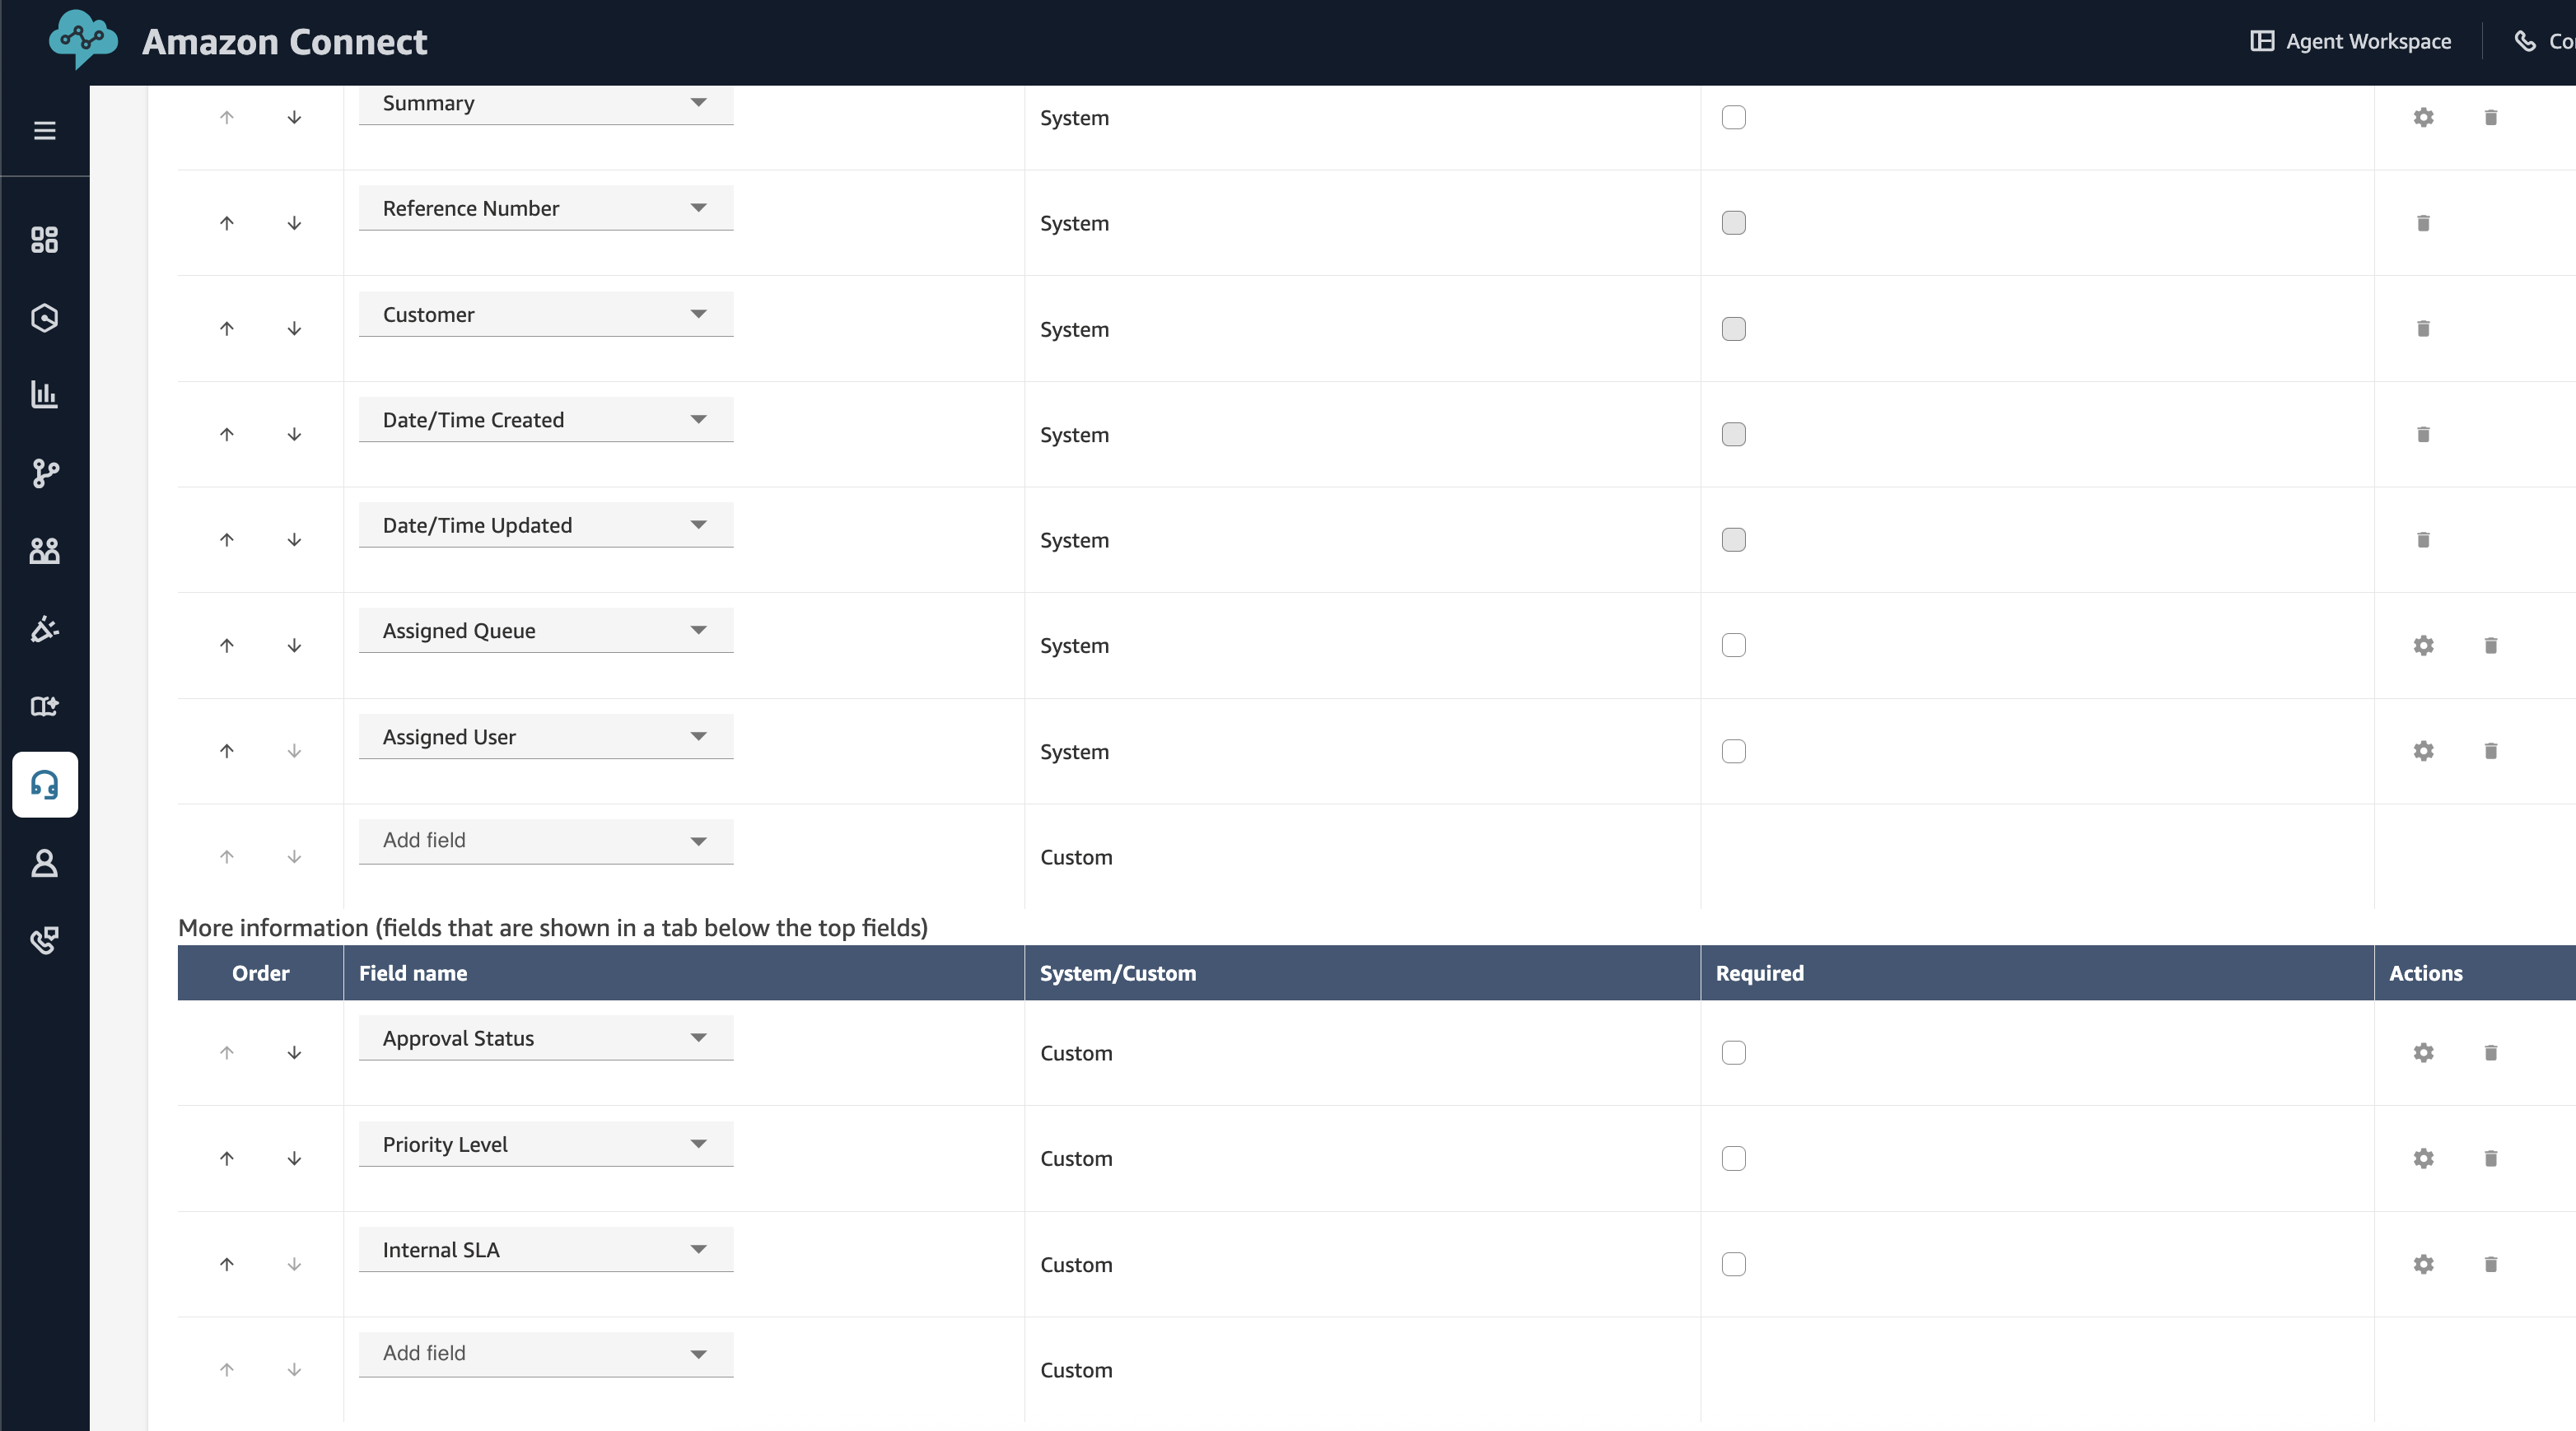
- High Priority Template: Pre-configured for urgent cases. Includes all complaint-specific fields
- Approval Status
- Priority Level
- Internal SLA
Step 3: Configure queues for different scenarios
Create specialized queues for handling different types of automated tasks:
Automated notifications queue:
- In the Amazon Connect console, choose Routing -> Queues,
- Choose Create
- Under Queue Details, provide name as “Automated Notifications”
- Provide appropriate description and choose appropriate hours of operation
- Configure for automatic processing (no agents needed for notification tasks)
- Set appropriate routing profiles
Supervisors queue:
- In the Amazon Connect console, choose Routing -> Queues,
- Choose Create
- Under Queue Details, provide name as “Supervisors Queue”
- Provide appropriate description and choose appropriate hours of operation
- Assign supervisor users to this queue
Complaint processing queue:
- In the Amazon Connect console, choose Routing -> Queues,
- Choose Create
- Under Queue Details, provide name as “Complaint Processing Queue” for handling complaint-specific cases
- Provide appropriate description and choose appropriate hours of operation
- Assign specialized complaint analysts users to this queue
- Configure skill-based routing if needed
Step 4: Create task contact flows for all scenarios
Create specialized Contact flows to handle different automation scenarios:
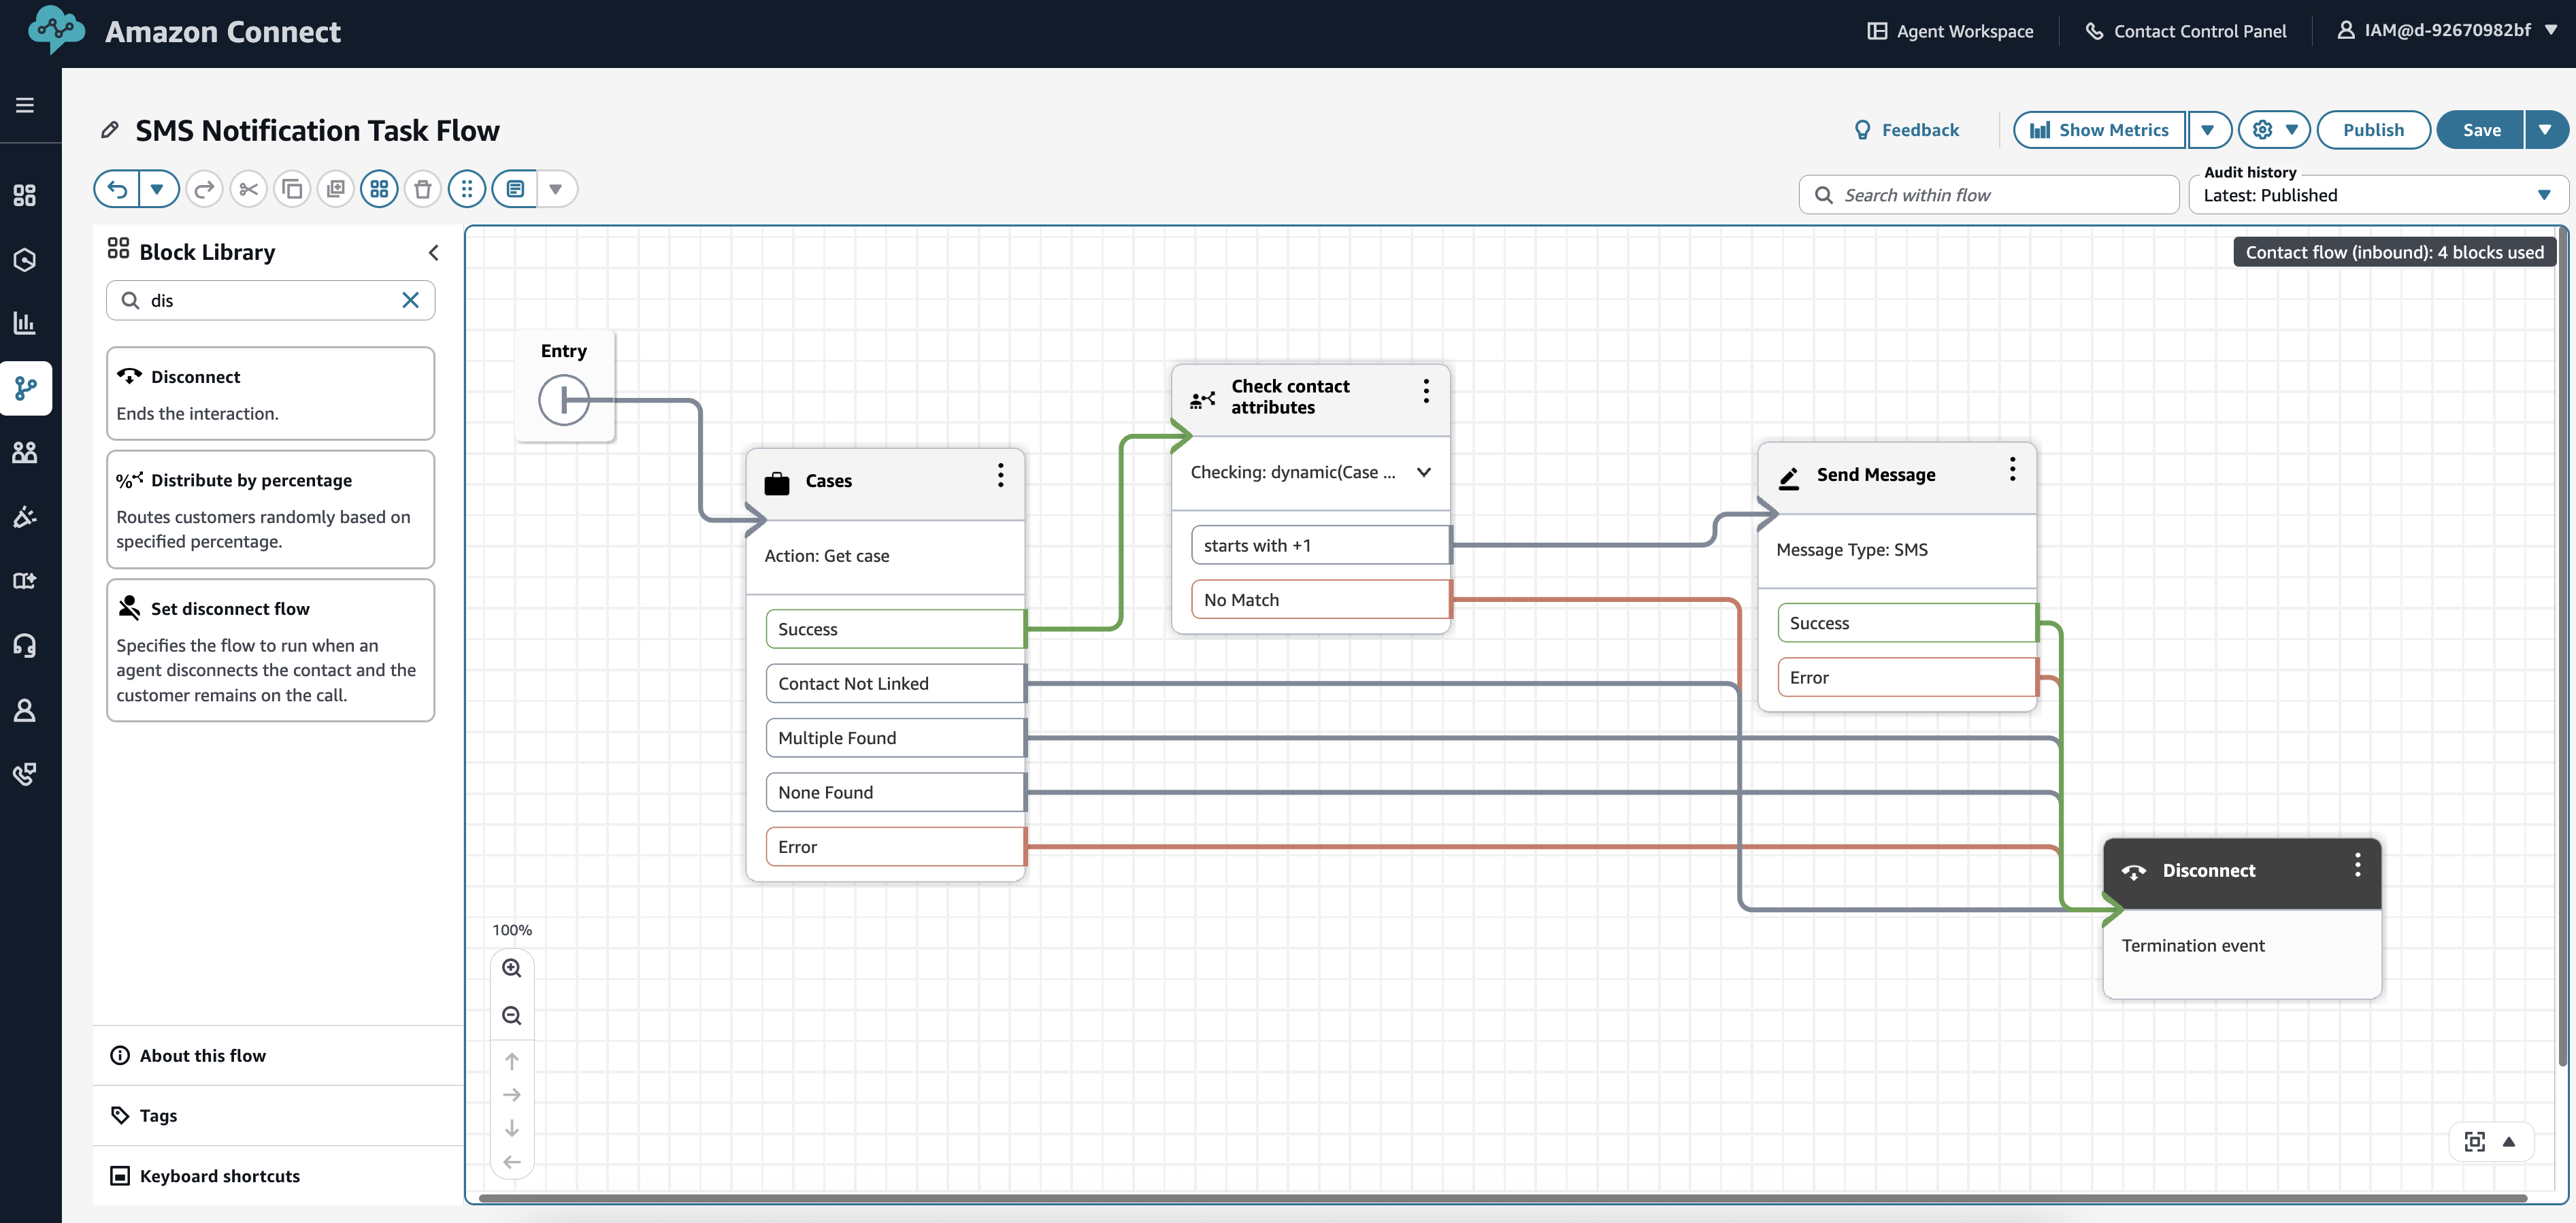
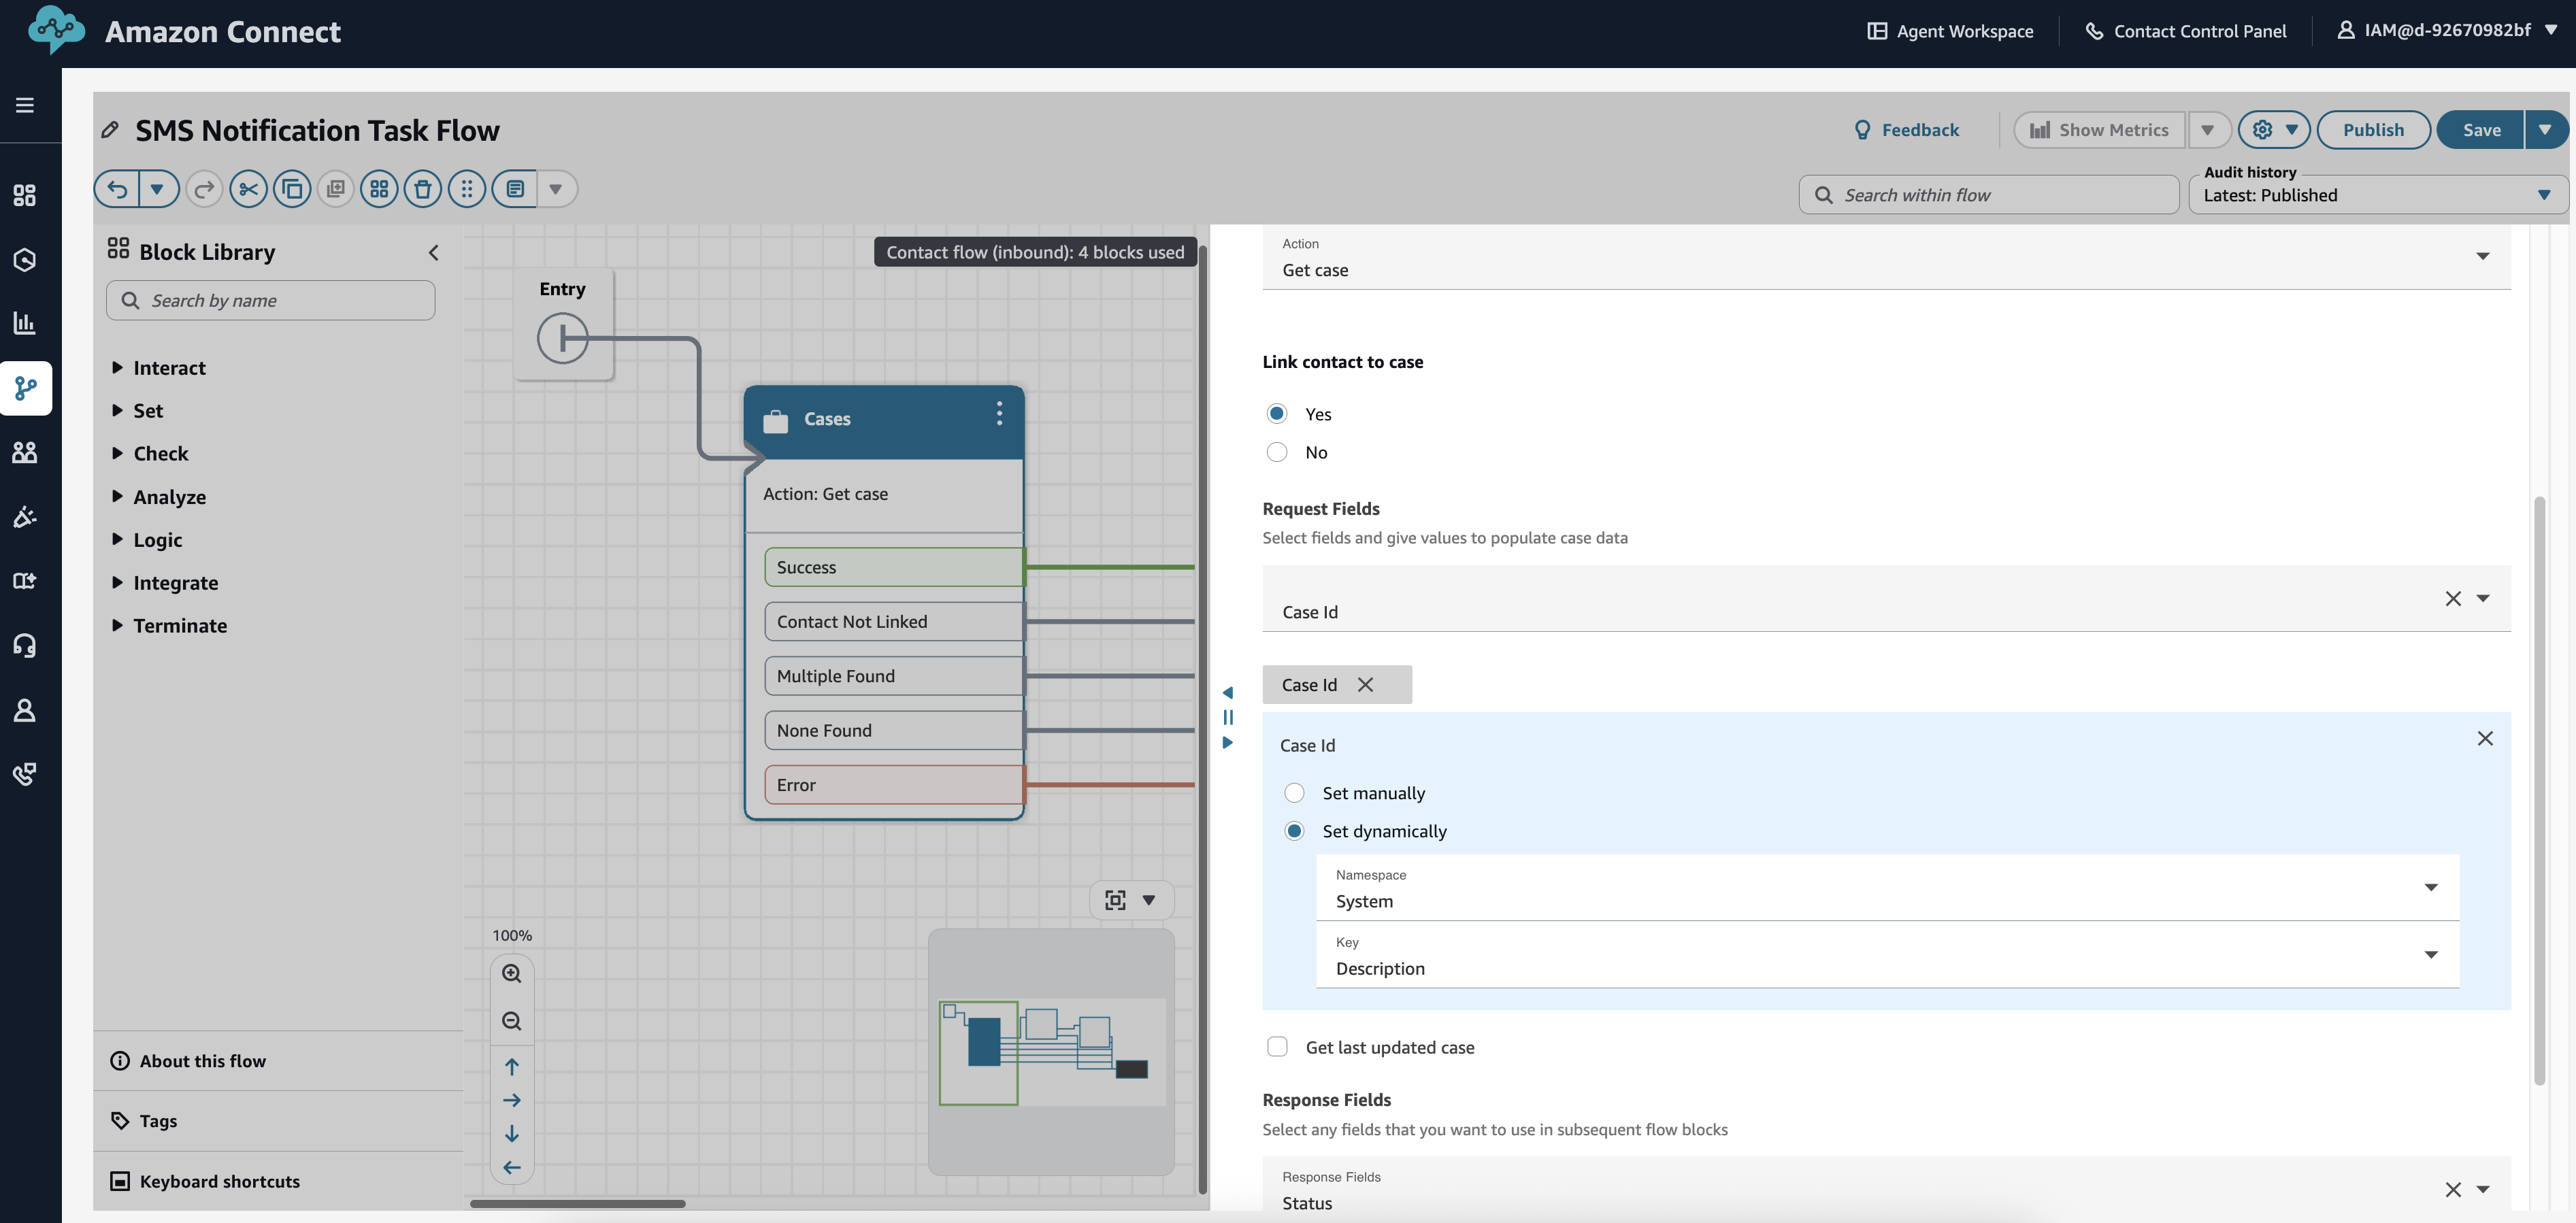
SMS notification task flow:
- In the Amazon Connect console, choose Routing -> Flows –> Create flow
- Create a new flow named “SMS Notification Task Flow”
- Add a Get case block to retrieve case details
- Add a Check contact attributes block to verify customer phone number exists
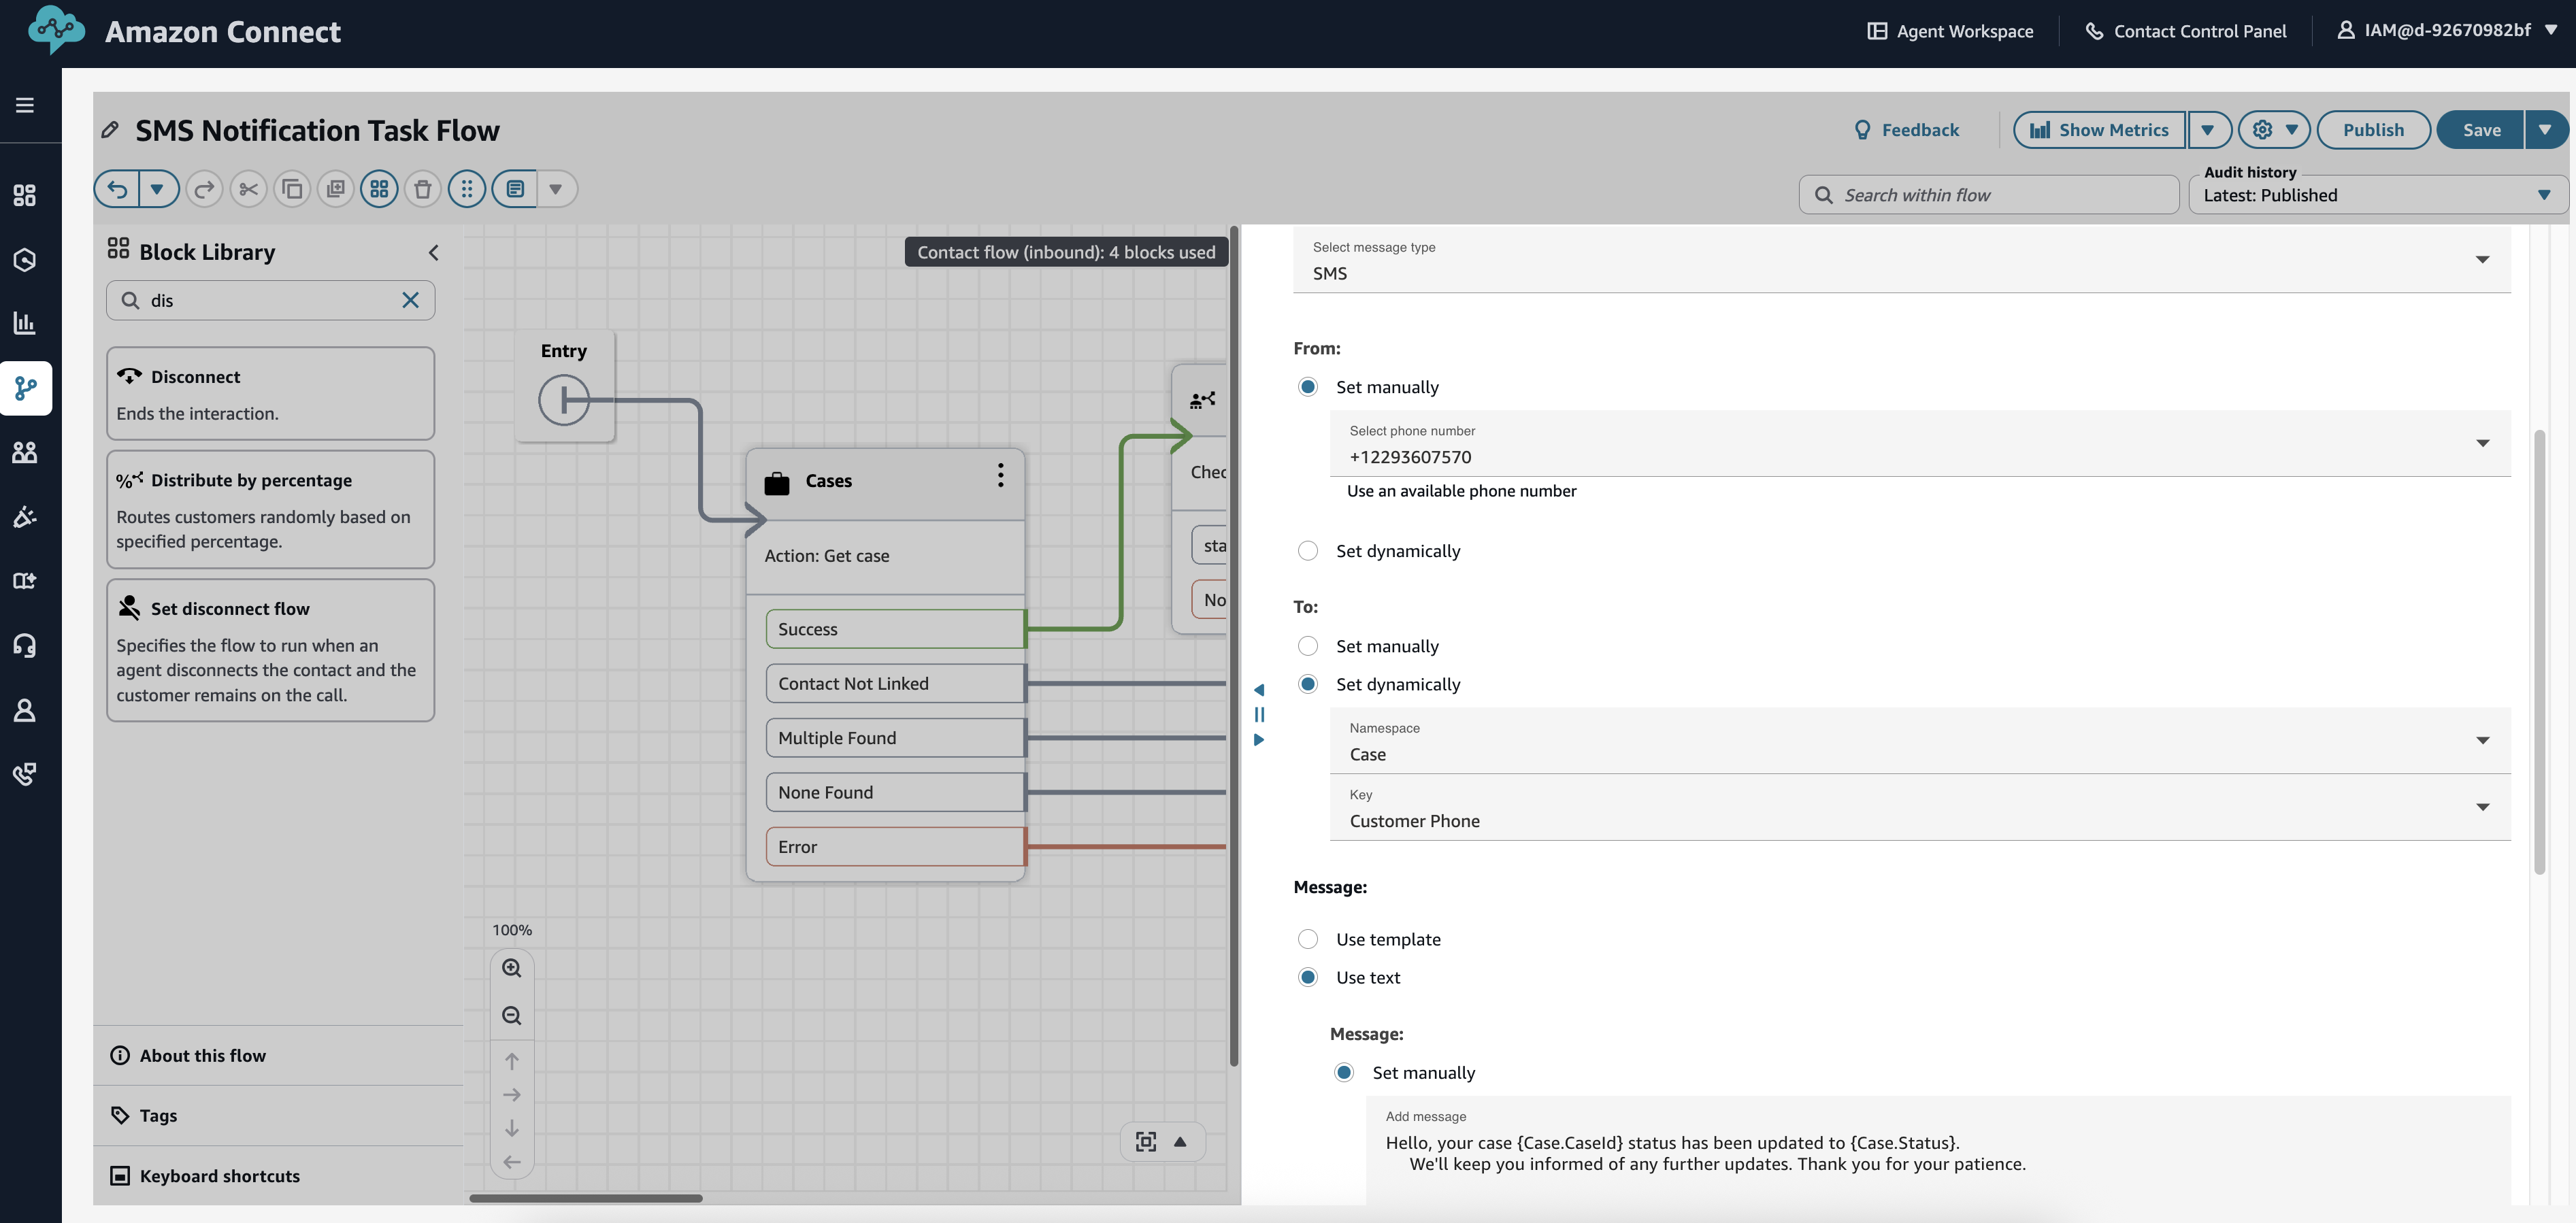
- Add a Send SMS block configured with:
- Destination phone number: Use case attribute {Case.CustomerPhone}
- Message body:
Hello, your case {Case.CaseId} status has been updated to {Case.Status}.
We'll keep you informed of any further updates. Thank you for your patience.
- Add error handling blocks for failed SMS delivery
- Add a Disconnect block to end the task flow
- Connect all blocks appropriately and publish the flow
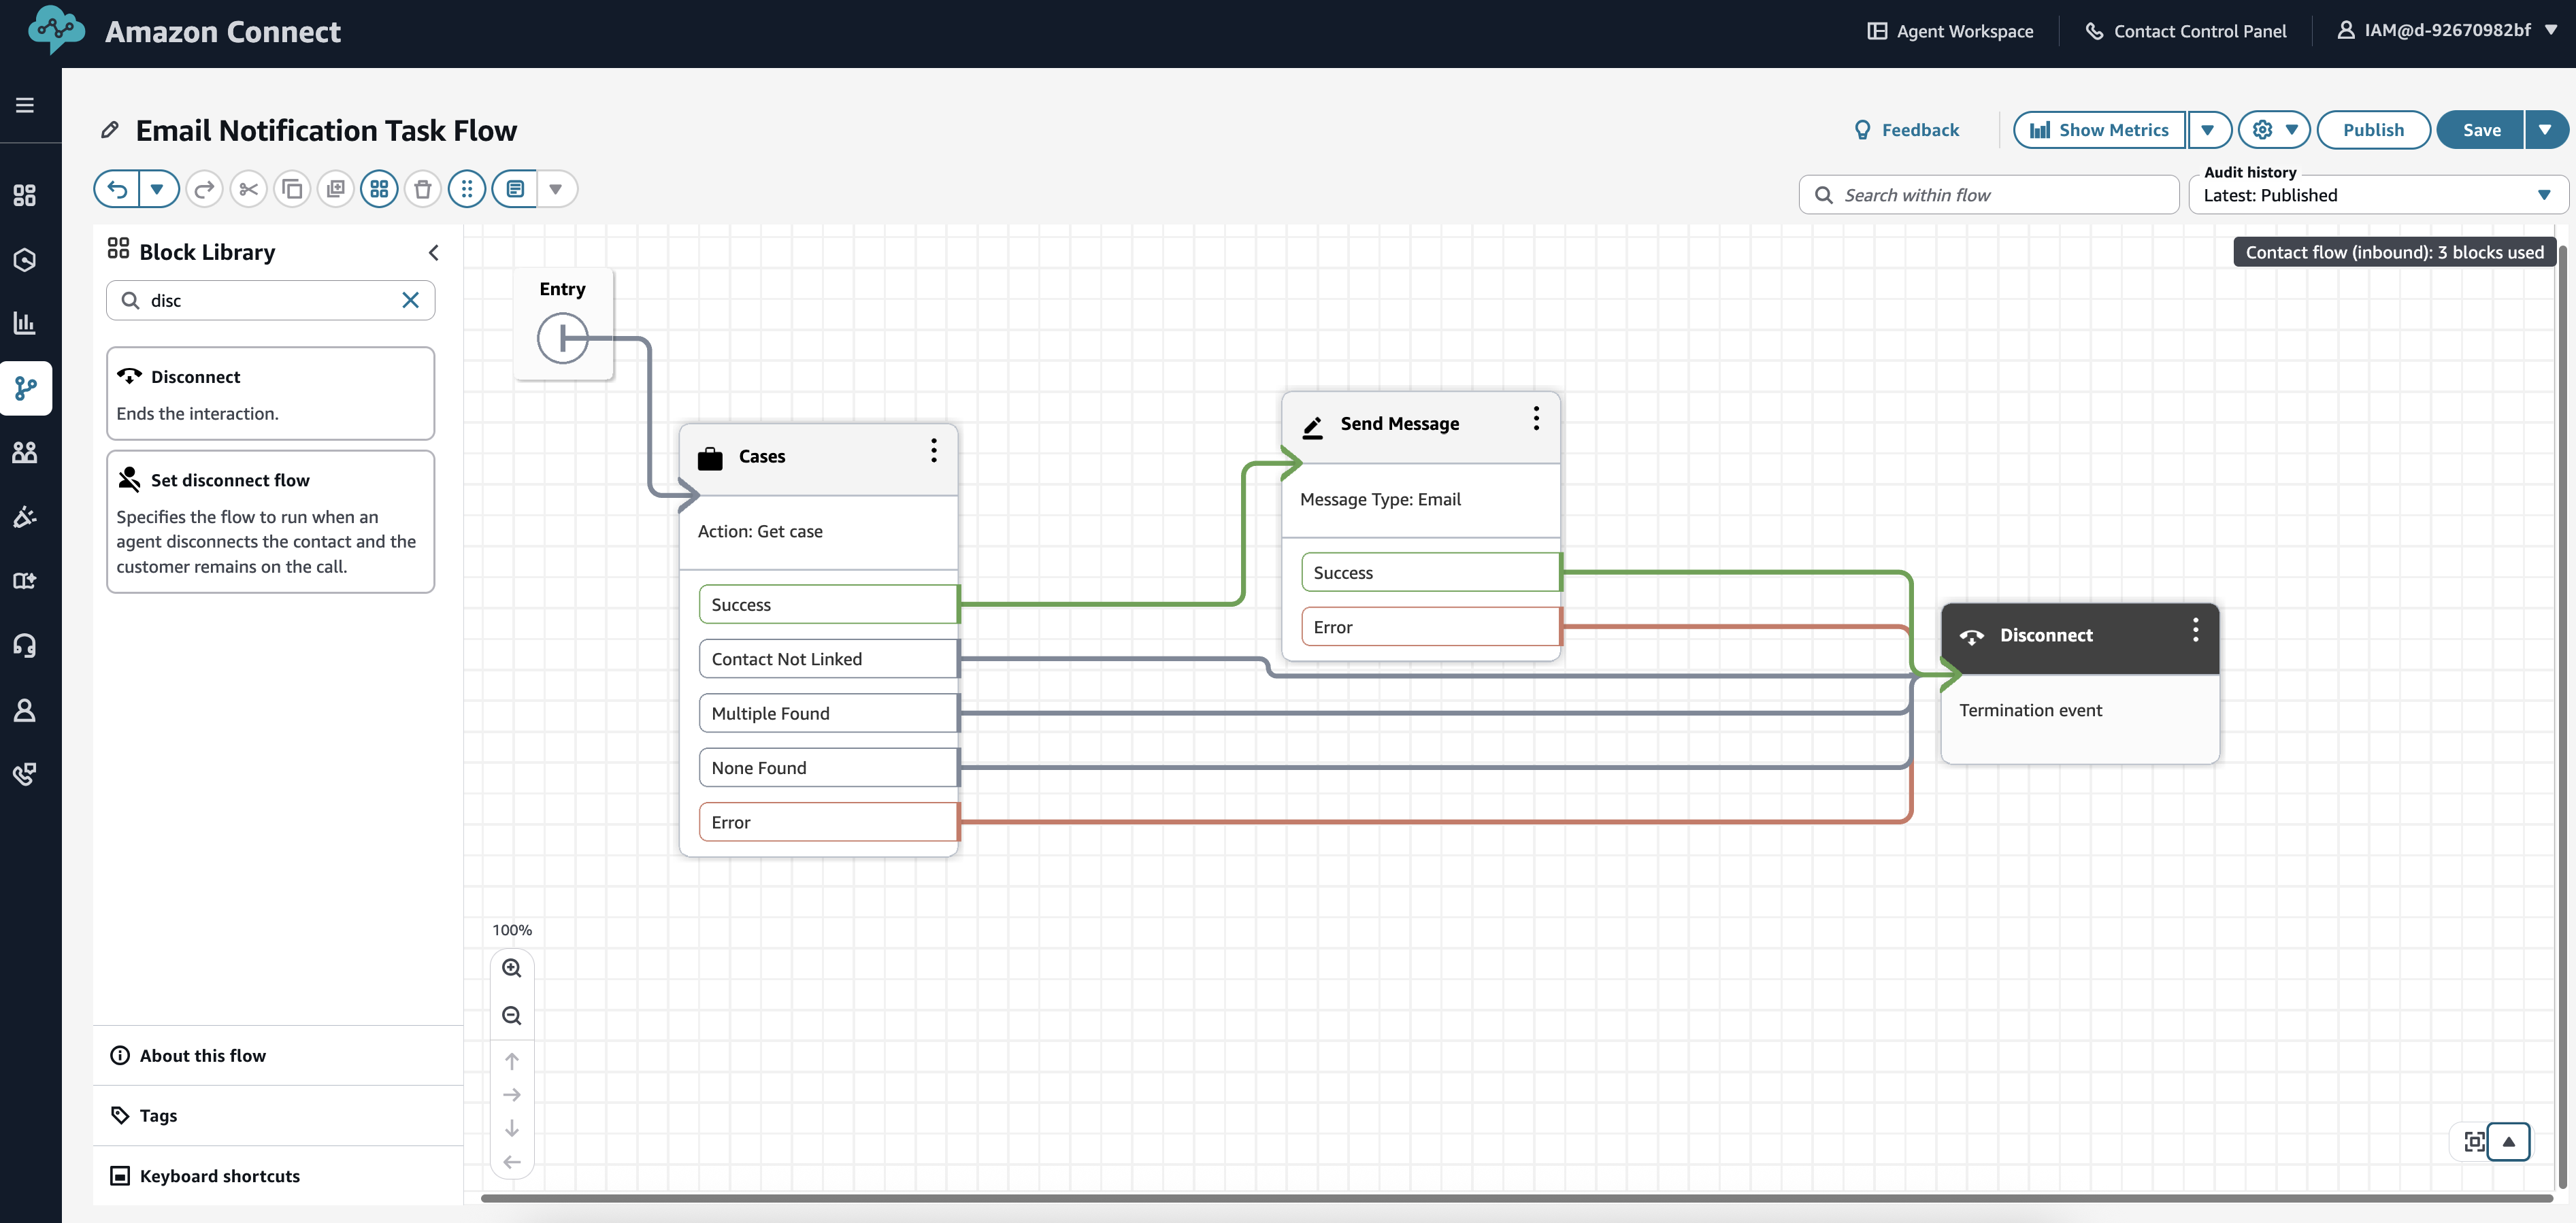
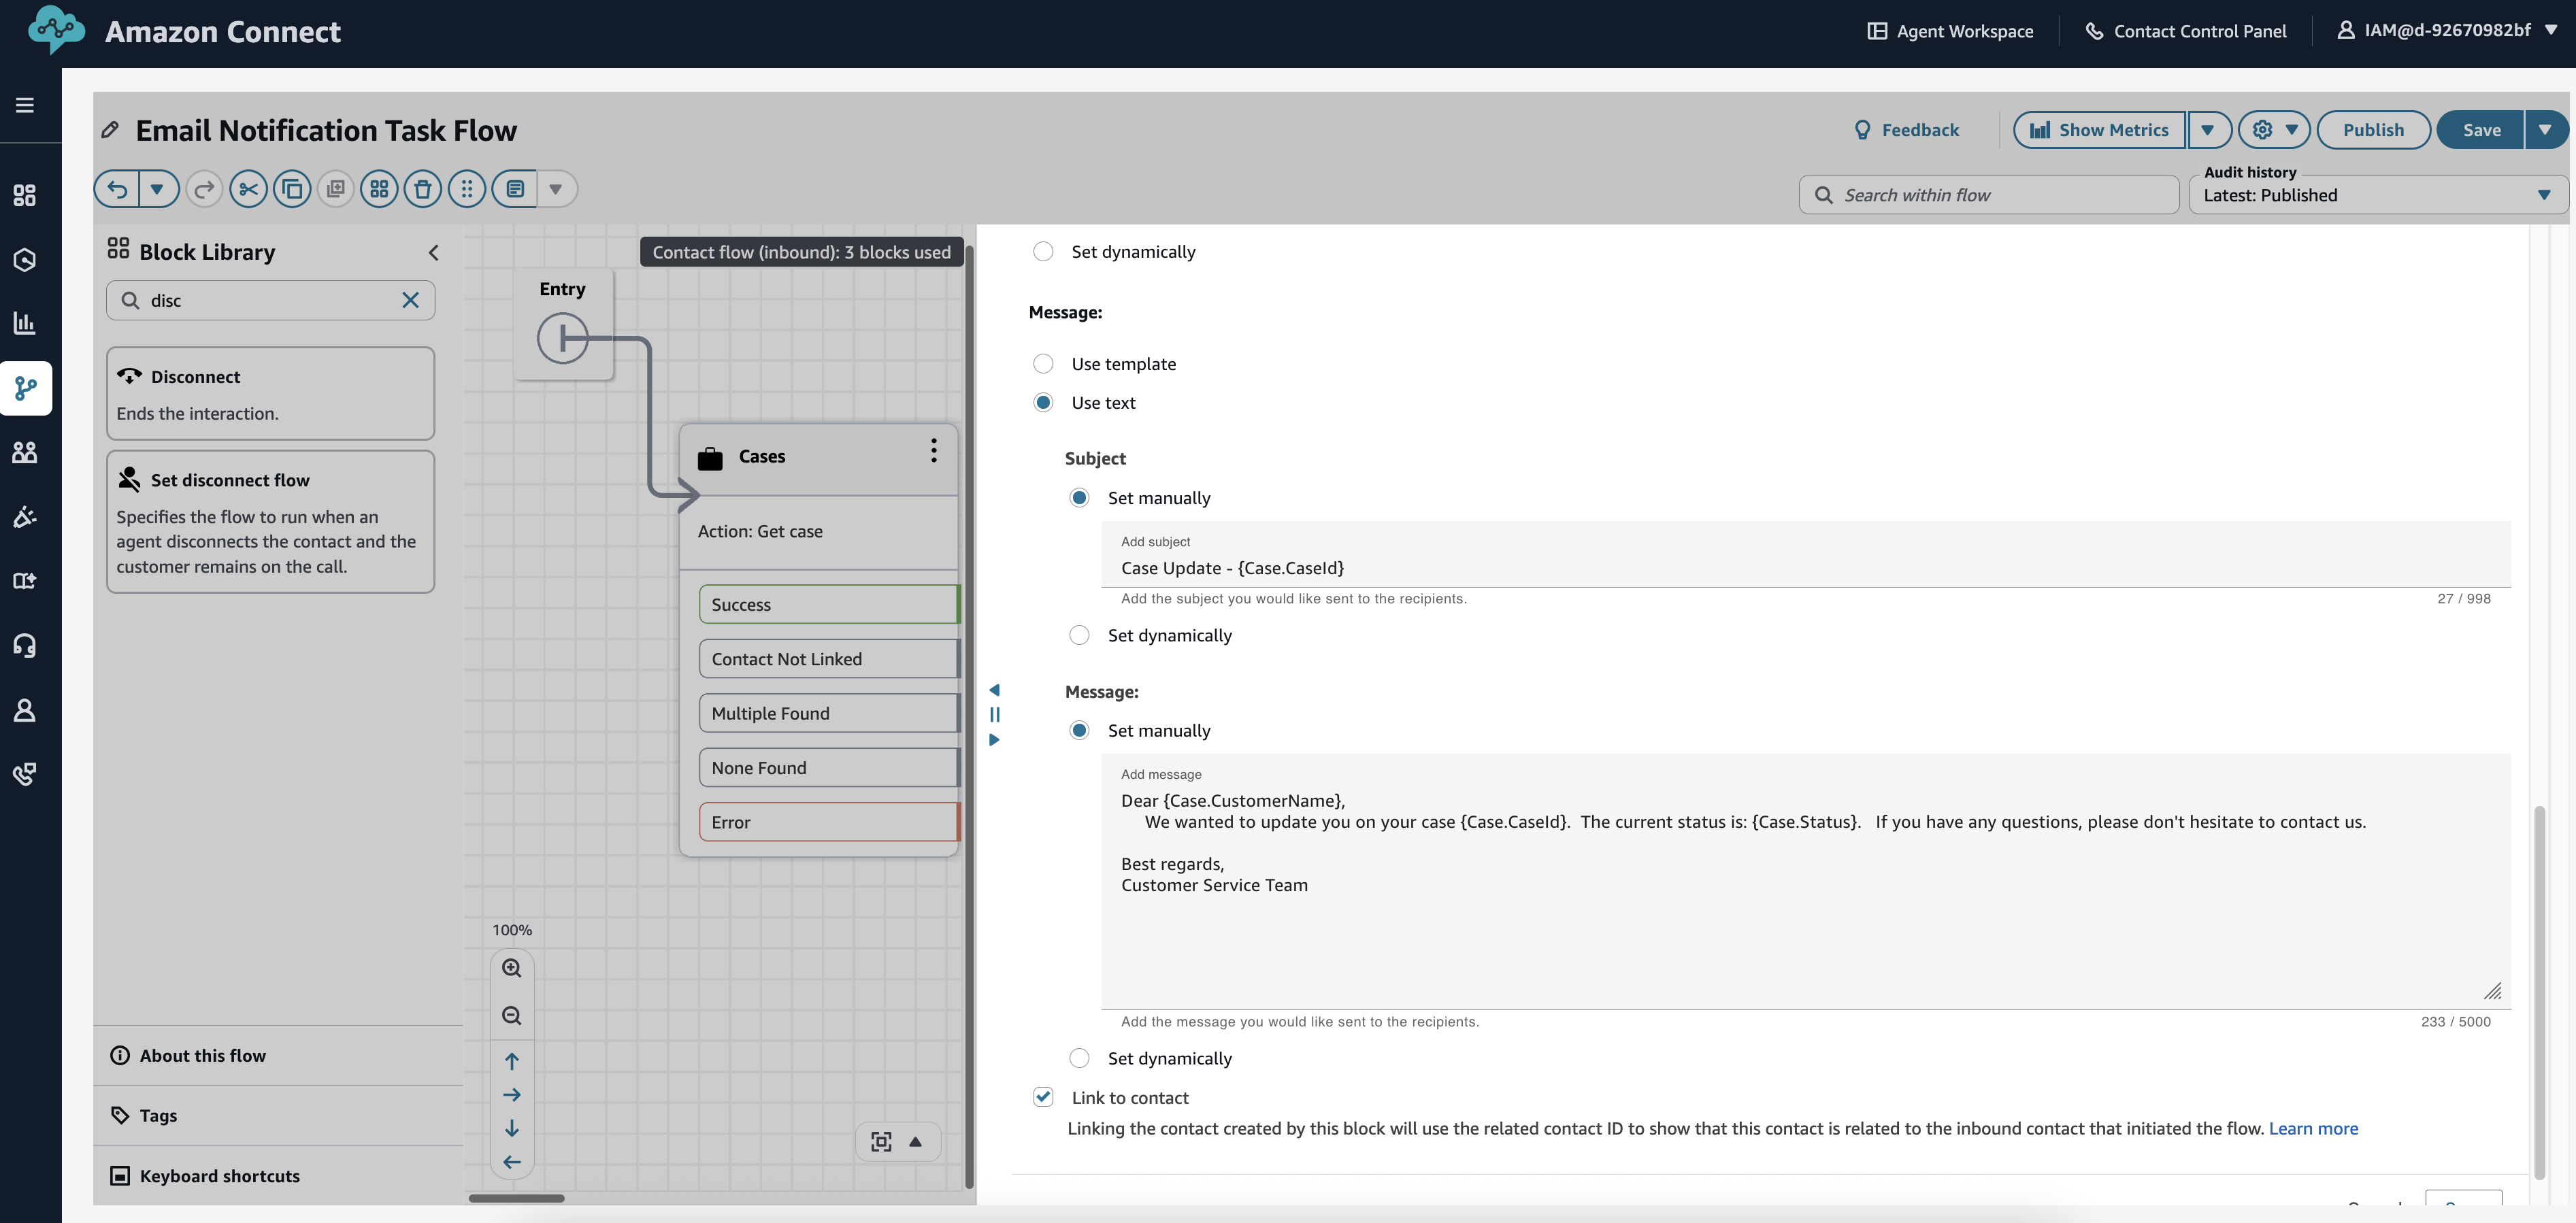
Email notification task flow:
- In the Amazon Connect console, choose Routing -> Flows –> Create flow
- Create a new Contact flow named “Email Notification Task Flow”
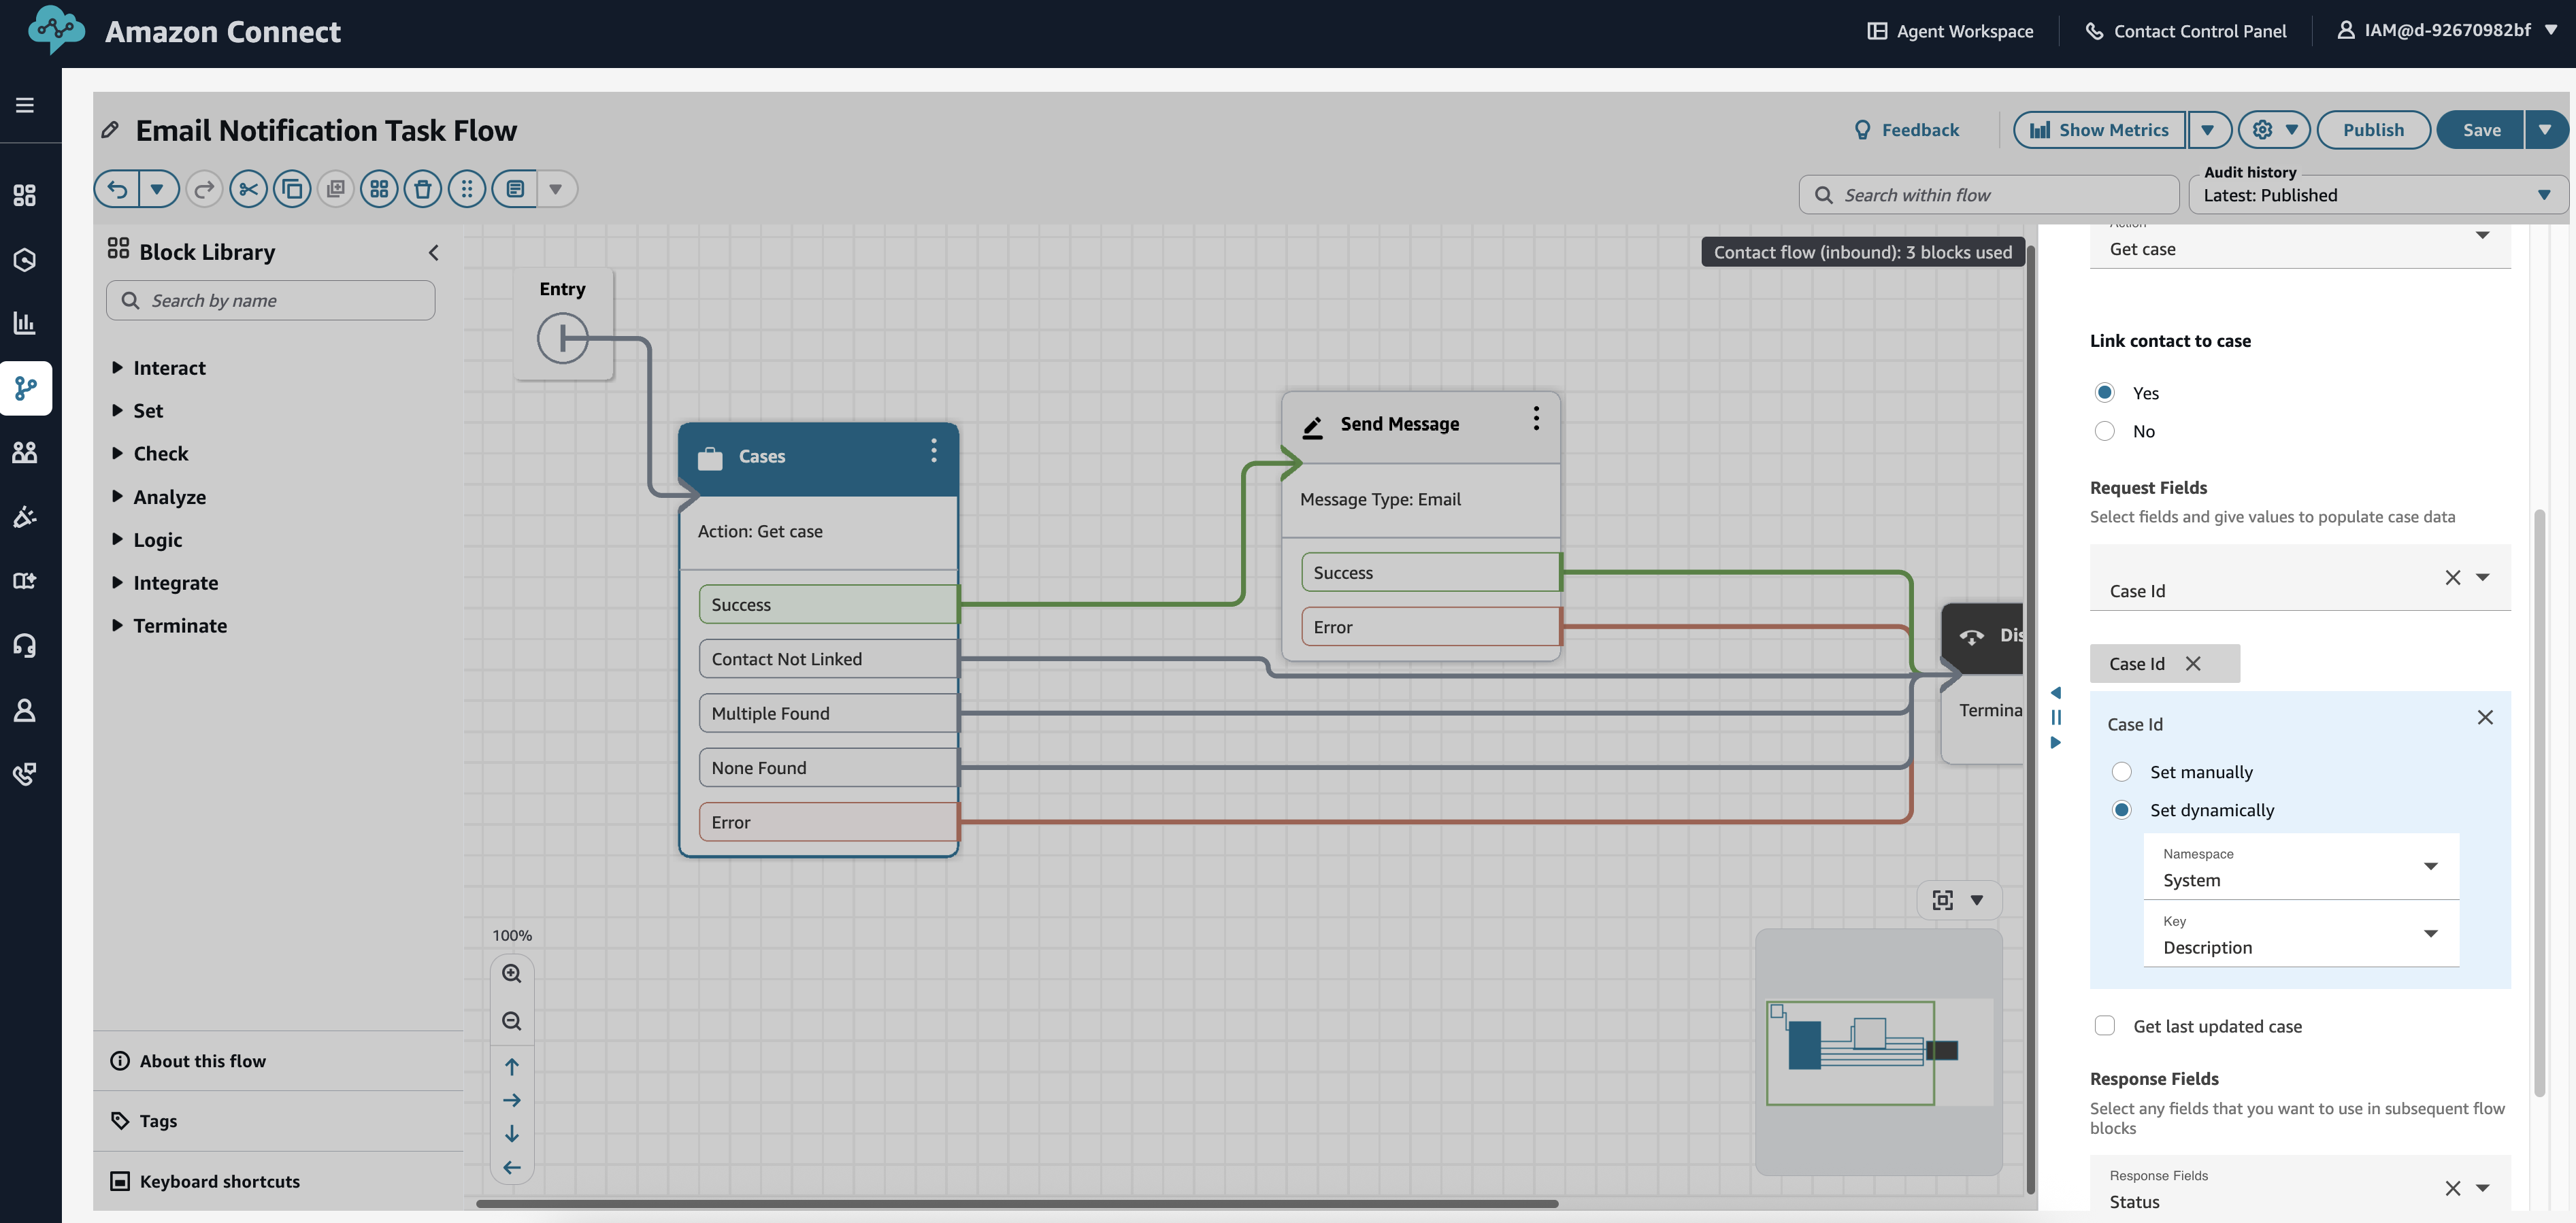
- Add a Get case block to retrieve case details
- Add a Send email block configured with:
- To: Use case attribute {Case.CustomerEmail}
- Subject: Case Update – {Case.CaseId}
- Body:
Dear {Case.CustomerName},

We wanted to update you on your case {Case.CaseId}.
The current status is: {Case.Status}.

If you have any questions, please don't hesitate to contact us.

Best regards,
Customer Service Team
- Add error handling and logging
- Add a Disconnect block to end the task flow
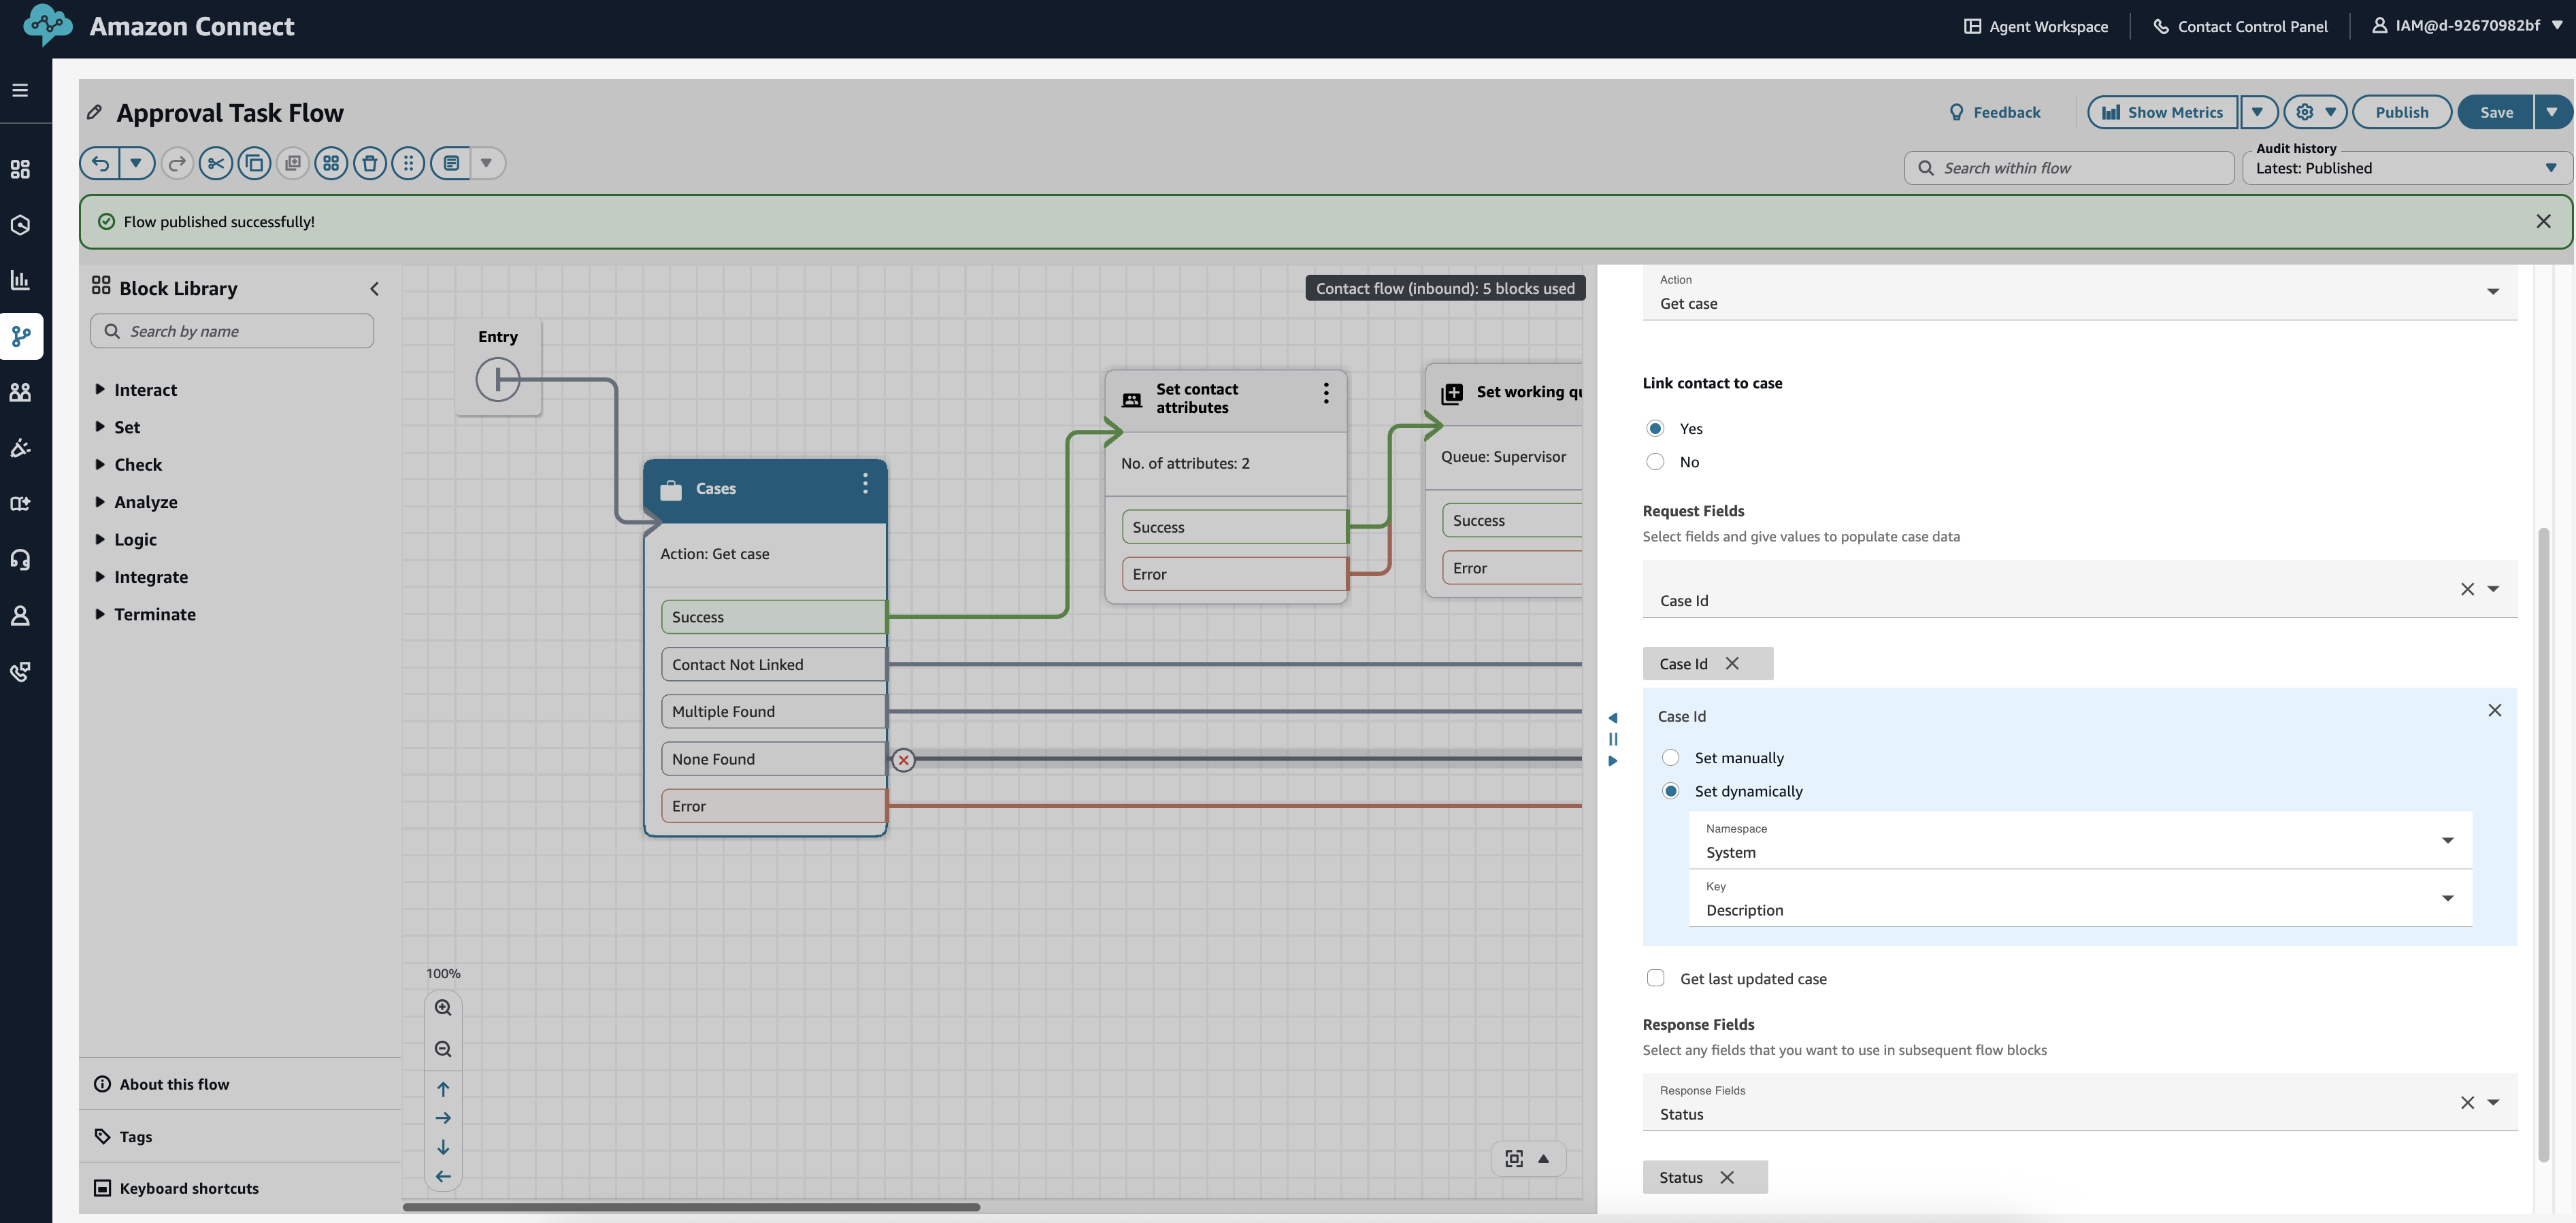
Approval task flow:
- In the Amazon Connect console, choose Routing -> Flows –> Create flow
- Create a new Contact flow named “Approval Task Flow”
- Add a Get case block to retrieve case details
- Add a Set working queue block to route to supervisor/approver queue
- Connect to transfer queue blocks

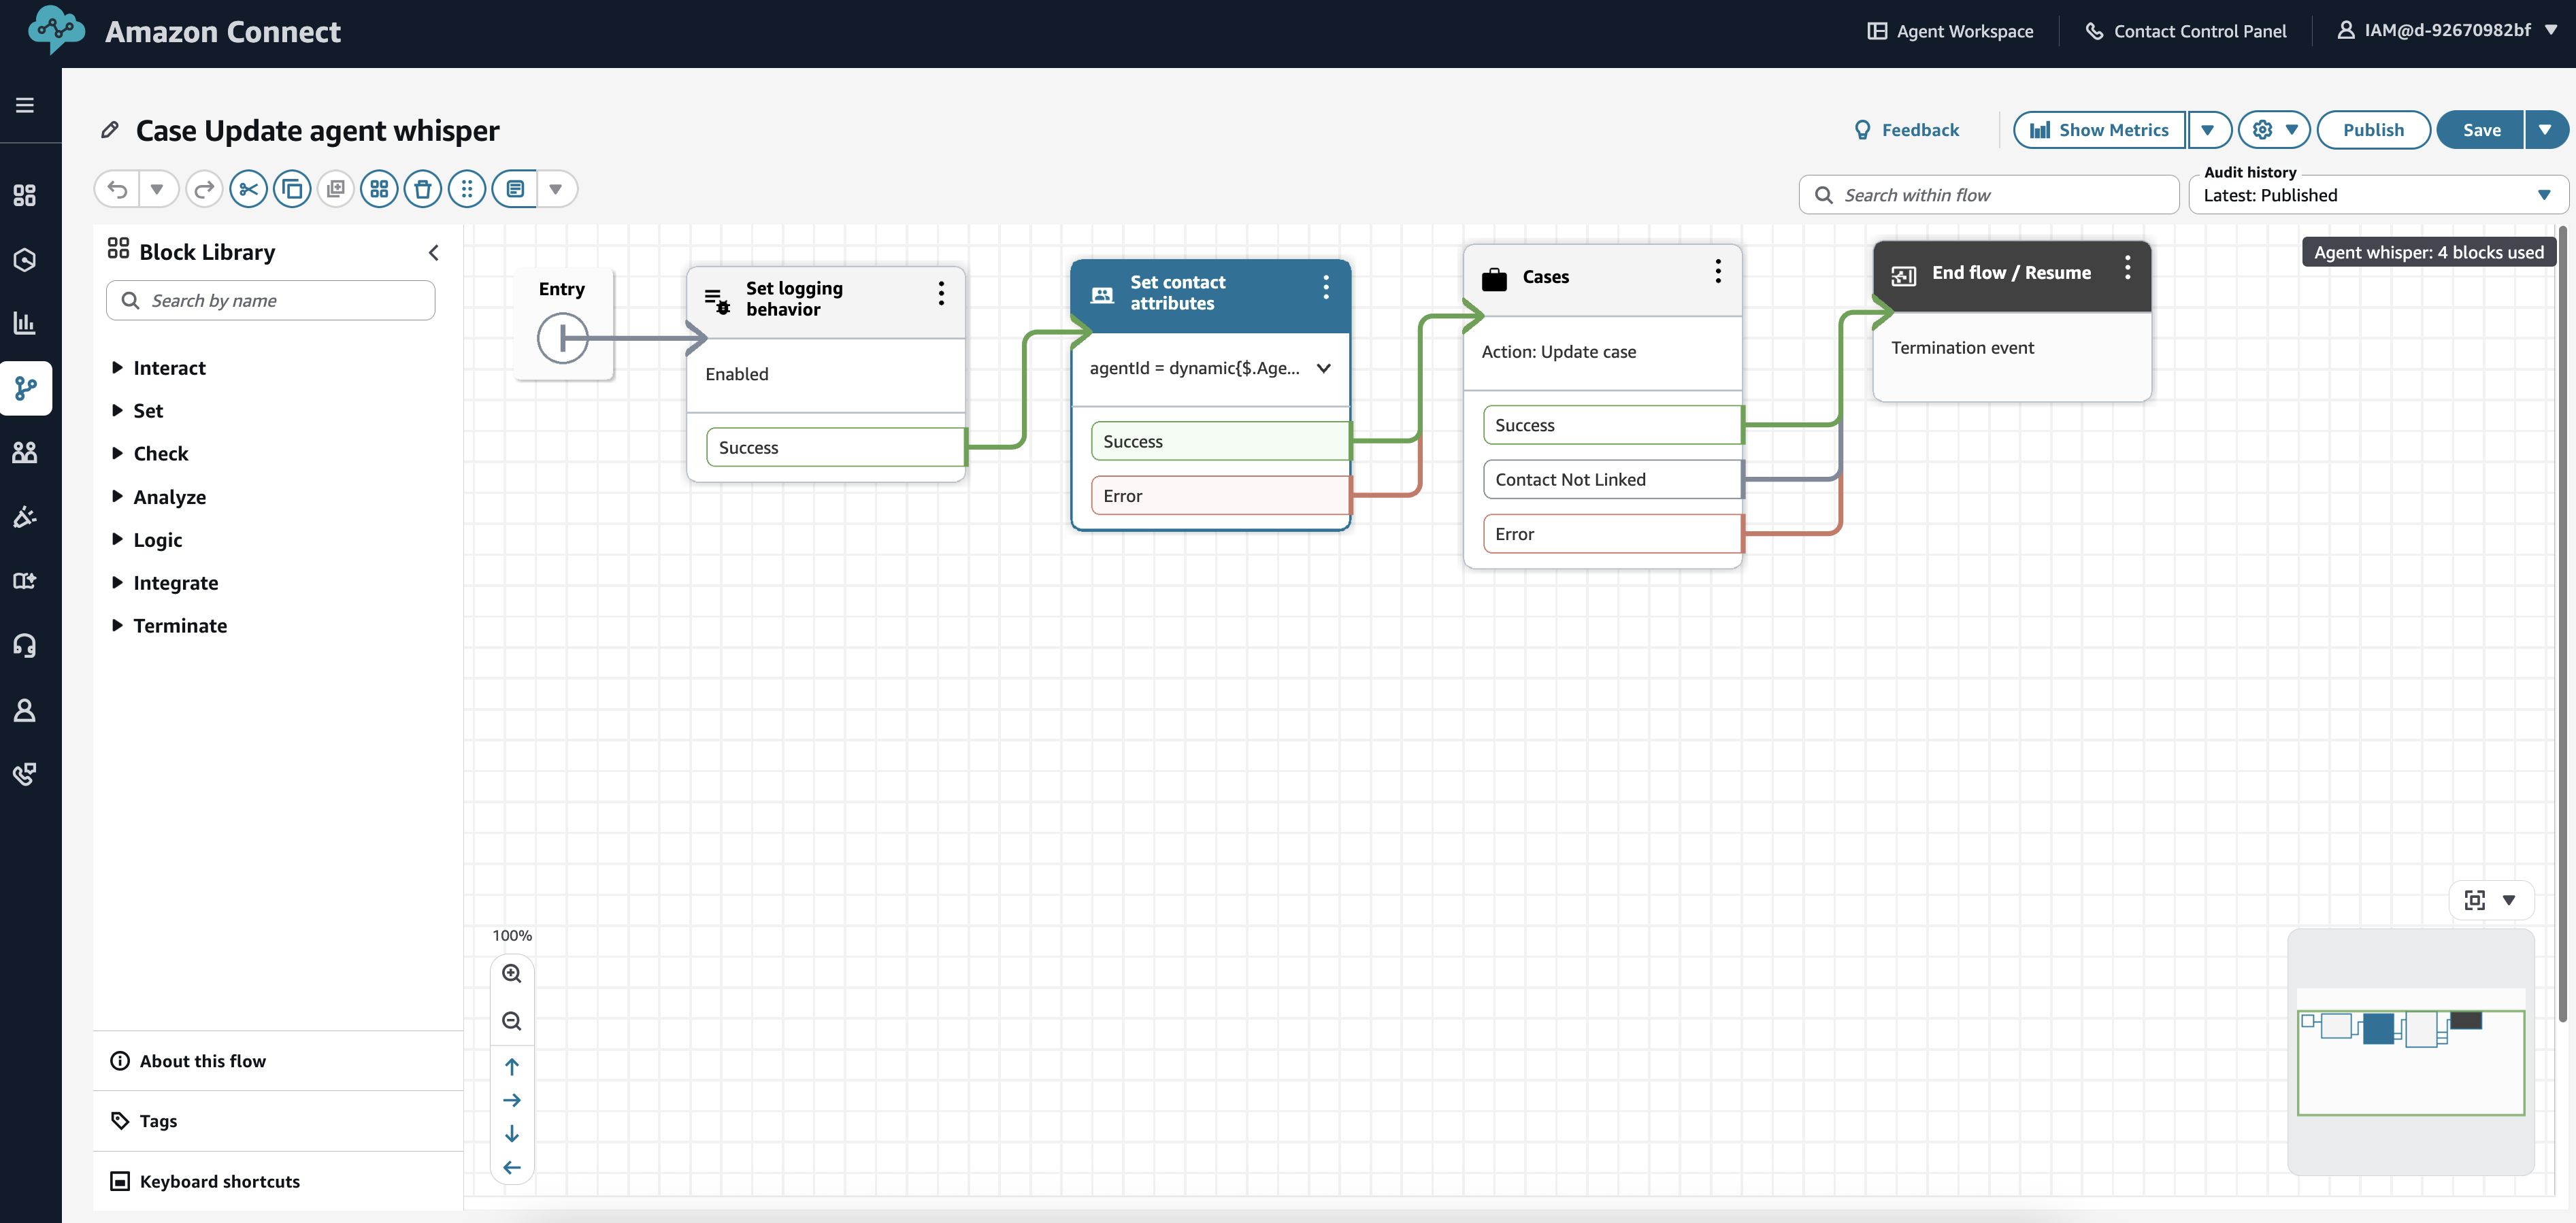
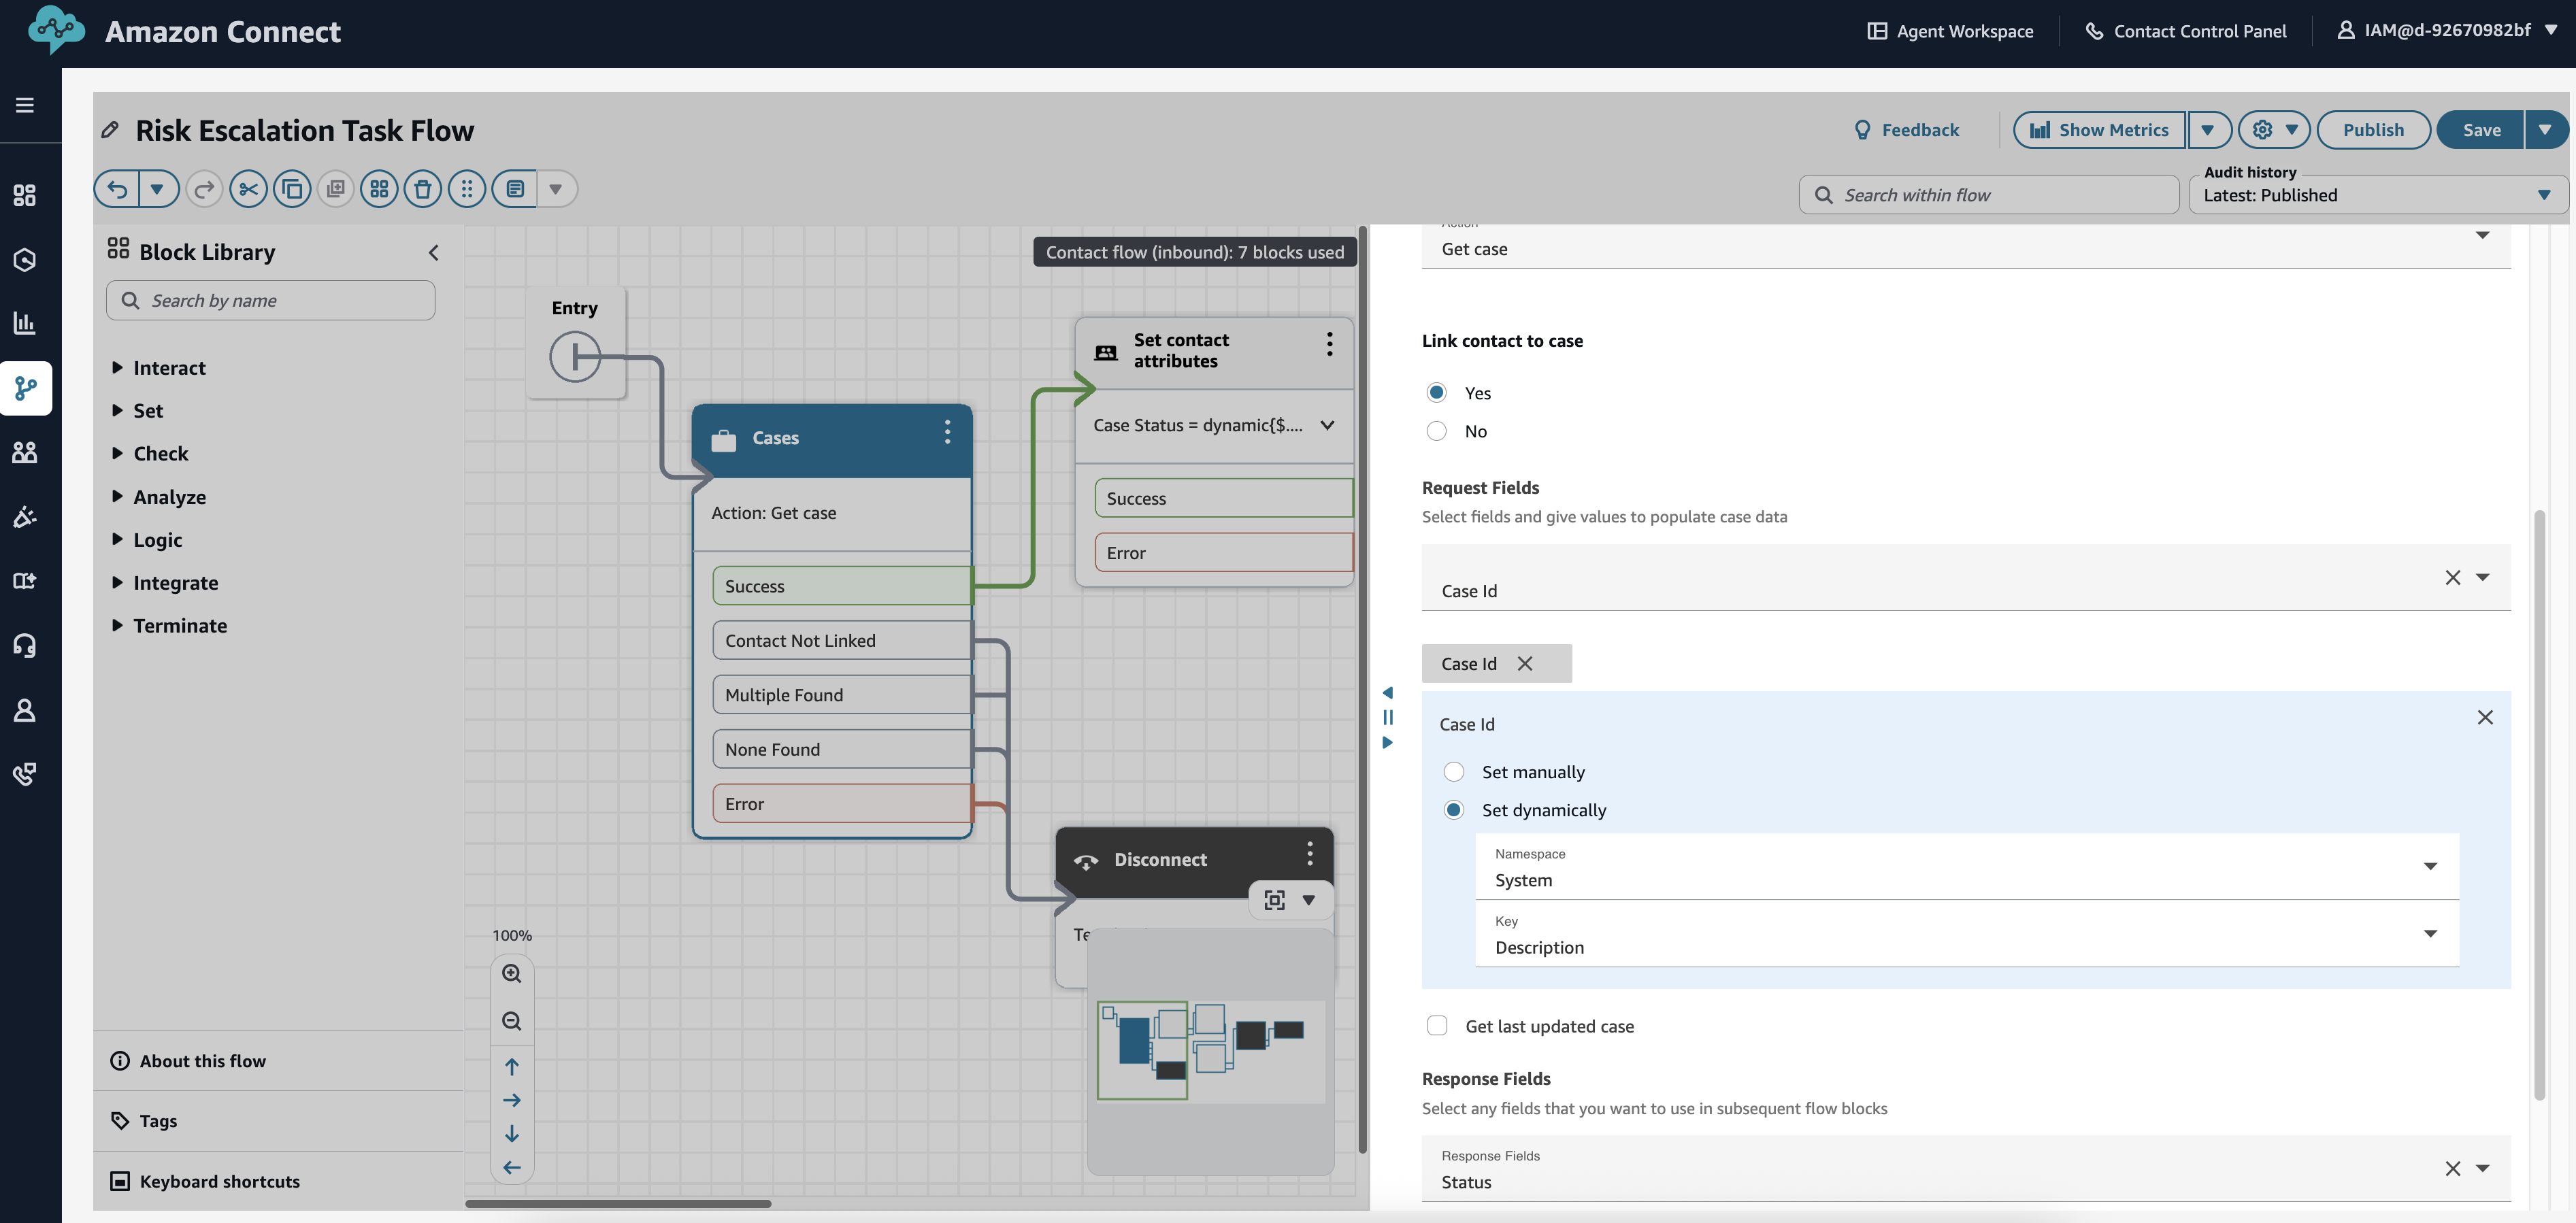
Risk escalation task flow:
-
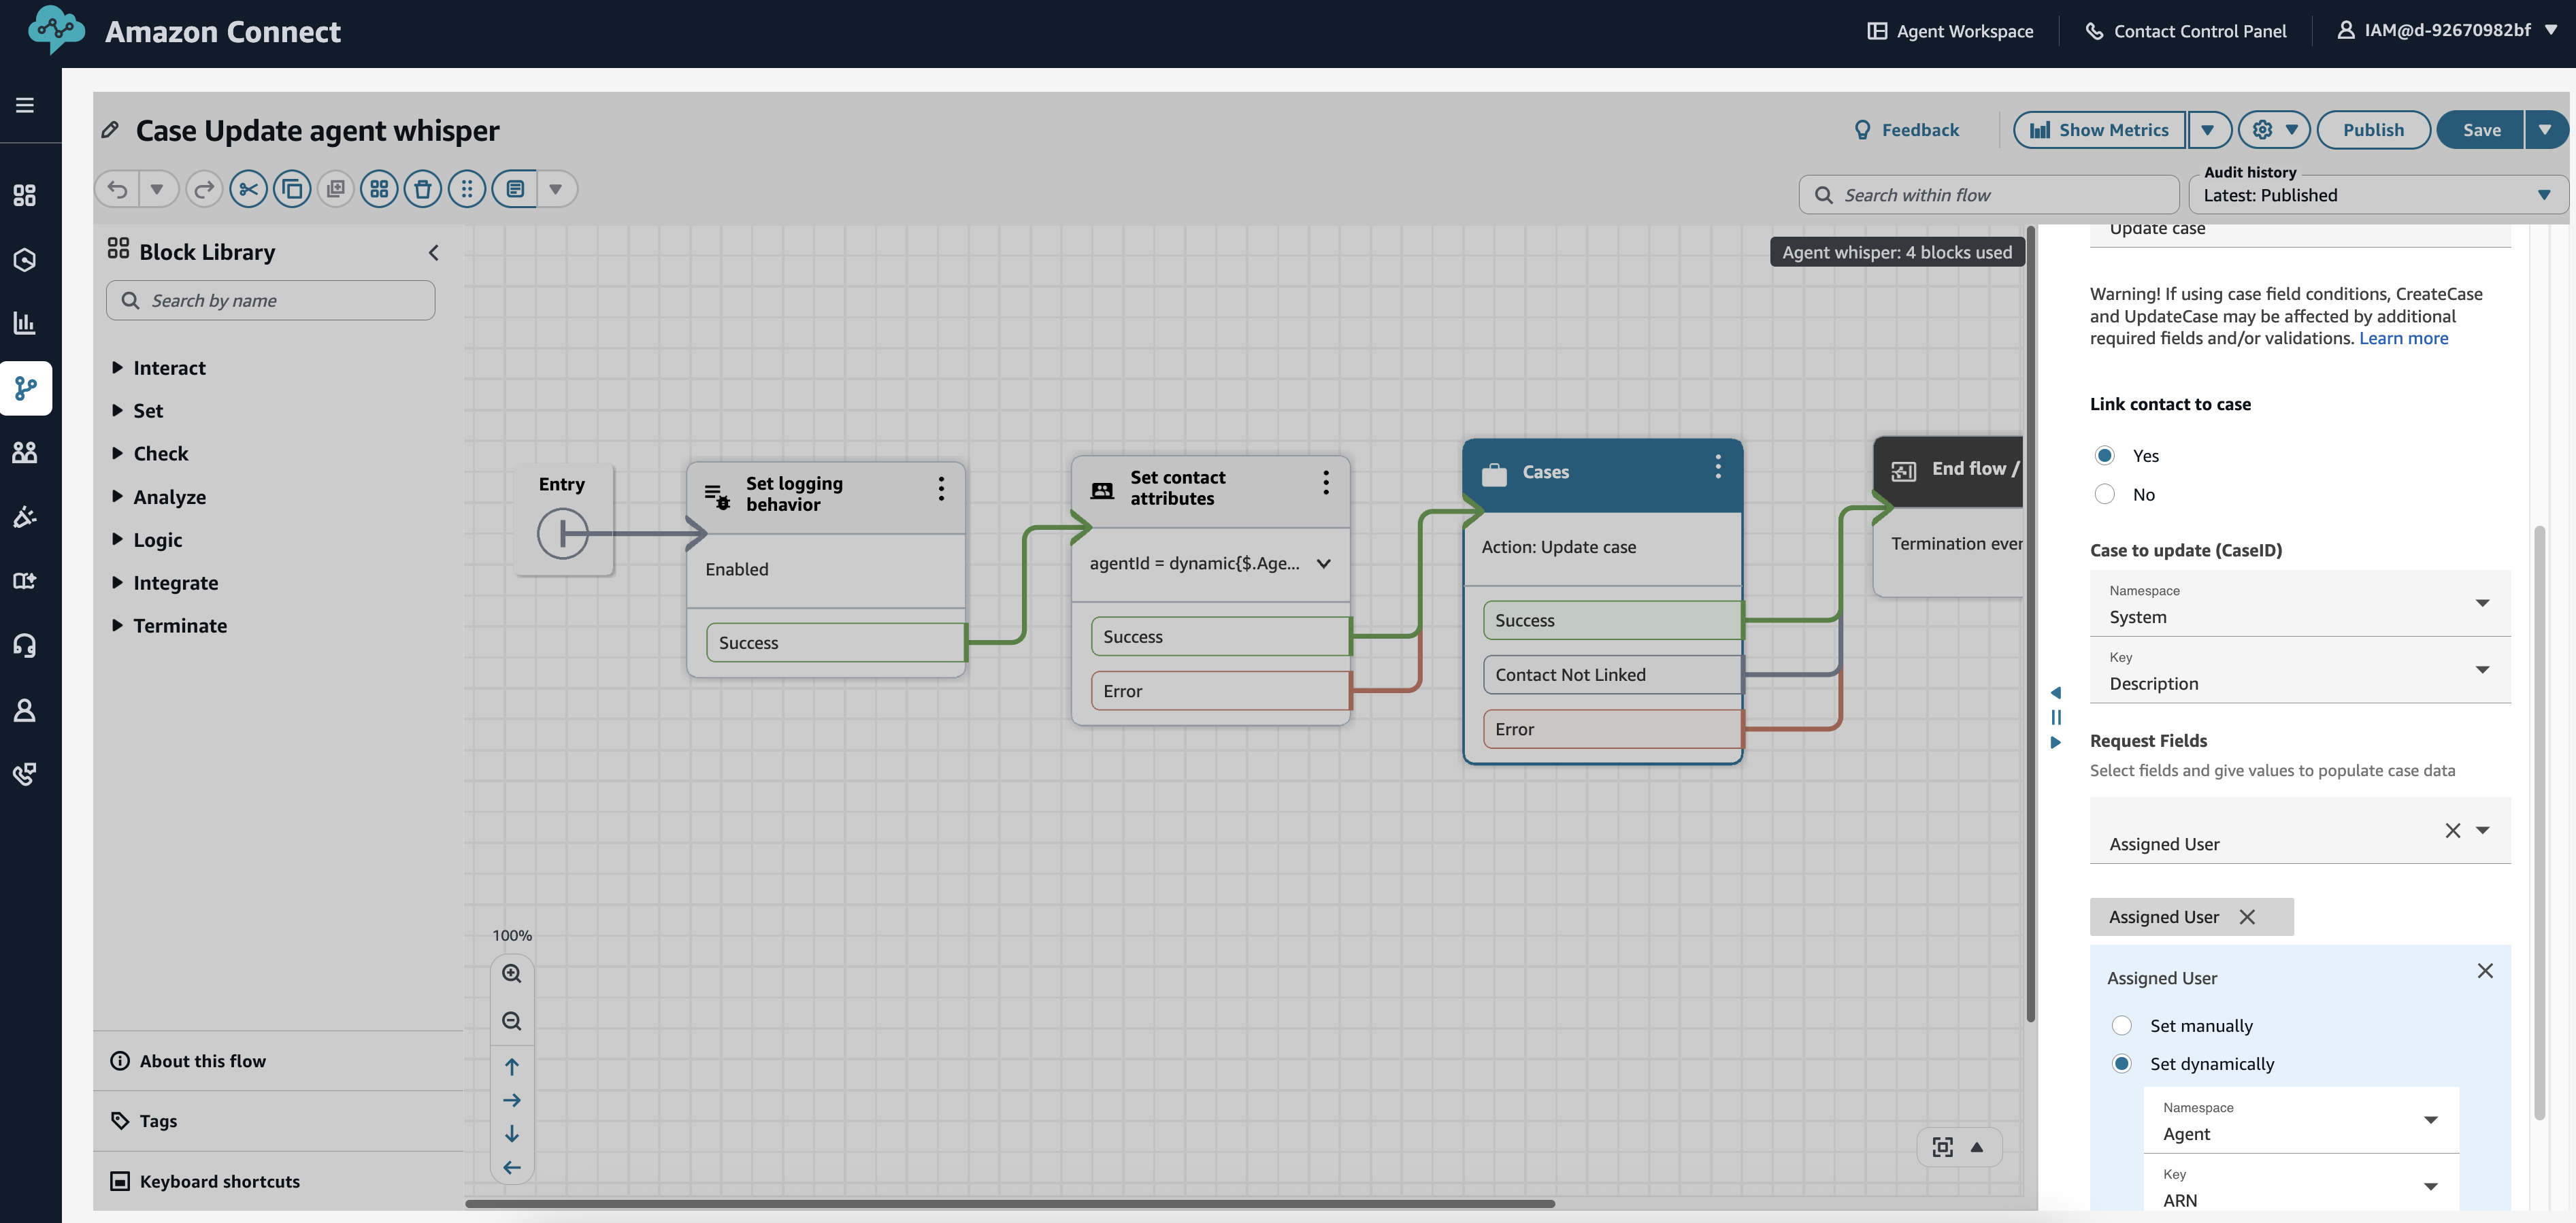
- Create a new Agent Whisper flow named “Case Update agent whisper”
- Add Update case block to assign case to accepting supervisor
- Create a new Task flow named “Risk Escalation Task Flow”
- Add a Get case block to retrieve case details
- Add a Set working queue block to route to supervisor queue
- Add logic to handle supervisor acceptance
- Add Update case block to assign case to accepting supervisor

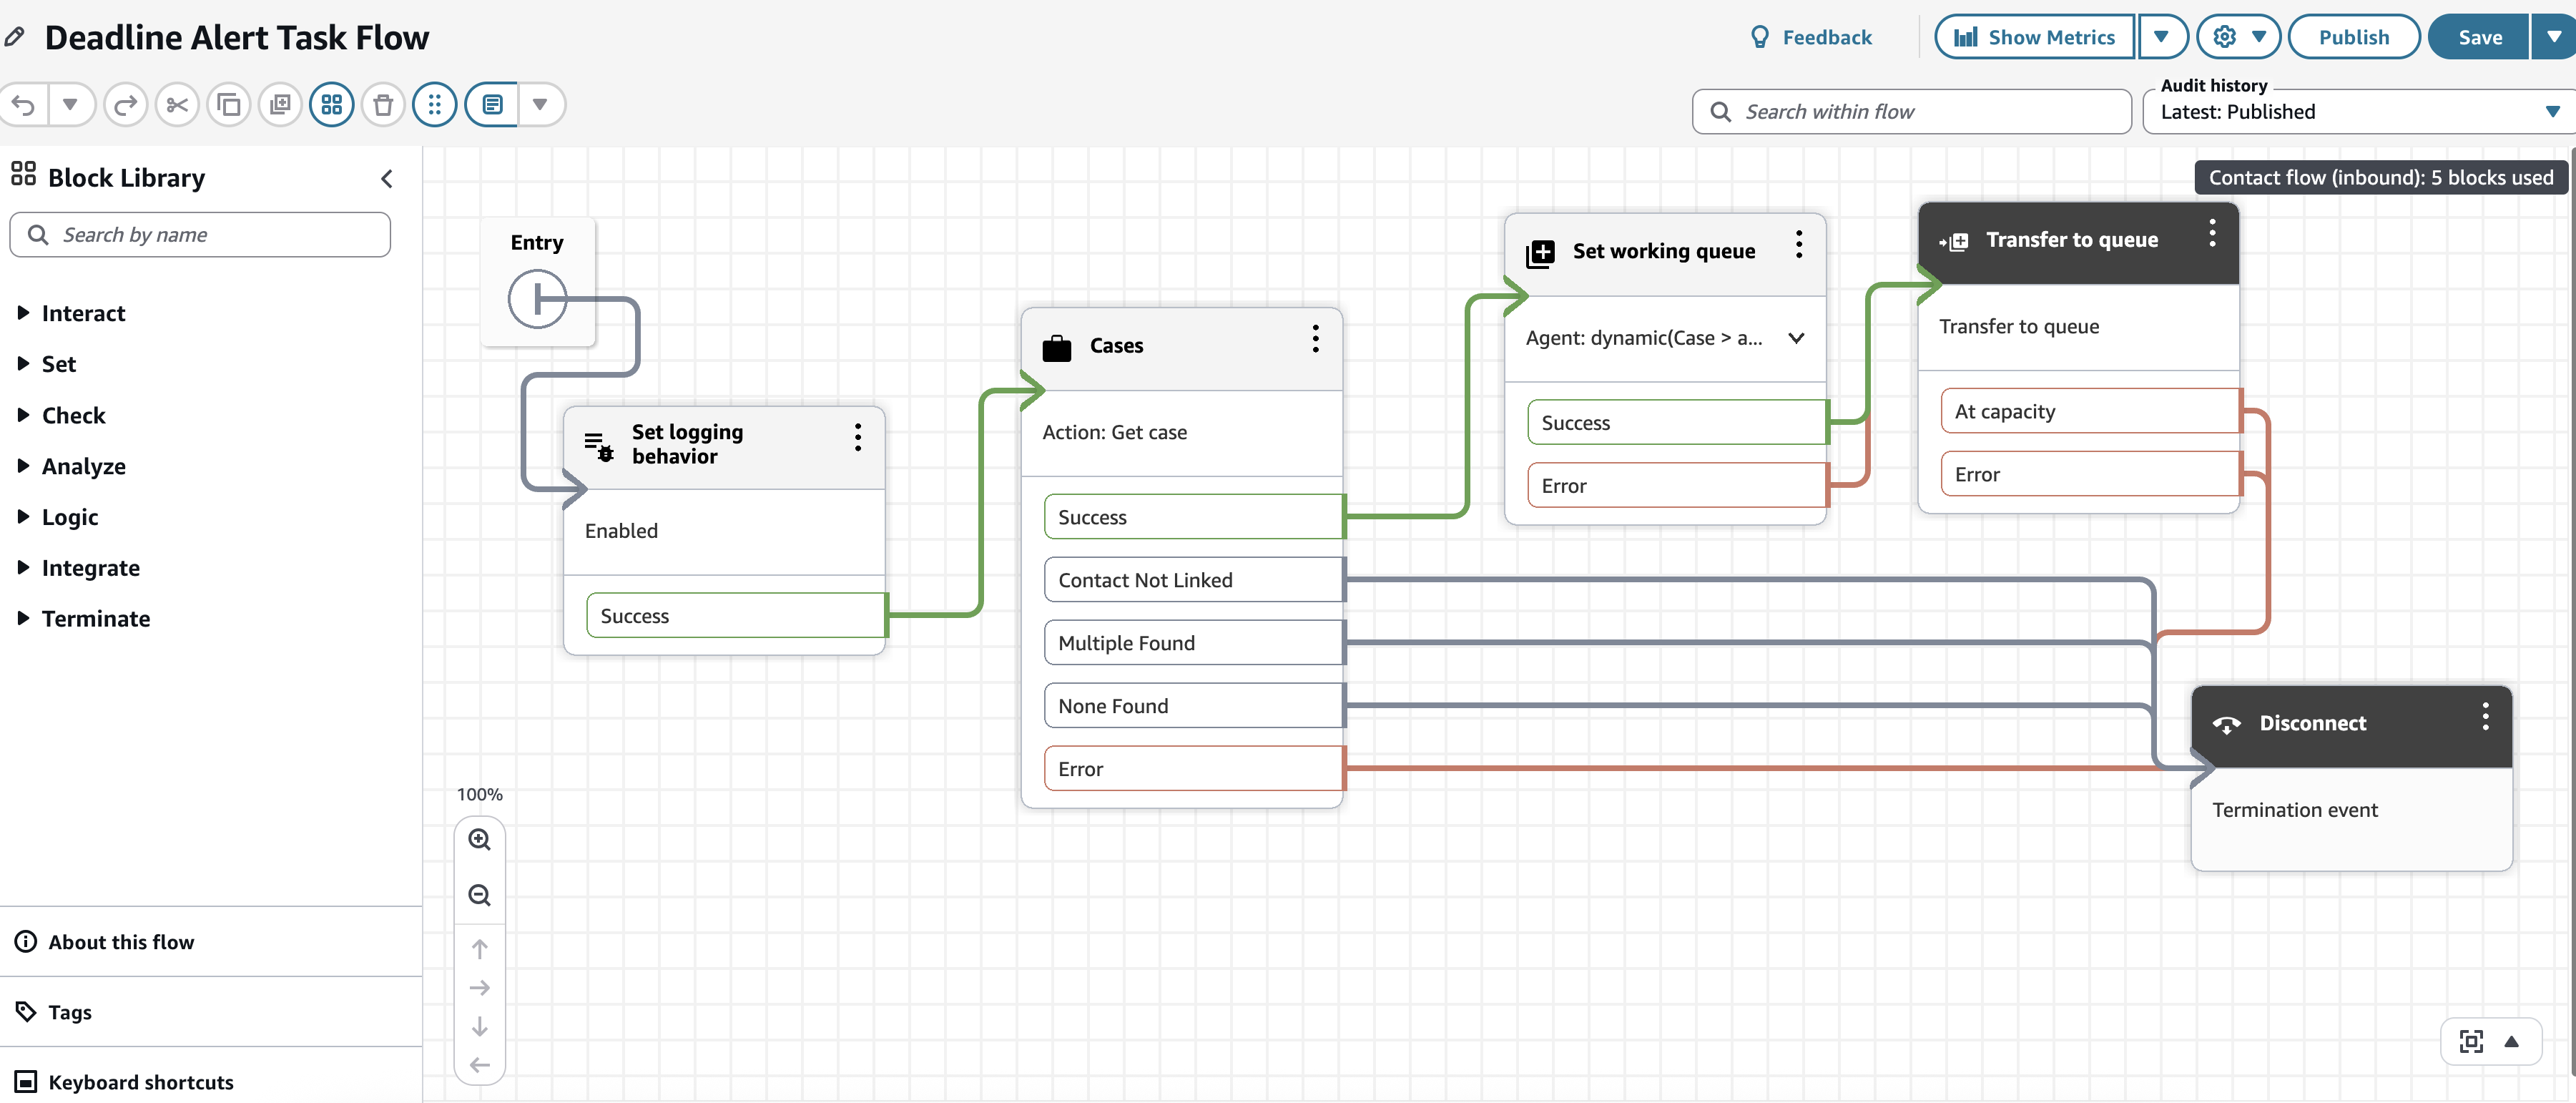
Deadline alert task flow:
- In the Amazon Connect console, choose Routing -> Flows –> Create flow
- Create a new Contact flow named “Deadline Alert Task Flow”
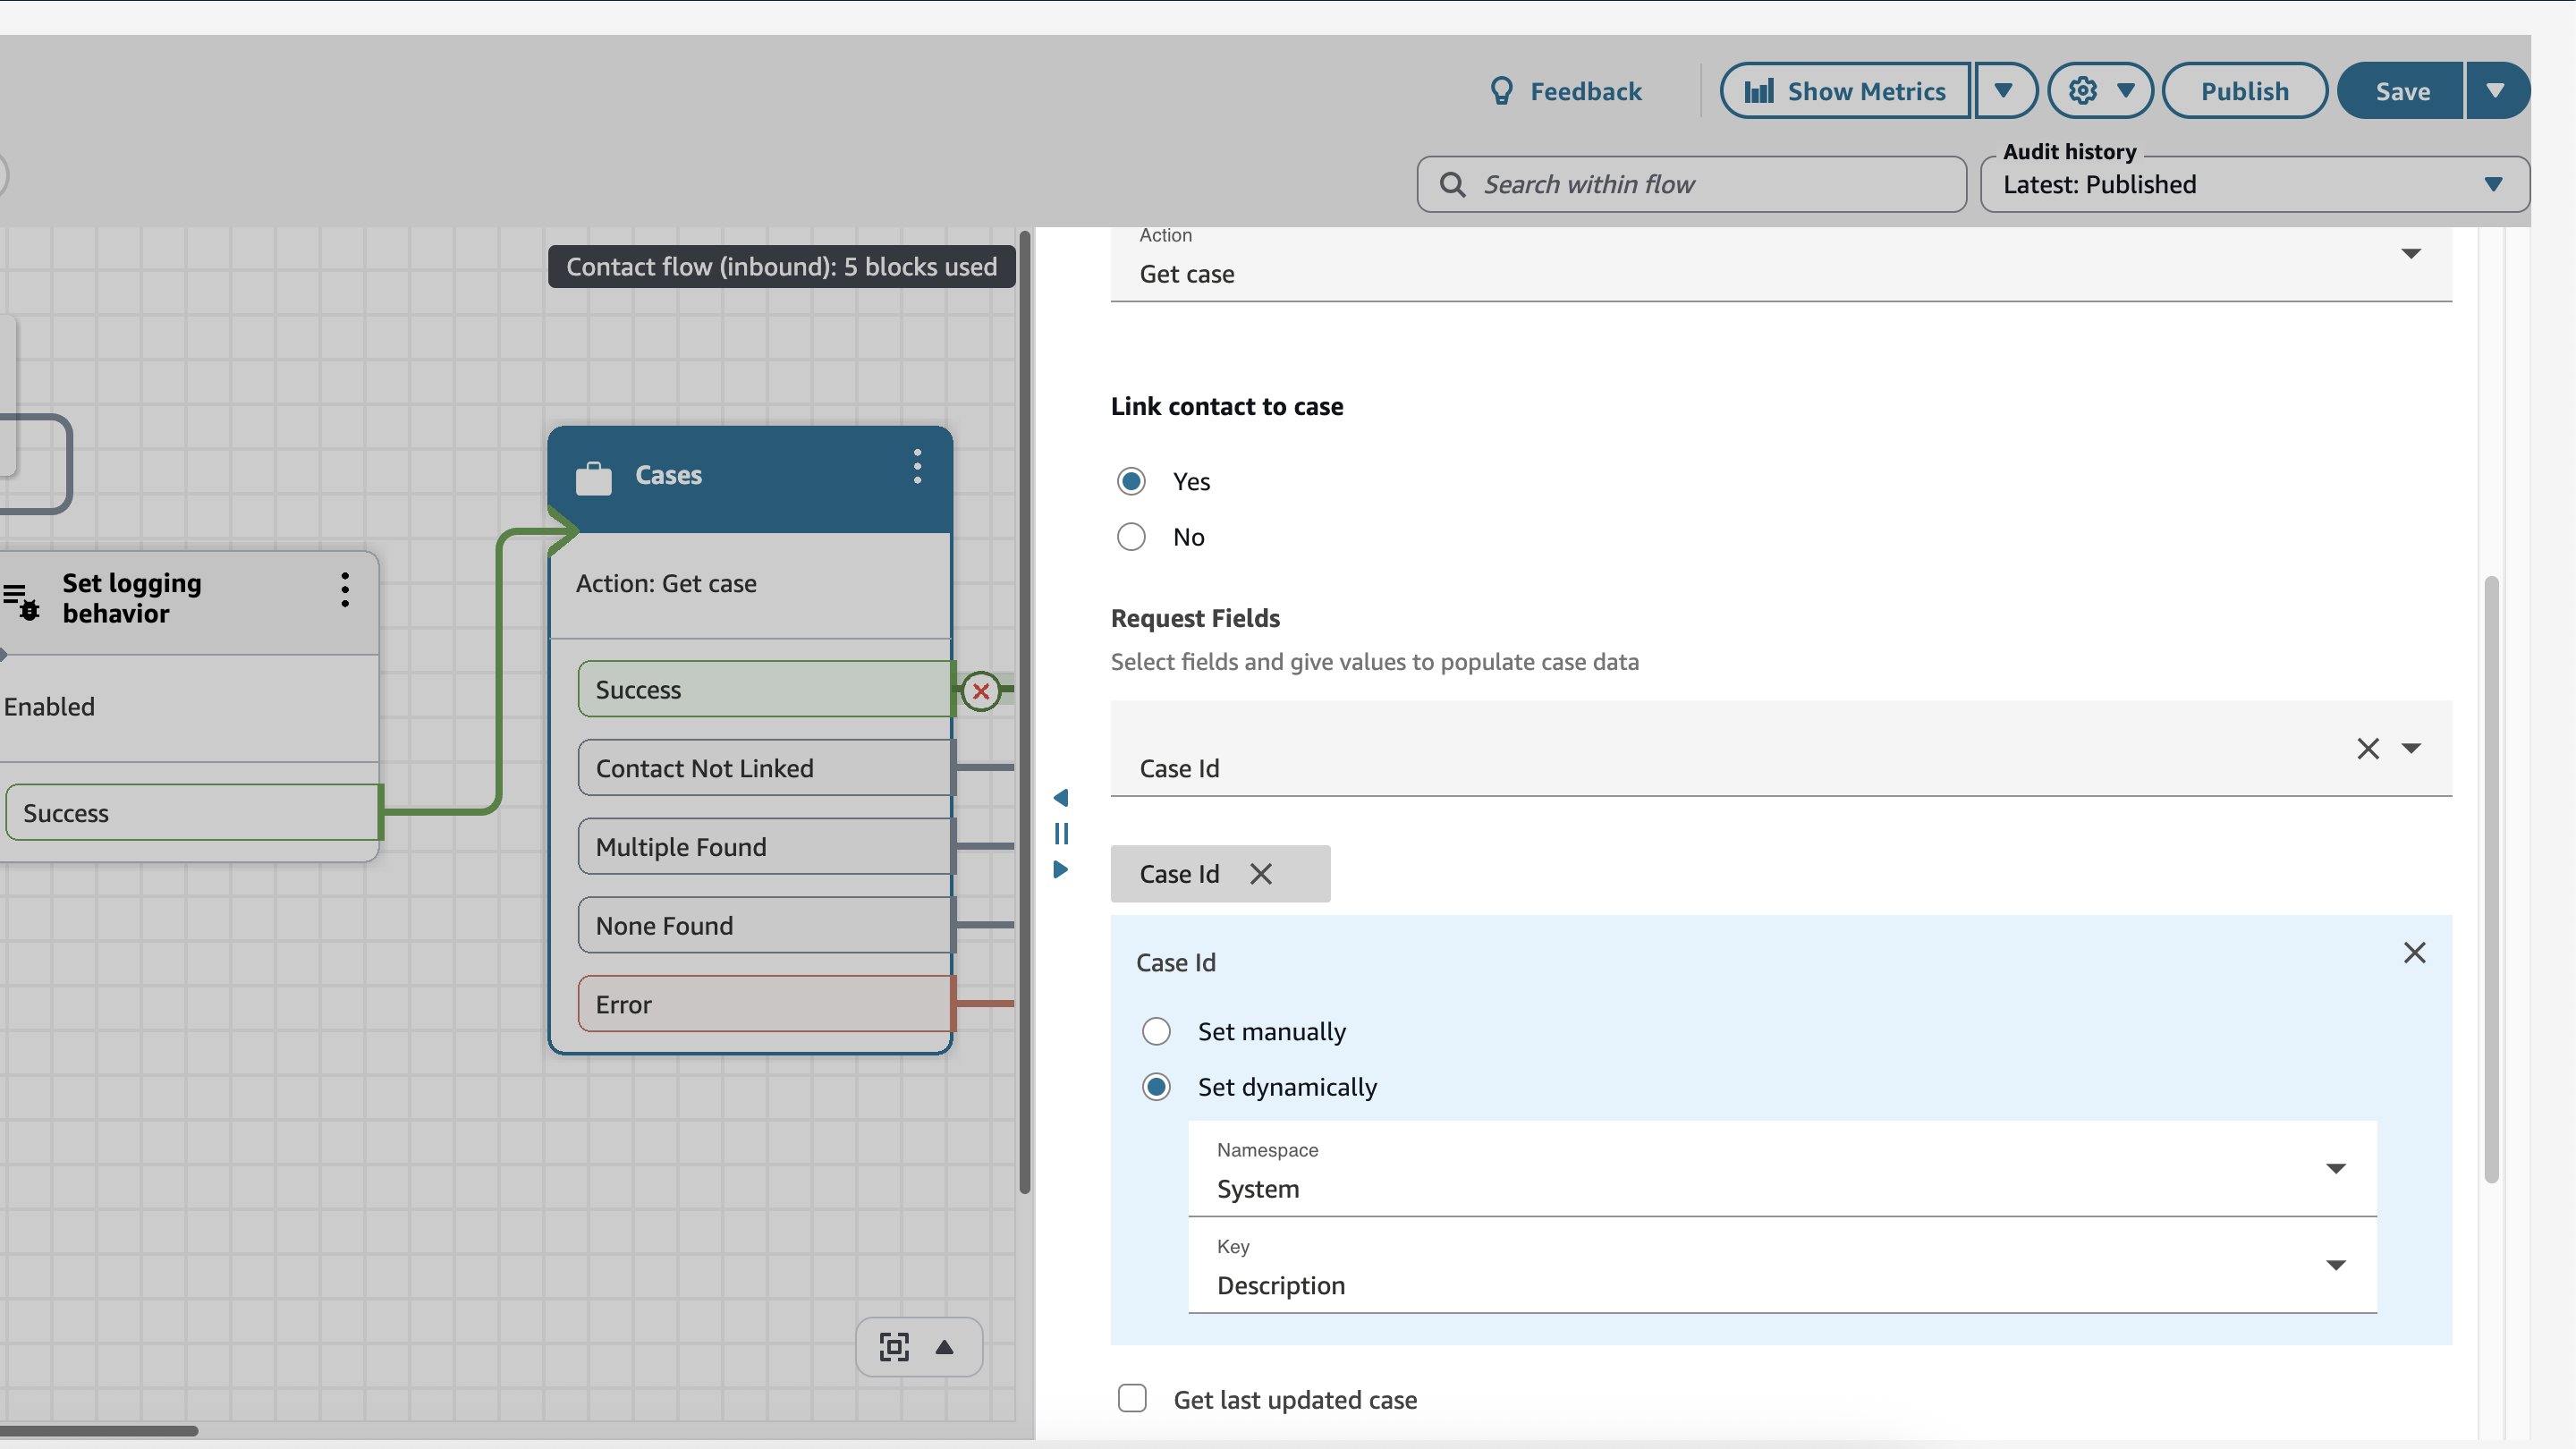
- Add a Get case block
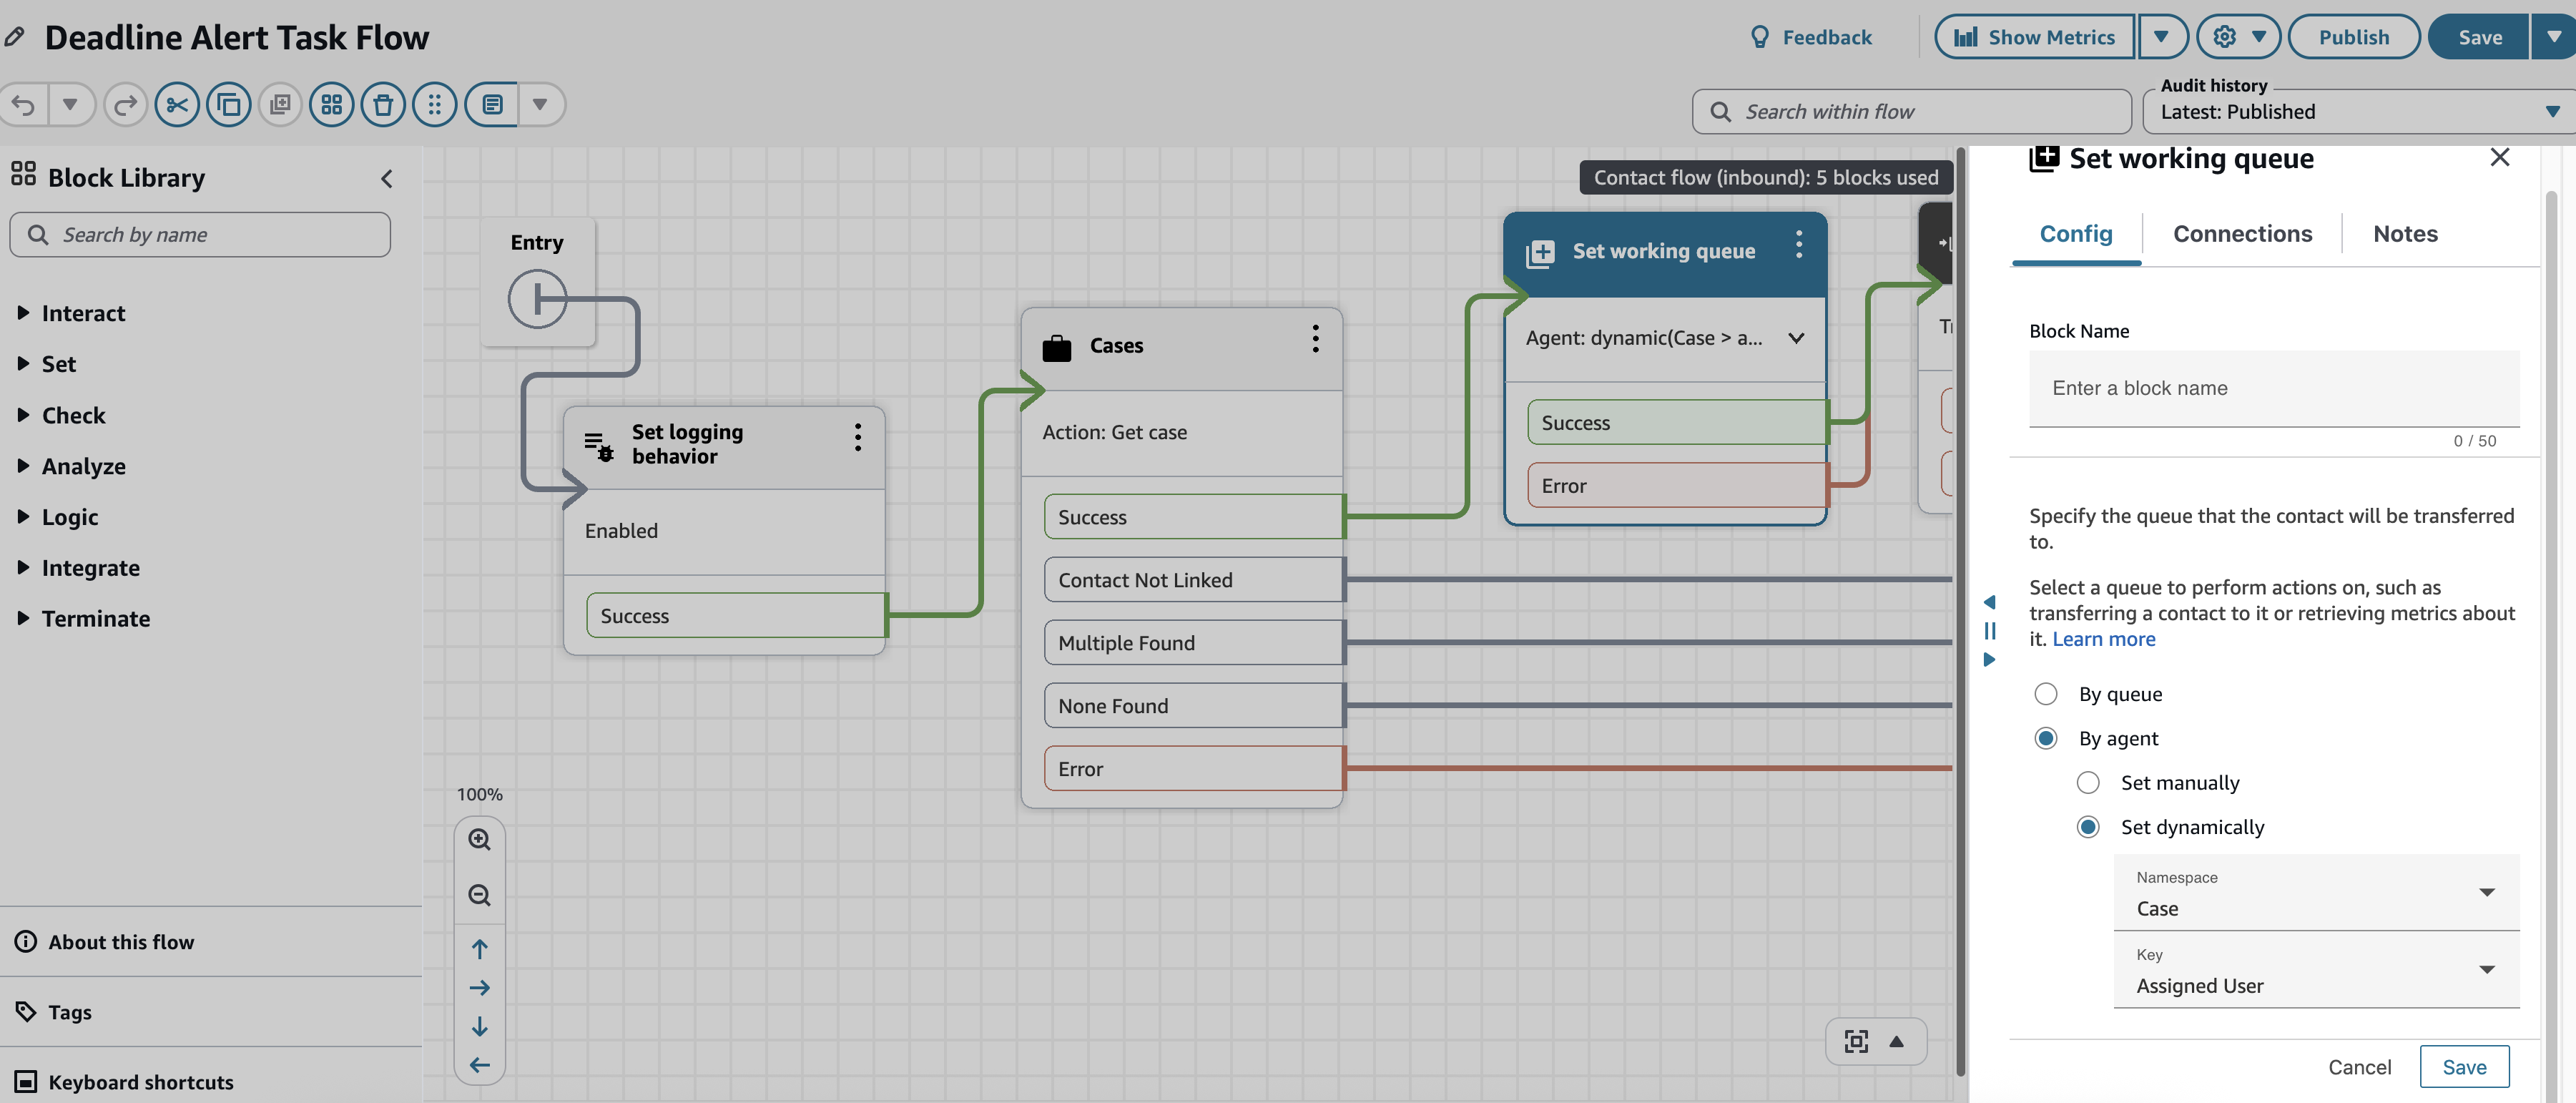
- Add a Set Working Queue action to assign follow-up task to agent
- Add appropriate error handling
Step 5: Configure Amazon Connect rules for approval workflow
Enable case event streams and setup to receive events into an SQS queue. All newly added custom case fields should be added to the case event streams. For more information see Set up Amazon Connect Cases event streams.
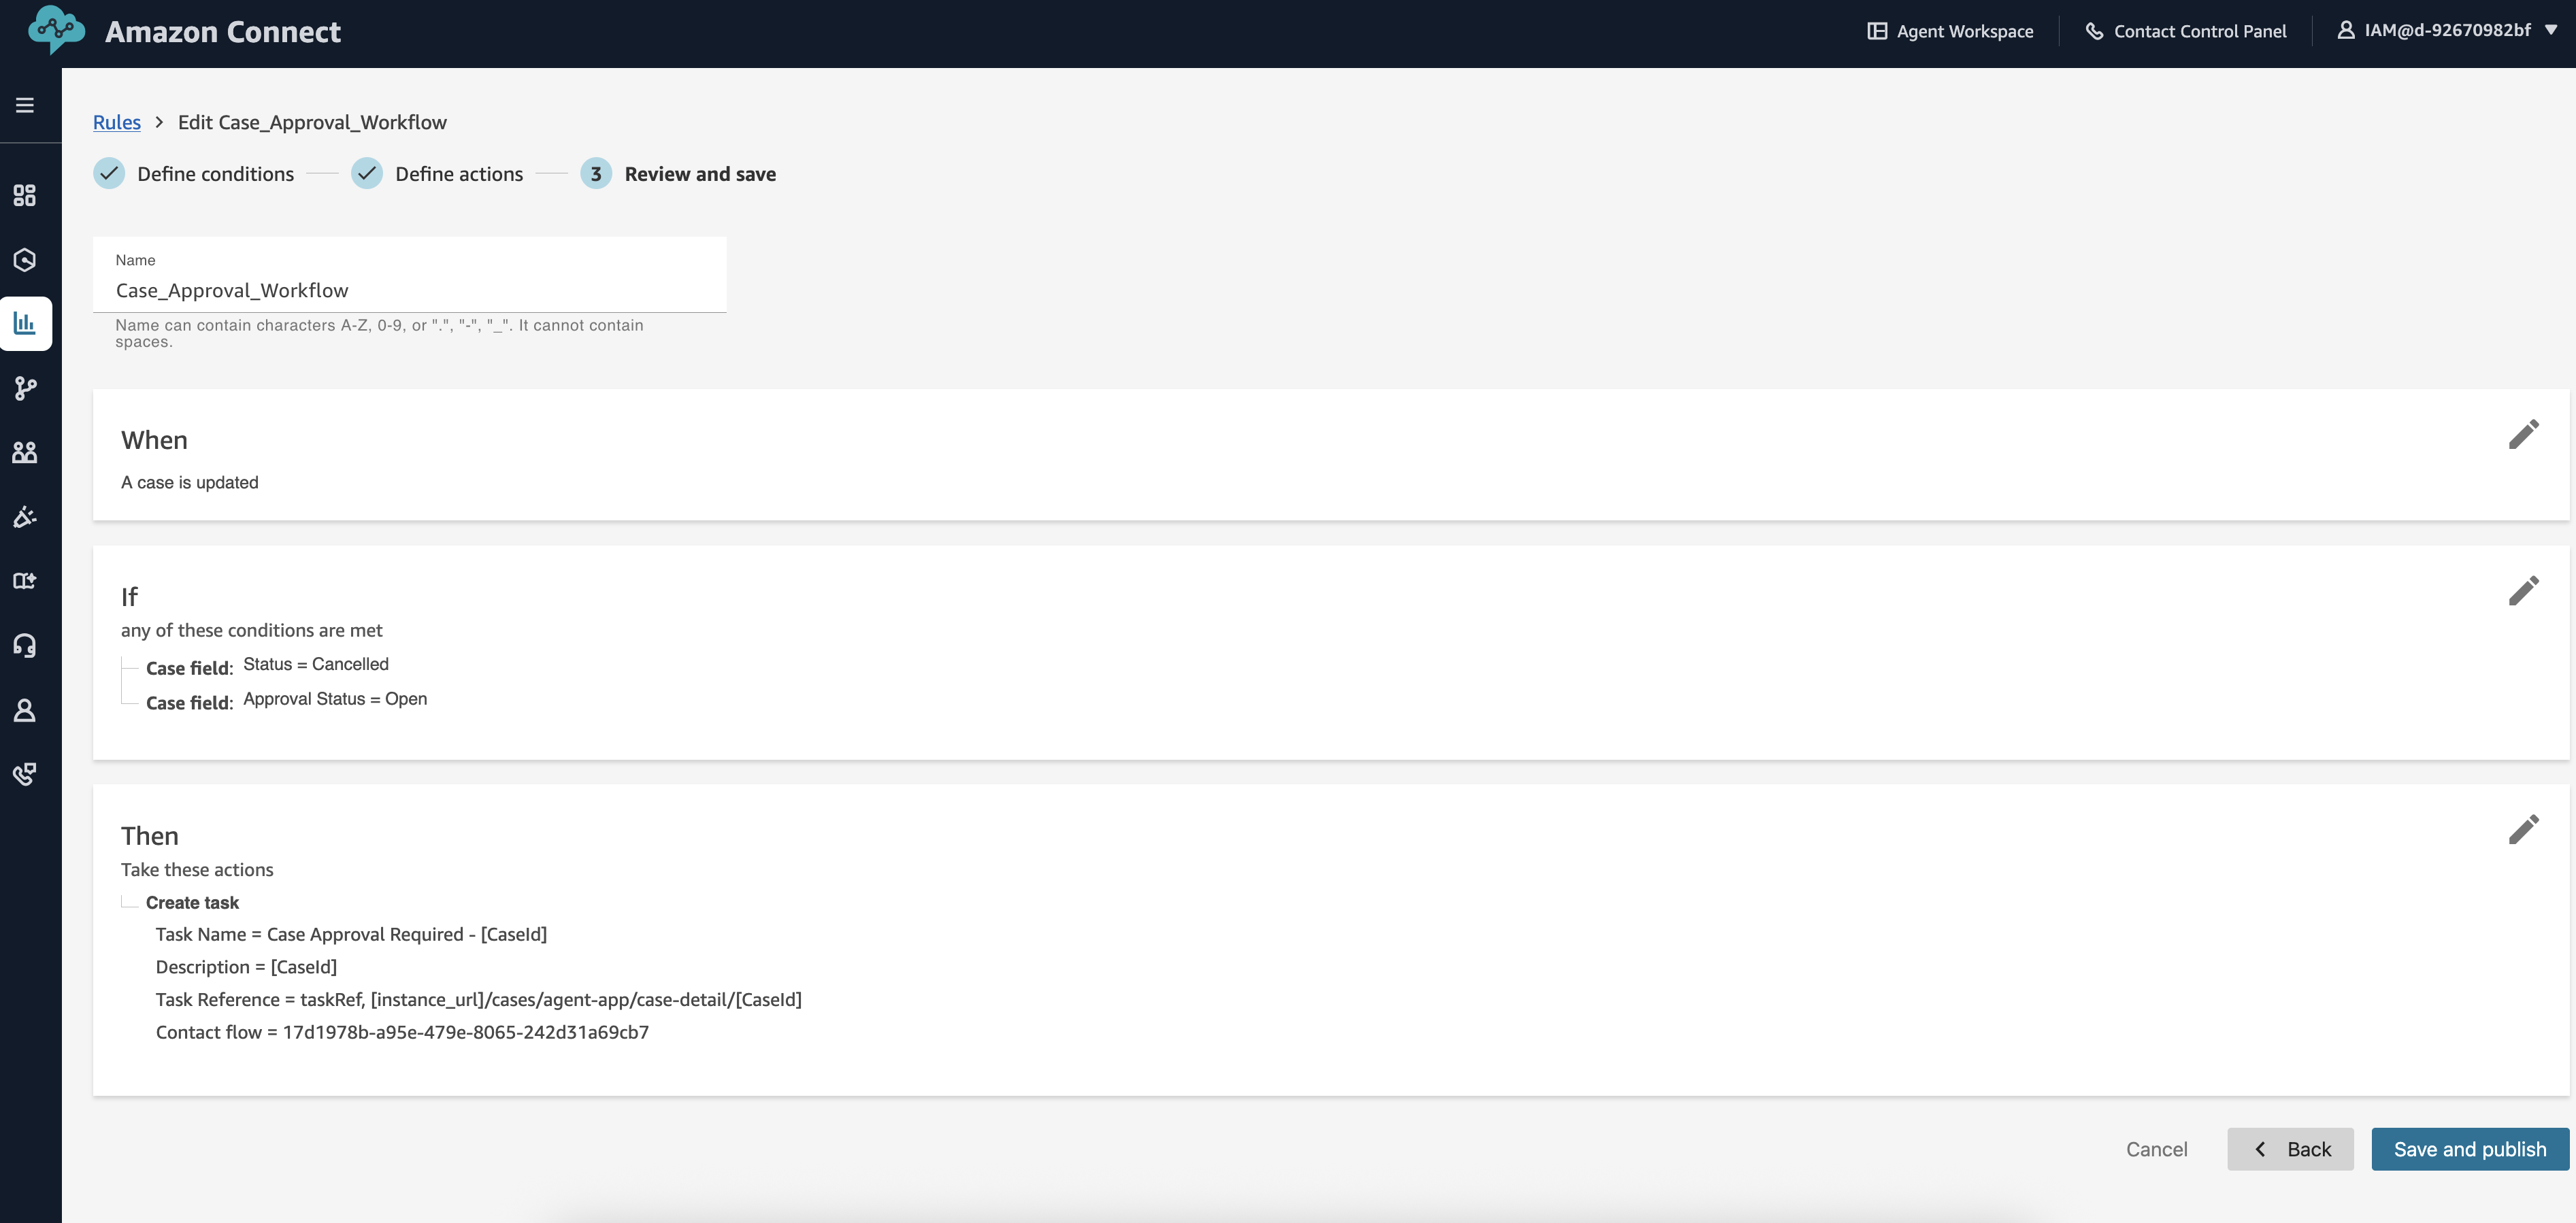
Create a rule to automate the approval process:
- Navigate to Rules under Analytics and optimization in the Amazon Connect console
- Choose Create -> Cases
- Configure the rule with the following settings:
- Name: Case Approval Workflow
- When: Case is updated
- Conditions If “All”:
- Case field “Approval Status” equals “Cancelled”
- Case field “Status” equals “Open”
- Actions: Create task
- Task name: Case Approval Required – [CaseId]
- Description: [CaseId]
- Task Reference: = taskRef, [instance_url]/cases/agent-app/case-detail/[CaseId]
- Contact flow: Approval Task Flow
- Save and publish the rule
Step 6: Set up customer notification rules
Create rules that generate tasks for customer communication:
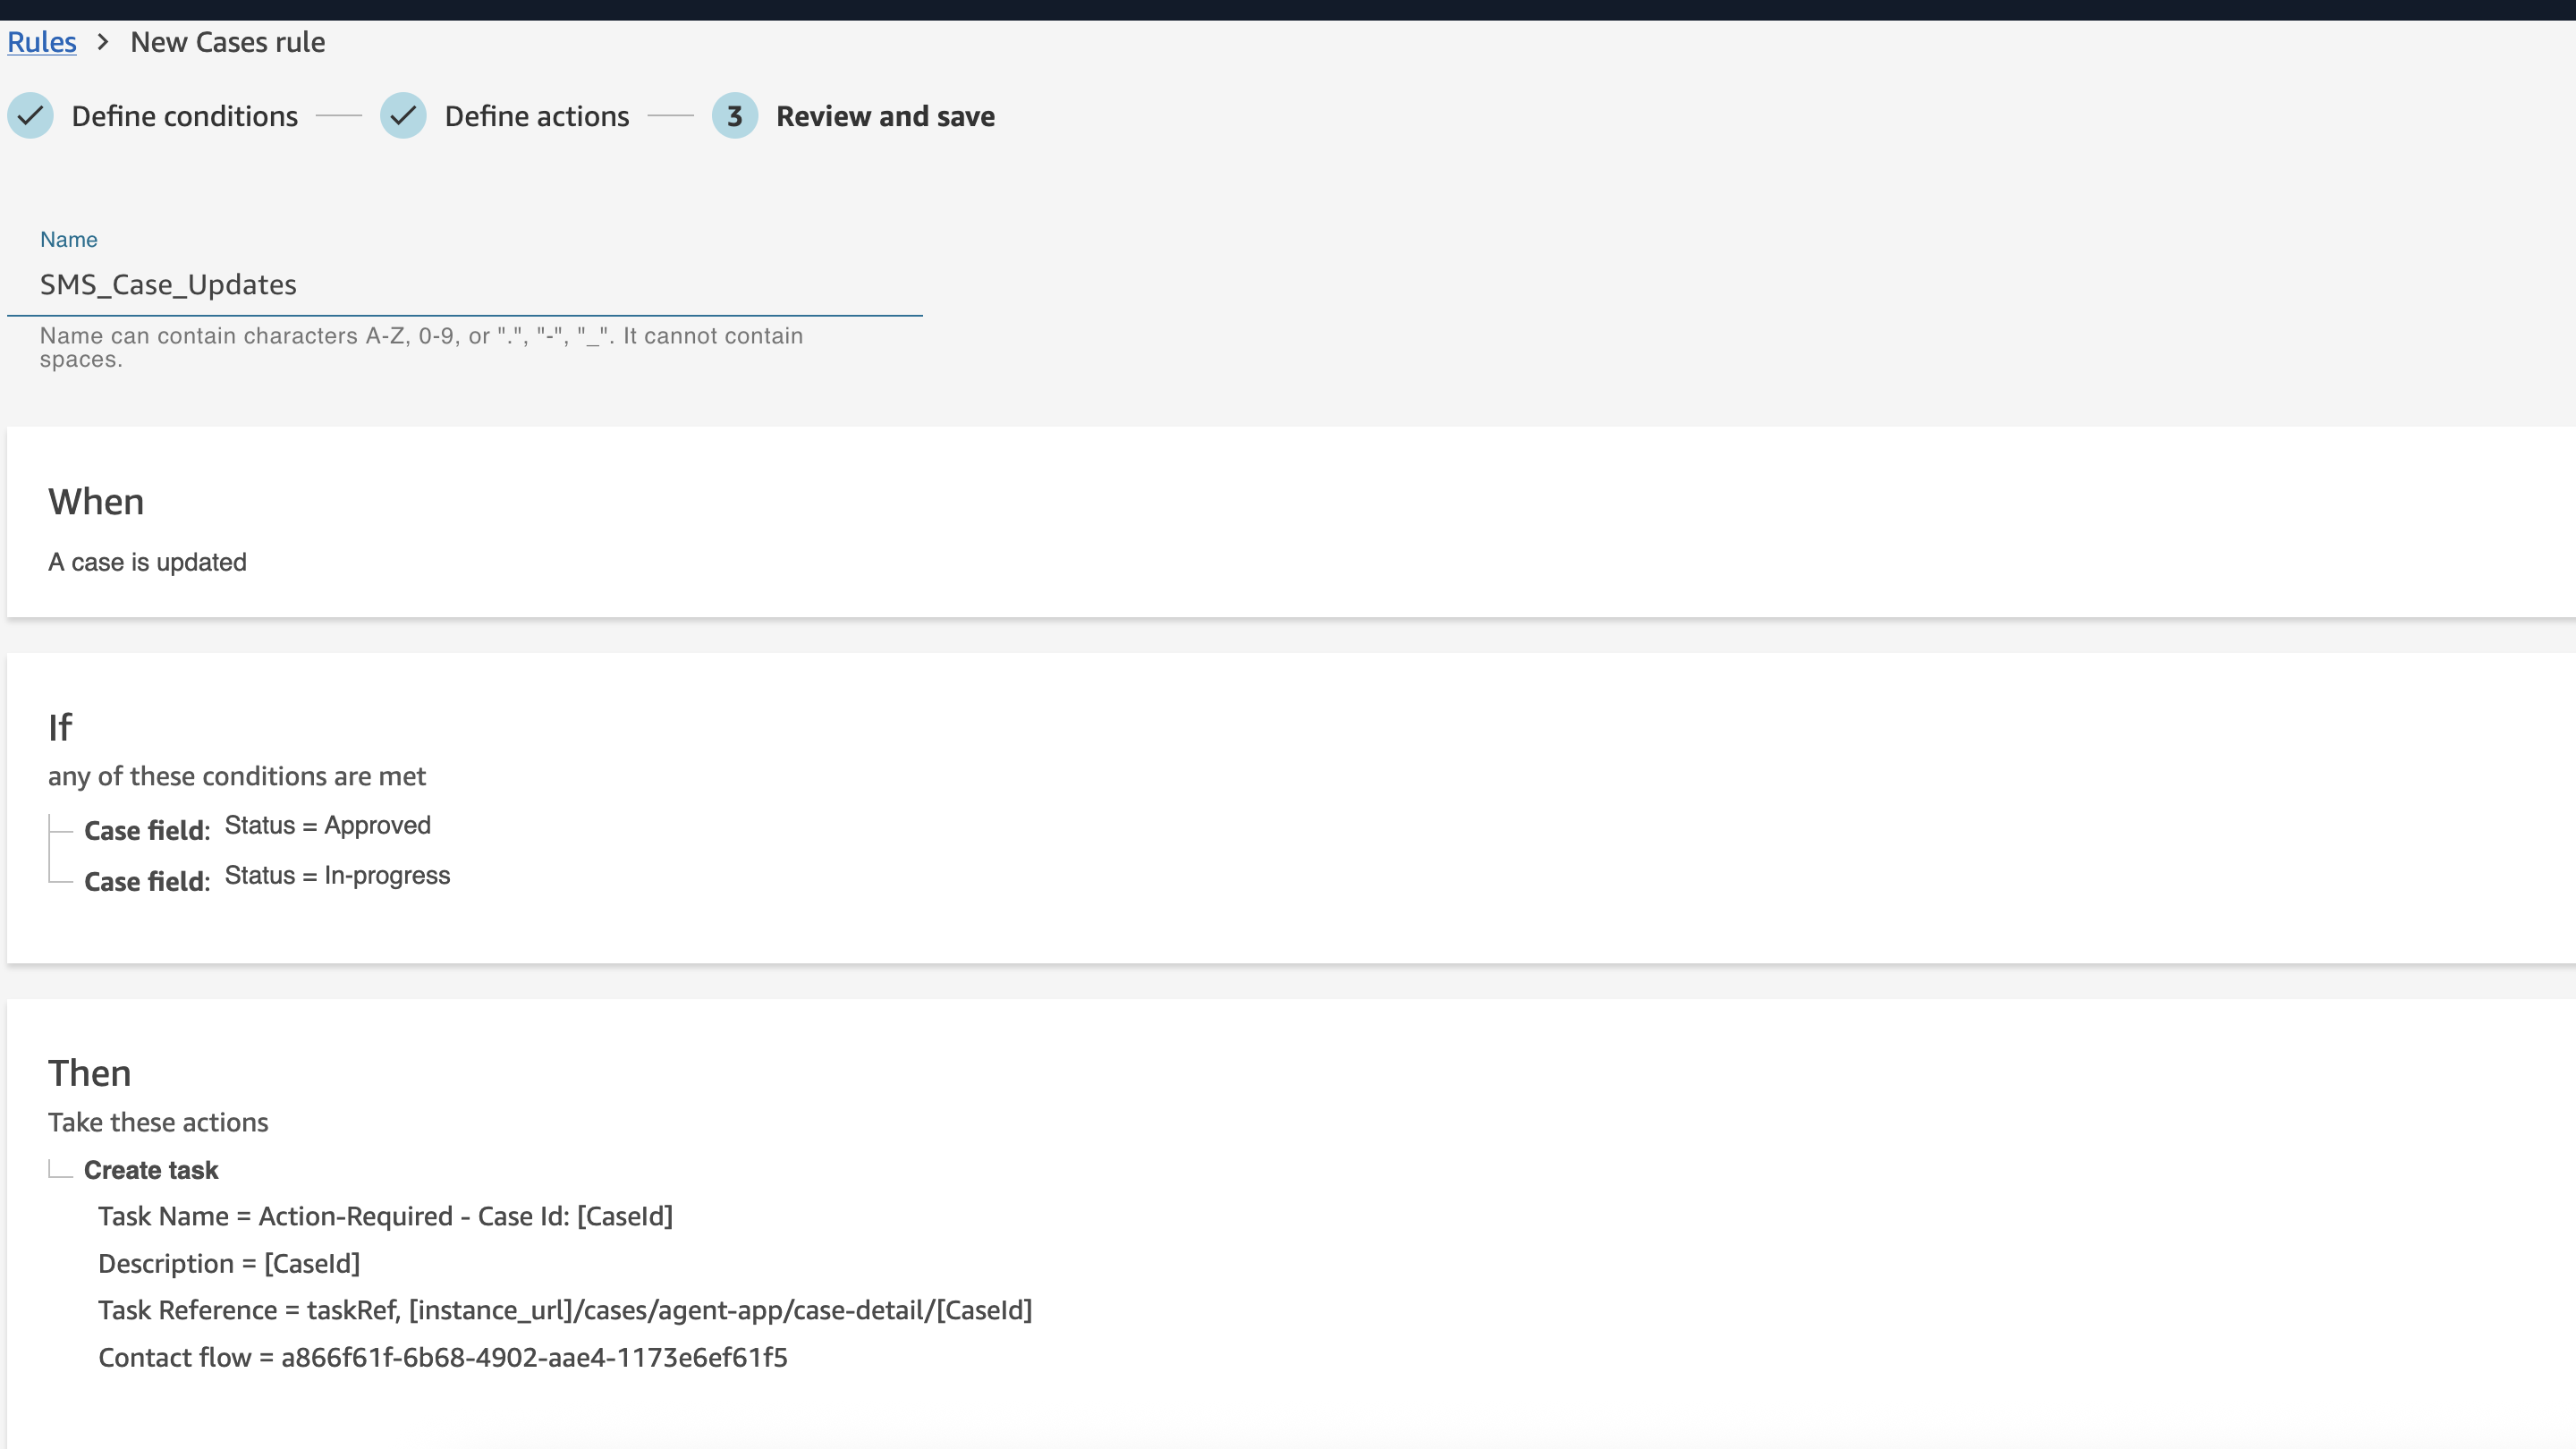
SMS notification rule:
- Create a new rule named “SMS Case Updates”
- Set conditions for case status changes:
- When: Case is updated
- Conditions: Case field “Status” changes to “Approved” OR “In Progress”
- Configure the action to create a task:
- Task name: Send SMS Update – [CaseId]
- Description: [CaseId]
- Contact flow: SMS Notification Task Flow
- Assigned to: Automated Notifications Queue
- Task priority: Normal
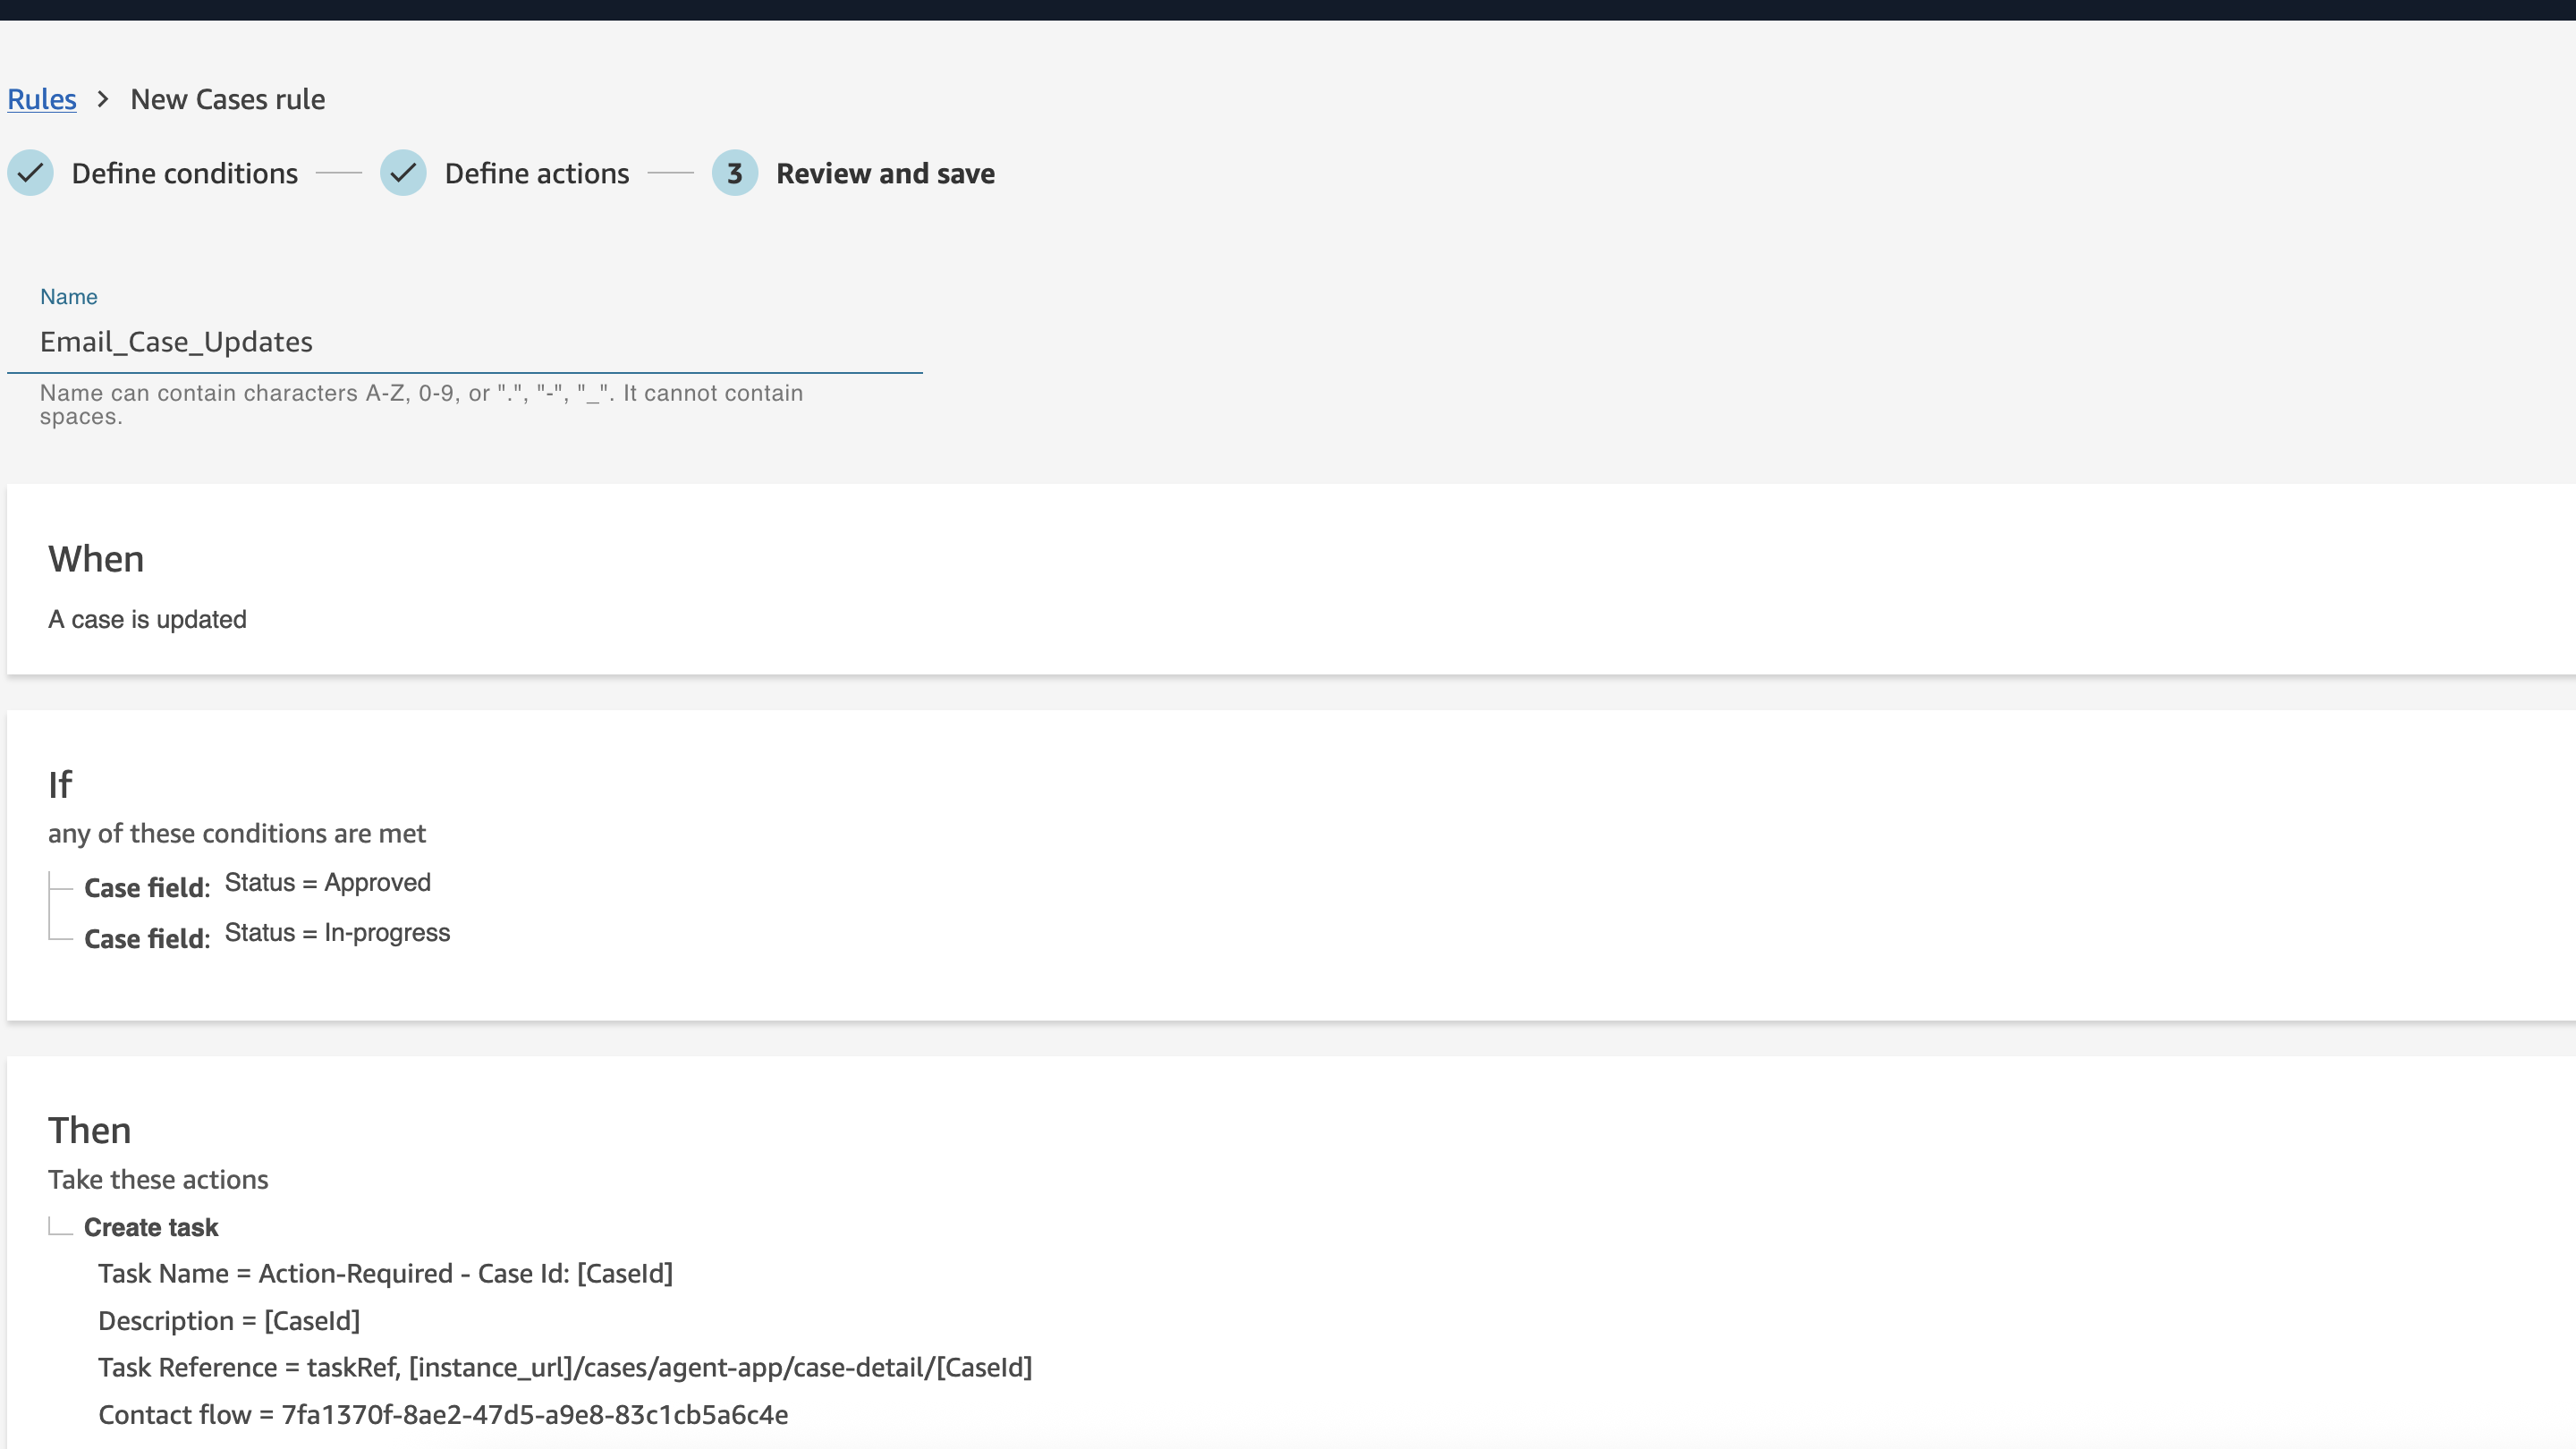
Email notification rule:
- Create a new rule named “Email Case Updates”
- Set similar conditions for email notifications
- Configure the action to create a task:
- Task name: Send Email Update – [CaseId]
- Description: [CaseId]
- Contact flow: Email Notification Task Flow
- Assigned to: Automated Notifications Queue
Step 7: Configure risk-based escalation rules
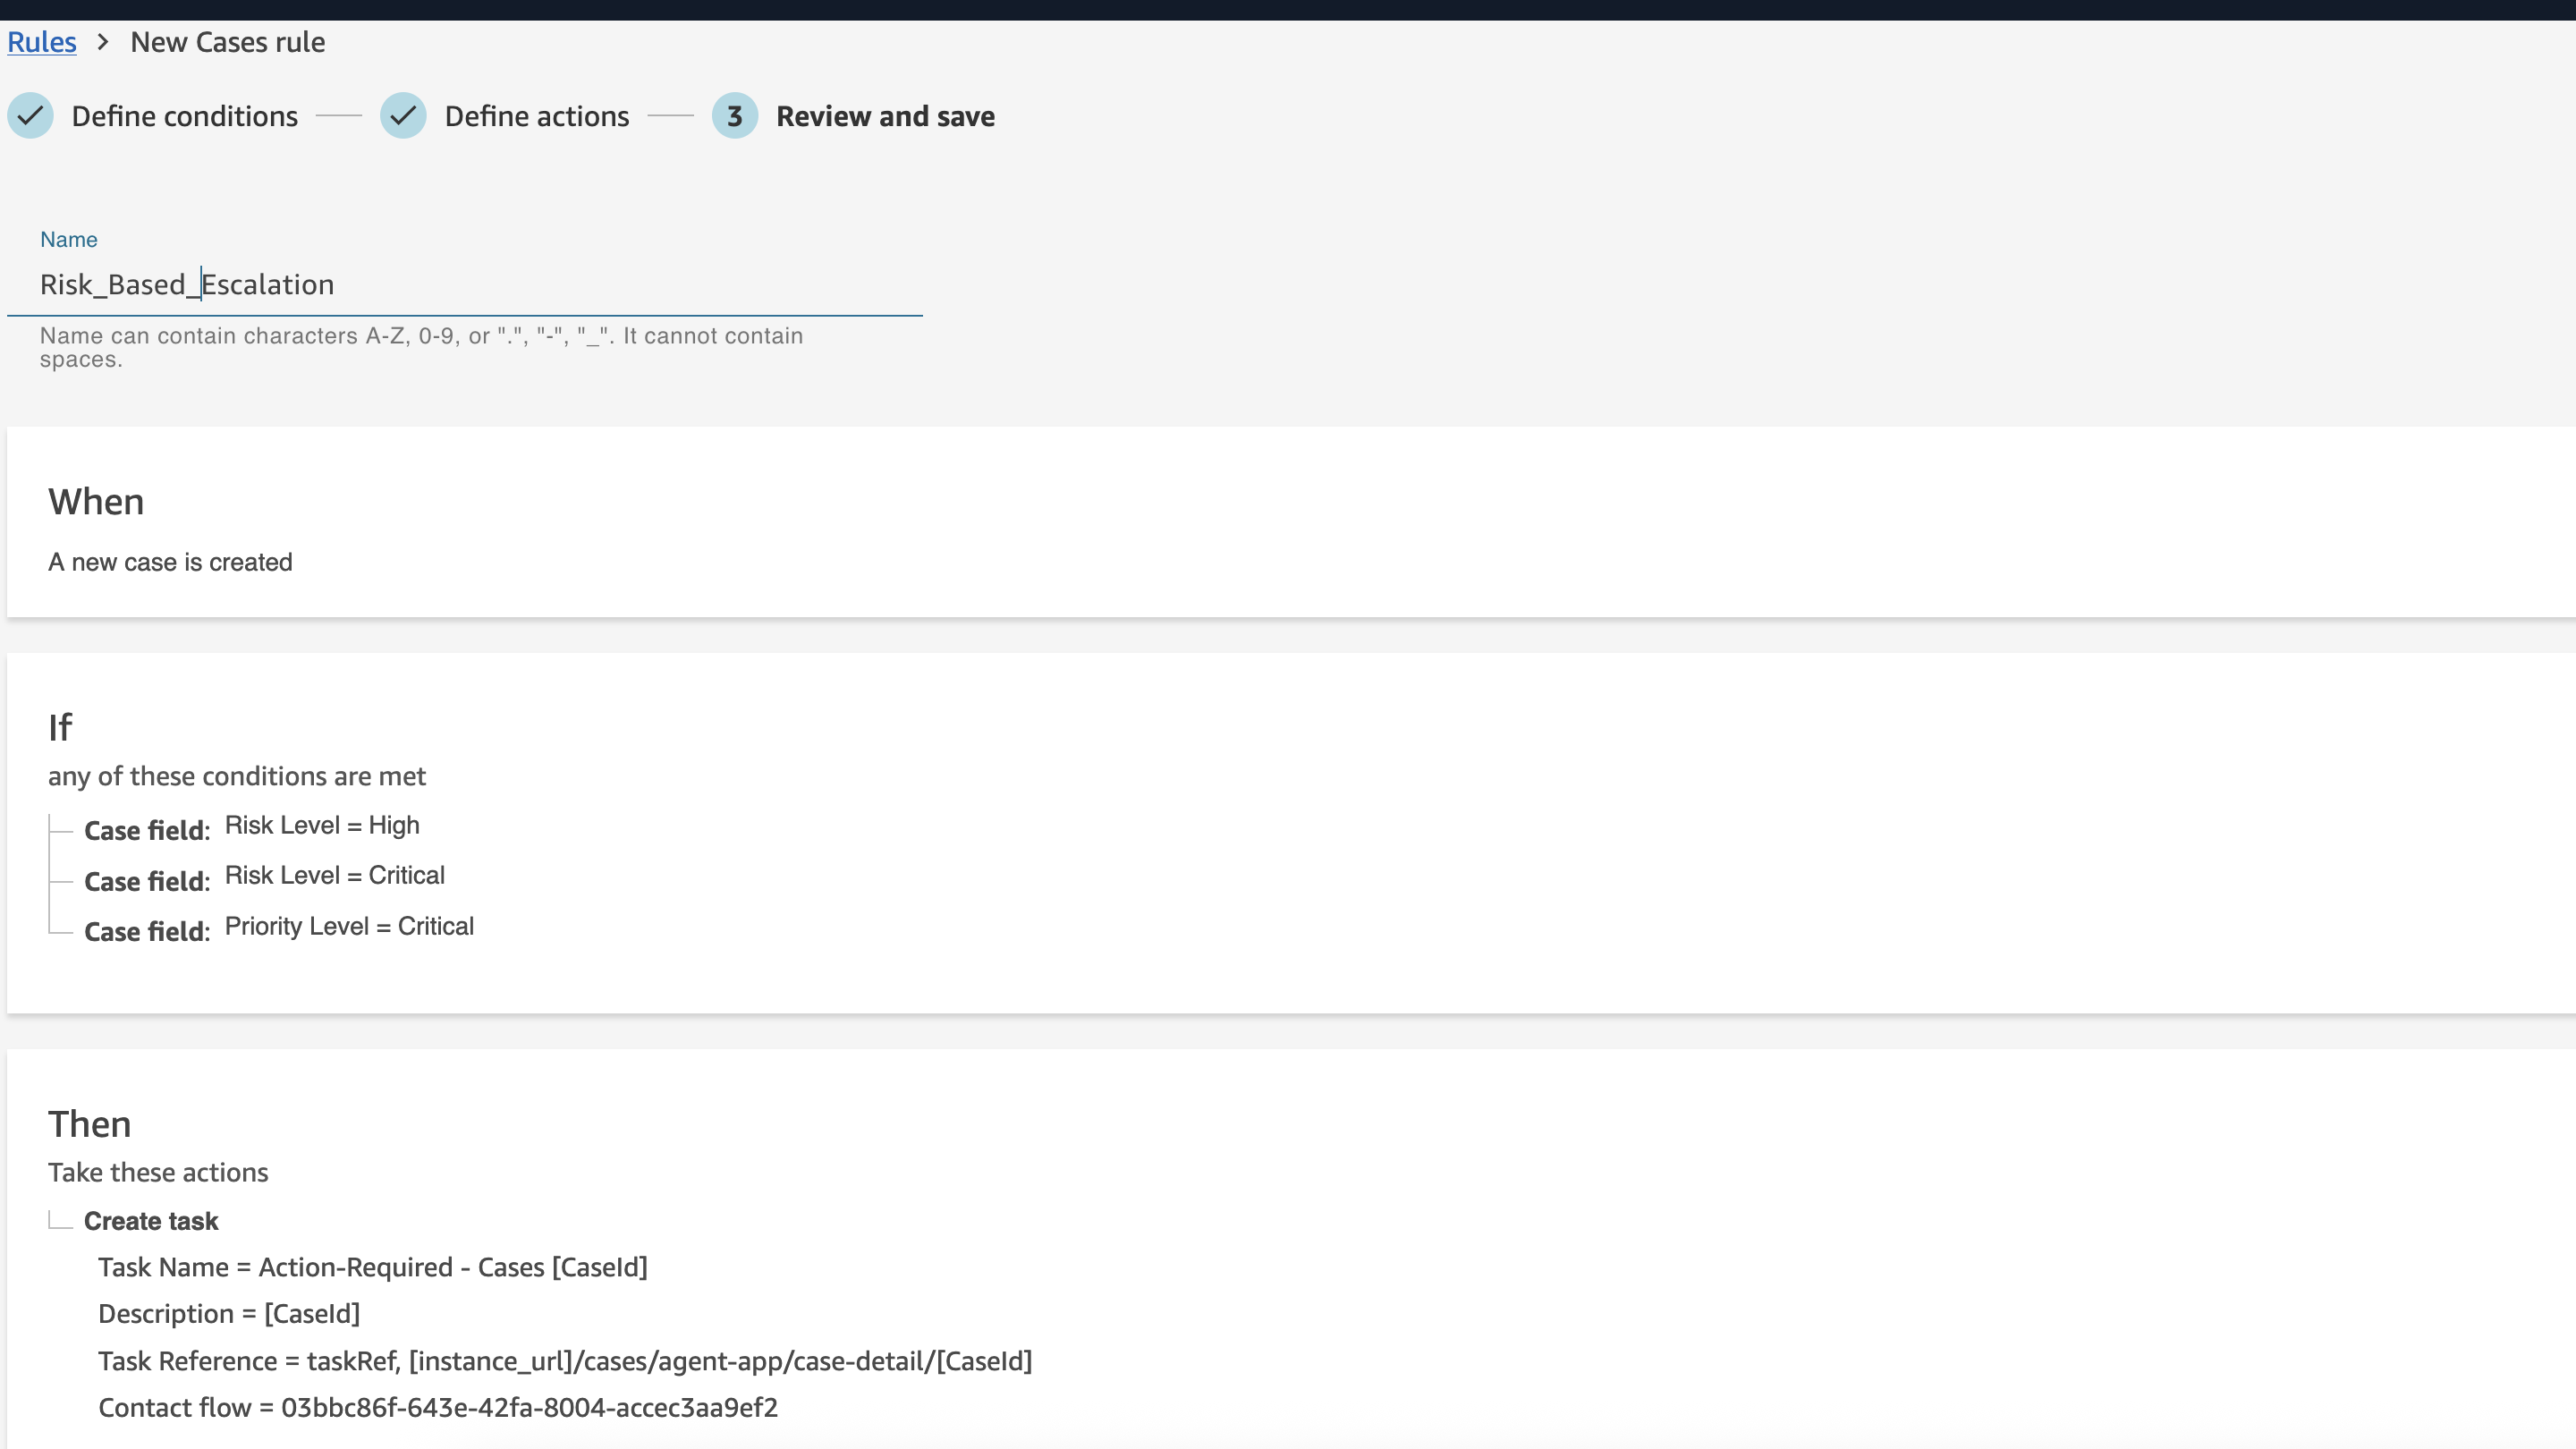
Create rules to automatically escalate high-risk cases:
- Create a new rule named “Risk-Based Escalation”
- Set conditions:
- When: Case is created OR Case is updated
- Conditions:
- Case field “Risk Level” equals “High” OR “Critical”
- OR Case field “Priority Level” equals “Critical”
- Configure actions:
- Create task:
- Task name: High Risk Case Alert – [CaseId]
- Description: [CaseId]
- Contact flow: Risk Escalation Task Flow
- Assigned to: Supervisors Queue
- Task priority: Critical
- Send notification (if available in your instance)
- Create task:
Step 8: Set up SLA monitoring rules
Create rules to monitor case deadlines:
Regulatory deadline monitoring:
- Create a new rule named “Regulatory Deadline Alert”
- Set conditions:
- When: Case is updated
- Conditions:
- Case field “Priority Level” is “Critical”
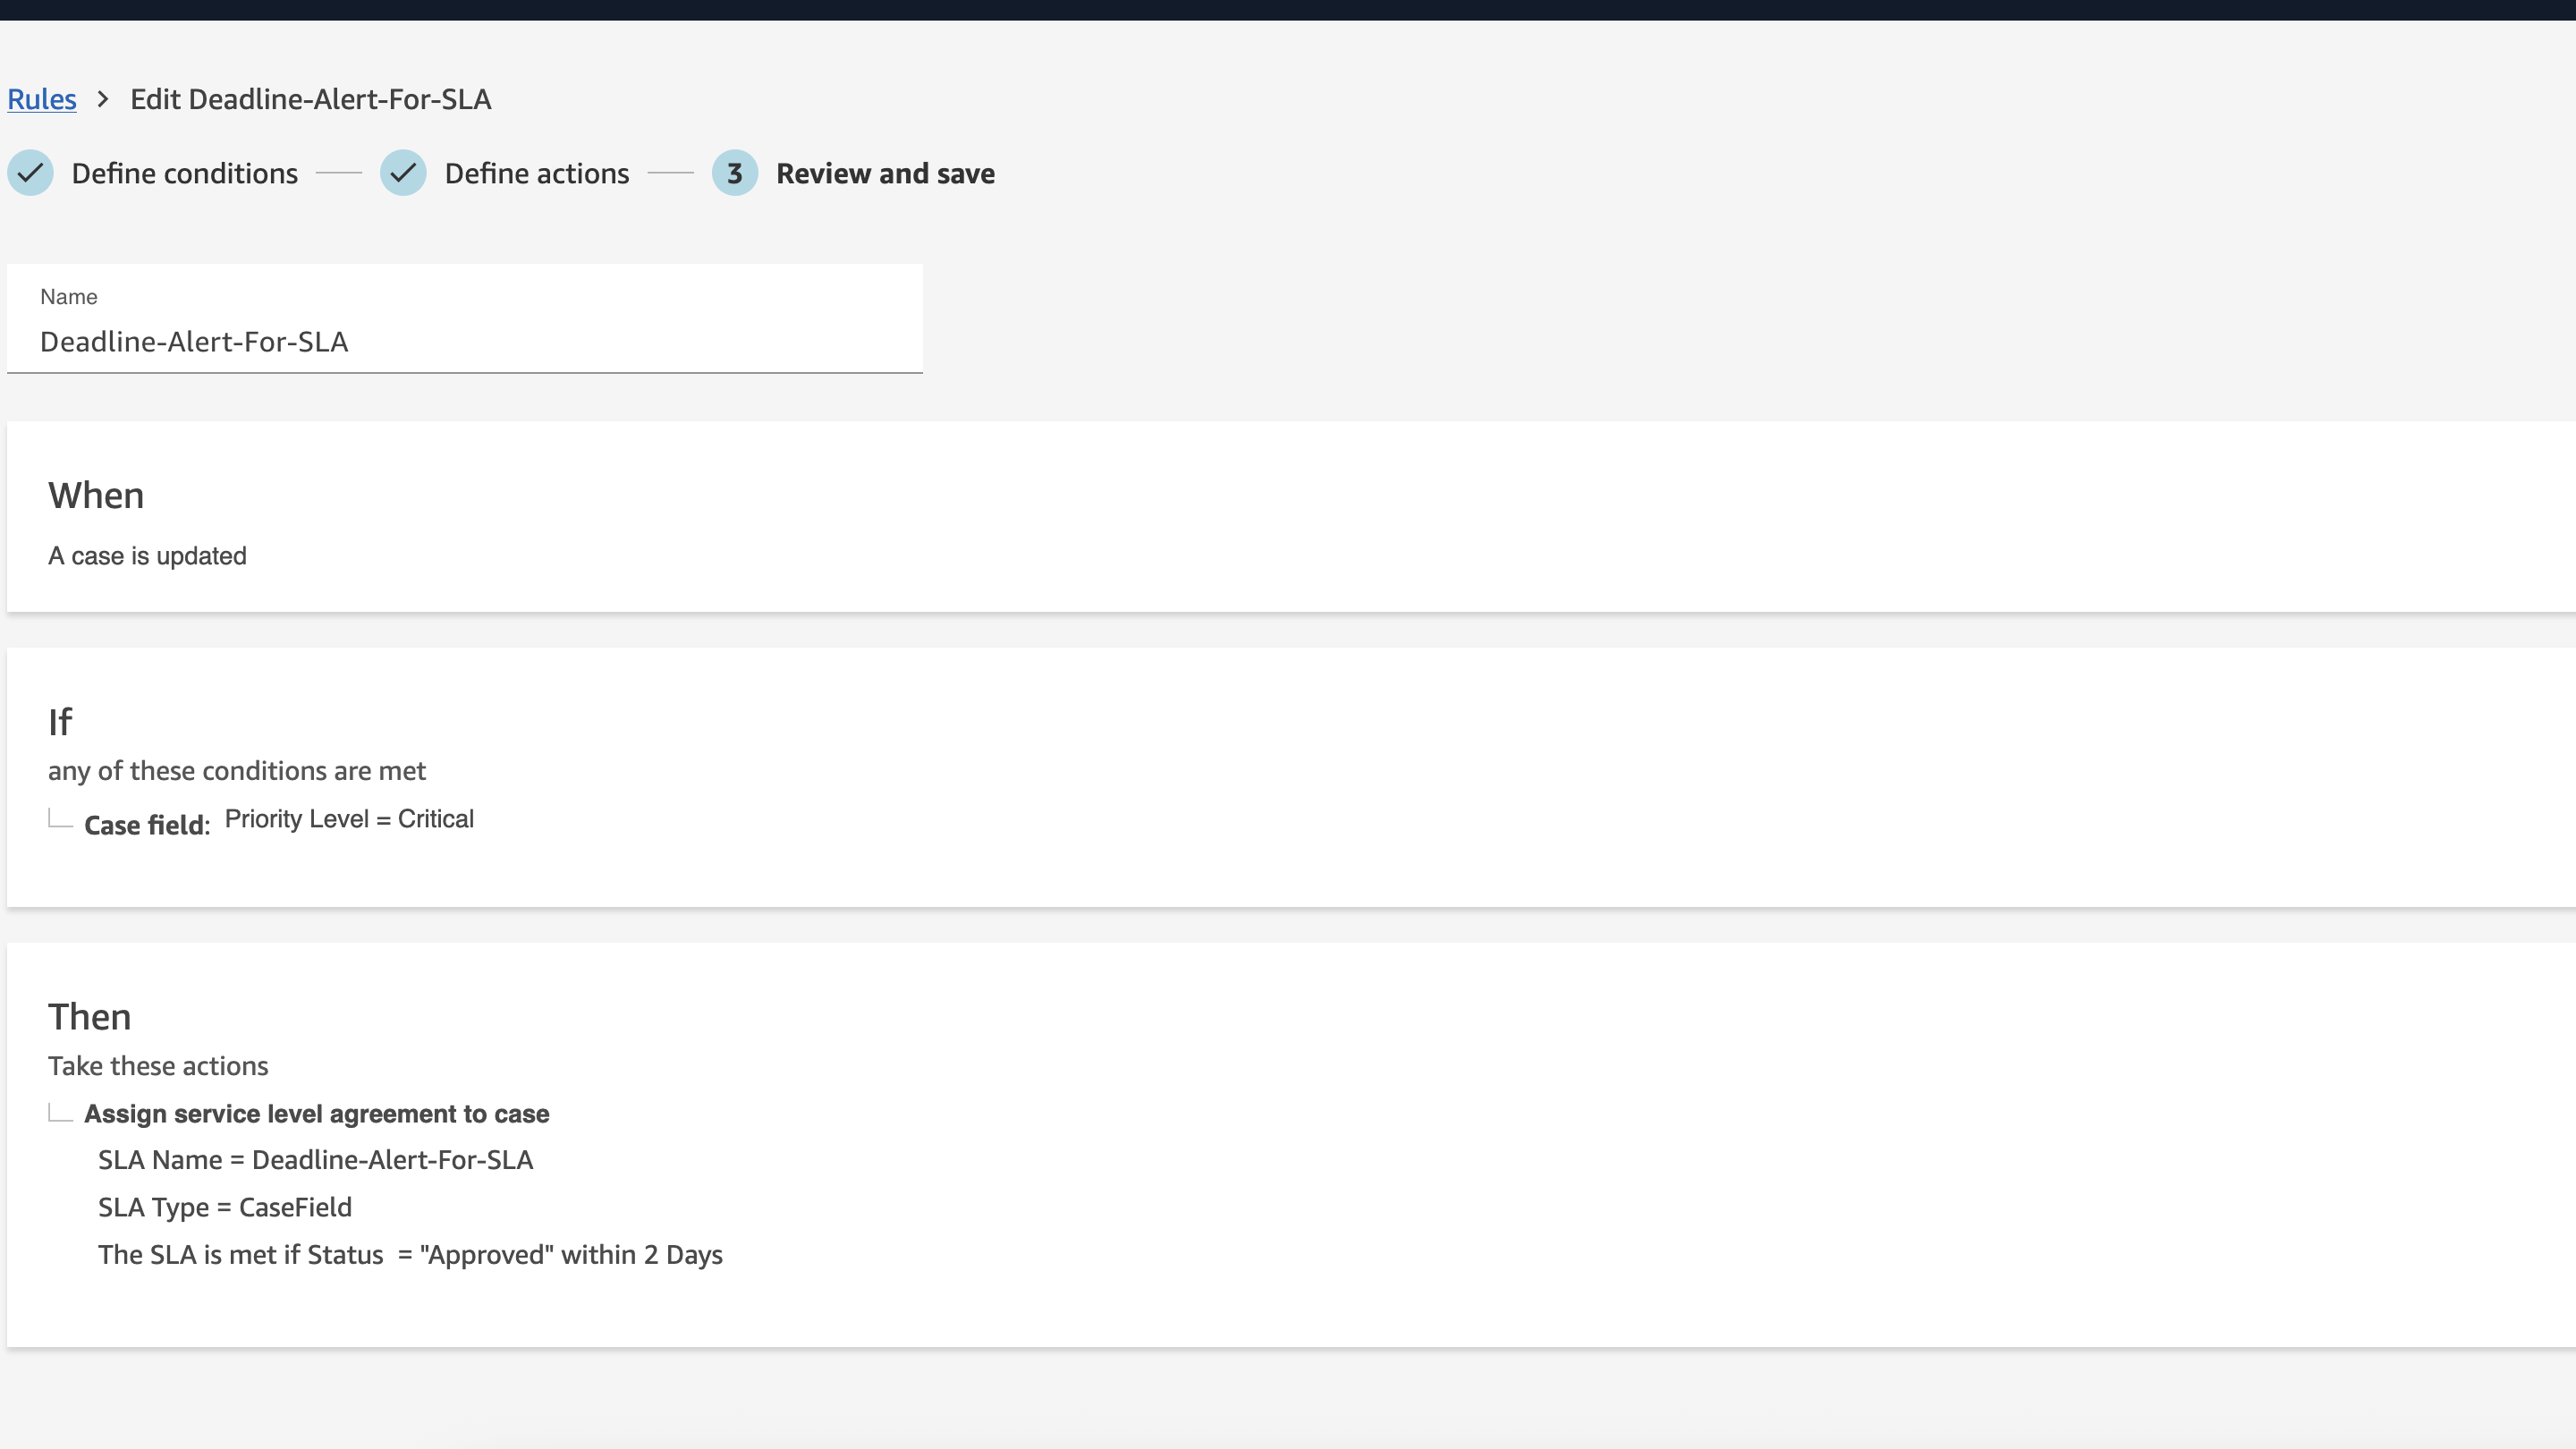
- Configure actions:
- Assign service level agreement to case:
- SLA name: Deadline-Alert-For-SLA
- Select field: “Status”
- Comparator: “=”
- Value: “Approved”
- Target : “2”
- Time : “Days”
- Assign service level agreement to case:
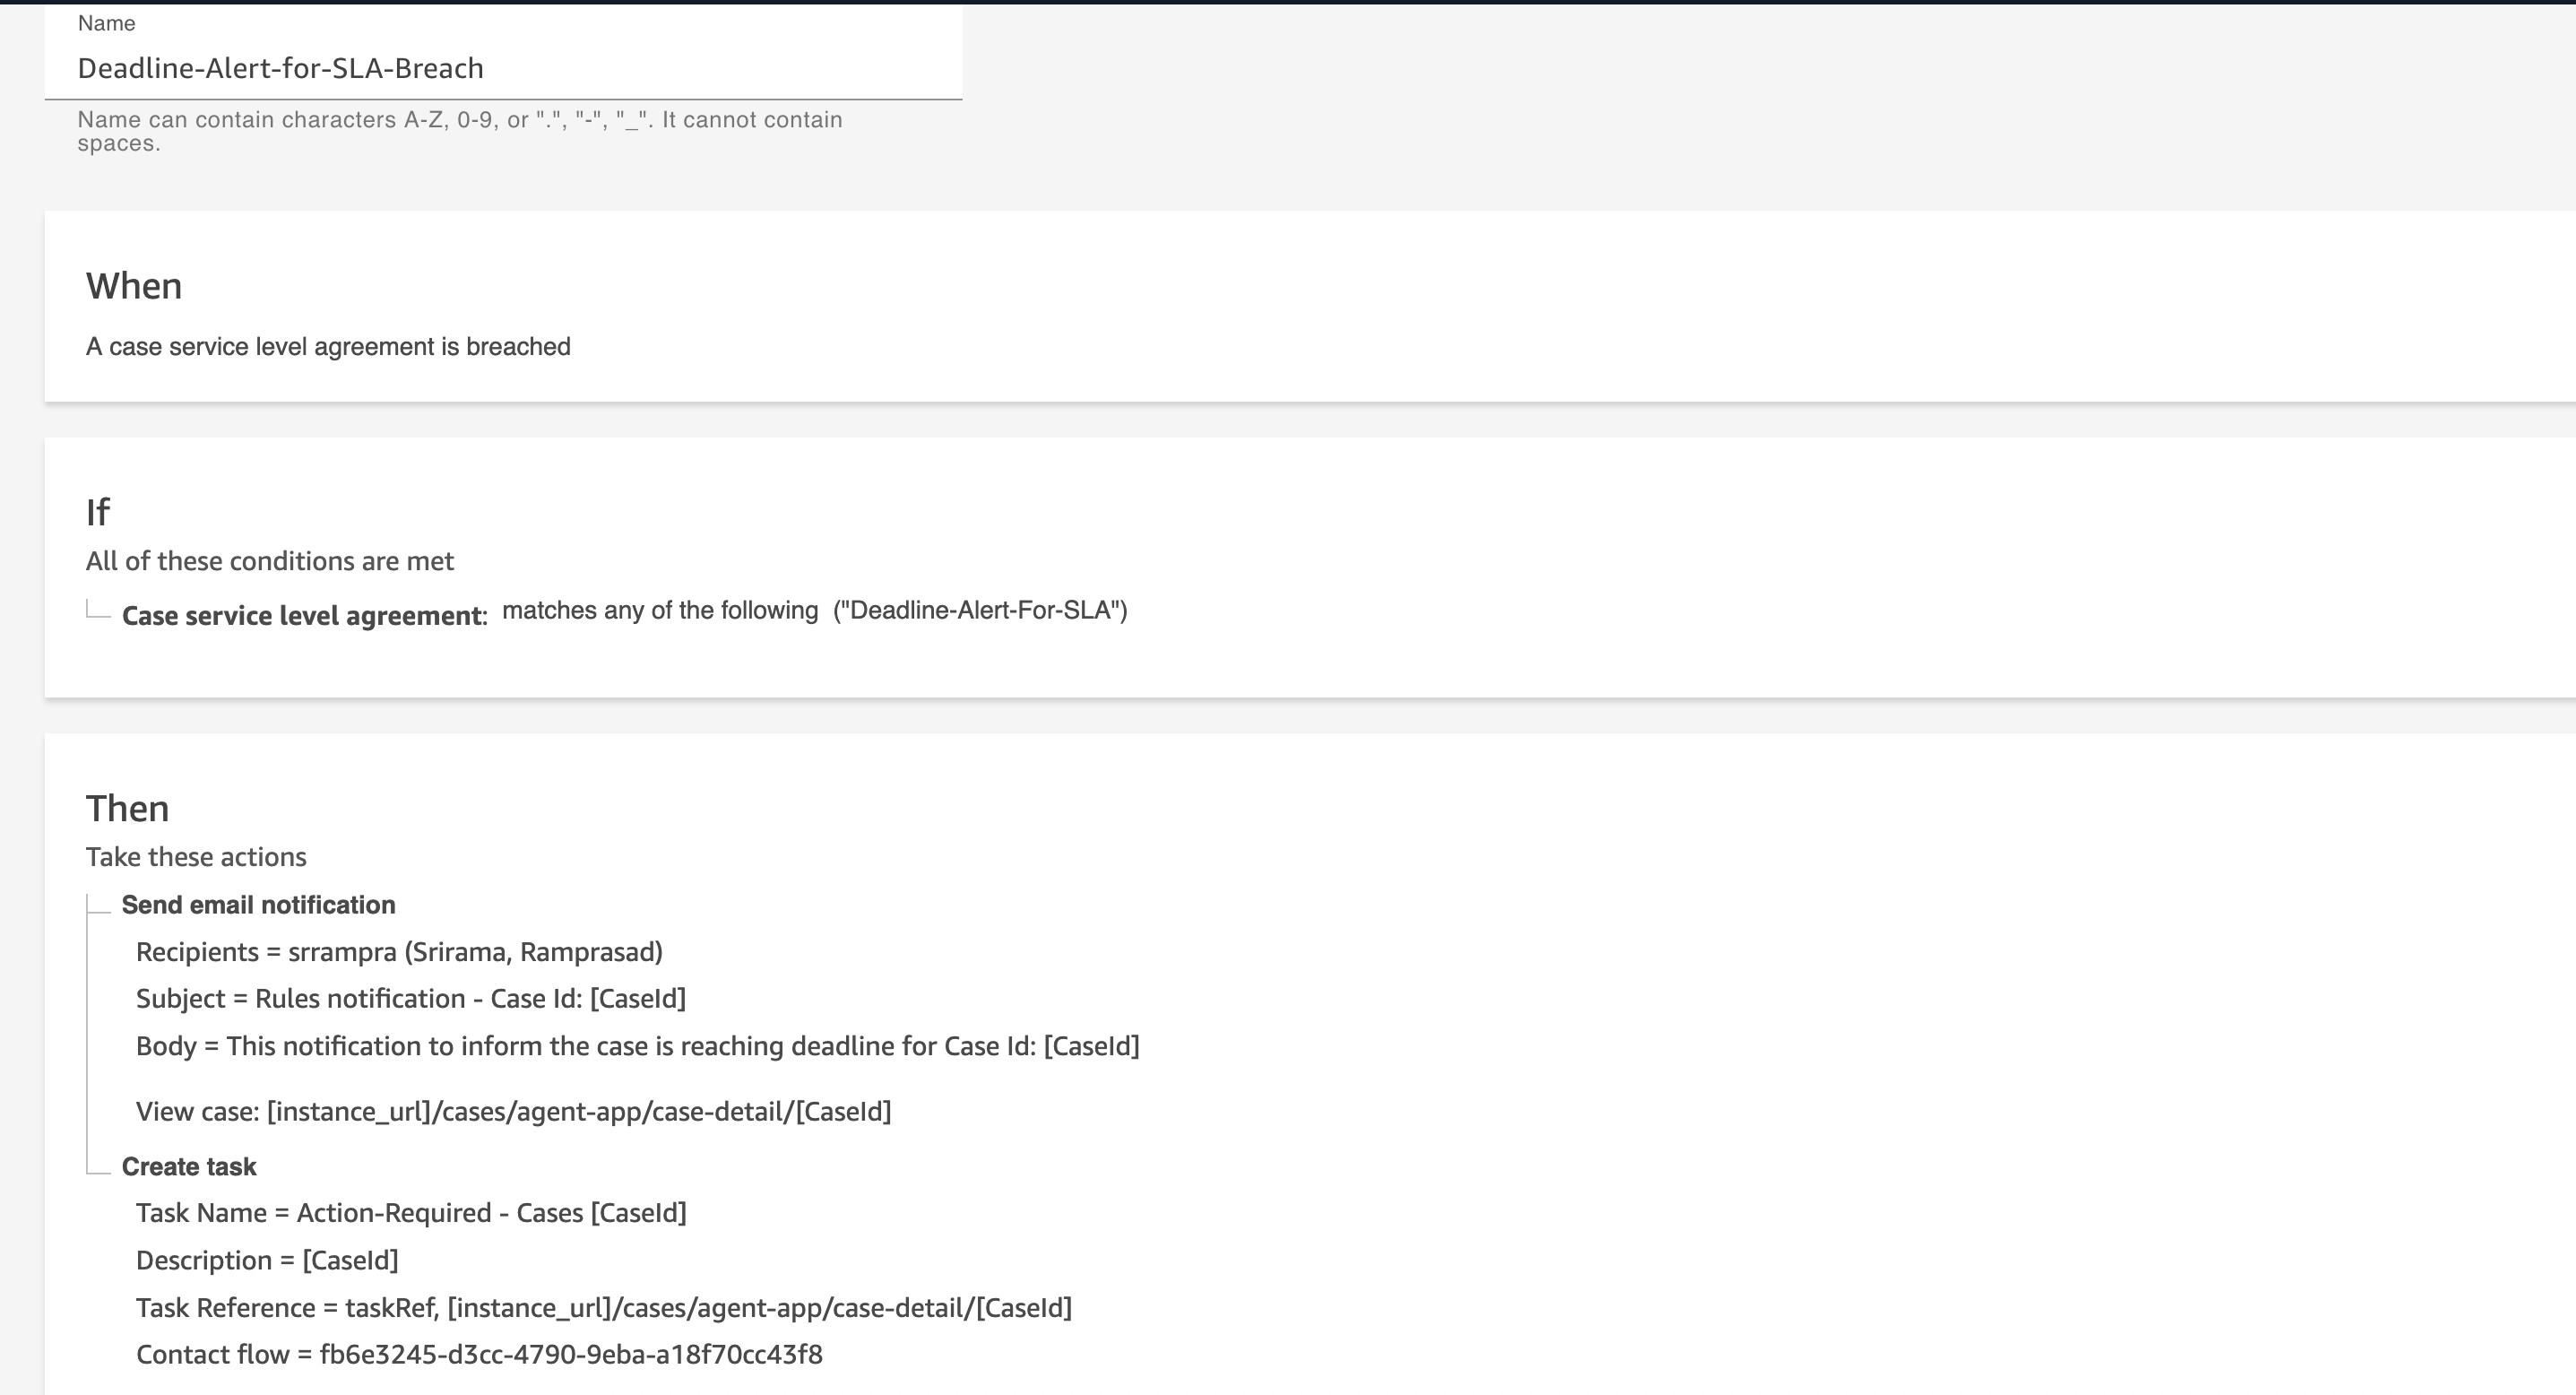
- Create a new rule named “Deadline-Alert-for-SLA-Breach”
- Set conditions :
- When: A case level agreement is breached
- Enter SLA Policy name : “Deadline-Alert-For-SLA”
- When: A case level agreement is breached
Step 9: Monitor and optimize
Set up comprehensive monitoring to track automation performance:
- Amazon Connect metrics:
- Task creation and completion rates
- Contact flow execution success rates
- Queue performance metrics
- SLA compliance rates
- Real-time monitoring:
- Set up real-time metrics for critical workflows
- Configure alerts for automation failures
- Monitor case aging and deadline compliance
- Performance analytics:
- Track automation effectiveness
- Measure reduction in manual effort
- Monitor customer satisfaction improvements
Clean up
If you’re testing these features and want to clean up resources:
- Delete rules:
- Navigate to Rules in Amazon Connect console
- Delete any test rules you created
- Be careful not to delete production rules
- Archive contact flows:
- Go to Contact flows
- Archive test notification task flows
- Ensure no active rules reference archived flows
- Clean up tasks:
- Complete or delete any test tasks created during implementation
- Clear task queues of test data
- Remove queues:
- Delete test queues like “Automated Notifications” if no longer needed
- Ensure no routing profiles reference deleted queues
- Remove routing profiles and users:
- Delete test users created for this exercise
- Delete test routing profiles like “Automated Notifications” if no longer needed
- Ensure no routing profiles are mapped to users
- Case cleanup:
- Remove custom fields if no longer needed
- Clean up case templates
- AWS resources:
- Remove IAM roles and policies created for testing
- Clean up any SES or SNS configurations
Note: Always test cleanup procedures in a development environment first. Document all production resources to avoid accidental deletion.
Conclusion
By combining Amazon Connect Cases, Rules, and Tasks with specialized contact flows, you can create intelligent automation workflows that improve your contact center operations, especially for regulated industries like insurance that require stringent compliance and SLA management.
The automation workflows we’ve covered address common pain points in case management:
- Approval processes: Streamlined supervisor workflows with contextual information
- Customer communication: Proactive notifications through task-driven contact flows
- Risk management: Automated escalation based on case attributes and business rules
- Compliance monitoring: SLA tracking and deadline alerts for regulatory compliance
- Intelligent routing: Dynamic case assignment based on skills, capacity, and priority
- Complaint processing: End-to-end automation from intake to resolution
Key benefits of this integrated approach include:
- Reduced manual effort: Automation handles routine tasks, freeing agents to focus on complex customer issues
- Improved compliance: Automated SLA monitoring and deadline tracking ensure regulatory adherence
- Enhanced customer experience: Proactive notifications and faster case routing lead to higher satisfaction
- Better visibility: Automated workflows provide consistent tracking and reporting through Amazon Connect metrics
- Scalability: Rules-based automation scales with your contact center growth
- Cost efficiency: Reduced operational overhead through intelligent automation
The key insight is that Rules create Tasks, and Tasks are processed through contact flows where the actual automation actions (SMS, email, case updates) occur. This architecture provides flexibility to handle complex business scenarios while maintaining the reliability and scalability of the Amazon Connect platform.
To get started with these features, visit the Amazon Connect Cases console and explore the Amazon Connect Cases documentation for additional configuration options and advanced use cases.
For detailed information on configuring Rules and Tasks, refer to the Amazon Connect Rules documentation and Amazon Connect Tasks documentation.
As your automation needs evolve, consider integrating with other AWS services:
- AWS Lambda: For custom business logic and external system integrations
- Amazon EventBridge: For cross-service workflows and event-driven architectures
- Amazon Bedrock: For AI-powered complaint analysis and categorization
- Amazon QuickSight: For advanced analytics and compliance reporting
- Amazon Comprehend: For sentiment analysis and text processing
- AWS Step Functions: For complex multi-step workflows
For more contact center innovation content, visit the AWS Contact Center blog.