Containers
Better Together: Amazon EKS Auto Mode and Istio Ambient Mesh
When your microservices architecture grows from a few services to hundreds, two problems emerge that can consume your team’s time: keeping compute infrastructure running smoothly and securing communication between services. In this post, you will learn how Amazon EKS Auto Mode and Istio Ambient Mesh work together to automate infrastructure management while providing automatic mTLS-based service-to-service security, helping reduce operational overhead and designed to help strengthen your security posture.
Teams often spend time on repetitive operational tasks such as patching nodes, scaling clusters, and configuring networking policies. As the number of services grows, securing service-to-service communication and managing proxy configurations for each service adds even more work. This growing complexity highlights the need for a more automated and integrated approach. This is where Amazon Elastic Kubernetes Service (Amazon EKS) Auto Mode and Istio Ambient Mesh come together. Amazon EKS Auto Mode automates node provisioning, scaling, and patching, so EKS Auto Mode handles the compute layer management. Istio Ambient Mesh provides automatic mutual TLS encryption and traffic policies without requiring application code changes or traditional sidecar proxies. This combination can help reduce manual work while providing automatic encryption and policy enforcement capabilities. We explore their integrated architecture and walk through a hands-on implementation from cluster creation through mTLS encryption, authorization policies, and Layer 7 traffic controls.
Understanding the components
Managing Kubernetes infrastructure traditionally requires significant operational overhead. Teams must handle node provisioning, capacity planning, OS patching, and scaling decisions manually. Amazon EKS Auto Mode addresses these challenges by extending AWS management beyond the Kubernetes control plane to the compute layer itself. It automates the full lifecycle of nodes including provisioning, scaling, patching, and update, so you can focus on deploying applications rather than maintaining infrastructure.
EKS Auto Mode runs workloads on Amazon EC2 managed instances with a hardened, container-optimized operating system and AWS-managed system components. You no longer need to deploy and operate many of the add-ons typically required to run Kubernetes in production.
Amazon EKS Auto Mode components
- EKS Auto Mode Managed instance – AWS controls node lifecycle, patching, and security configuration. EKS Auto Mode removes direct SSH access and provides Kubernetes-native observability and troubleshooting.
- Bottlerocket-based OS – Nodes use Bottlerocket, a minimal, immutable, container-optimized Linux distribution which includes only the essential software required to run containers. The immutable root filesystem and SELinux mandatory access control help enforce strict security boundaries.
- Built-in system components – AWS manages components like Amazon VPC CNI, kube-proxy, Amazon EBS CSI driver, CoreDNS, and AWS Load Balancer Controller as system processes rather than requiring you to deploy them as cluster add-ons. As a result, you avoid version compatibility issues and reduce the threat surface.
- Karpenter-powered scaling – EKS Auto Mode uses a custom version of Karpenter. Karpenter on Auto Mode is not the same as OSS Karpenter. It provisions right-sized instances based on pod resource requests and scheduling constraints. It continuously evaluates consolidation opportunities, replacing multiple underutilized nodes with fewer, appropriately sized instances, or migrating workloads to Spot instances when possible.
The result is a Kubernetes environment where you manage workloads, not nodes. While EKS Auto Mode streamlines compute operations, you still need secure and observable service-to-service communication for your microservices. Istio Ambient Mesh helps reduce resource overhead and streamline operations by removing sidecars from the service mesh entirely. Ambient Mesh shifts traffic security and policy enforcement out of individual pods, decoupling networking from application lifecycles.
Istio Ambient Mesh components
- Istio-cni – A node agent that watches for pods labeled for ambient mode and programs the iptables rules that send their traffic through ztunnel. It runs as a chained CNI plugin, so it coexists with whatever CNI your cluster already uses (in EKS Auto Mode, that’s the AWS VPC CNI).
- ztunnel (zero-trust tunnel, Layer 3/4) – ztunnel is a per-node proxy (deployed as a Kubernetes DaemonSet) that creates a secure L4 overlay across your workloads. It terminates mTLS connections, enforces L4 authorization policies, and emits TCP telemetry, so application pods get zero-trust networking without code changes or sidecars. It’s written in Rust for performance and memory safety. By design, ztunnel stays at L3/L4. it doesn’t parse HTTP headers or terminate application-layer traffic, which is what keeps it safe to run as a shared per-node component.
- Waypoint Proxies – Optional Layer 7 proxies deployed per-namespace or per-service account. Waypoints run as standard Kubernetes Deployments (enabling horizontal autoscaling) and provide HTTP-aware features: request routing, retries, timeouts, circuit breaking, and L7 authorization policies. Waypoints process traffic when you configure Layer 7 features such as request routing, retries, or circuit breaking.
- HBONE (HTTP-Based Overlay Network Environment) Protocol – Ambient mode uses HBONE to tunnel traffic between ztunnel and waypoints. This allows mTLS-encrypted traffic to traverse existing network infrastructure without requiring CNI plugins to understand service mesh semantics.
With this model, you can apply service mesh capabilities incrementally without forcing every workload into a uniform proxy model.
EKS Auto Mode and Istio Ambient Mesh both reduce what you need to manage: one at the compute layer, the other at the service networking layer. Together, they can help reduce operational complexity while maintaining security and flexibility.
Solution architecture
Amazon EKS Auto Mode simplifies the configuration and management required to run workloads on Kubernetes. After you create the cluster, you define resource requirements (CPU, memory) and scheduling constraints (availability zones, instance types) for your workloads. Karpenter then automatically provisions the right-sized EC2 managed instances to meet these requirements, reducing the need for manual capacity planning. With node security managed by AWS, you can focus on your workloads.
Secure traffic Flow
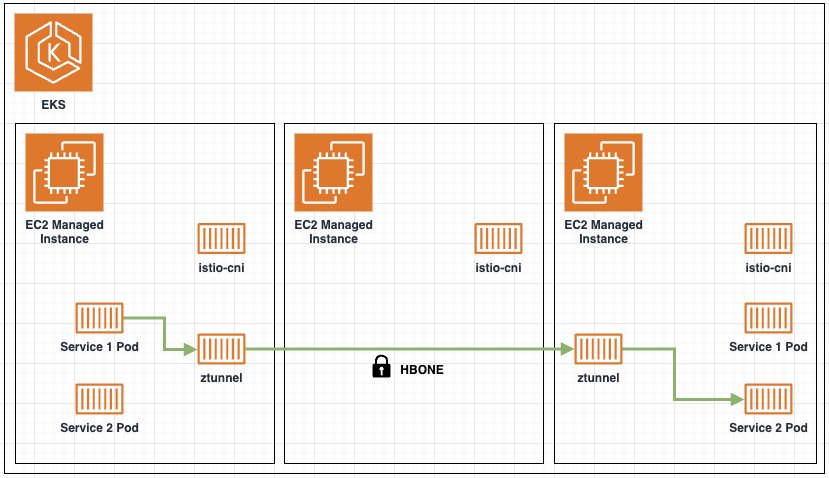
Figure 1. Architecture of Istio ambient mode with Layer 4 features
To add workloads to the Istio Ambient Mesh, add the label istio.io/dataplane-mode=ambient to the target namespace or pod. Adding the label to the namespace adds the pods in that namespace to the ambient mesh, or you can be more selective by adding the label to specific pods. After it’s added to the ambient mesh, traffic into and out of the pod is intercepted at the Layer 4 level by ztunnel. At this point, the Istio “secure overlay” is in place, and workloads can take advantage of automatic mTLS encryption and authentication, L4 authorization policies, and TCP level observability. The ztunnel routes traffic securely to other workloads, other ztunnel proxies, or waypoint proxies.
The diagram in Figure 1 illustrates the following end-to-end workflow for Layer 4 traffic in Istio Ambient Mesh:
- Pod startup and detection – When a pod starts, Istio-cni detects it and sends the pod network namespace file descriptor to the node-local ztunnel proxy. Ztunnel uses this to create listeners inside the pod’s network namespace.
- Traffic redirection – Iptables rules within the pod’s namespace redirect inbound and outbound traffic to local ztunnel listeners, making sure pod traffic flows through the ztunnel proxy transparently.
- HBONE tunnel establishment – Ztunnel establishes HBONE (HTTP-Based Overlay Network Environment) tunnels to securely transport traffic between source and destination workloads. Each unique source-destination pair gets a dedicated connection within the encrypted tunnel. Istio-cni then notifies the ztunnel proxy to set up a TCP stream between the source and destination.
- Certificate management – Ztunnel manages SPIFFE-based X.509 certificates for each workload running on the node to support mutual TLS (mTLS) authentication, helping make sure that communication within the mesh is authenticated and encrypted.
- Traffic encapsulation – When a Service 1 Pod sends traffic to a Service 2 Pod, the source ztunnel captures and encapsulates the traffic into the HBONE protocol and securely tunnels it to the destination ztunnel.
- Policy enforcement and delivery – At the destination, ztunnel decapsulates the HBONE traffic, evaluates Layer 4 Authorization Policies, and presents traffic to the destination service if it passes policy enforcement. This entire process happens transparently, without the source or destination service being aware of it.
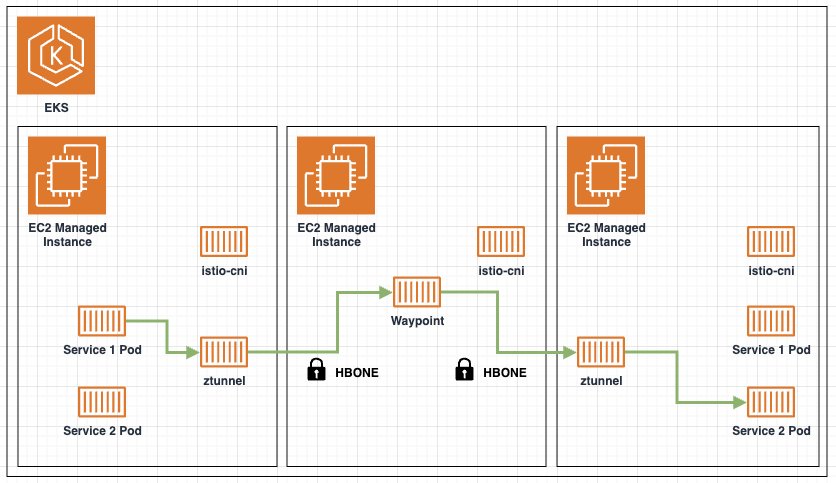
Figure 2. Architecture of Istio ambient mode with Layer 7 features (waypoint)
To take advantage of the full feature set of Istio and L7 capabilities, a waypoint proxy is required. After deploying a waypoint proxy, a label like istio.io/use-waypoint=waypoint must be added to the target namespace, service, or Pod. At this point, traffic will now flow through the waypoint proxy.
The initial steps match the L4 flow described above (iptables redirection, HBONE tunnel setup, and SPIFFE certificate management). The difference is in how traffic is routed after ztunnel captures it:
- When a service 1 Pod sends traffic to a service 2 pod, ztunnel captures and encapsulates the traffic into the HBONE protocol and securely tunnels the traffic to the waypoint proxy
- Waypoint proxy handles L7 processing, including policy enforcement
- After waypoint proxy processing, the traffic is sent to the destination through a second secure tunnel to the destination ztunnel proxy
- At the destination, ztunnel will decapsulate the HBONE traffic from the pod’s network namespace, and present traffic to destination service
- This happens without the source or destination service aware of the process
Implementation Guide
Prerequisites
Before you begin, make sure the following tools are installed:
You also need an AWS account with permissions to create EKS clusters, VPCs, AWS Identity and Access Management (IAM) roles, and load balancers. Familiarity with Kubernetes concepts and kubectl is helpful. The walkthrough takes approximately 30-45 minutes to complete, and the AWS resources you create will incur costs while running. Be sure to complete the cleanup section when you are done.
Note: This walkthrough deploys Istio 1.28.1. Before deploying Istio in your own environment, review the Istio security advisories for any known vulnerabilities and recommended versions
Create the Amazon EKS Auto Mode Cluster with Istio’s Ambient Mode
- Clone the Istio on EKS repository:
- Navigate to the Terraform module directory
The repository contains an example for deploying and running Istio on EKS. You use the Terraform module to create your EKS Auto Mode cluster and deploy the required Helm charts for Istio in ambient mode. For more information about installing Istio in ambient mode with Helm, refer to the Istio documentation. Run the following commands to create the EKS Auto Mode cluster, deploy Istio in ambient mode, and configure kubectl access to the cluster.
- Initialize and apply the Terraform configuration
Note: This step typically takes 15–20 minutes to complete, as it provisions the EKS Auto Mode cluster, VPC, IAM roles, and installs Istio in ambient mode.
- Configure kubectl access to the cluster
Visualization
Next, deploy several add-ons to support the observability of Istio and the workloads running within the mesh.
Kiali is a console for the Istio service mesh. You use it here to validate the ambient mode configuration. To access this dashboard, port-forward the Kiali service to your local machine:
Use your browser to navigate to http://localhost:20001
Deploy sample EKS application
To demonstrate some of the features of Istio, deploy a retail store sample application. This sample application uses a microservices architecture with components written in various programming languages and uses a variety of data stores. By default, the UI service is set to type=LoadBalancer, but you update this to ClusterIP and let Istio handle traffic into the cluster later. Run the following commands in a second terminal session.
After this step, use kubectl wait to verify that you have successfully started the pods before you proceed
EKS clusters don’t include Kubernetes Gateway API custom resource definitions (CRDs) by default. The Gateway API is an open-source standard interface for Kubernetes application networking and represents the next generation of managing ingress and service mesh traffic within a cluster. Istio supports the Kubernetes Gateway API, and you need these resources to allow ingress traffic into your cluster and to manage ambient mesh traffic. There is a Gateway resource in the Istio APIs, but this walkthrough doesn’t use that resource, and there are key differences between the two.
A Gateway helps route traffic to services within the cluster. Each Gateway is associated with a GatewayClass which indicates the gateway controller that handles the traffic for that Gateway. In this example, you need traffic from outside the cluster routed to the UI service running within the cluster. By default, Istio creates a ServiceAccount, Service, and Deployment that corresponds to the Gateway configuration. If you need to adjust the settings of the underlying resources, create a ConfigMap and associate it to the Gateway resource as shown here. Route resources define rules for mapping requests through a Gateway to backend Kubernetes services. The HTTP Route is for the HTTP protocol and routes requests to the UI service.
Note: This walkthrough configures the Gateway listener for HTTP on port 80 to keep the demonstration focused on the service mesh. For production environments, configure TLS termination on the Gateway listener. See the Istio Gateway TLS configuration and the AWS Load Balancer Controller TLS guidance for setting up HTTPS with ACM certificates.
To wait for the load balancer to finish provisioning you can run this command:
To verify that workloads in the default namespace are included in the ambient mesh, label the namespace.
Run the following commands to get the URL to access the example retail store application.
You should see the example retail store homepage.

Demonstrate mTLS between services
Because we labeled the default namespace, all workloads are added to the ambient mesh and service to service communication is authenticated with mutual TLS (mTLS). To validate this, let’s generate some traffic for our example retail store which we will review in Kiali. Using the URL of the example retail store site, explore the site and the gadget repository. Add some items to your cart and complete the checkout process. Do this several times to generate test traffic.
Return to the browser tab with Kiali and open the Traffic Graph. You might need to select additional items under the Display menu. With Security selected under the Display menu, you can see the lock icon marking each segment between microservices.
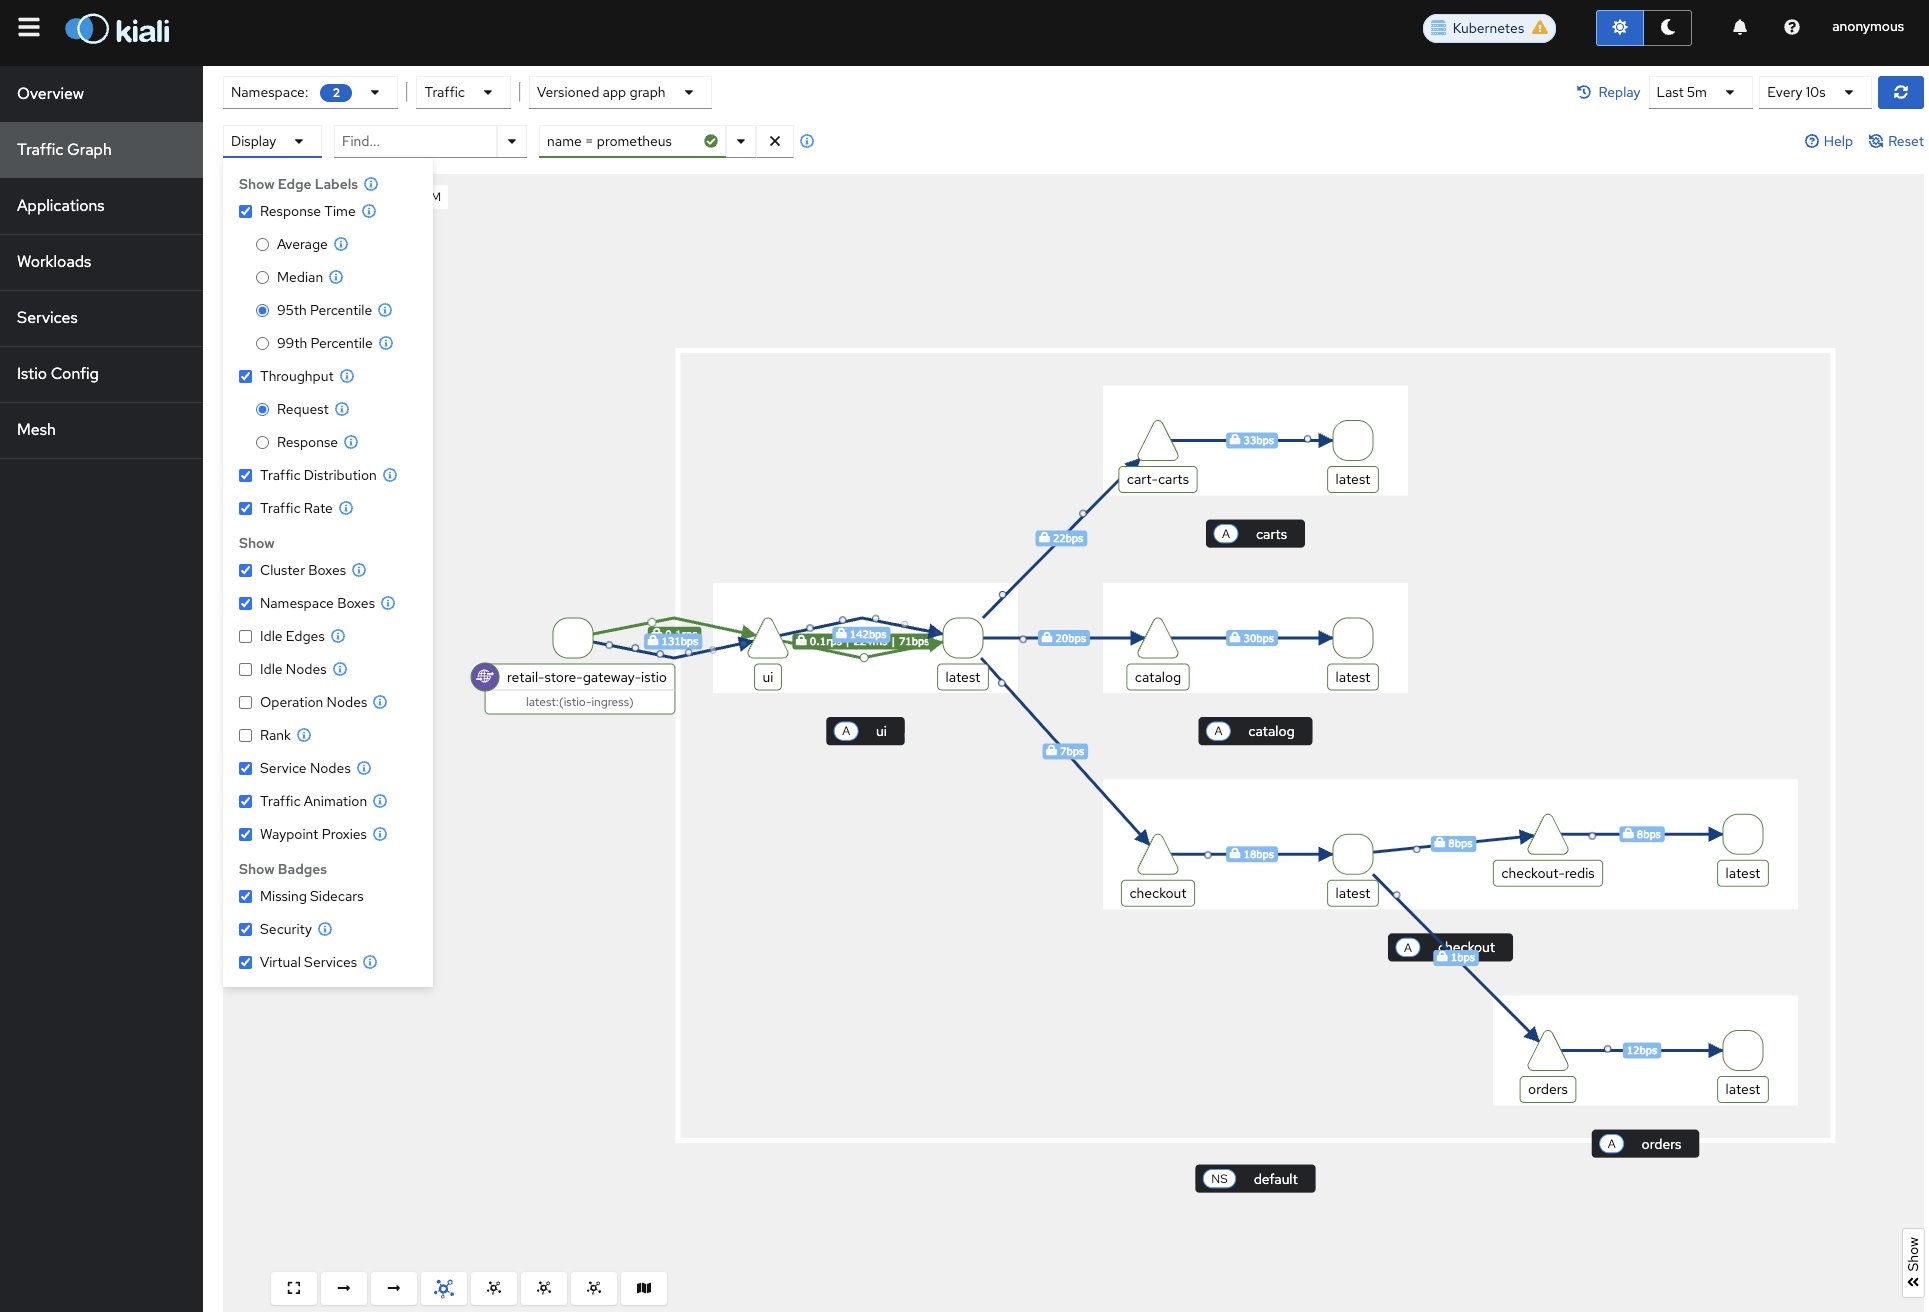
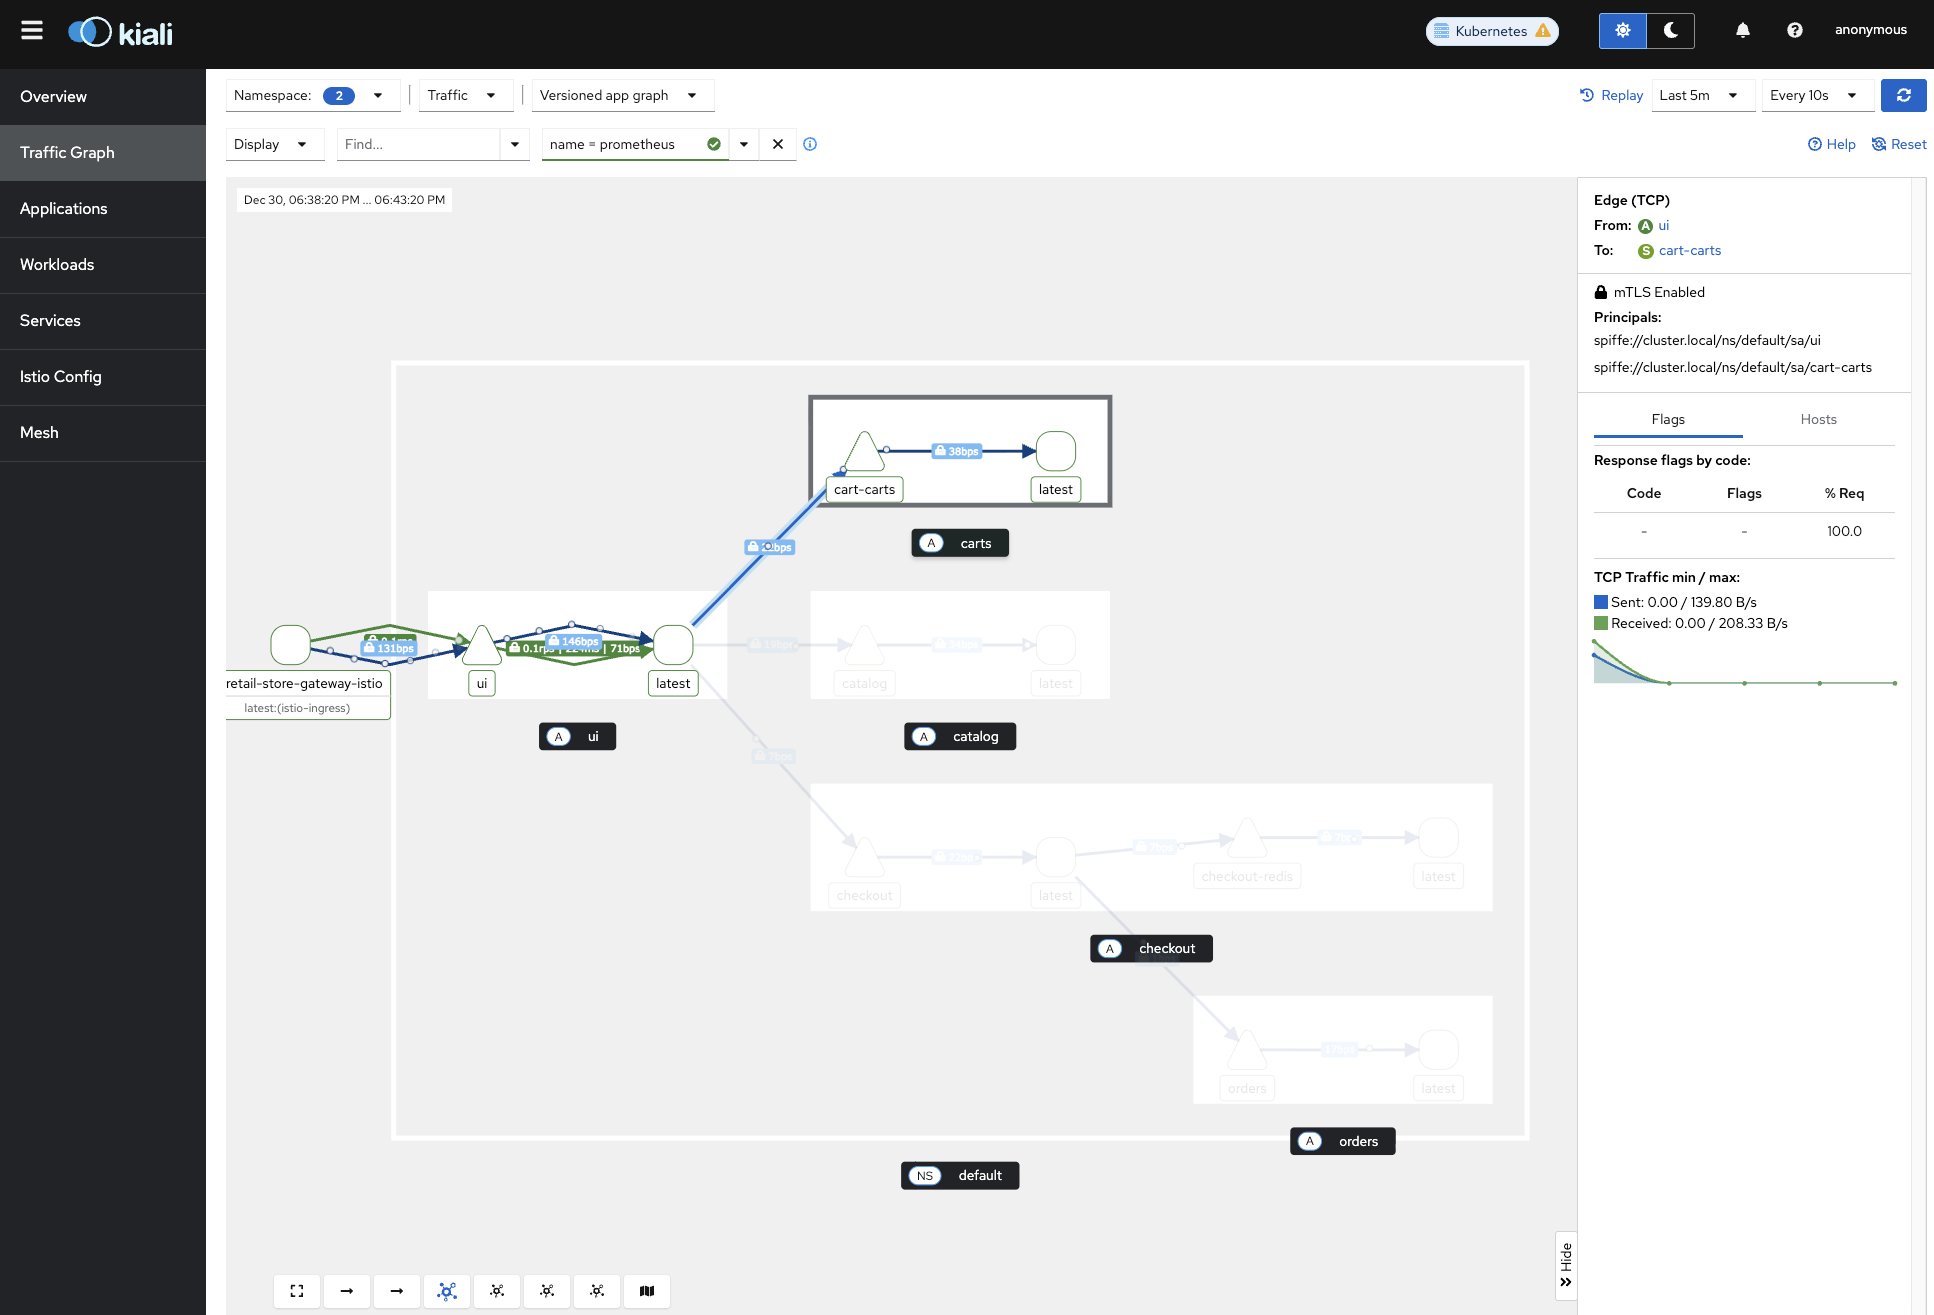
If you select a segment, like between the ui and carts service, you will see on the right hand side the lock icon that indicates that mTLS is enabled for that traffic. As you can see, the lock icon is displayed for each network segment between microservices, indicating that mTLS is enabled for traffic within the ambient mesh.
Enforce mTLS within the mesh
For service-to-service communication within the ambient mesh, network traffic is authenticated with mTLS. However, mTLS isn’t required. If a service outside the scope of the ambient mesh attempts to connect to a service inside the ambient mesh, mTLS won’t be used. Create a test workload in a separate namespace so this workload isn’t automatically included in the ambient mesh.
Test connectivity from this workload to a service running within the ambient mesh.
This request succeeds because mTLS isn’t required yet for ambient mesh workloads.
To enforce mTLS connectivity for ambient mesh workloads, create a mesh-wide PeerAuthentication policy that requires mTLS.
After creating the mesh wide PeerAuthentication policy, attempt the request again.
Now the request fails as expected.
Layer 4
So far you’ve seen how ztunnel handles identity and encryption at the network layer. Authorization at Layer 4 — controlling which workloads can talk to each other — is also enforced by ztunnel without any additional components. Create another test workload, but this time it resides in the default namespace and becomes part of the ambient mesh.
Test connectivity from this workload to the catalog service within the ambient mesh.