Containers
Blue/Green Kubernetes upgrades for Amazon EKS Anywhere using Flux
Introduction
Amazon EKS Anywhere (Amazon EKS-A) allows customers to run containerized workloads on customer-managed hardware. Amazon EKS-A cluster upgrades are performed in place using a rolling process (similar to Kubernetes Deployments). Upgrades can only happen one minor version at a time (e.g., version 1.20 to 1.21) and Control plane components will be upgraded before worker nodes. As Kubernetes continues to evolve, it’s important for you to keep your clusters up-to-date with the latest security enhancements, features, and bug fixes. For more details on the upgrade process see Amazon EKS-A documentation.
By default Amazon EKS-A cluster upgrades use an in-place rolling process, but in certain scenarios an alternative strategy may be preferred. The blue/green deployment method allows the customer to shift traffic between two nearly identical environments that are running different versions of Kubernetes. Customers may prefer a blue/green Amazon EKS-A upgrade strategy for a few reasons:
- To reduce risk during in-place Kubernetes or platform component upgrades
- To rollback easily to an older version by shifting traffic back
- As a disaster recovery pattern (e.g., active-active, active-passive)
- As a migration strategy to Amazon EKS in-region
- To move a platform from old to newer hardware software versions
- Ability to test applications with a new version of Kubernetes in a safe and non‑production environment
In a blue/green approach there is one environment (blue) running the current application and platform version and one environment (green) running the new application or platform version. Using Flux, which is bundled with Amazon EKS Anywhere, you can implement the blue/green pattern for Amazon EKS-A cluster upgrades. Flux is a GitOps operator for Kubernetes to sync your cluster state with a Git repository. On success, traffic can then be switched from the old environment to the new.
This post details a solution on how to achieve blue/green Kubernetes platform deployments on Amazon EKS-A deployed on vSphere using the bundled Flux controller. In addition, it discusses additional design considerations for the pattern.
Solution overview
In this solution, two Amazon EKS-A clusters (workload cluster A and workload cluster B) are provisioned with Flux, MetalLB, and Emissary Ingress controller installed. Workload cluster A represents the blue cluster and workload cluster B represents the green environment.
The following diagram shows the solution:
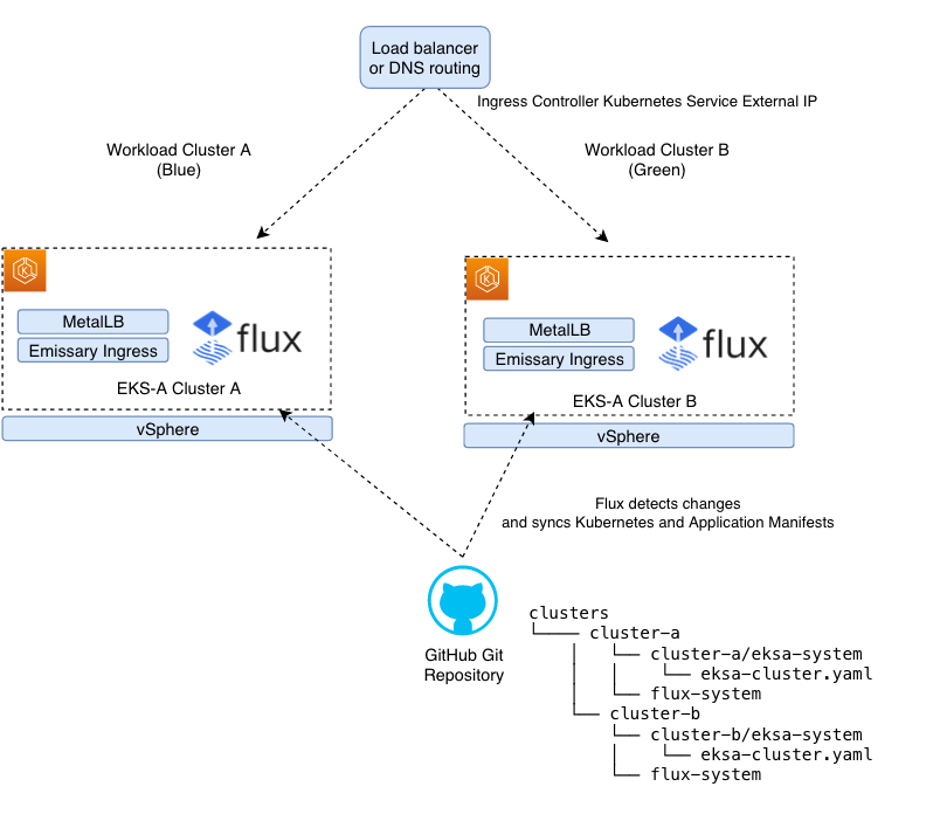
Emissary Ingress controller is used to control layer 7 routing to Kubernetes services. MetalLB is a load balancer controller, which is a replacement for cloud-based load balancers. When creating Kubernetes services of type LoadBalancer the MetalLB controller provide a static IP address that can be used to route traffic to the Emissary Ingress controller. Emissary and MetalLB can be installed via the Amazon EKS-A Curated Packages. Amazon EKS-A curated packages are trusted, up-to-date, and compatible software that are supported by Amazon to extend your EKS-A clusters functionality, while reducing the need for multiple vendor support agreements.
When Flux is enabled, the Amazon EKS-A cluster configuration is stored in Git and version controlled. The Flux controller works in the following way:
- A platform operator or automation tool commits new Kubernetes configuration change to an environment repository, which is used in this blog a Git repo on GitHub.
- Flux detects changes to the environment repository and syncs the Kubernetes manifests to the Kubernetes cluster.
Flux makes it easy to version control and apply cluster configurations. For a production process, it’s recommended to use a Continuous Integration (CI) pipeline that validates any Kubernetes manifest changes before pushing to the environment Git repository. This minimizes accidental configuration changes that could impact the availability of your workloads running on the Amazon EKS-A cluster.
Walkthrough
Prerequisites
- Administrative tool with the following tools installed:
- Helm
- eksctl
- eks-anywhere (v0.12.0 or later for curated packages support)
- kubectl
- curl
- Git
- vSphere client credentials with administrator permissions
- Follow setup authentication to use Amazon EKS Anywhere Curated Packages to create an IAM user with required ECR access. Amazon EKS Anywhere Curated Packages are only available to customers with the Amazon EKS Anywhere Enterprise Subscription. To request a free trial, talk to your Amazon representative or connect with one here.
- A GitHub Personal Access Token (PAT) to access your provided GitHub repository. It must be scoped for all repo permissions with an SSH key set-up for cloning a repository.
Set-up environment
First, set up the environment by providing the vSphere username and password, GitHub token, and AWS keys for fetching Amazon EKS-A curated packages.
Next, create a GitOps-enabled Amazon EKS-A cluster. Use the following eksctl command to generate the vSphere EKS-A cluster configuration:
Complete the vSphere cluster configuration by referring to vSphere configuration, and specify the Kubernetes version (to simulate different Kubernetes versions you may want to specify an older version for Cluster A). Now, add the additional GitOps config to the cluster‑a.yaml file and replace <github-username> with your GitHub username. The gitOpsRef needs to be added to the existing Kind: Cluster definition configuration that was generated from the previous command rather than a new one.
Create Cluster A by executing the following:
Set the KUBECONFIG context for cluster A in an environment variable:
Install MetalLB and Emissary Ingress controller Amazon EKS-A curated packages
The following instructions describe how to install MetalLB and Emissary Ingress controller via Amazon EKS-A curated packages.
Following the creation of the package specification YAML file, we need to configure the package. The following package Kubernetes specification creates an IPAddress Pool and L2Advertisement resource, which is required to inform MetalLB to advertise the allocated LoadBalancer IPs via the Address Resolution Protocol (ARP). The IPAddressPool is a user-specified host range on your vmware virtual network that should be excluded from DCHP allocation pool. Without the following configuration, any Kubernetes service of type Load Balancer created with the external IP allocation will be in a pending state.
Edit the metallb.yaml and configure the host address range. The Kubernetes specification should be similar to the following:
Next, create a Kubernetes namespace metallb-system and install the MetalLB package:
Now to install the emissary ingress controller curated package:
Validate the Emissary and MetalLB curated packages are installed:
Next, configure the emissary-listener. The Listener Custom Resource Definition (CRD) defines where and how the Emissary-ingress should listen for requests from the network, and which Host definitions should be used to process those requests. You can learn more on this topic from Emissary-ingress listener resource.
Validate if the emissary http-listener and https-listeners listener are configured correctly. The securityModel defines how the Listener decides whether a request is secure or insecure. You’ll notice our security model to be XFP for both the listeners, which means the requests are secure if — and only if — the X-Forwarded-Proto header indicates HTTPS.
Create GitOps enabled Amazon EKS Anywhere Cluster B
Following exactly the same procedure in the previous two sections, we create a GitOps-enabled Amazon EKS Anywhere Cluster B on the upgraded version of Kubernetes using the same GitHub repository. We install Amazon EKS-A curated packages, such as MetalLB and Emissary Ingress controller. Cluster B represents the green cluster. The eksctl anywhere installation process automatically creates a new folder for Cluster B under the clusters root folder in the Git environment repository on GitHub. Using this approach, you can modify the cluster configuration for all your Amazon EKS-A clusters in a single place.
Once the Cluster B is created, set the KUBECONFIG context for cluster B in an environment variable:
Deploying a workloads and ingress mappings in Cluster A and B via Flux
Now, we’ll use Flux to deploy a sample workload to Cluster A (Blue) and Cluster B (Green) simultaneously. The following set of commands push a Kubernetes manifest for a sample workload along with emissary ingress controller mappings to the Git environment repository. The Flux operator detects these changes and applies the Kubernetes manifests to cluster A and B.
The <environment-repository> is a private GitHub repository created automatically when creating a GitOps-enabled Amazon EKS-A cluster. See the details here on how to clone a GitHub repository using SSH, as per the pre-requisites, it assumes you have Git set-up and SSH keys set-up for cloning and pushing to the repository from your local administrator machine.
Validate Cluster A and B have the same workload synced
Obtain the EXTERNAL-IP of the emissary load balancer from Cluster A using the below command:
Next, curl the application to validate it is accessible:
Next, let’s test Cluster B. Obtain, the EXTERNAL-IP of the emissary load balancer from Cluster B using the below command:
Next, curl the application to validate it is accessible:
With these steps, we’ve shown how Flux can be used to sync configuration between clusters. In a more complex scenario, where Cluster B is running on a newer version of Kubernetes, there may be more work required to get your workload running (e.g., if there is Kubernetes API deprecations).
Routing traffic across workloads in two clusters
To switch traffic between Cluster A (Blue) and Cluster B (Green) there are two options to consider. One approach using AWS Route 53 weighted routing policy, though you need to consider any DNS propagation delay when switching. Another approach is to use a top-level load-balancer like F5, Nginx, or HAProxy with dynamically updated routing. For approach two, there is no Domain Name System (DNS) propagation delay but the top-level load-balancer requires network connectivity to both Cluster A and B Emissary Ingress Kubernetes service. It’s recommended that client applications that invoke this endpoint, implement active retries in-case of temporary disconnection during traffic switch over.
Once you validated the workload is serving traffic on Cluster B, then delete Cluster A. You’ve just completed a blue/green upgrade.
Additional design considerations:
- Network Load Balancer – A network load balancer was required to expose the Kubernetes ingress service to services outside the Kubernetes cluster. MetalLB was chosen as it provides Kubernetes service of type Load Balancer with a virtual IP address, from an IP address pool you can define. In this solution MetalLB was configured to advertise the allocated IP address via Layer2 using the Address Resolution Protocol (ARP) for IPv4 as the load balancers IP address wasn’t advertised outside of the network. MetalLB can also be configured to advertise via Border Gateway Protocol (BGP). A limitation of MetalB ARP deployment configuration is single-node bottlenecking. Only a single leader node is elected for MetalLB which limits Kubernetes service ingress bandwidth to the single node. An alternative load balancer you could consider is kube-vip.
- Kubernetes Ingress Controller – Emissary was the chosen Kubernetes ingress controller. Alternative ingress controller solutions could have been used.
- Fleet Capacity Management – To support blue/green approach to platform upgrades it is important to ensure in your data center or colocation facility there is adequate hardware and VM capacity, and the IP addresses available to support a second Amazon EKS-A cluster of a near production scale. For customers with a large number of clusters, this upgrade path may not be feasible due to the resources required.
- GitOps Environment Management – It’s advised to have a shared environment Git repository per environment type (i.e., production and non-production) and in this repository have a directory per application environment. In this solution, the environment repository had a Cluster A and Cluster B subdirectory, where the configuration was stored for each respective Amazon EKS-A cluster. This enables environment specific configuration to be applied isolated from other environments. We used public GitHub for the Git repository hosting service, although you can use AWS CodeCommit or any other compatible Git repository that can be cloned via SSH.
- Amazon EKS Anywhere Enterprise Subscriptions and Curated Packages – An Amazon EKS Anywhere Enterprise Subscription is required per Amazon EKS-A cluster you are running and would like support. An Amazon EKS Anywhere Enterprise Subscription is also required to make use of Amazon EKS-A curated packages.
- Application Storage – Data management is more complex in a blue/green strategy. This post didn’t take into consideration application storage. If using an external database, then you would look at sharing these between the blue and green cluster.
Cleaning up
Use the following commands to clean up the resources created as part of this blog:
Finally, delete the GitOps repository created for this demo manually.
Conclusion
In this post, we showed you a blue/green Amazon EKS-A upgrade strategy using Flux as an alternative to an in-place upgrade. Customer might look at a blue/green upgrade strategy for various uses cases including reducing risks of upgrades, as part of a migration pattern to Amazon EKS in-region or part of a disaster recovery pattern.
For more information on getting started with Amazon EKS Anywhere checkout the Amazon EKS-A workshop and Amazon EKS-A documentation.