Migration & Modernization
Modernize your applications using Amazon Bedrock AgentCore Gateway and Kiro powers
In this blog post, I will demonstrate a pattern to modernize your existing application by adding agentic AI capability to it without touching the source code of your legacy application. I will do that by offloading the heavy lifting of this transformation to Amazon Bedrock AgentCore Gateway and Kiro powers. For the purposes of this demo, I will use a mock application called Train Travel that you can check in this repo.
Note – My colleague Ryan Peterson presented an earlier version of this modernization pattern at re:Invent 2025. This blog post provides a more complete picture of the solution and incorporates newly available features such as Kiro powers.
Many customers I talk to recognize the huge potential of AI, but they often struggle to identify opportunities that truly fit their unique needs. In other cases, the technology stack in the organization is not easy to change. Maybe old systems and frameworks, or maybe the original developers are not around anymore.
In this blog post, I introduce an easy pattern that takes customers’ applications (in this example the Train Travel application) and adds an agentic AI layer that unlocks AI capabilities on the existing application . Since this method uses existing applications code, it could be easier to implement than a greenfield approach to build Proof-of-Concept (POC) from scratch. This is an example of “Move to AI” modernization pathway. For more details about this pathway check Introducing AWS ‘Move to AI’ Modernization Pathway: Transforming Your Application Portfolio with AI
How to add an agentic AI layer to your application
In this process, we add an AI agent that sits in the middle between your application and its users. The AI agent will have more capabilities than just chatting with users. Based on your design, the agent will receive and analyze user requests, invoke the Large Language Model (LLM), check if it needs to call an external tool (like an API from your application), execute the tool if needed, and invoke the LLM again with the result. It repeats this agentic loop until it successfully fulfills the users’ requests.
To do this, I need to work on two parts. The first part is the backend, which includes adding a wrapper around my existing APIs so that the agent can consume them. The second part is the frontend: the AI agent itself.
1. Backend implementation
The first part of the solution is building the backend infrastructure. In this context, the backend consists of application code wrapped in a format that AI agents can understand and interact with, including agent authentication, observability mechanisms, and a gateway that receives the AI agent’s requests and processes them through the agentic AI loop explained in the previous section.
The Model Context Protocol (MCP) serves as the standard for connecting AI agents to external systems and applications. MCP requires three core components: an MCP Client, an MCP Server, and MCP Tools (which can include file operations, API calls, and database queries). The implementation process involves converting your existing code, APIs, and tools into an MCP-compatible format that the server can expose to AI agents.
To streamline this conversion process, we leverage Amazon Bedrock AgentCore Gateway, a fully managed service that connects AI agents with tools and services. AgentCore Gateway serves as a centralized tool server, providing a unified interface where agents can discover, access, and invoke tools while offering native support for MCP. It accepts multiple target types, including APIs and AWS Lambda functions, with additional targets available in the documentation.
For this blog post, we’ll focus on APIs as the primary target type. The key advantage of using AgentCore Gateway is that it eliminates the need to write custom code for converting APIs to MCP tools. You simply provide Gateway with OpenAPI specifications. Gateway then functions as an MCP server, automatically handling the translation layer between your RESTful APIs and the AI agent.
2. Frontend implementation (The AI Agent)
The frontend component involves building an AI agent that acts as an MCP client. This agent receives user requests and sends them to the LLM for processing. The LLM evaluates whether it can fulfill the request directly or needs to invoke external tools through the MCP Server (Gateway) for additional processing.
To build the AI agent, I use Kiro (an Agentic IDE) enhanced with Kiro powers. Kiro powers are extensions that provide domain-specific context, best practices, examples, and documentation to Kiro, enabling it to accomplish coding tasks more deterministically and with greater accuracy.
For this demo, I leverage the Strands Agent SDK Power, which equips Kiro with all the necessary knowledge and capabilities to build my AI agent using the Strands Agents SDK.
The legacy application: Train Travel
I’m going to use an OpenAPI sample application for Train Travel. I downloaded the application and packaged it as a container that runs on ECS Fargate and made it accessible with Application Load Balancer. For this demo, you need an actual URL for the application. Let’s assume it’s: my-train-travel.com.
The application currently has 4 RESTful APIs (get_statistics, get_trips, create_booking, get_bookings) and it looks like this:
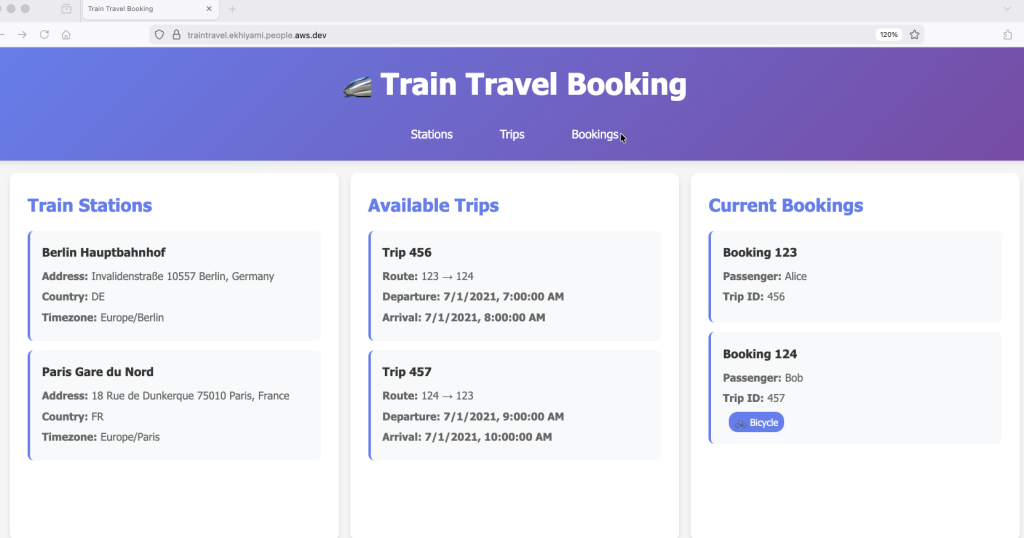
Figure 1: The sample application
Target Architecture
By connecting AgentCore Gateway to the OpenAPI schemas from Train Travel application’s RESTful API, it automatically manages the MCP compatibility layer. Acting as an MCP server, the Gateway translates incoming requests from the AI agent into HTTP calls to the underlying APIs, while managing response formatting and authentication seamlessly. Once the Gateway is created, you receive a URL endpoint that provides the agent (acting as MCP client) with access to all business logic and tools within the Train Travel application.
The target architecture is depicted in the this diagram.
In the next section, I will walk you through the steps to building it.
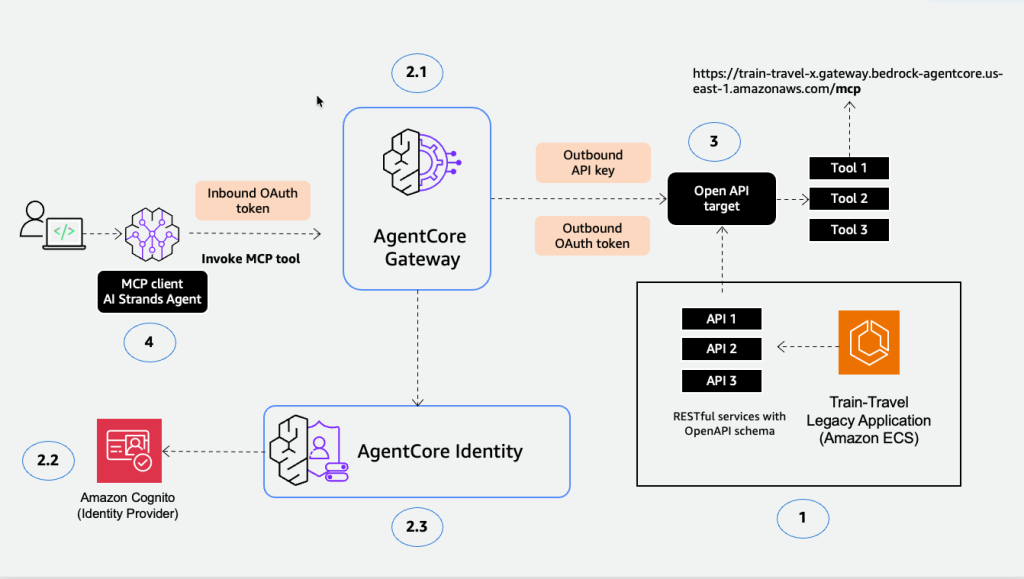
Figure 2: Target architecture
Solutions walkthrough
Backend implementation
Creating Gateway (MCP Server)
- Open the Amazon Bedrock AgentCore console.
From the left navigation pane, choose Gateways. Choose Create gateway. Give it a name and description.
2. Configure Inbound Authentication:
In the Inbound Auth configurations section, select Quick create configurations with Cognito. This will create a new identity provider.
If you already have one, you can choose Use existing identity provider configurations. This step controls the authentication from the caller (agent) to Gateway. You can configure it using either IAM or JSON web tokens (for example, OAuth tokens) from your identity provider.
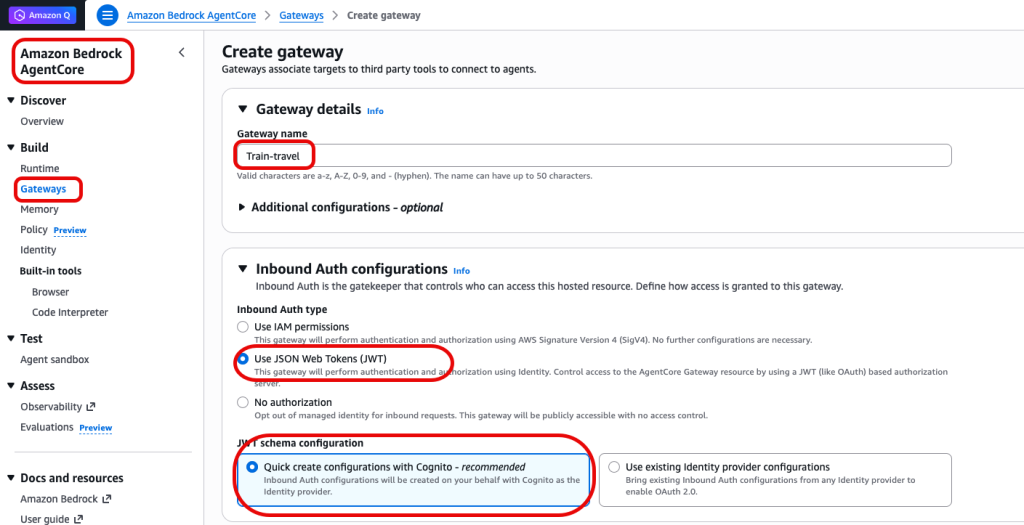
Figure 3: Create a gateway
3. Set Permissions:
In the Permissions section, choose Create and use a new service role.Use an IAM service role to invoke the gateway on the user’s behalf.
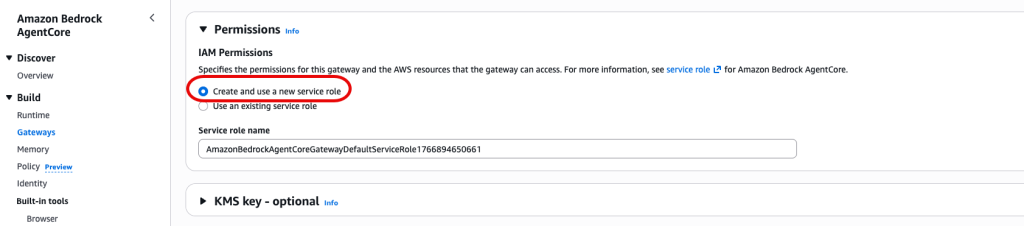
Figure 4: Set permissions
4. Configure Target:
For Target, select REST API as a target. Select OpenAPI schema as a type. To provide the schema, upload it to an S3 bucket or choose Define an inline schema.
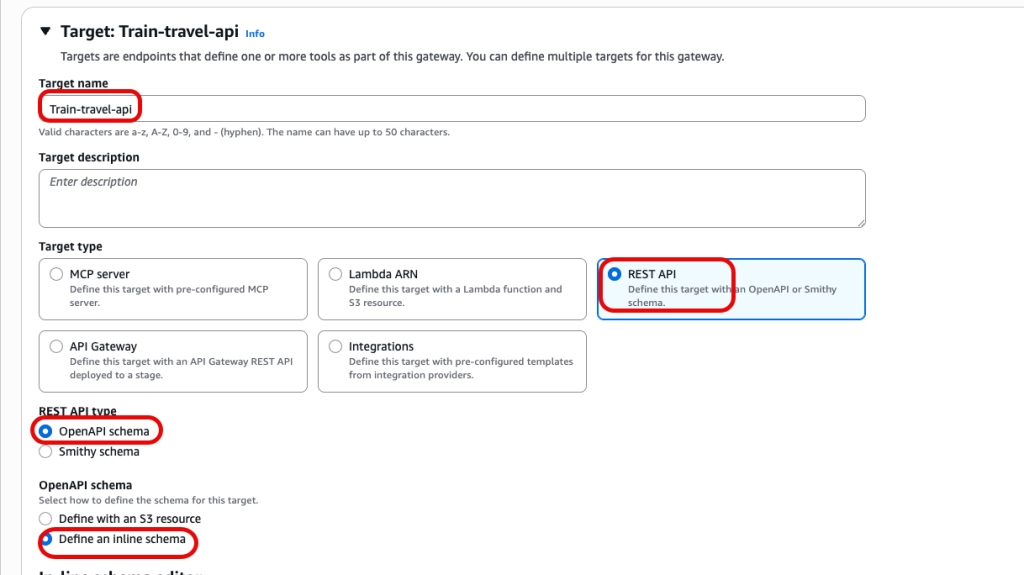
Figure 5: Gateway target
I downloaded the OpenAPI specification from the project repo. I then modified openapi.yaml file to it to point to use my application URL (for example my-train-travel.com.)
There are also some considerations for the OpenAPI specs to be compatible with AgentCore Gateway. You can check details in OpenAPI schema targets for AgentCore Gateway. I also provide the Train travel application URL in the file so that the Gateway can start translation.
This is how the final OpenAPI specs file will look like based on my configuration
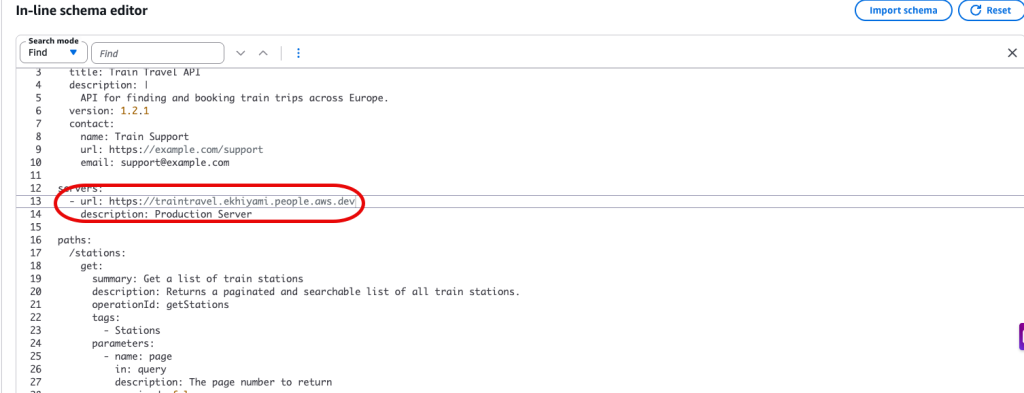
Figure 6: Schema for OpenAPI
For this step, It is critical that your OpenAPI specification be well documented with clear descriptions for each endpoint, parameter, and response. The documentation you provide in the OpenAPI spec becomes the tool description and capabilities information that the MCP client (your AI agent) sees when querying available tools.
When the agent receives a user request, it examines these tool descriptions to determine which tools are relevant and how to use them effectively. Well-written descriptions with clear parameter explanations help the agent make better tool selection decisions, leading to more accurate and efficient request handling. Poorly documented APIs may result in the agent misunderstanding tool capabilities or failing to select the appropriate tool for a given task.
5. Configure Authentication:
The last step before the target is ready is to define how the agent, tools, or the Gateway access downstream resources. You can select either an API Key or an OAuth client.
For simplicity, I select an API key that I already created. If you don’t have one, you can create a pair and use them. Choose Create.
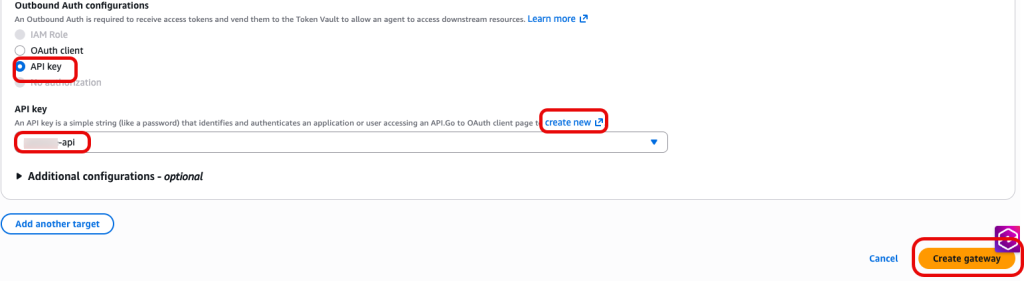
Figure 7: oAuth configuration
Once the gateway is created and the status shows Ready, it gives you a Gateway resource URL.
This will be the MCP server URL that my AI agent will need to connect to.
Take note of it. It should look like this:
https://train-travel-xx.gateway.bedrock-agentcore.us-east-1.amazonaws.com/mcp
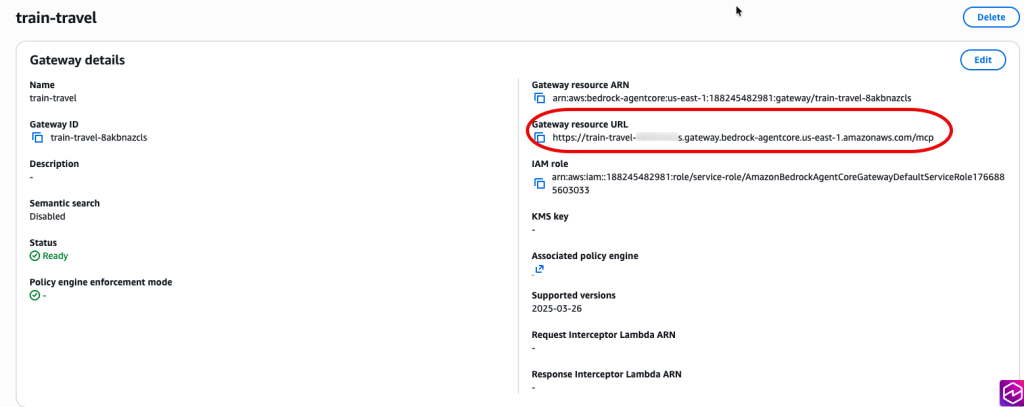
Figure 8: Gateway resource URL
6. Note OAuth Credentials:
Before you leave the AWS Console, you need to take note of the OAuth token generated for our application by Cognito in the Configure Inbound Authentication step (step2). We need to provide this to the agent for authentication to be able to invoke the Gateway.
Go to Amazon Cognito and under Application, find App clients. Under App client information, copy Client ID and Client secret.
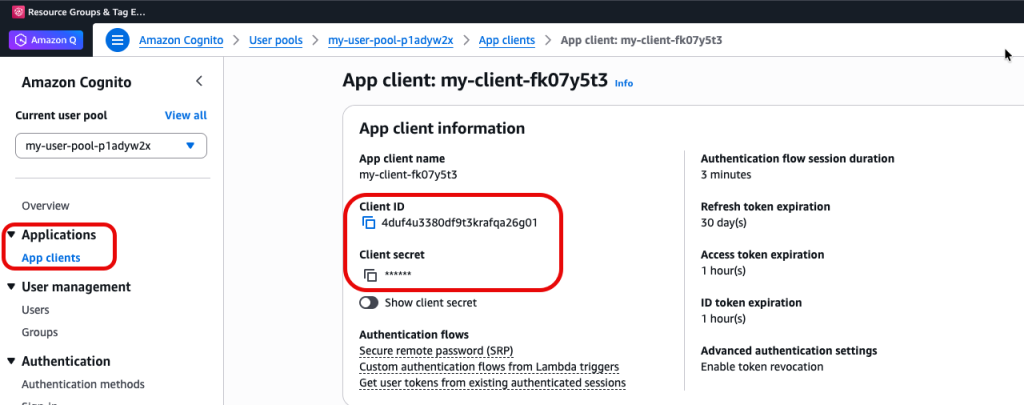
Figure 9: Client ID
That’s it. You just created an MCP server and MCP tools that can access your applications.
Now that we have the MCP server ready, let’s create an MCP client to complete the cycle.
Frontend implementation
I will use Kiro to vibe code the AI agent. You can follow the instructions in Kiro installation for more details how to get installed.
To create an AI agent, I will use Strands Agents SDK.
With vibe coding, the Agentic IDE (Kiro in this case) will attempt to satisfy my request based on its existing knowledge. However, given the nondeterministic nature of LLMs, there will be some guessing involved, and it may make decisions that don’t align with my application requirements or organization policies.
To eliminate this uncertainty, I need to provide Kiro with specific guidance through a new functionality called Kiro powers. A Kiro power is a curated collection of documentation, guidance, best practices, MCP servers, and examples focused on a specific topic. It acts like a domain expert that sits next to Kiro and guides its behavior. Powers are only activated when explicitly needed. This also helps manage my context window usage efficiency.
- Installing Kiro power:
In Kiro window, I select the Power icon on the left side. As you can see, there are multiple powers available. I install the Strands Agent Power.

Figure 10: Kiro powers
2. Creating the agent
Next, I ask Kiro to write a simple agent using this prompt:
"Use AWS Strands Agent SDK to write a simple terminal-based AI agent that connects to MCP tools available at this endpoint:https://train-travel-x.gateway.bedrock-agentcore.us-east-1.amazonaws.com/mcp"
Kiro will activate the power I installed and create a Strands agent using the latest best practices.
3. Configure authentication
Once it’s finished, I provide the authentication secrets I recorded in the Note OAuth Credentials step from Step 6 in the backend implementation.
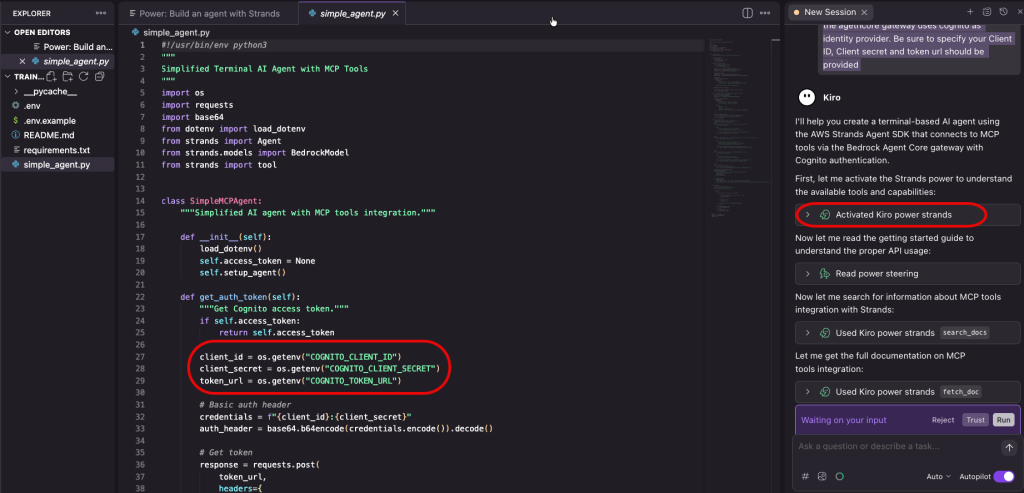
Figure 12: Agent authentication
Now, I’m ready to test the agent. In Kiro terminal I type
Python3.11 simple_agent.py
I start asking question about the available trips between cities, and when I find one I ask the agent to book one for me.
You can watch this short video for a quick demo.
Figure 13: Test the agent
What’s Next
After you’ve built a basic AI agent that can answer your user questions relevant to your business logic, you can take it to the next level by:
- Deploying it to AWS as a fully managed agent – You can deploy it to AWS using Amazon Bedrock AgentCore Runtime
- Implementing memory – Enable the agent to remember previous conversations using AgentCore Memory
- Running observability – Monitor backend interactions using AgentCore Observability
While implementing these additional features is outside the scope of this blog post, you can check the AWS Artificial Intelligence blogs for example implementation
Conclusion
In this post, we demonstrated how to modernize a legacy application by adding agentic AI capabilities through Amazon Bedrock AgentCore Gateway and Kiro powers. We built an MCP server using AgentCore Gateway to expose the Train Travel application’s RESTful APIs as MCP-compatible tools, then created an AI agent using Kiro and Strands Agent SDK to act as an MCP client. This pattern allows you to introduce agentic AI capabilities to your customers without changing your source code, without managing the infrastructure to run an MCP server and tools, and without the heavy lifting of converting your existing code into MCP-compatible tools.
Even though your actual application in your organization may be more complex, the intent of this demo is to show you the art of the possible and to enable your team to start the discussion on what possibilities exist today to introduce AI into legacy systems.
Feel free to comment or connect with me directly if you have more questions. See you in the next one!