Front-End Web & Mobile
Creating a Python WebSocket client for AWS AppSync real-time subscriptions
This article was written by Steve Johnson, Principal Specialist Solutions Architect, AWS
AWS AppSync is a managed service that uses GraphQL to make it easy for applications to get exactly the data they need on AWS. One of the great things about writing clients for AppSync is that GraphQL queries and mutations can be sent as HTTP POST messages. This means just about any programming language or client framework can talk to an AppSync API. AppSync also gives you the ability to provide real-time events via GraphQL subscriptions. For example, if a client wants to be notified when a certain data record changes, it can subscribe to that change and get a notification containing the relevant data. Since the GraphQL spec doesn’t dictate how subscriptions work, every GraphQL implementation may have a different way to handle this important feature.
In November, the AppSync product team improved and simplified the AppSync subscriptions protocol by using pure WebSockets. The new protocol supports a higher maximum payload size (240kb vs. 128kb), enhanced connection and broadcast rates, CloudWatch metrics, and selection set filtering for GraphQL subscriptions. Real-time data, connections, scalability, fan-out and broadcasting are all handled by AppSync.
In this post, we walk you through the creation of an AppSync subscription client (subscription_client.py) using the new WebSocket protocol. We use Python, since it’s easy to read for non-speakers and is popular with AWS customers. We’re also using a class from the websocket-client library, which provides an abstraction similar to JavaScript sockets. The sample code we provide in this article can be easily translated to any language with a WebSocket (IETF RFC 6455) library.
High-level overview
Here is a sequence diagram showing how AppSync interfaces with multiple clients to deliver subscription notification messages:
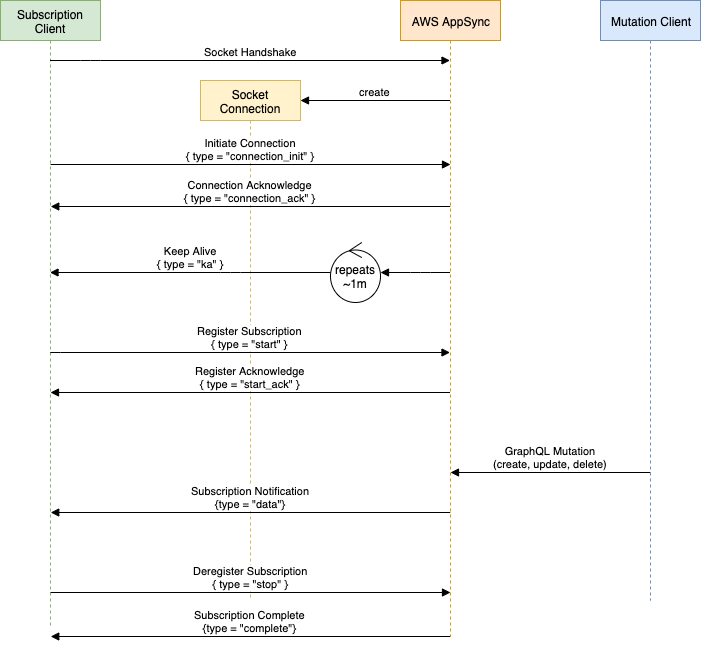
The protocol is initiated by the client, and has the following stages:
- Creating the WebSocket — The client connects to AppSync, the connection is then acknowledged by AppSync
- Registering a subscription — The client sends GraphQL subscription request to AppSync, the request is then acknowledged by AppSync
- Receiving messages — AppSync delivers messages to the client, which can be:
- Subscriptions notification data
- “Keep-alive” messages
- Error messages
- Unregistering a subscription — The client sends message to AppSync, ending events on a subscription, which is then acknowledged by AppSync.
Create the WebSocket
Let’s dive into the code. In order to use subscriptions, the first step is to create a WebSocket connection. We use the websocket-client library for Python which provides both low and high-level abstractions of the WebSocket. In order to connect to AppSync, we have to gather some parameters and format them correctly.
AppSync APIs provide two endpoints that can be retrieved using the following AWS CLI command:
$ aws appsync get-graphql-api --api-id example123456
{
    "graphqlApi": {
        "name": "myNewRealTimeGraphQL-API",
        "authenticationType": "API_KEY",
        "tags": {},
        "apiId": "example123456",
        "uris": {
            "GRAPHQL": "https://xxxxxxxxxxxx.appsync-api.us-west-2.amazonaws.com/graphql",
            "REALTIME": "wss:// xxxxxxxxxxxx.appsync-realtime-api.us-west-2.amazonaws.com/graphql"
        },
        "arn": "arn:aws:appsync:us-west-2: xxxxxxxxxxxx:apis/xxxxxxxxxxxx"
    }
}
Applications with custom client and runtime requirements can use subscriptions with the Real-Time endpoint (wss://), queries and mutations can still use HTTP clients connecting to the GraphQL endpoint (https://). As we need secure WebSockets, the protocol for the connection will be wss://. The address is similar to the AppSync API endpoint, replacing appsync-api with appsync-realtime-api:
WSS_URL = API_URL.replace("https","wss").replace("appsync-api","appsync-realtime-api")Now that we have a base URL, we need to add parameters. For our initial connection, we add an authentication header and a payload. The attributes of the header are different depending on the authentication method as discussed in the upcoming sections. For API key, use the following:
{
    "host":<HOST: is the host portion of the 'appsync-api' URL or GRAPHQL endpoint>,
    "x-api-key":<API_KEY: taken from the AppSync API settings section in the AWS Console>
}
Both the header and payload need to be base64 encoded and assembled as follows:
connection_url = WSS_URL + '?header=' + <B64-ENCODED-HEADER> + '&payload=e30=
For the initial connection the payload is always the same (empty JSON object {}). The base 64 representation of {} is: =e30=.
Before connecting to the server, there is one more parameter to set. In the connection request we need to add a secondary protocol graphql-ws :
ws = websocket.WebSocketApp( connection_url,
                            subprotocols=["graphql-ws"],
                            on_open = on_open,
                            on_message = on_message,
                            on_error = on_error,
                            on_close = on_close,)
The WebSocketApp class (from websocket-client) mimics the high-level abstractions of JavaScript WebSockets. There are four event callbacks: on_open, on_message, on_error, and on_close. References to the handler functions are passed to the WebSocketApp constructor, which simultaneously initiates the connection to the server.
All messages (from and to the AppSync endpoint over the connection) have the following format:
{
  payload: any;
  id: string;
  type: string;
}
The type field is the only required field, while id and payload are optional.
The on_open function is used to set up any attributes of the connection (not attributes of individual subscriptions). This function is also used to send the connection_init message, which tells AppSync you are ready to start registering subscriptions. The first message you will receive after connection_init is connection_ack, which contains the timeout value:
{
  "type":"connection_ack",
   "payload": {
      "connectionTimeoutMs":300000
   }
}
The timeout mechanism is a Timer from the threading class, which is reset with every keep alive message. The timeout value is the longest (suggested) amount of time to wait for a “keep-alive” message on the connection. You can, of course, specify your own timeout.
Register a subscription
Once the connection is acknowledged by the server, you can register a subscription. You do not need to have a separate socket connection for each subscription. AppSync conserves network and client resources by handling multiple individual subscriptions per WebSocket connection.
Each subscription on a connection can use a different authentication mechanism, meaning a single client can have access to different events if they provide the appropriate credentials.
The message to register (or start) a subscription looks like:
register = {
    'id': SUB_ID,
    'payload': {
        'data': GQL_SUBSCRIPTION,
        'extensions': {
            'authorization': {
                'host':HOST,
                'x-api-key':API_KEY
            }
        }
    },
    'type': 'start'
}
The id field contains a unique client-generated identifier for the subscription. This allows you to identify incoming events, and unregister the subscription later when necessary. We recommend using a UUID for this purpose. The data field in the payload contains the a stringified JSON formatted GraphQL subscription object. The object has query and variable attributes, formatted like a GraphQL POST request. query is a required field, the others are optional. This same format is used to send queries and mutations to AppSync over HTTP POST (sample code is in the mutation_client.py sample).
{
    "query": "...",
    "operationName": "...",
    "variables": { "myVariable": "someValue", ... }
}
Under extensions, we have the authorization field. It contains the same data as the authorization header we used in the initial connection. Unlike the header, we do not have to base64 encode the data. All messages to and from the AppSync socket endpoint are serialized JSON. The easiest way to handle this in Python is to use the json.dumps() method on a dictionary:
ws.send( json.dumps(register) )A successful registration results in the client receiving a start_ack message. After acknowledgment, the client begins to receive events on the subscription.
{
   "id": <SUB ID>,
   "type":"start_ack"
}
Receive messages
The following message types are handled in the sample code’s on_message callback:
Keep-Alive
After the connection_ack message, the first message you will receive is the keep-alive message. The keep-alive is used for the connection to the AppSync service, not for individual subscriptions:
{
   "type":"ka"
}
These are sent to the client over the WebSocket connection about every minute. AppSync will keep sending those messages and servicing the registered subscriptions until it shuts down the connection automatically after 24 hours. Keep-alive messages are ‘heartbeats’ and do not need to be acknowledged by the client.
Data
Subscription events are sent to the client with the message type data. The ID tells you which subscription the notification is related to, and the payload contains a data object that contains the selection set for the subscription (the same selection set defined in the register subscription message).
{
    "id":"c3418793-9a33-421f-882d-7100b3cfd377",
    "type":"data",
    "payload":{
        "data":{"onUpdateTodo":{
            "__typename":"Todo",
            "id":"18153f53-54f8-41fc-90ae-2ba80cfa1c58",
            "title":"Find TP"
            }
        }
    }
}
Service errors
Service (AppSync generated) errors are handled by the on_message callback (type error). For example, if the client attempts to register too many subscriptions on a single connection the service responds with the following message:
{
    "type": "error",
    "id": “<SUB_ID>",
    "payload": {
        "errors": [{
            "errorType": "MaxSubscriptionsReachedException",
            "message": "Max number of subscriptions reached“
        }]
    }
}
In that case, the client can either stop subscriptions or open another connection.
For the curious: the on_error handler is used by the WebSocketApp code to publish errors internal to that library such as client-side errors when establishing the connection.
Deregister a subscription
The message used to deregister (or stop) a subscription is type stop, and contains the subscription ID to be unregistered:
deregister = {
      "type": "stop",
      "id": SUB_ID
}
ws.send( json.dumps(deregister) )
AppSync will acknowledge that the subscription is no longer active by sending a complete message:
{"id":"c3418793-9a33-421f-882d-7100b3cfd377","type":"complete"}
Notes on authorization
AWS AppSync has rich authorization capabilities that allows clients to access a single API using various methods (IAM, OIDC, Cognito User Pools, and API key). A client’s ability to connect to an API depends on the authorization method and how it is configured to access the AppSync endpoints.
The AppSync API settings section in the AWS Console lets you set the default authorization method, as well as other methods you want to use. If only a default method is specified, then clients have to use that method to authenticate. If the API has additional authorization methods, any of those are allowed as well. For subscriptions, the authorization header encoded in the URL on connection must be one of these methods.
Once authenticated, you can restrict access to operations in the schema (including subscriptions) based on the method of authorization. This can be configured using the @auth transform with Amplify — an annotation in the GraphQL schema that defines which operations (or fields) can be used by which authorization type.
If no authorization directives are present in the GraphQL schema, all operations use the default authorization method selected in the API settings. When registering a subscription, the authorization header in the request must be one of the methods allowed for that subscription.
Here are the header formats for each type of authentication in Python dictionary format. The same format is used for the connection URL and subscription requests, except the URL value is base64 encoded.
API Key
api_header = {
    "host":HOST,
    "x-api-key":API_KEY
}
Cognito User Pool / OIDC Token
Since both use JWT tokens, the header format is the same:
OIDC_header = {
    "host": HOST,
    "Authorization": JWT_TOKEN
}
IAM credentials
The fields in this header look familiar to anyone who has worked with IAM credentials. The tricky part of building this header is getting the signature correct. If you need to calculate it yourself, you can find the code for a Python signer here.
IAM_header = {
    "accept": "application/json, text/javascript",
    "content-encoding": "amz-1.0",
    "content-type": "application/json; charset=UTF-8",
    "host": <HOST>,
    "x-amz-date": <ISO_UTC_TIMESTAMP>,,
    "X-Amz-Security-Token": <IAM SECURITY TOKEN>,
    "Authorization": <IAM SIGNATURE>
}
Sample code and demo
The demo consists of three parts that map to the sequence diagram above:
- AppSync API definition (created through the AppSync Console)
- Subscription client (Python script)
- Mutation client (Python script)
AppSync API definition
If you are already familiar with AppSync, you may build your API with the Amplify CLI, or use an existing API for the demo. The only things you need to change are the GraphQL definition used in the sample code, and possibly the authentication information.
In order to create your AppSync API, use the AppSync Console. From the APIs tab, click on the ‘Create API Button’:

From the ‘Getting Started’ page, select ‘Build from scratch’ and click ‘Start’:

Next, enter a name for your API (like ‘WebSockets_Subscription_API’), and click ‘Create’. AppSync takes you to the API home page, where you can click the ‘Edit Schema’ button:

Now enter the following SDL in the Schema pane:
This is a minimal valid schema, which allows us to save it — click Save, then Create Resources. Select Existing type then Todo for resource generation, an Amazon DynamoDB table is automatically created based on the GraphQL type defined in the schema. Make sure the DynamoDB table name is unique before clicking Create at the bottom of the page.
AppSync creates your backend using DynamoDB as your data source. There is only one data type in the Schema (Todo), but AppSync automatically adds queries, mutations, and subscriptions definitions for you. Once the API is created, you can delete the placeholder query if you wish to do so.
Next go to the Settings tab and copy the API URL and API Key at the top of the page . This endpoint is used for queries and mutations, and for getting the derived value of the Real-time endpoint (appsync-realtime-api) for subscriptions.
To test the API, go to the Queries section on the AppSync console, and paste the following GraphQL into the Query pane.
mutation CreateTodo{
  createTodo(input:{
    title:"Find TP"
    description:"White Gold"
  }){
    id
    title
    description
  }
}

query ListTodos{
  listTodos{
    items{
      id
      title
} } }
Click on the orange ‘play’ button and then click CreateTodo from the list. A new Todo item is created. To query all the items, click ListTodos from the play list. You then see a list of Todos in the results pane.
Subscription client
Paste in the API_URL and API_KEY values you obtained from the API settings page into the script below. The other values are derived from these. The script does the following:
- Construct the connection URL and header parameters
- Define the WebSocket event callbacks (similar to JS sockets)
- Creates a WebSocketApp object, which also completes the Socket handshake
- Invokes the callbacks during the WebSocket lifecycle
The on_message callback is the main event loop, and the type of message received dictates the next behavior. In our case, on_message looks for the keep-alive (ka) messages, the connection_ack (and sets up a Timer daemon based on the provided value), and the start_ack after subscription registration.
After a subscription notification occurs (type data, resulting from the mutation client bellow), the subscription client outputs the data and deregisters (stops) the subscription. If the timeout Timer expires before a ka message is received, the socket is shut down gracefully.
To get started, install the necessary modules with pip:
$ pip install websocket-client datetime uuid –userThen execute the code:
# subscription_client.py

from base64 import b64encode, decode
from datetime import datetime
from uuid import uuid4

import websocket
import threading

import json

# Constants Copied from AppSync API 'Settings'
API_URL = <Paste API URL Here>
API_KEY = <Paste Key Here>

# GraphQL subscription Registration object
GQL_SUBSCRIPTION = json.dumps({
        'query': 'subscription OnUpdateTodo { onUpdateTodo { __typename id title } }',
        'variables': {}
})

# Discovered values from the AppSync endpoint (API_URL)
WSS_URL = API_URL.replace('https','wss').replace('appsync-api','appsync-realtime-api')
HOST = API_URL.replace('https://','').replace('/graphql','')

# Subscription ID (client generated)
SUB_ID = str(uuid4())

# Set up Timeout Globals
timeout_timer = None
timeout_interval = 10

# Calculate UTC time in ISO format (AWS Friendly): YYYY-MM-DDTHH:mm:ssZ
def header_time():
    return datetime.utcnow().isoformat(sep='T',timespec='seconds') + 'Z'

# Encode Using Base 64
def header_encode( header_obj ):
    return b64encode(json.dumps(header_obj).encode('utf-8')).decode('utf-8')

# reset the keep alive timeout daemon thread
def reset_timer( ws ):
    global timeout_timer
    global timeout_interval

    if (timeout_timer):
        timeout_timer.cancel()
    timeout_timer = threading.Timer( timeout_interval, lambda: ws.close() )
    timeout_timer.daemon = True
    timeout_timer.start()

# Create API key authentication header
api_header = {
    'host':HOST,
    'x-api-key':API_KEY
}

# Socket Event Callbacks, used in WebSocketApp Constructor
def on_message(ws, message):
    global timeout_timer
    global timeout_interval

    print('### message ###')
    print('<< ' + message)

    message_object = json.loads(message)
    message_type   = message_object['type']

    if( message_type == 'ka' ):
        reset_timer(ws)

    elif( message_type == 'connection_ack' ):
        timeout_interval = int(json.dumps(message_object['payload']['connectionTimeoutMs']))

        register = {
            'id': SUB_ID,
            'payload': {
                'data': GQL_SUBSCRIPTION,
                'extensions': {
                    'authorization': {
                        'host':HOST,
                        'x-api-key':API_KEY
                    }
                }
            },
            'type': 'start'
        }
        start_sub = json.dumps(register)
        print('>> '+ start_sub )
        ws.send(start_sub)

    elif(message_type == 'data'):
        deregister = {
            'type': 'stop',
            'id': SUB_ID
        }
        end_sub = json.dumps(deregister)
        print('>> ' + end_sub )
        ws.send(end_sub)

    elif(message_object['type'] == 'error'):
        print ('Error from AppSync: ' + message_object['payload'])

def on_error(ws, error):
    print('### error ###')
    print(error)

def on_close(ws):
    print('### closed ###')

def on_open(ws):
    print('### opened ###')
    init = {
        'type': 'connection_init'
    }
    init_conn = json.dumps(init)
    print('>> '+ init_conn)
    ws.send(init_conn)

if __name__ == '__main__':
    # Uncomment to see socket bytestreams
    #websocket.enableTrace(True)

    # Set up the connection URL, which includes the Authentication Header
    #   and a payload of '{}'.  All info is base 64 encoded
    connection_url = WSS_URL + '?header=' + header_encode(api_header) + '&payload=e30='

    # Create the websocket connection to AppSync's real-time endpoint
    #  also defines callback functions for websocket events
    #  NOTE: The connection requires a subprotocol 'graphql-ws'
    print( 'Connecting to: ' + connection_url )

    ws = websocket.WebSocketApp( connection_url,
                            subprotocols=['graphql-ws'],
                            on_open = on_open,
                            on_message = on_message,
                            on_error = on_error,
                            on_close = on_close,)

    ws.run_forever()
Mutation client
The mutation client is straightforward. It calls a query to get the ID of a Todo record, and then uses that information to update that record with a mutation. An HTTPS POST message is created, containing the authentication information in the headers and the GraphQL query in the message body. We also add a Content-Type header (application/graphql).
The GraphQL query should be defined in the following JSON format:
{
    "query": "...",
    "operationName": "...",
    "variables": { "myVariable": "someValue", ... }
}
The query attribute is required. The value is called query, even if the operation is a mutation. The other two fields, operationName and variables are optional. The operationName is only required if there is more than one operation in the query. There is an example of using variables in the sample code below.
# mutation_client.py

import http.client
import json

# Constants Copied from AppSync API 'Settings'
API_URL = <Paste API URL Here>
API_KEY = <Paste Key Here>

HOST = API_URL.replace('https://','').replace('/graphql','')

if __name__ == '__main__':
    conn = http.client.HTTPSConnection(HOST, 443)
    headers = {
        'Content-type': 'application/graphql',
        'x-api-key': API_KEY,
        'host': HOST
    }

    # Perform a query to get a Todo ID
    graphql_query = {
        'query': 'query{ listTodos { items {id title} } }'
    }
    query_data = json.dumps(graphql_query)
    conn.request('POST', '/graphql', query_data, headers)
    response = conn.getresponse()

    response_string = response.read().decode('utf-8')
    print(response_string)

    # Substitue the ID in the GraphQL Mutation Variables
    response_json = json.loads(response_string)
    id = response_json['data']['listTodos']['items'][0]['id']
    new_title = "Get Lunch"

    graphql_mutation = {
        'query': 'mutation($in:UpdateTodoInput!){updateTodo(input:$in){id title}}',
        'variables': '{ "in": {"id":"'+id+'", "title":"'+ new_title +'"} }'
    }
    mutation_data = json.dumps(graphql_mutation)

    # Now Perform the Mutation
    conn.request('POST', '/graphql', mutation_data, headers)
    response = conn.getresponse()

    response_string = response.read().decode('utf-8')
    print(response_string)
Pulling it together

Cut and paste the subscription_client.py and mutation_client.py into separate files. Go to the AppSync console for your API and copy the API URL and API Key from the Settings page. Paste those values into each of the client scripts.
To see the demo in action, run the subscription client in your Python 3 environment. After successfully connecting to AppSync, the client will wait for events as the keep alive messages come in.
In another terminal window, run the mutation client. It queries the API for an existing Todo record (the one you created while setting up the API), and then extract the record ID from the results. The client then builds a mutation using the ID as a variable. The mutation executes, and AppSync generates an event that is captured by the subscription client.
You can also have the subscription client running in multiple terminal windows simultaneously and confirm the mutation is broadcasted to all registered clients. Each client will have a different subscription ID tracked by AppSync, since they are all subscribed to the same mutation they’ll all receive the same data at the same time.
It is important to run the subscription client first, so there is an active subscription present when the mutation occurs.
Conclusion
The AppSync SDKs and Amplify clients have built-in logic to automatically manage all the stages of the GraphQL subscriptions life cycle in AppSync for real-time use cases in Web applications on JavaScript and native mobile applications on iOS, Android, and React Native. They also automatically handle jittered exponential backoff and re-connection logic, which are out of the scope of this article.
If you want to build an application in other languages we showcased how to use HTTPS and WSS to build a simple generic GraphQL client for AppSync, illustrating the steps to work with the AppSync’s WebSockets subscription protocol on the client side. The protocol is now available in our documentation, enabling developers to seamlessly receive GraphQL subscriptions from AppSync in their application’s language of choice via pure WebSockets in real-time. Let us know in the comments if you’d like us to revisit this topic in future articles and demonstrate different authorization and security implementations that may provide the basis for your own code.
Go build your own AWS AppSync real-time client!