Networking & Content Delivery
Drive application performance with Application Load Balancer Target Optimizer
ALB distributes incoming requests among targets based on the configured load balancing algorithm, round robin by default. The number of concurrent requests delivered to each target can vary a lot based on the incoming client load, the amount of time it takes the backend application to process the request, the number of targets, and the load balancing algorithm. Many applications have difficulty processing too many concurrent requests. Some specialized applications, such as Large Language Models, often can only process 1 or 2 concurrent requests at a time. Traditional load balancing algorithms like round robin cannot ensure exactly 1 or 2 concurrent requests, affecting application performance for such specialized applications.
Target Optimizer allows you to accurately control how many concurrent requests an application instance receives, enabling high-efficiency load balanced applications while still maintaining low latency and high availability. In the next section, we will look at the key benefits it provides.
Key benefits
Target Optimizer provides the following benefits:
- Limit concurrent requests: Target Optimizer lets you enforce a given maximum on the number of concurrent requests on a target. You can use this capability to fine-tune your application stack so that targets receive only the number of requests they can process.
- Optimize load balancing for low concurrency: You can use Target Optimizer for large applications and models that run at very low concurrency, where each application instance can only process a small number (e.g. 1-5) of requests at a time. With Target Optimizer, you can enforce as low as one concurrent request per target. This is perfect for applications that need strict control over concurrent requests.
- Reduce error-rate and latency: Without Target Optimizer, some targets could get excessive requests creating hot spots, while others could be underutilized. Hot-spotted targets get more requests than they have the capacity to process, causing clients to see errors and retry requests which adds latency. With Target Optimizer, ALB uniformly distributes the load. This eliminates errors caused by hot spots, therefore eliminating the need for client retries.
- Drive target utilization: With Target Optimizer, a target that completes a request immediately sends a signal indicating its readiness to ALB for the next request. This allows the targets to stay busy without becoming overloaded.
- Use heterogeneous targets: With Target Optimizer, you can register targets of different capacities with a target group. You can configure each target to receive requests proportional to its capacity.
Prerequisites
In this post, we assume that readers are familiar with the fundamentals of ALB, such as creating an ALB, creating listeners, adding rules and associating target groups. This is necessary to understand what Target Optimizer is and how it generally works. We also assume readers are familiar with running containers. This will be useful to understand the example we walk through.
Introducing Target Optimizer
Target optimizer augments ALB capabilities by addressing challenges that emerge with large applications or models that are compute-intensive and where an application instance can process only few requests concurrently. Inference workloads such as image generation models, large language models, etc. may run on expensive GPU hardware that can be easily impacted by small inefficiencies in load distribution. Let’s look at how ALB works and how these inefficiencies may emerge with commonplace load balancing algorithms like round robin, weighed round robin, and least outstanding requests (LoR).
High-availability and redundancy are built into ALB by design. Under the hood, ALB consists of multiple independent nodes spread across multiple different AZs. Any node can answer an incoming request. Each ALB node makes independent routing decisions based on the load balancing algorithm chosen when the ALB was configured, and without regard to the target’s current capacity. This can lead to the below non-ideal situations for low concurrency workloads:
- A target can end up receiving more requests than it has capacity to process. This can lead to an increase in 5XX errors, in latency, and a negative impact on the target’s health if appropriate error handling is missing.
- Targets can become unevenly utilized when request processing times vary. For example, requests that need image generation may take longer to complete than requests that need a plain-text response. Under normal circumstances, there can be inconsistent performance which can lead to under-utilization on some targets and increased errors on others.
- Each ALB node is independent and has its own view of the load on a target. Since more than one node may be interacting with a single target, an ALB node is unaware of the total load on each target. This can lead to increased errors, especially when each target has capacity to process only a small number of requests at a time.
Target Optimizer addresses these challenges by involving targets in load distribution. Rather than a ‘push’ model where the ALB forwards requests to targets based solely on the output of an algorithm, Target Optimizer enables a ‘pull’ model where targets ask the ALB to forward requests to them. You configure the maximum number of concurrent requests that a target can receive from the ALB. If a target has fewer requests than your configured maximum number, it lets the ALB know, and the ALB makes it eligible for processing another incoming request. The ALB forwards a request only when asked by a target. Since the target receives a request only when it can process it, the request has a much lower chance of being rejected or having to be retried by the client and a higher chance of being fulfilled. Also, since a target immediately asks the ALB for another request when one completes, Target Optimizer ensures utilization of the target fleet is high. In the next section, we will see how Target Optimizer works.
Target Optimizer ALB agent
Target Optimizer works with the help of an agent, provided by AWS, that runs on the target. You deploy the agent to run on the host of the application target, which then acts as a gatekeeper to your application. Using the agent, you can specify the maximum number of concurrent requests that you want the ALB to send to that application instance.
The agent serves as a proxy between the ALB and the application. It establishes long-lived communication channels with the ALB nodes on which it sends metrics and other control data. The agent tracks the number of requests the target is processing. When the number of requests falls below the configured maximum number, the agent sends a signal to one of the ALB nodes asking for another request.
Now that we understand how Target Optimizer works, we will give a high-level overview of how to set it up, followed by walking through a step-by-step example.

Figure 1: The Target Optimizer agent is an inline proxy between the ALB and target application
Setting up Target Optimizer
Target Optimizer can be set up easily using three steps outlined below. We’ll cover the steps in more detail in an example later. For more information, refer to the ALB User Guide.
Step 1: Install and configure the ALB agent on your targets:
In this first step, you install the agent on the targets where your application resides. Since the agent serves as a proxy, you configure it by providing the port on which it will receive traffic from the ALB and the port which it will proxy traffic to. You also configure the maximum concurrent requests that you want the ALB to send to that application instance. If your application is running on Amazon Elastic Container Service and Amazon Elastic Kubernetes Service, you run the agent as a sidecar with your application container.
Step 2: Create a target group with Target Optimizer enabled:
You create a new target group and specify a ‘target control port’ for it. This is the port on which the agent exchanges control data with the ALB. You then register the targets created in Step 1 with this target group. Once registered, the ALB establishes control channels with the agents running on the targets.
Step 3: Shift traffic to the new target group:
Once your new ‘target-optimized’ target group is ready; you then modify the listener rules on your ALB to shift a portion of traffic to it.
Now let’s demonstrate these steps in the section below.
Setup Example
These steps are for Linux-based machine.
Step 1: Install and configure the Target Optimizer agent on your targets
In this step, we will launch and configure EC2 instances that we will later add to our ‘target-optimized’ target group.
1.1 Create a new EC2 instance and install Docker on it:
sudo yum install docker
sudo service docker start
1.2 Pull the latest agent container:
docker pull public.ecr.aws/aws-elb/target-optimizer/target-control-agent:latest
1.3 Run the agent container with the following variables:
- TARGET_CONTROL_DATA_ADDRESS: The agent will receive application traffic from the ALB on this socket (IP:port). The port in this socket is what you will configure for your target group.
- TARGET_CONTROL_CONTROL_ADDRESS: The ALB establishes control channels with agents on this socket for management traffic. The port in the socket is what you configure as the target control port for the target group in Step 2.
- TARGET_CONTROL_DESTINATION_ADDRESS: The agent will proxy traffic to this socket. Your target application should listen on this socket.
- TARGET_CONTROL_MAX_CONCURRENCY: The maximum number of concurrent requests that the target will receive from the ALB. It can be between 0-1000. The default is 1.
docker run -d \
--name target-optimizer-agent \
--restart unless-stopped \
--network host \
-e TARGET_CONTROL_DATA_ADDRESS=0.0.0.0:80 \
-e TARGET_CONTROL_CONTROL_ADDRESS=0.0.0.0:3000 \
-e TARGET_CONTROL_DESTINATION_ADDRESS=127.0.0.1:8080 \
-e TARGET_CONTROL_MAX_CONCURRENCY=2 \
-p 3000:3000 \
-p 80:80 \
public.ecr.aws/aws-elb/target-optimizer/target-control-agent:latest
In this example, the agent running on the target instance will receive application traffic from the ALB on port 80 and proxy it to port 8080 of the loopback interface where the application is listening. It will receive management traffic from the ALB on port 3000. There are four other variables you can configure. We will look at them in a later section.
Step 2: Create a new target group:
2.1 In the AWS Management Console, navigate to EC2 > Target groups.

Figure 2: Creating a target group from the AWS Management Console
2.2 Provide a name and the protocol for the target group. For port, specify the port you provided for TARGET_CONTROL_DATA_ADDRESS in Step 1.

Figure 3: Specifying the name, protocol, and port for a target group in the AWS Management Console
2.3 For target control port, specify the port you provided for TARGET_CONTROL_CONTROL_ADDRESS in Step 1.
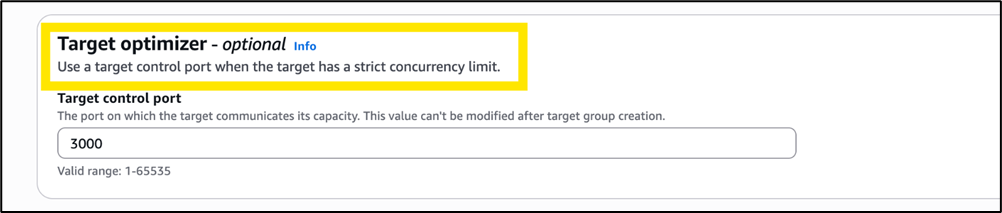
Figure 4: Enabling Target Optimizer on a target group by specifying a target control port
2.4 Register the instances on which the agent is running as targets in the target group. The port value should be the same as the port value in TARGET_CONTROL_DATA_ADDRESS that you provided in Step 1.
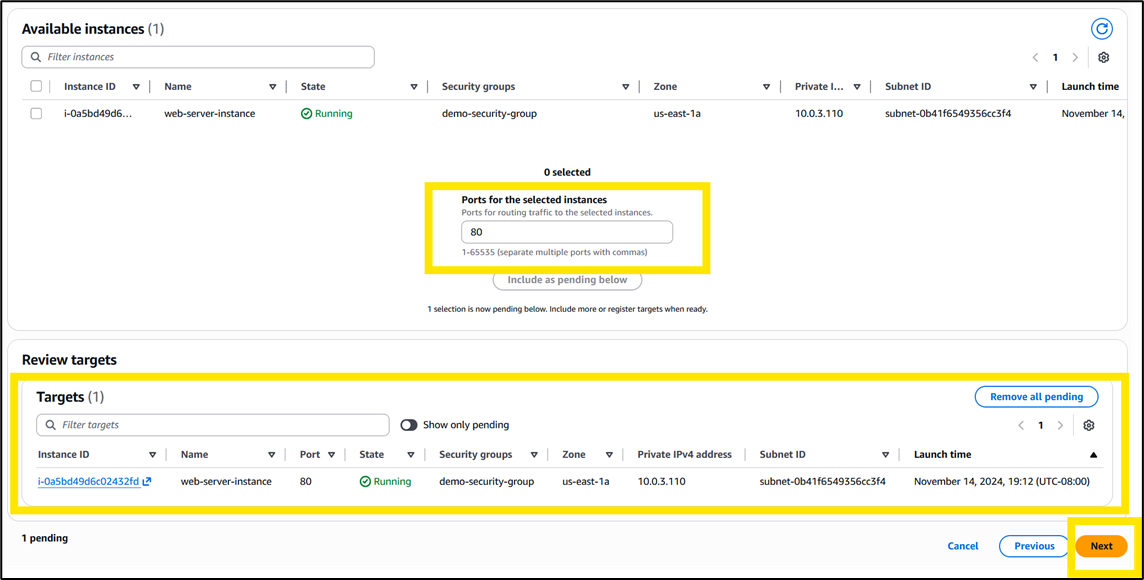
Figure 5: Registering targets with the target group
(Optional) Step 3: Verify your agent installation:
This is a validation step for the ‘target-optimized’ target group that you’ve just created. We will verify that agents are properly set up and are proxying traffic correctly before we move production traffic to the target group. For this, we will run a default nginx server on targets in our target group. Next, we will create a test listener on the ALB that forwards traffic to the agent, which should proxy it to the Nginx server. Once we verify this setup, we will replace the Nginx container with the actual application.
3.1 On your target instances, install and run nginx on port 8080. From a shell, run:
Install Nginx
sudo yum install nginx -y
Modify the default Nginx config to listen on 8080
sudo sed -i 's/listen\s*80;/listen 8080;/' /etc/nginx/nginx.conf
Start nginx
sudo systemctl start nginx
Verify it’s listening on 8080
curl localhost:8080
3.2 Navigate to EC2 > Load balancers in the Management Console. Select your ALB. Note the ALB DNS name and click on Add listener.
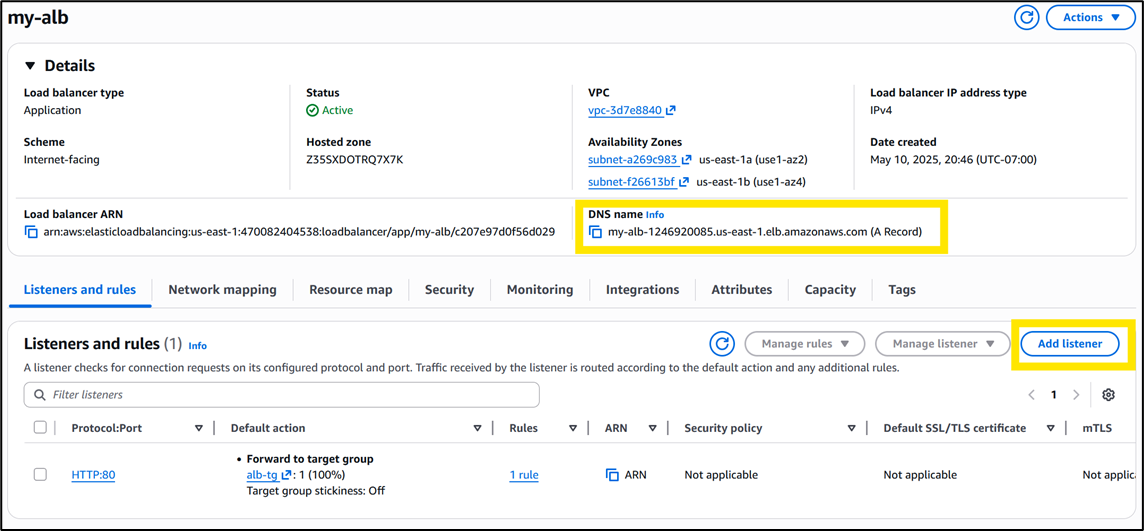
Figure 6: Adding a listener to an ALB from the AWS Management Console
3.2 Select a port (e.g. 81) for your test listener and the ‘target-optimized’ target group you created in Step 2.

Figure 7: Configuring an ALB listener from the AWS Management Console
3.3 Verify that nginx is responding. From a shell on a client instance, run:
curl http://<ALB DNS name>:81
It should return:
HTTP/1.1 200 OK
Welcome to nginx!
3.4 Now that you have verified that the agent is correctly proxying traffic to port 8080, stop the nginx server, run the actual application on port 8080 and continue with Step 4. You can also check the TargetControlActiveChannels metric in CloudWatch. When the metric value grows to become equal to the number of agents you deployed, it indicates that your agents are responding to the ALB.
sudo systemctl stop nginx
Step 4: Move traffic to your new ‘target optimized’ target group:
4.1 Navigate to EC2 > Load Balancers in the Management Console. Select your ALB and the listener to which you want to add the ‘target optimized’ target group. Under the Manage listener drop-down select Edit listener.

Figure 8: Modifying an ALB listener from the AWS Management Console
4.2 Add the ‘target-optimized’ target group you created in Step 2 and give it a weight of 1. In our example, the existing target group also has a weight of 1; therefore 50% of traffic will shift to the new ‘target-optimized’ target group.
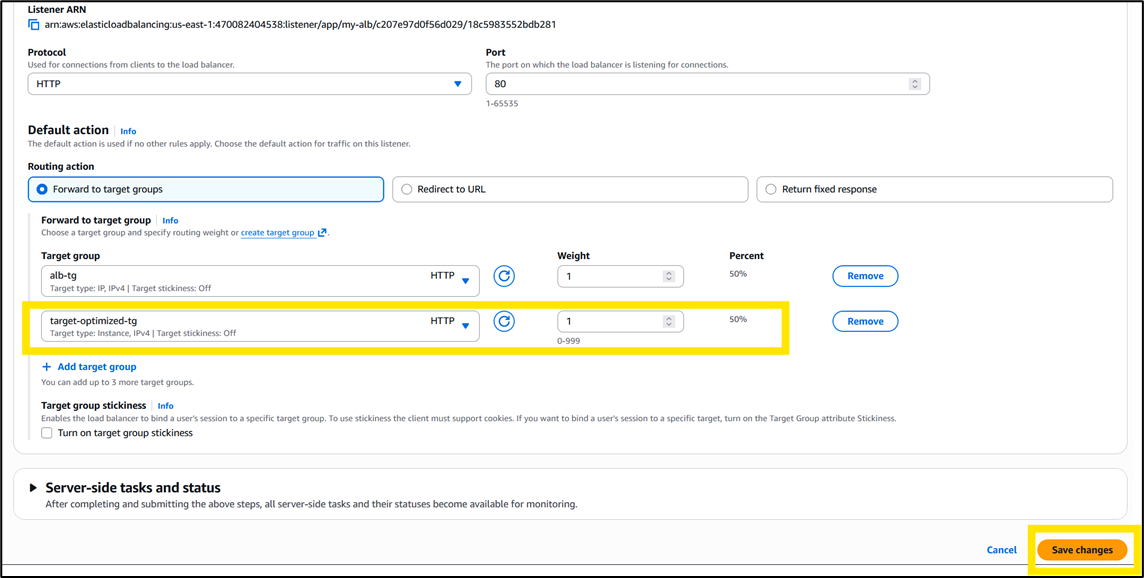
Figure 9: Shifting traffic to a new target group by modifying an ALB listener rule
ALB Agent variables
In addition to the variables mentioned in Step 1, you can configure the following additional variables for the ALB agent:
- TARGET_CONTROL_TLS_CERT_PATH: The location of the TLS certificate that the agent provides to the ALB during TLS handshake. By default, the agent generates a self-signed certificate in-memory.
- TARGET_CONTROL_TLS_KEY_PATH: The location of the private key corresponding to the TLS certificate that the agent provides to the ALB during TLS handshake. By default, the agent generates a private key in-memory.
- TARGET_CONTROL_TLS_SECURITY_POLICY: The ELB security policy that you configure for your target group. The default is ELBSecurityPolicy-2016-08.
- TARGET_CONTROL_PROTOCOL_VERSION: The protocol through which the ALB communicates with the agent. The default is HTTP1.
- RUST_LOG: The log level of the agent process. The default is info.
Metrics and troubleshooting
You can troubleshoot using the following metrics in CloudWatch:
- TargetControlRequestCount: Number of requests forwarded by ALB to the agent.
- TargetControlRequestRejectCount: Number of requests rejected by ALB due to no targets being ready to receive requests. This metric shows an uptick when TargetControlWorkQueueLength is zero.
- TargetControlActiveChannelCount: Number of active control channels between the ALB and agents. Ideally, this should be equal to the number of agents. A lower number indicates that agents are not configured properly or are not available.
- TargetControlNewChannelCount: Number of new channels created between the ALB and agents. You will see an uptick in this metric when a new target is successfully added to the target group.
- TargetControlChannelErrorCount: Number of control channels between ALB and agents that failed to establish or experienced an unexpected error. A control channel error will result in that agent (and target) not receiving any application traffic.
- TargetControlWorkQueueLength: Number of signals received by the ALB from agents asking for requests.
- TargetControlProcessedBytes: Number of bytes processed by ALB for traffic going to target groups that enable target optimizer.
Things to know
- New vs existing target groups: Target optimizer cannot be enabled on an existing target group. To use target optimizer, you must create a new target group.
- Supported target types: Targets of type ‘instance’ and ‘IP’ are supported with target optimizer. Targets of type ‘Lambda’ are not supported.
- Health checks: With Target Optimizer, we recommend you set the health-check port of your target group to be the same as the port in TARGET_CONTROL_DATA_ADDRESS. This way, the target will fail health checks if the agent is unhealthy.
- Attributes supported: For target optimizer, the load balancing algorithm type is ‘round robin’.
- AWS Load Balancer Controller: If you are using EKS, v2.16 of the AWS Load Balancer Controller has new annotations for Target Optimizer.
- ALB Agent: The agent uses insignificant resources that should not affect the target’s health or performance.
Conclusion
In this post, we introduced Target Optimizer for Application Load Balancer. We explained how it works and walked through an example of how to configure it. This feature allows you to factor in the capacity of your targets and helps you optimize the performance and efficiency of your application stack for workloads that require strict concurrency.
Target Optimizer is available in all commercial AWS Regions, AWS GovCloud (US) Regions, and AWS China. Traffic to target groups that enable target optimizer is charged differently on the ALB. To learn more about the feature, please refer to the ALB user guide and pricing page.