AWS Robotics Blog
Escape from the maze by training a Reinforcement Learning model on AWS RoboMaker
This blog references AWS RoboMaker Integrated Development Environment (IDE), a feature that has been deprecated. To follow along with this blog post, use the AWS Cloud9 IDE. See our updated blog on how to Build and simulate robotics applications in AWS Cloud9.
Introduction
Technologies for autonomous robots and self-driving cars are advancing. Advanced robotics development relies on building application-specific simulation environments, followed by simulation training on a machine learning model through ‘trial and error’ using RL. If you are wondering how to get a custom simulation environment, then train a model through Reinforcement Learning (RL) using AWS RoboMaker. This blog provides an overview of how you can apply RL machine learning algorithms within your custom robotics project, and use the AWS RoboMaker simulator to test your results. Specifically, we familiarize you with the development environment, then define the steps required to complete RL machine learning within AWS RoboMaker.
Solution Overview
The following figure, a screenshot from Gazebo, shows you a simulation environment on AWS RoboMaker. It is the custom Meiro application.
Note: The term Meiro stands for a maze in Japanese.
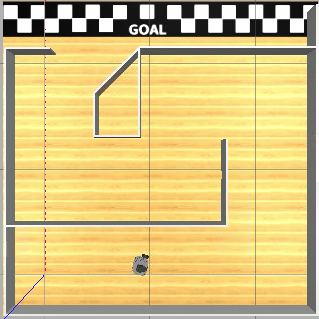
Meiro Runner application running in AWS RoboMaker simulation.
The sample Robot Operating System (ROS) application sets up the environment where an agent is placed in a maze. The agent is Turtlebot3, which is a standard reference robot for ROS applications widely used among robotics researchers and developers.
In the application, a machine learning model trained through reinforcement learning (RL), helps navigate the agent to reach the GOAL without bumping into a wall. The agent has a 360-degree LIDAR (Light Detection and Ranging) scanner sensor (360 points x 5 fps), so it can monitor the distance to all surrounding walls. The LIDAR data is used to describe the state at each step within an episode. The agent chooses from five different possible actions (for example, turn left, turn right, move straight, steer to the left, and steer to the right). For instructions on reinforcement learning framework, Coach used in application, see here for more details.
Prerequisites
Setting up RL application in AWS RoboMaker
Open the AWS Management Console page. Choose AWS RoboMaker in the list of AWS services. Make sure AWS RoboMaker service is available in the Region, which you create your application, such as US East N. Virginia, US West Oregon, Asia Pacific Tokyo, etc.
Once you are at the AWS RoboMaker console page, choose Development and then choose Development environments. Click on [Create environment] button on the top right of the Development environment page. It proceeds to the general settings page.

From general settings, name your development environment (for example, workshop_1). For the pre-installed software suite, choose ROS Kinetic. Instance type, choose m4.large. For Networking settings, choose a default VPC from a pulldown list, then choose one subnet from the subsequent pulldown list, which will be activated after choosing the correct VPC. Press the [Create] button in the bottom right of the page. It takes around 3 minutes for the development environment to be launched in AWS Cloud9.

Once you are in the development environment on AWS Cloud9’s IDE, you are ready to clone scripts from the following Github page to your environment.
In the terminal window at the bottom of the development environment page, enter the following command.
git clone https://github.com/aws-samples/aws-robomaker-sample- application-meirorunner.git MeiroRunner Move to the MeiroRunner directory using cd command and then run the setup script by typing the following two lines of commands. This setup takes around 20 minutes to complete.
cd MeiroRunner
./ws_setup.sh
The setup script, ws_setup.sh, runs the following processes:
- Update software and libraries to the latest version
- Run a AWS CloudFormation template, which generates S3 bucket and IAM role.
- Verify security group and subnet
- Generate a simulation application name
- Generate a robot application name
- To match your simulation, update json
- Build and bundle
You can look at the meiro_runner_env.py file while waiting for the setup to finish (MeiroRunner/robot_ws/src/rl_agent/markov/environments/meiro_runner_env.py). The Python script contains Python objects, which contain key functions to train an RL model. For example, the function infer_reward_state defines the reward function. It is analogous to the reward function in AWS DeepRacer.
The agent receives a reward when it stays away from a wall. The agent is also encouraged, through rewards, to stay away from Regions marked by previous footsteps. It prevents the agent from going back to where it previously came from. Finally, when the agent reaches the finish line, it receives a huge reward as much as 100,000 / number of footsteps. This reward encourages the agent to reach the goal in the least number of steps.
def infer_reward_state(self,action):
        #Wait until we have an image from the LIDAR.
        while not self.ranges:
            time.sleep(SLEEP_WAITING_FOR_IMAGE_TIME_IN_SECOND)

        steering = float(action[0])
        throttle = float(action[1])

        #Fit data size to training image
        size = len(self.ranges)
        x = np.linspace(0, size-1, TRAINING_IMAGE_SIZE)
        xp = np.arange(size)
        state = np.clip(np.interp(x, xp, self.ranges), 0, LIDAR_SCAN_MAX_DISTANCE)
        state[np.isnan(state)] = LIDAR_SCAN_MAX_DISTANCE

        #Find min distance
        min_distance = np.amin(state)

        reward = 0
        if self.last_position_x >= FINISH_LINE:
            print("Congratulations! You passed the finish line!")
            if self.steps == 0:
                reward = 0.0
                done = False
            else:
                reward = FINISHED / self.steps
                done = True

        elif min_distance < CRASH_DISTANCE:
            # Robot likely hit the wall
            reward = CRASHED
            done = True

        else:
            # When robot is close to the wall, give score based by how far from the wall.
            # doubled the score when robot is leaving from the wall.
            if min_distance < 0.19:

                if min_distance < 0.15:
                    reward = 0.05
                elif min_distance < 0.17:
                    reward = 0.15
                else:
                    reward = 0.35

                if min_distance - self.last_min_distance - 0.01 > 0:
                    reward *= 2

                done = False
            else:
                # While the robot is away enough from the wall, give throttle value as score.
                # (Max throttle 0.1 => 1.0 for score)
                reward = throttle * 10.0
                done = False

        # leave footstep marker to the place robot has passed through.
        footstep_marker = self.calc_footsteps_mark_position(self.x, self.y)
        if not self.last_footsteps_mark_position == footstep_marker:
            # if the robot had been already walked through that area more than twice, treat it as crashing.
            if self.footsteps_marker[footstep_marker[0]][footstep_marker[1]] > 1:
                reward = CRASHED
                done = True
            # if the robot had been already walked through that area, reduce the reward.
            elif self.footsteps_marker[footstep_marker[0]][footstep_marker[1]] > 0:
                reward = reward * 0.01

            self.footsteps_marker[footstep_marker[0]][footstep_marker[1]] += 1
            self.last_footsteps_mark_position = footstep_marker

        self.reward_in_episode += reward
        print('Step No=%.2f' % self.steps,
              'Reward=%.2f' % reward,
              'Distance from finish line=%f' % abs(FINISH_LINE - self.x))

        self.reward = reward
        self.done = done
        self.next_state = state

        self.last_min_distance = min_distance
        self.last_position_x = self.x
        self.last_position_y = self.y
The function named step describes the action space. As we mentioned earlier, there are five different actions in the action space (such as; turn left, turn right, move straight, steer to the left, and steer to the right).
def step(self, action):
        # Convert discrete to continuous
        if action == 0:  # turn left
            steering = 1.159
            throttle = 0.08
        elif action == 1:  # turn right
            steering = -1.159
            throttle = 0.08
        elif action == 2:  # straight
            steering = 0
            throttle = 0.1
        elif action == 3:  # steer to the left
            steering = 0.6
            throttle = 0.09
        elif action == 4:  # steer to the right
            steering = -0.6
            throttle = 0.09
        else:  # should not be here.
            raise ValueError("Invalid action")
When the setup is completed, you are going to see the following message.

Test the sample RL Application
Now, you see the menu under Run is configured for the MeiroRunner project. From menu, choose Run, choose Launch Simulation, and then choose MeiroRunner Training. It starts the RL training on the AWS RoboMaker simulations.

In order to look at the simulation in detail, choose Simulation from the menu and then press View Simulation Job Details.

Once the “Status” changes to “Running” – this may take a few minutes for this status change to happen -, click “Connect” button in “gzclient” icon to watch the simulation.

When the simulation begins, the agent begins to wander around in the Gazebo Simulation. In about 1.5 hours, the agent reaches the finish line.

The parameters that control the behaviors of RL training are described in meiro_runner.py (MeiroRunner/robot_ws/src/rl_agent/markov/presets/meiro_runner.py). Congratulations, you have now come to the end of the web tutorial.
Cleanup
The AWS resources (S3 bucket and IAM role) used to run sample application were created through an AWS CloudFormation template, which was run inside ws_setup.sh. To clean them up, go to AWS CloudFormation, find a stack named meirorunner, and then remote it. You also want to remove the AWS RoboMaker development environment, which can be done manually through AWS RoboMaker console.
Conclusion
AWS RoboMaker provides you with a customizable simulation environment in which you can train your custom RL model. We walked you through a project where a TurtleBot agent wandered in a custom maze and eventually reached the finish line. It takes approximately 1 hour to complete with the cost of less than $5. We used AWS RoboMaker, Amazon S3, and AWS CloudFormation. In this example case, we skipped some of the laborious environment settings, such as S3 bucket and IAM role for this blog post. If you are interested in diving deep into these aspects, AWS RoboMaker provides further training resources for you here.
You may try another simulation using a much larger maze, such as maze_large.world (MeiroRunner/simulation_ws/src/meiro_runner_simulation/worlds/maze_large.world). Modify create_maze_world.launch (MeiroRunner/simulation_ws/src/meiro_runner_simulation/launch/create_maze_world.launch), re-build and then re-bundle it. The detailed instructions are in Github.
In the simulation with the larger maze, it takes approximately 8 hours for the agent to complete. Once the RL training becomes computationally intensive, you can also assign the training job to Amazon SageMaker. For example, AWS DeepRacer uses Amazon SageMaker for the RL training. You can then run distributed training using both AWS RoboMaker and Amazon SageMaker simultaneously.
Now you know the basics.If you have further questions about AWS RoboMaker, reach out to us for further information!