AWS Storage Blog
Managing NTFS permissions at scale on Amazon FSx for NetApp ONTAP
Organizations migrating large file systems to the cloud often encounter New Technology File System (NTFS) permission inconsistencies where folders lack proper access control list (ACL) entries, preventing inheritance to new files and subfolders. Without proper inheritance, newly created content doesn’t automatically receive the correct permissions, leading to access denied errors for legitimate users, hours of manual permission fixes, and application failures during and after migrations. Traditional client-side approaches to managing NTFS permissions struggle at scale. They operate slowly over the Server Message Block (SMB) protocol, become error-prone when processing thousands of files, and lack atomic operations for bulk changes. For enterprises managing millions of files, these approaches can turn what should be a straightforward permission update into an 8-12 hour manual remediation effort.
Amazon FSx for NetApp ONTAP (FSx for ONTAP) provides enterprise-grade file storage with ONTAP capabilities so administrators can manage NTFS permissions at the storage layer rather than through client-side tools. By using ONTAP security descriptors and policies, you can apply permissions recursively across millions of files with operations that are significantly faster than Windows-based approaches. These operations run as single, all-or-nothing transactions at the storage level, delivering consistent results without partial failures. This storage-layer approach provides consistent ACL coverage, proper inheritance flags, and the ability to reapply permissions after data migrations, all without the performance bottlenecks and reliability issues of SMB-based tools.
In this post, we demonstrate how to use ONTAP security descriptors and policies to apply consistent NTFS permissions at scale on FSx for ONTAP. You will learn how to create reusable permission templates, configure inheritance flags to make sure new content automatically receives correct permissions, apply policies recursively across existing files and folders, and validate that permissions propagate correctly throughout your volume hierarchy. This approach reduces permission management time from hours to minutes while providing reliable, repeatable results across your entire file system.
Solution overview
The solution uses the following ONTAP components to manage NTFS permissions at scale:
- Security descriptor – A reusable template that defines ownership and discretionary access control list (DACL) entries, specific permissions such as full-control, modify, read-and-execute, read, and write assigned to users or groups, with inheritance flags.
- Security policy – A container that links security descriptors to target volume paths.
- Apply operation – A job-based execution that recursively propagates permissions across files and subfolders.
Figure 1 illustrates the complete workflow for applying NTFS permissions at scale using FSx for ONTAP.
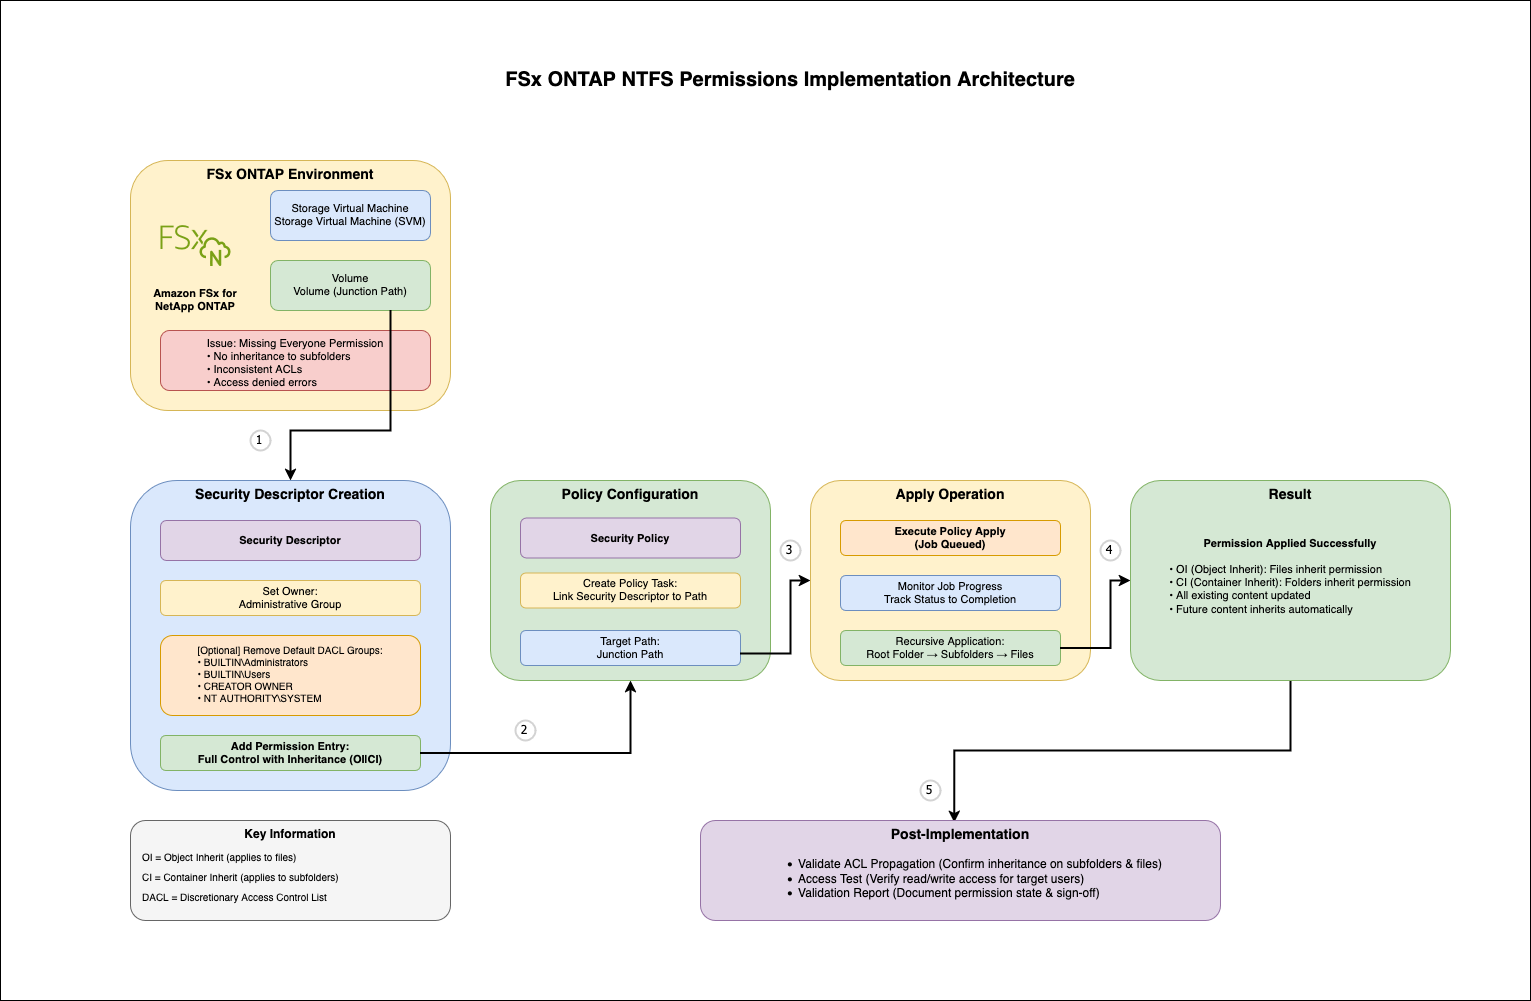
Figure 1: Applying NTFS permissions at scale using FSx for ONTAP
The workflow follows a simple pattern: create a security descriptor template, add DACL entries with appropriate permissions and inheritance flags, create a policy that links the descriptor to your target path, and apply the policy recursively. ONTAP’s job engine handles the execution, updating permissions on millions of files while maintaining consistency through atomic operations.The solution uses the following key inheritance flags:
- OI (Object Inherit) – Files inherit this permission.
- CI (Container Inherit) – Subfolders inherit this permission.
- OI|CI – Both files and subfolders inherit, achieving complete top-down inheritance.
This approach operates at the storage layer, bypassing SMB protocol overhead and delivering significantly faster performance than Windows-based tools.
Prerequisites
Before implementing this solution, ensure you have the following:
- An FSx for ONTAP file system with at least one Storage Virtual Machine (SVM).
- A volume configured with NTFS security style.
- Active Directory integration configured for your SVM.
- SSH access to the FSx for ONTAP management endpoint within the virtual private cloud (VPC) using fsxadmin credentials.
- Basic understanding of NTFS permissions and Active Directory groups.
To verify your prerequisites, use the following code:
Implement the solution
This section walks you through the complete implementation, from verifying current permissions to validating the final results.
Step 1: Verify current permissions
Before making changes, examine the current permission state on your target folder to understand what’s missing:
For example:
We get the following output:
Look for missing groups such as DOMAIN\FileShare_Users in the DACL to identify which permission entries need to be added. Note whether inheritance flags (OI|CI) are present on existing entries.
Step 2: Create NTFS security descriptor
Create a security descriptor that serves as a template for your permissions. This descriptor will define ownership and contain the DACL entries you will add in the next step.
For example:
Verify security descriptor creation:
This displays the security descriptor with its owner and confirms successful creation.
This code uses the following parameters:
- -vserver – Your SVM name
- -ntfs-sd – A descriptive name for your security descriptor
- -owner – Optional owner specification in DOMAIN\Group or DOMAIN\User format
ONTAP automatically adds four default Windows security groups to new security descriptors:
- BUILTIN\Administrators
- BUILTIN\Users
- CREATOR OWNER
- NT AUTHORITY\SYSTEM
If you want a minimal DACL with only specific entries, you can remove these defaults using the vserver security file-directory ntfs dacl remove command before adding your custom entries.
Step 3: Configure DACL entries
Add specific permission entries to your security descriptor. This is where you define which Active Directory groups or users have what level of access. Using groups (like DOMAIN\FileShare_Users) is recommended for easier management at scale.
For example:
Verify the DACL entry was added:
This confirms the permission entry was added with the correct access rights and inheritance flags. In this example, DOMAIN\FileShare_Users is an Active Directory security group. Using groups instead of individual user accounts simplifies permission management, and you can control access by adding or removing users from the group.
The following permission levels are available:
- full-control – Read, write, modify, delete, change permissions (0x1f01ff)
- modify – Read, write, modify without delete or permission changes (0x1301bf)
- read-and-execute – Read and execute only (0x1200a9)
- read – Read-only access (0x120089)
- write – Write access (0x100116)
Start with the minimum required permissions and expand as needed. For most migration scenarios, full-control for DOMAIN\FileShare_Users makes sure authenticated users can access their files, and NTFS permissions on individual files and folders provide granular control.
Step 4: Verify security descriptor configuration
Before applying your security descriptor, confirm it contains the correct permissions and inheritance flags:
For example:
We get the following output:
Verify the output shows the correct account name, access type is allow, permission level matches your intent, and Apply To includes this-folder, sub-folders, files (indicating OI|CI flags are set).
Step 5: Create security policy
Create a policy that will act as a container for linking your security descriptor to specific paths:
For example:
Verify creation:
A single policy can contain multiple tasks, so you can apply different security descriptors to different paths within the same policy execution.
Step 6: Add task to policy
Link your security descriptor to the target path by adding a task to the policy:
For example:
This code uses the following parameters:
- -path – Junction path to your target folder (the volume’s mount point path, must start with /)
- -ntfs-sd – The security descriptor name you created in Step 2
Verify task creation:
Step 7: Apply policy recursively
Execute the policy to apply permissions recursively to existing files and folders:
For example:
We get the following output:
ONTAP queues a background job that recursively updates permissions on existing content. The job processes folders first, then files, making sure inheritance propagates correctly throughout the directory tree. Note the job ID for monitoring in the next step.
Step 8: Monitor job progress
Track the apply operation status to confirm successful completion:
For example:
We get the following output:
The job states are as follows:
- Queued – Job waiting to start.
- Running – Job in progress (check periodically).
- Success – Job completed successfully.
- Failed – Job encountered errors (check job details).
For detailed job information, use the following code:
Monitor the job periodically until the state shows Success. Large directories might take considerable time to complete.
Step 9: Validate permissions and inheritance
Confirm permissions were applied correctly to folders, subfolders, and files:
For example:
We get the following output:
This code uses the following inheritance flags:
- OI (Object Inherit) – Files inherit this permission
- CI (Container Inherit) – Subfolders inherit this permission
- 0x1f01ff – Hexadecimal representation of full control permissions
Verify DOMAIN\FileShare_Users appears in the DACL with correct permissions, inheritance flags (OI|CI) are present, and the same permissions appear on subfolders and files.Now you can test inheritance on new content. From a Windows or Linux client, create a test file in the folder and verify it automatically inherits the Everyone permission:
The new file should show DOMAIN\FileShare_Users permission inherited from the parent folder, confirming inheritance is working correctly for future content.
Managing permissions after data migrations
When migrating data using AWS DataSync or other tools after your initial policy application, the migrated files might have different permissions from the source system. You can update permissions by reapplying your existing policy.
For example: You’ve applied NTFS permissions to your FSx for ONTAP volume, then later migrate additional data from an on-premises file server using DataSync. The newly migrated files retain their source permissions, which might not match your target environment.To fix this, reapply the existing policy without recreating security descriptors or policies:
The policy recursively updates existing files and folders, including newly migrated content, maintaining consistent permissions across your entire volume. This approach simplifies post-migration permission management and makes sure all content, whether originally created on FSx for ONTAP or migrated from external sources, has consistent ACLs.
Applying different permissions to subdirectories
In many environments, not all subdirectories within a volume should have the same level of access. For example, a finance team might need restricted access to sensitive reports, whereas a broader group needs read access to shared resources. You can apply different permissions to subdirectories within the same volume by creating separate security descriptors for each path.For example, within your /data_volume, you might need different access levels for subdirectories, one for confidential data with restricted access, and another for shared data with broader read access.The following is an example permission structure:
- Parent folder (/data_volume/) – Everyone: Full control (explicit).
- Confidential subdirectory (/data_volume/confidential/) – DOMAIN\Confidential_Users: Modify (explicit) + Everyone: Full control (inherited).
- Shared subdirectory (/data_volume/shared/) – DOMAIN\Shared_Users: Read-and-execute (explicit) + Everyone: Full control (inherited).
- Files in subdirectories – Inherit all permissions from their immediate parent folder.
Each subdirectory has its own explicit permissions plus inherited permissions from parent. They coexist.We use the following approach:
- Create separate security descriptors for each subdirectory.
- Define appropriate permissions for each subdirectory’s user group.
- Apply policies to specific subdirectory paths.
- Parent directory permissions remain independent of subdirectory permissions.
For example:
When you apply policies to both parent and subdirectories, the permissions work together as follows:
- Subdirectories keep their explicit permissions even if you later apply a policy to the parent.
- Subdirectories also inherit permissions from the parent.
- Both explicit and inherited permissions coexist on the subdirectory.
- Files inherit all permissions from their immediate parent folder.
This makes it possible to set specific permissions on subdirectories while still benefiting from parent-level permissions.
Managing and modifying permissions
Understanding how ONTAP handles permission updates is critical for maintaining accurate access control without unintended consequences.When you apply a security policy to a path, ONTAP replaces existing explicit permissions on that path with the permissions defined in the security descriptor. Inherited permissions from parent directories remain unchanged.
For example, you might apply a policy granting read access to Group A on /data_volume/reports. Later, you apply a different policy granting write access to Group B on the same path. As a result, only Group B has explicit permissions (write). Group A’s read permission is removed.
If you need to add permissions to a folder that already has explicit permissions, update the existing security descriptor rather than creating a new policy:
This approach preserves existing permissions in the security descriptor while adding the new permission. Note the following key points:
- Applying a new policy replaces explicit permissions on that path.
- Inherited permissions from parent folders are not affected.
- To add permissions, update the security descriptor and reapply the same policy.
- Verify changes with vserver security file-directory show to see explicit vs. inherited permissions.
Performance considerations for large volumes
ONTAP security policies handle large-scale permission updates efficiently through storage-layer operations that run as background jobs, independent of client connections.We recommend the following planning steps:
- Schedule operations during maintenance windows to minimize user impact.
- Monitor job progress with the job show command.
The following factors affect runtime:
- File system throughput capacity and provisioned IOPS.
- Total number of files and directory structure complexity.
- Concurrent workload on the file system.
ONTAP’s job-based execution provides reliable completion even for volumes with millions of files, alleviating the timeout and failure issues common with Windows-based permission tools.
Clean up
To avoid incurring future charges, delete the resources created during this walkthrough.Remove policies and security descriptors:
Deleting policies and security descriptors only removes the templates, permissions already applied to files and folders remain unchanged. If you created a test FSx for ONTAP file system specifically for this walkthrough, delete it through the Amazon FSx console to stop incurring storage charges.
Conclusion
In this post, we demonstrated how to use ONTAP security descriptors and policies to manage NTFS permissions at scale on FSx for ONTAP. This storage-layer approach delivers significant advantages over traditional Windows-based tools: faster performance, reliable operations, proper inheritance configuration, and the ability to reapply permissions after migrations.By following the implementation walkthrough presented in this post, you can apply consistent NTFS permissions to millions of files in minutes rather than hours, maintaining proper inheritance for future content and simplifying post-migration permission management. The advanced use cases demonstrate how this approach scales to support DataSync migrations, multi-tenant environments, and large-scale operations involving millions of files.
To learn more about FSx for ONTAP, refer to the Amazon FSx for NetApp ONTAP User Guide. If you have questions or comments about this post, please leave them in the comments section.